2023 TOYOTA COROLLA run flat
[x] Cancel search: run flatPage 14 of 468

14Pictorial index
Fuel filler door .................................................................... P.180
Refueling method ............................................... .................. P.181
Fuel type/fuel tan k capacity ................................... .............. P.393
Tires..................................................................................... P.311
Tire size/inflation pressure ................................... ................ P.397
Winter tires/tire chains ....................................... .................. P.253
Checking/rotation/tire pressure warning system
*2............... P.311
Coping with flat tires......................................... .................... P.370
Hood ........................................................... ......................... P.302
Opening ............................................................................... P.302
Engine oil ..................................................... ........................ P.394
Coping with overheating ...................................................... P.387
Headlights/daytime running lights .............................. ..... P.173
Turn signal lights/parking lights .............................. ......... P.173
Front side marker lights ....................................... ............. P.173
LED accent lights
*2............................................................ P.1 73
Stop lights/tail lights/rear side marker lights/turn signal lig hts
P. 1 7 3
License plate lights........................................... ................. P.173
Tail lights
*2............................................................... ........... P.173
Back-up lights
Shifting the shift position to R ............................... ....... P.160, 162
Side turn signal lights
*2..................................................... P.167
*1: Vehicles with a smart key system
*2: If equipped
Light bulbs of the exterior lights for driving
(Replacing method: P.340, Watts: P.398)
Page 272 of 468
2725-2. Using the interior lights
interior light will turn on when a
door is open and turn off when
all of them are closed.
When the rear interior light is on
linked to the door position for
the front interior lights, it will not
turn off even though the switch
is pressed.
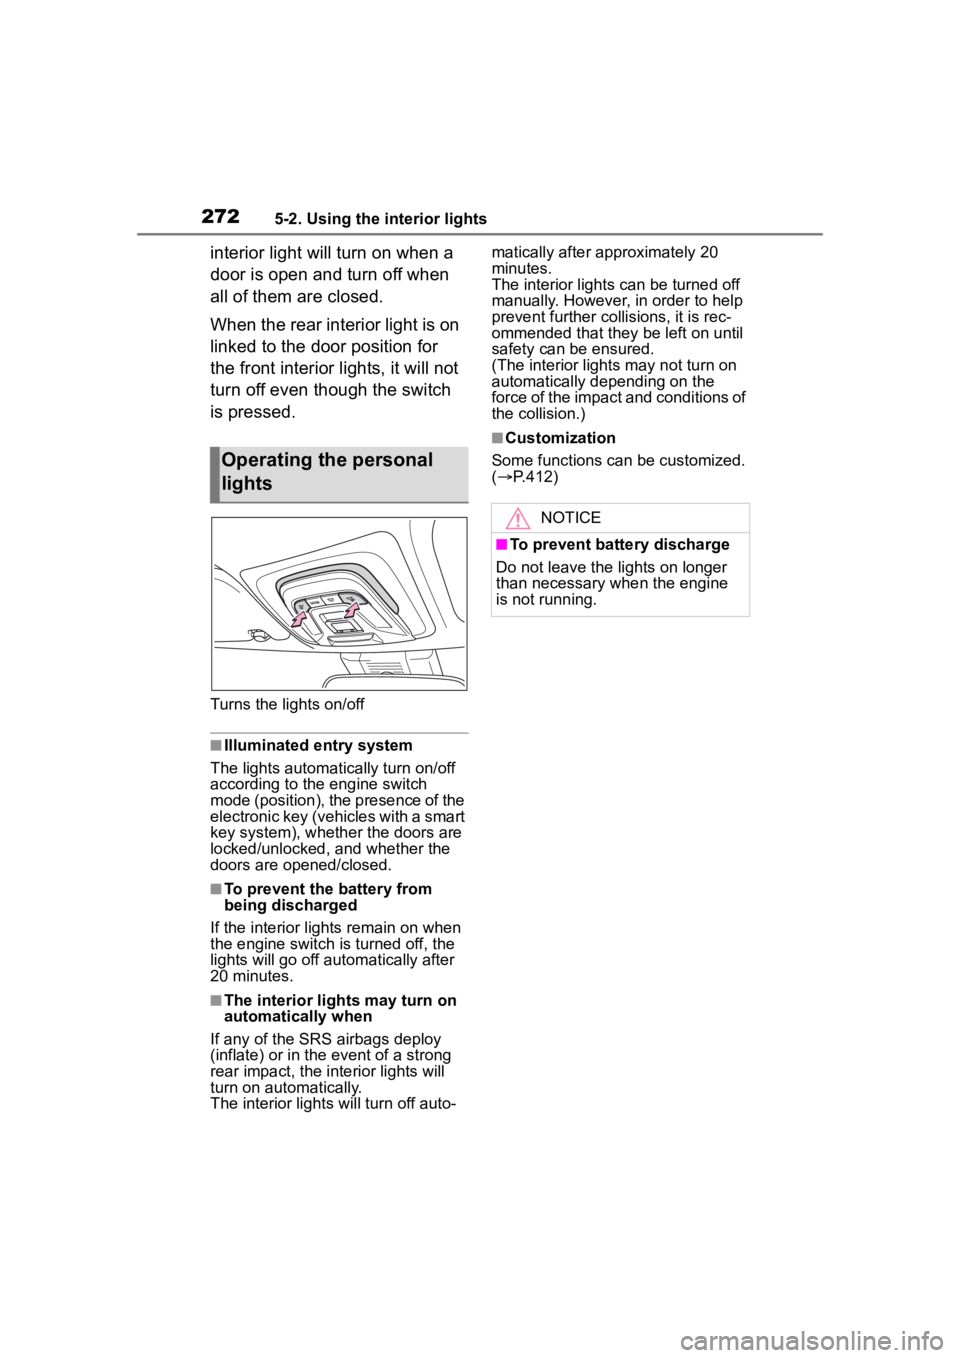
Turns the lights on/off
■Illuminated entry system
The lights automatically turn on/off
according to the engine switch
mode (position), the presence of the
electronic key (vehicles with a smart
key system), whether the doors are
locked/unlocked, and whether the
doors are opened/closed.
■To prevent the battery from
being discharged
If the interior lights remain on when
the engine switch is turned off, the
lights will go off automatically after
20 minutes.
■The interior lights may turn on
automatically when
If any of the SRS airbags deploy
(inflate) or in the event of a strong
rear impact, the interior lights will
turn on automatically.
The interior lights will turn off auto- matically after approximately 20
minutes.
The interior lights can be turned off
manually. However, in order to help
prevent further co
llisions, it is rec-
ommended that they be left on until
safety can be ensured.
(The interior lights may not turn on
automatically depending on the
force of the impact and conditions of
the collision.)
■Customization
Some functions can be customized.
( P.412)
Operating the personal
lights
NOTICE
■To prevent battery discharge
Do not leave the lights on longer
than necessary w hen the engine
is not running.
Page 315 of 468
3156-3. Do-it-yourself maintenance
6
Maintenance and care
6Press or to select
“Pressure unit setting”.
7 Press or to select the
desired unit and then press
.
■Routine tire inflation pressure
checks
The tire pressure warning system
does not replace routine tire inflation
pressure checks. Make sure to
check tire inflation pressure as part
of your routine of daily vehicle
checks.
■Tire inflation pressure
●It may take a few minutes to dis-
play the tire inflation pressure
after the engine switch is turned to
ON. It may also take a few min-
utes to display the tire inflation
pressure after inflation pressure
has been adjusted.
●Tire inflation pressure changes
with temperature.
The displayed values may also be
different from th e values mea-
sured using a tire pressure gauge.
■Situations in which the tire
pressure warning system may
not operate properly
●In the following cases, the tire
pressure warning system may not
operate properly.
• If non-genuine Toyota wheels are
used.
• A tire has been replaced with a tire that is not an OE (Original
Equipment) tire.
• A tire has been replaced with a tire that is not of the specified size.
• Tire chains, etc. are equipped.
• An auxiliary-supported run-flat tire is equipped.
• If a window tint that affects the radio wave signals is installed.
• If there is a lot of snow or ice on
the vehicle, particularly around the wheels or wheel housings.
• If the tire inflation pressure is extremely higher than the speci-
fied level.
• If tires not equipped with tire pres- sure warning valves and transmit-
ters are used.
• If the ID code on the tire pressure warning valves and transmitters is
not registered in the tire pressure
warning computer.
●Performance may be affected in
the following situations.
• Near a TV tower, electric power
plant, gas station, radio station,
large display, airpo rt or other facil-
ity that generates strong radio
waves or electrical noise.
• When carrying a portable radio, cellular phone, cordless phone or
other wireless communication
device.
●When the vehicle is parked, the
time taken for the warning to start
or go off could be extended.
●When tire inflation pressure
declines rapidly for example when
a tire has burst, the warning may
not function.
■Warning performance of the tire
pressure warning system
The warning of the tire pressure
warning system w ill change in
accordance with driving conditions.
For this reason, the system may
give a warning even if the tire pres-
sure does not reach a low enough
level, or if the p ressure is higher
than the pressure that was adjusted
to when the system w as initialized.
When replacing tires or wheels,
tire pressure warning valves and
Installing tire pressure
warning valves and trans-
mitters (vehicles with a
tire pressure warning sys-
tem)
Page 342 of 468
3426-3. Do-it-yourself maintenance
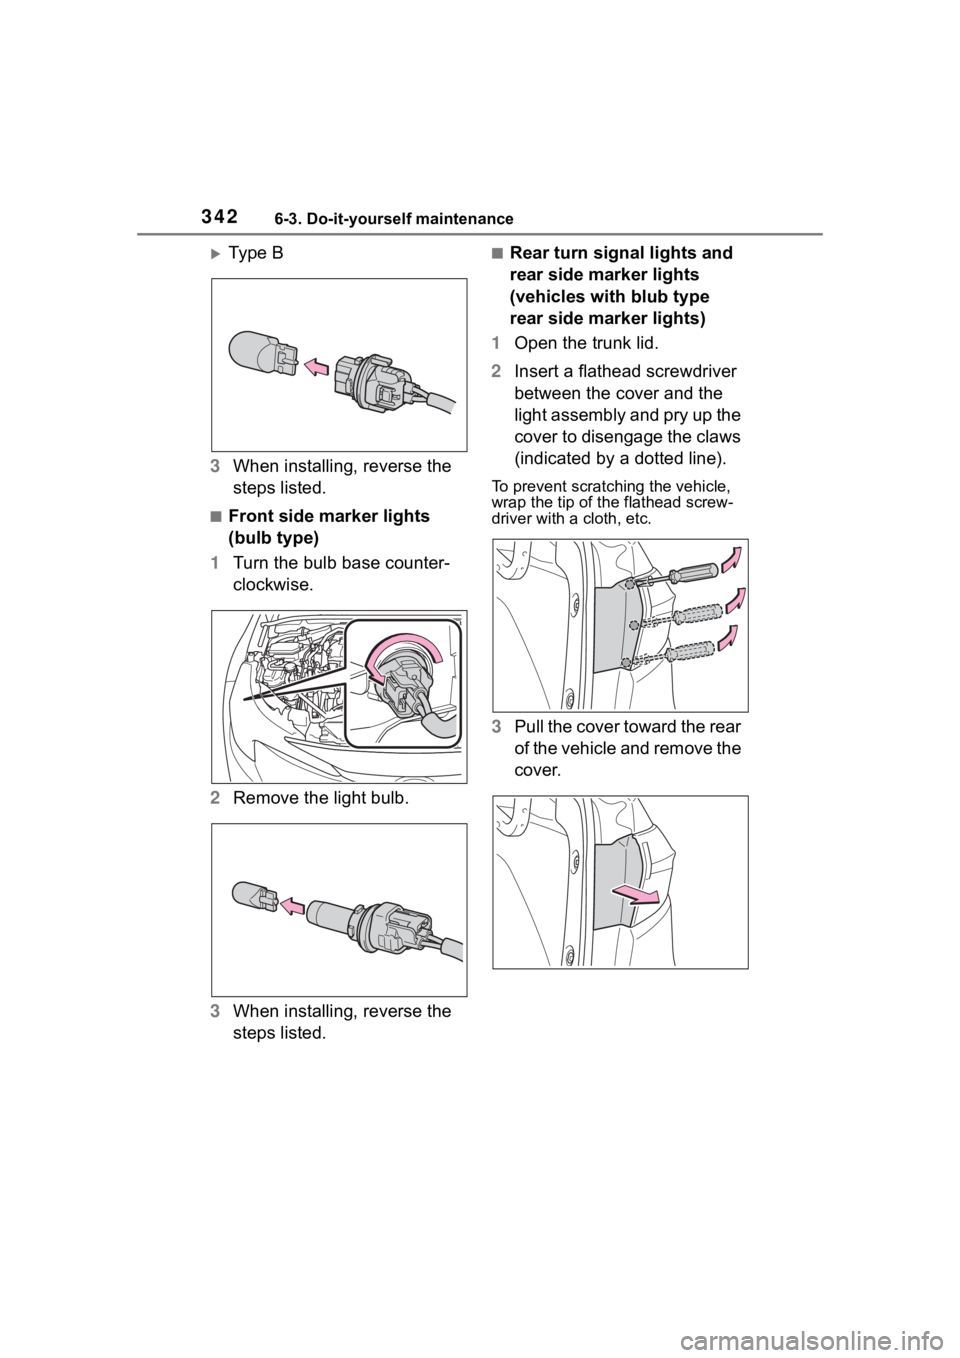
Ty p e B
3 When installing, reverse the
steps listed.
■Front side marker lights
(bulb type)
1 Turn the bulb base counter-
clockwise.
2 Remove the light bulb.
3 When installing, reverse the
steps listed.
■Rear turn signal lights and
rear side marker lights
(vehicles with blub type
rear side marker lights)
1 Open the trunk lid.
2 Insert a flathead screwdriver
between the cover and the
light assembly and pry up the
cover to disengage the claws
(indicated by a dotted line).
To prevent scratching the vehicle,
wrap the tip of th e flathead screw-
driver with a cloth, etc.
3Pull the cover toward the rear
of the vehicle and remove the
cover.
Page 343 of 468
3436-3. Do-it-yourself maintenance
6
Maintenance and care
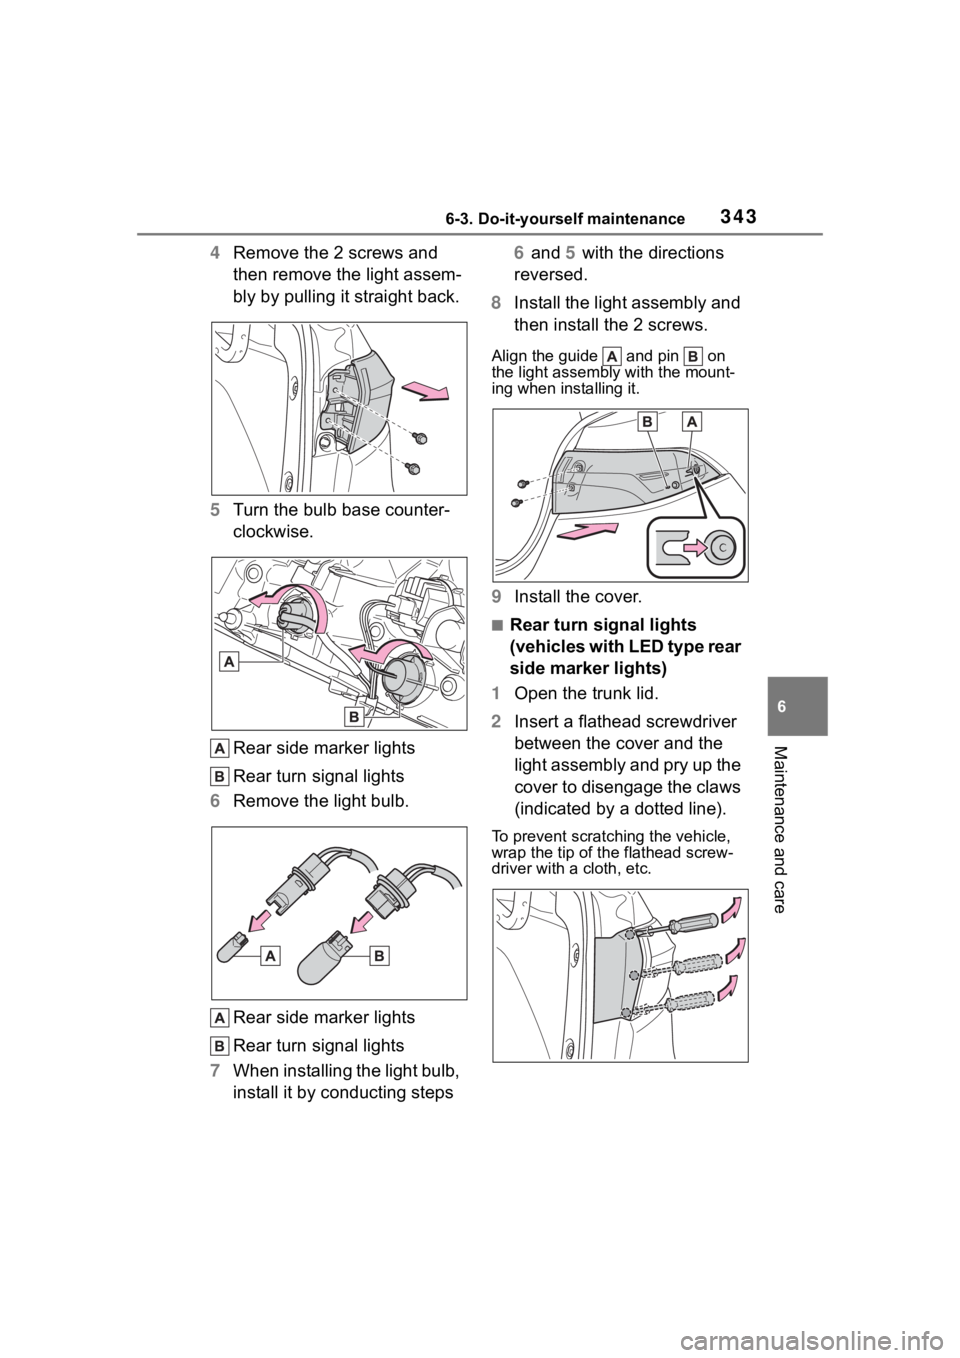
4Remove the 2 screws and
then remove the light assem-
bly by pulling it straight back.
5 Turn the bulb base counter-
clockwise.
Rear side marker lights
Rear turn signal lights
6 Remove the light bulb.
Rear side marker lights
Rear turn signal lights
7 When installing the light bulb,
install it by conducting steps 6 and 5 with the directions
reversed.
8 Install the light assembly and
then install the 2 screws.
Align the guide and pin on
the light assembl y with the mount-
ing when installing it.
9 Install the cover.
■Rear turn signal lights
(vehicles with LED type rear
side marker lights)
1 Open the trunk lid.
2 Insert a flathead screwdriver
between the cover and the
light assembly and pry up the
cover to disengage the claws
(indicated by a dotted line).
To prevent scratching the vehicle,
wrap the tip of th e flathead screw-
driver with a cloth, etc.
Page 352 of 468

3527-2. Steps to take in an emergency
The following may indicate a
problem with your transmission.
Contact your Toyota dealer or
commercial towing service
before towing.
The engine is running but the
vehicle does not move.
The vehicle makes an abnor-
mal sound.
From the front
Release the parking brake. Turn automatic mode off.
(
P.169)
From the rear
Use a towing dolly under the
front wheels.
When using a flat-bed truck to
transport the vehicle, use tire
strapping belts. Refer to the
owner's manual of the flat-bed
truck for the tire strapping
method.
In order to suppress vehicle
movement during transporta-
tion, set the parking brake and
turn the engine switch off.
NOTICE
■To prevent damage to the
vehicle when towing with a
sling-type truck
Do not tow with a sling-type truck,
either from the front or rear.
■To prevent damage to the
vehicle during emergency
towing
Do not secure cables or chains to
the suspension components.
Situations when it is nec-
essary to contact dealers
before towing
Towing with a wheel-lift
type truck
NOTICE
■Towing with a sling-type truck
Do not tow with a sling-type truck
to prevent body damage.
Using a flatbed truck
Page 354 of 468
3547-2. Steps to take in an emergency
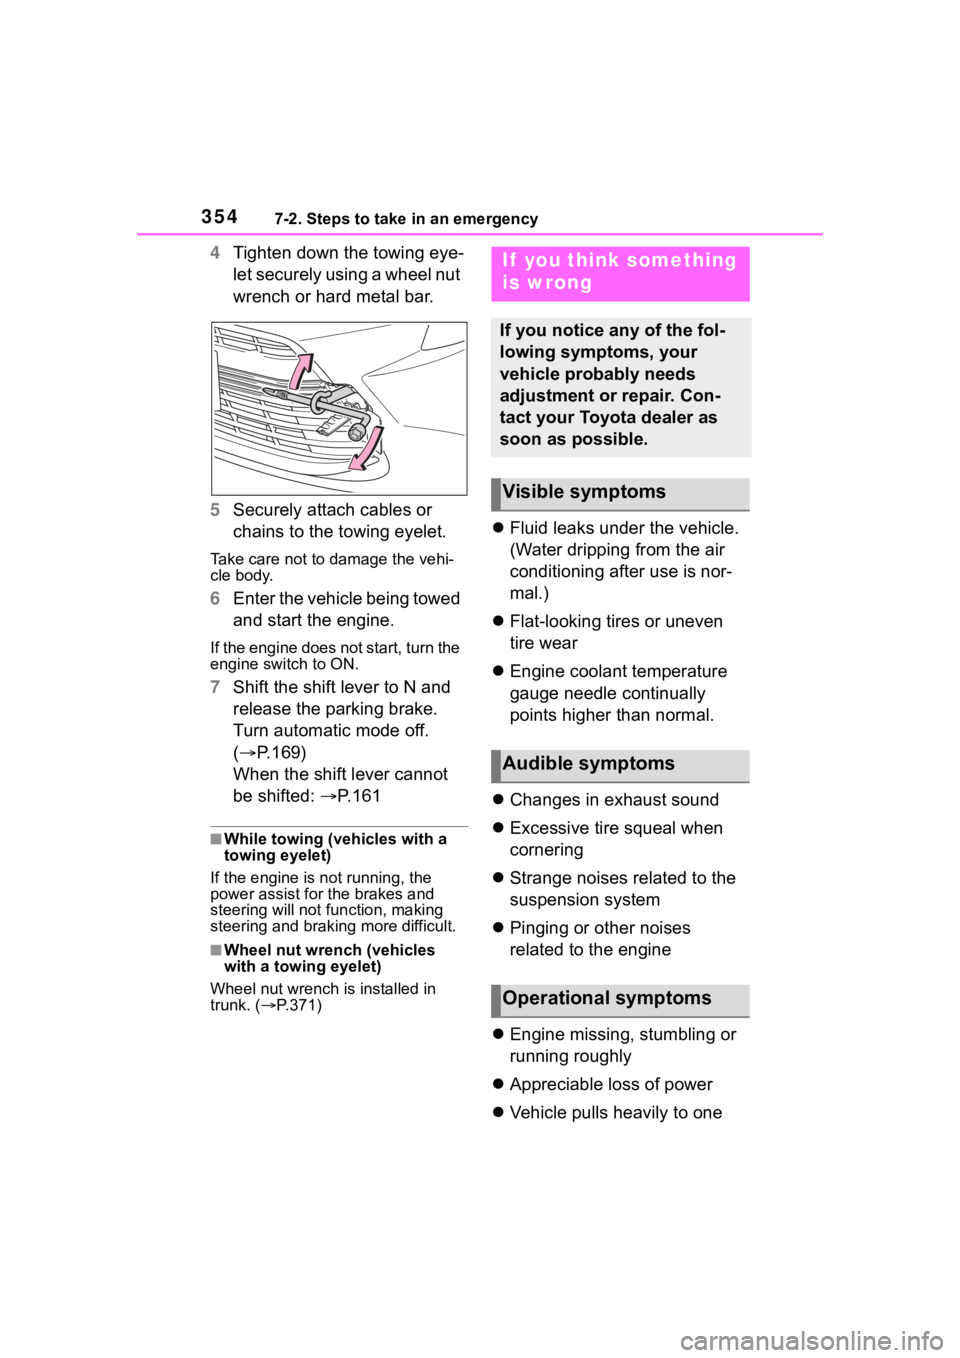
4Tighten down the towing eye-
let securely using a wheel nut
wrench or hard metal bar.
5 Securely attach cables or
chains to the towing eyelet.
Take care not to damage the vehi-
cle body.
6Enter the vehicle being towed
and start the engine.
If the engine does not start, turn the
engine switch to ON.
7Shift the shift lever to N and
release the parking brake.
Turn automatic mode off.
( P.169)
When the shift lever cannot
be shifted: P. 1 6 1
■While towing (vehicles with a
towing eyelet)
If the engine is not running, the
power assist for the brakes and
steering will not function, making
steering and braking more difficult.
■Wheel nut wrench (vehicles
with a towing eyelet)
Wheel nut wrench is installed in
trunk. ( P.371)
Fluid leaks under the vehicle.
(Water dripping from the air
conditioning after use is nor-
mal.)
Flat-looking tires or uneven
tire wear
Engine coolant temperature
gauge needle continually
points higher than normal.
Changes in exhaust sound
Excessive tire squeal when
cornering
Strange noises related to the
suspension system
Pinging or other noises
related to the engine
Engine missing, stumbling or
running roughly
Appreciable loss of power
Vehicle pulls heavily to one
If you think something
is wrong
If you notice any of the fol-
lowing symptoms, your
vehicle probably needs
adjustment or repair. Con-
tact your Toyota dealer as
soon as possible.
Visible symptoms
Audible symptoms
Operational symptoms
Page 398 of 468
3988-1. Specifications
Ty p e D
A: Wedge base bulbs (clear)
B: Wedge base bulbs (amber)
Wheel size18 8J, 17 4T (compact spare)
Wheel nut torque76 ft•lbf (103 N•m, 10.5 kgf•m)
Tire size225/40R18 88W, T125/70D17 98M
Tire inflation pressure
(Recommended cold tire
inflation pressure)
Front
33 psi (230 kPa, 2.3 kgf/cm
2 or bar)
Rear
30 psi (210 kPa, 2.1 kgf/cm
2 or bar)
Spare
60 psi (420 kPa, 4.2 kgf/cm
2 or bar)
Wheel size18 8J, 17 4T (compact spare)
Wheel nut torque76 ft•lbf (103 N•m, 10.5 kgf•m)
Light bulbs
Light bulbsBulb No.WTy p e
Exterior
Front side marker lights (bulb
type)—5A
Front turn signal /parking lights
(vehicles without side turn signal
lights)
7444NA28/8B
Rear side marker lights (bulb
type)—5A
Rear turn signal lights—21B
Back-up lights—16A
InteriorTrunk light—5A