Page 95 of 496

952-1. Instrument cluster
2
Vehicle status information and indicators
*1: These lights come on when the power switch is turned to ON to
indicate that a system check is
being performed. They will turn
off after the hybrid system is on,
or after a few seconds. There
may be a malfunction in a sys-
tem if the lights do not come on,
or turn off. Have the vehicle inspected by your Toyota dealer.
*2: This light comes on when the
system is turned off.
*3: This light illuminates on the out-side rear view mirrors.
*4: This light illuminates on the multi-information display.
*5: When the outside temperature is approximately 37°F (3°C) or
lower, this indicator will flash for
approximately 10 seconds, then
stay on.
*6: This light illuminates on the cen-ter panel.
*7: This light illuminates on the over-head console.
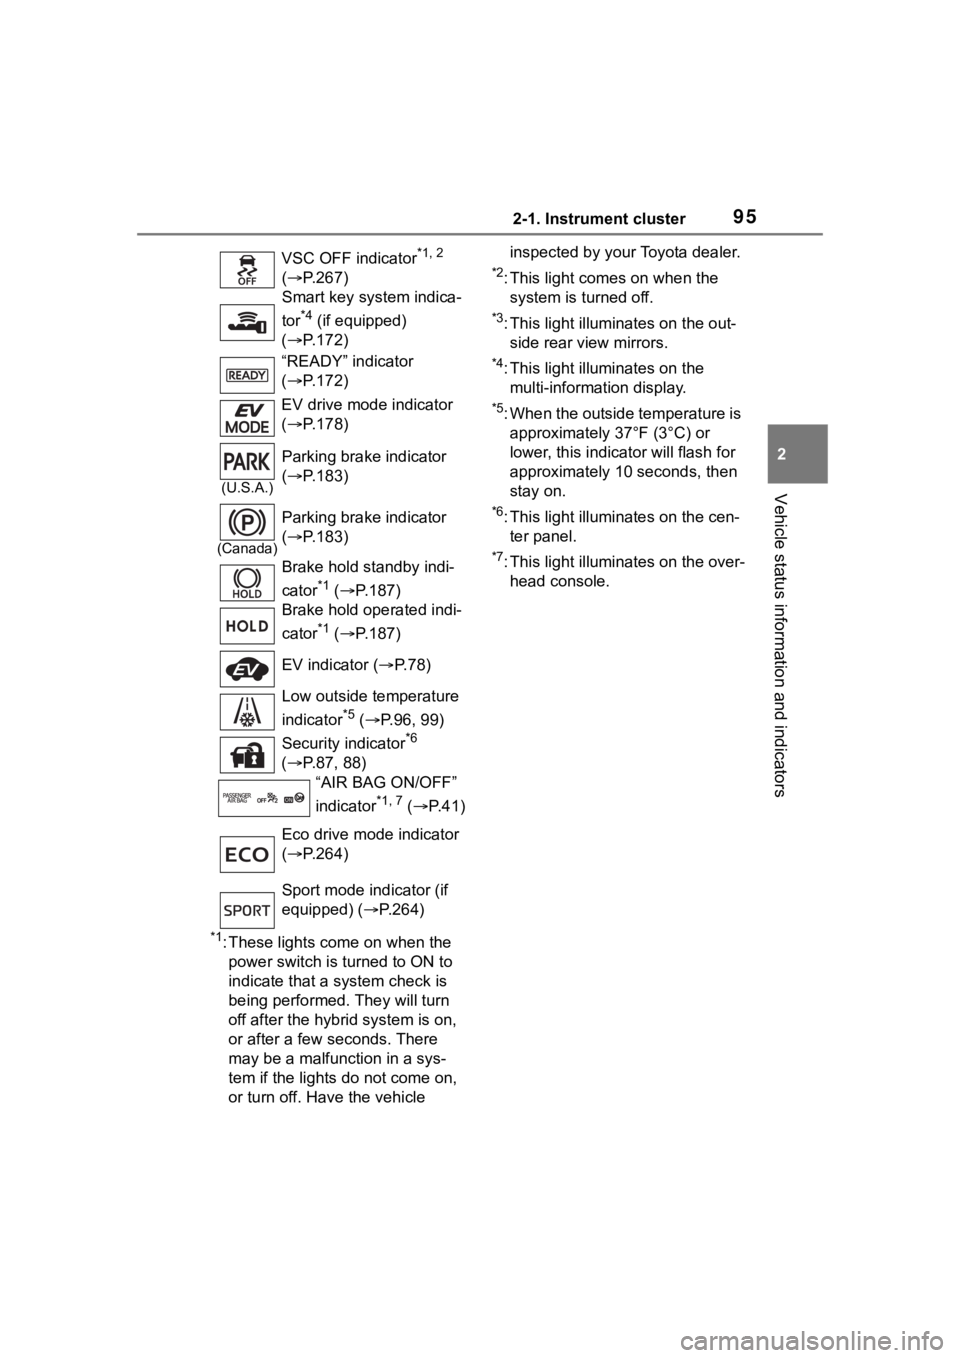
VSC OFF indicator
*1, 2
( P.267)
Smart key system indica-
tor
*4 (if equipped)
( P.172)
“READY” indicator
( P.172)
EV drive mode indicator
( P.178)
(U.S.A.)
Parking brake indicator
( P.183)
(Canada)
Parking brake indicator
( P.183)
Brake hold standby indi-
cator
*1 ( P.187)
Brake hold operated indi-
cator
*1 ( P.187)
EV indicator ( P. 7 8 )
Low outside temperature
indicator
*5 ( P.96, 99)
Security indicator
*6
( P.87, 88)
“AIR BAG ON/OFF”
indicator
*1, 7 ( P. 4 1 )
Eco drive mode indicator
( P.264)
Sport mode indicator (if
equipped) ( P.264)
Page 121 of 496
121
3
3
Before driving
Before driving
.3-1. Key informationKeys ............................ 122
3-2. Opening, closing and locking the doors
Doors .......................... 127
Trunk ........................... 133
Smart key system ....... 136
3-3. Adjusting the seats Front seats .................. 141
Rear seats................... 142
Head restraints............ 144
3-4. Adjusting the steering wheel and mirrors
Steering wheel ............ 146
Inside rear view mirror .................................. 147
Outside rear view mirrors .................................. 148
3-5. Opening and closing the windows
Power windows ........... 150
Moon roof .................... 153
3-6. Favorite settings My Settings ................. 156
Page 146 of 496
1463-4. Adjusting the steering wheel and mirrors
3-4.Adjusting the steering wheel and mirrors
1Hold the steering wheel and
push the lever down.
2 Adjust to the ideal position by
moving the steering wheel
horizontally and vertically.
After adjustment, pull the lever up
to secure the steering wheel.
To sound the horn, press on or
close to the mark.
Steering wheel
Adjustment procedure
WARNING
■Caution while driving
Do not adjust the steering wheel
while driving.
Doing so may cause the driver to
mishandle the vehicle and cause
an accident, resul ting in death or
serious injury.
■After adjusting the steering
wheel
Make sure that the steering wheel
is securely locked.
Otherwise, the steering wheel
may move suddenly, possibly
causing an accident, and resulting
in death or serious injury. Also,
the horn may not sound if the
steering wheel is not securely
locked.
Horn
Page 147 of 496
1473-4. Adjusting the steering wheel and mirrors
3
Before driving
The height of the rear view mir-
ror can be adjusted to suit your
driving posture.
Adjust the height of the rear
view mirror by moving it up and
down.
Reflected light from the head-
lights of vehicles behind can be
reduced by operating the lever.Normal position
Anti-glare position
Inside rear view mirror
The rear view mirror’s posi-
tion can be adjusted to
enable sufficient confirma-
tion of the rear view.
Adjusting the height of
rear view mirror
WARNING
■Caution while driving
Do not adjust the position of the
mirror while driving.
Doing so may lead to mishandling
of the vehicle and cause an acci-
dent, resulting in death or serious
injury.
Anti-glare function
Page 148 of 496

1483-4. Adjusting the steering wheel and mirrors
■When using the outside rear
view mirrors in a cold weather
When it is cold and the outside rear
view mirrors are frozen, it may not
be possible to fold /extend them or
adjust the mirror surface. Remove
the ice, snow, etc. covering the out-
side rear view mirrors.
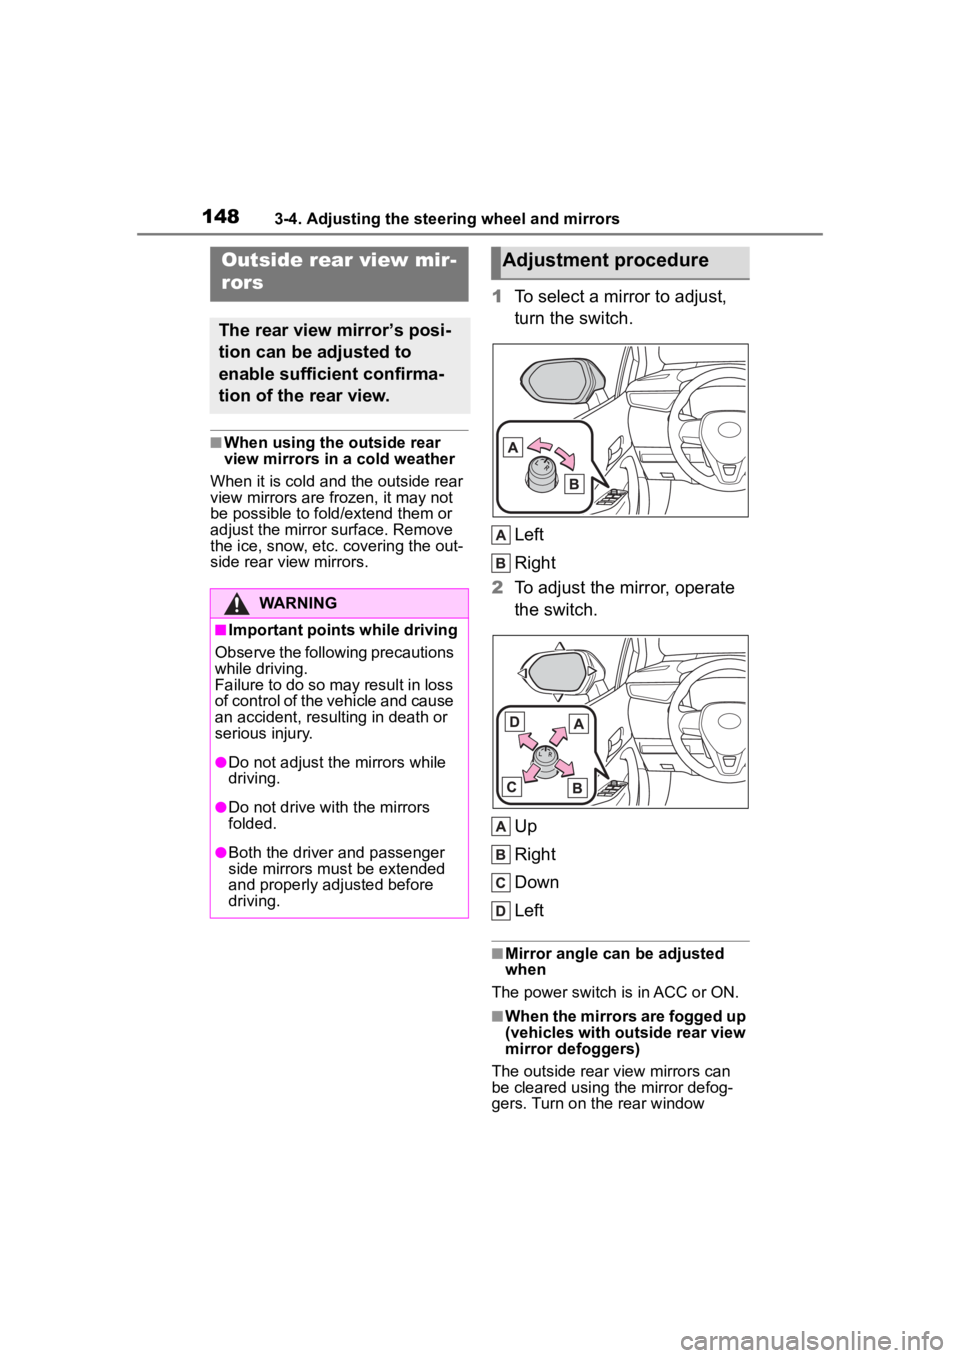
1 To select a mirror to adjust,
turn the switch.
Left
Right
2 To adjust the mirror, operate
the switch.
Up
Right
Down
Left
■Mirror angle can be adjusted
when
The power switch is in ACC or ON.
■When the mirrors are fogged up
(vehicles with outside rear view
mirror defoggers)
The outside rear view mirrors can
be cleared using the mirror defog-
gers. Turn on the rear window
Outside rear view mir-
rors
The rear view mirror’s posi-
tion can be adjusted to
enable sufficient confirma-
tion of the rear view.
WARNING
■Important points while driving
Observe the following precautions
while driving.
Failure to do so may result in loss
of control of the vehicle and cause
an accident, resul ting in death or
serious injury.
●Do not adjust the mirrors while
driving.
●Do not drive with the mirrors
folded.
●Both the driver and passenger
side mirrors must be extended
and properly adjusted before
driving.
Adjustment procedure
Page 149 of 496
1493-4. Adjusting the steering wheel and mirrors
3
Before driving
defogger to turn on the outside rear
view mirror defoggers. (P.280)
Push the mirror back in the
direction of the vehicle’s rear.
WARNING
■When the mirror defoggers
are operating (vehicles with
outside rear view mirror
defoggers)
Do not touch the rear view mirror
surfaces, as they can become
very hot and burn you.
Folding the mirrors
WARNING
■When a mirror is moving
To avoid personal injury and mir-
ror malfunction, be careful not to
get your hand caught by the mov-
ing mirror.
Page 204 of 496

2044-5. Using the driving support systems
WARNING
• Even if a glass coating agent is applied to the windshield, it will
still be necessary to use the
windshield wipers to remove
water droplets, etc. from the
area of the windshield in front of
the front camera.
• If the inner side of the wind- shield where the front camera is
installed is dirty, contact your
Toyota dealer.
●Do not attach stickers (including
transparent stickers) or other
items to the area of the wind-
shield in front o f the front cam-
era (shaded area in the
illustration).
Approximately 1.6 in. (4 cm)
Approximately 1.6 in. (4 cm)
●If the part of the windshield in
front of the front camera is
fogged up or covered with con-
densation or ice, use the wind-
shield defogger to remove the
fog, condensation, or ice.
●If water droplets cannot be
properly removed from the area
of the windshield in front of the
front camera by the windshield
wipers, replace the wiper insert
or wiper blade.
●Do not attach win dow tint to the
windshield.
●Replace the windshield if it is
damaged or cracked.
If the windshield has been
replaced, recalibration of the
front camera will be necessary.
For details, contact your Toyota
dealer.
●Do not allow liquids to contact
the front camera.
●Do not allow bright lights to
shine into the front camera.
●Do not damage th e lens of the
front camera o r allow it to
become dirty.
When cleaning the inside of the
windshield, do not allow glass
cleaner to contact the lens of
the front camera. Do not touch
the lens of the front camera.
If the lens of the front camera is
dirty or damaged, contact your
Toyota dealer.
●Do not subject the front camera
to a strong impact.
●Do not change the position or
orientation of the front camera
or remove it.
●Do not disassemble the front
camera.
●Do not modify any parts around
the front camera , such as the
inside rear view mirror or ceil-
ing.
●Do not attach accessories
which may obstruct the front
camera to the hood, front grille,
or front bumper. For details,
contact your Toyota dealer.
●If a surfboard or other long
object is to be mounted on the
roof, make sure that it will not
obstruct the front camera.
●Do not modify or change the
headlights and other lights.
Page 249 of 496

2494-5. Using the driving support systems
4
Driving
the brake lights may illuminate,
depending on the road conditions,
etc.
After entering the deceleration
stop phase, a buzzer will sound
continuously and a message will
be displayed to warn the driver,
and the vehicle will slowly decel-
erate and stop. After the vehicle
stops, the system will enter the
stop and hold phase.
After the vehicle is stopped, the
parking brake will be applied
automatically. After entering the
stop and hold phase, the buzzer
will continue sounding continu-
ously, the emergency flashers
(hazard lights) will flash to warn
other drivers of the emergency.
*: If equippedDeceleration stop phase
Stop hold phase
BSM (Blind Spot Moni-
tor)*
The Blind Spot Monitor is a
system that uses rear side
radar sensors installed on
the inner side of the rear
bumper on the left and right
side to assist the driver in
confirming safety when
changing lanes.
WARNING
■Cautions regarding the use of
the system
●The driver is solely responsible
for safe driving. Always drive
safely, taking care to observe
your surroundings.
●The Blind Spot Monitor is a sup-
plementary function which alerts
the driver that a vehicle is in a
blind spot of the outside rear
view mirrors or is approaching
rapidly from behind into a blind
spot. Do not overly rely on the
Blind Spot Monitor. As the func-
tion cannot judge if it is safe to
change lanes, over reliance
could lead to an accident result-
ing in death or serious injury. As
the system may not function
correctly under certain condi-
tions, the driver’s own visual
confirmation of safety is neces-
sary.