2023 TOYOTA COROLLA HYBRID low beam
[x] Cancel search: low beamPage 191 of 496

1914-3. Operating the lights and wipers
4
Driving
■Customization
Some functions can be customized.
( P.442)
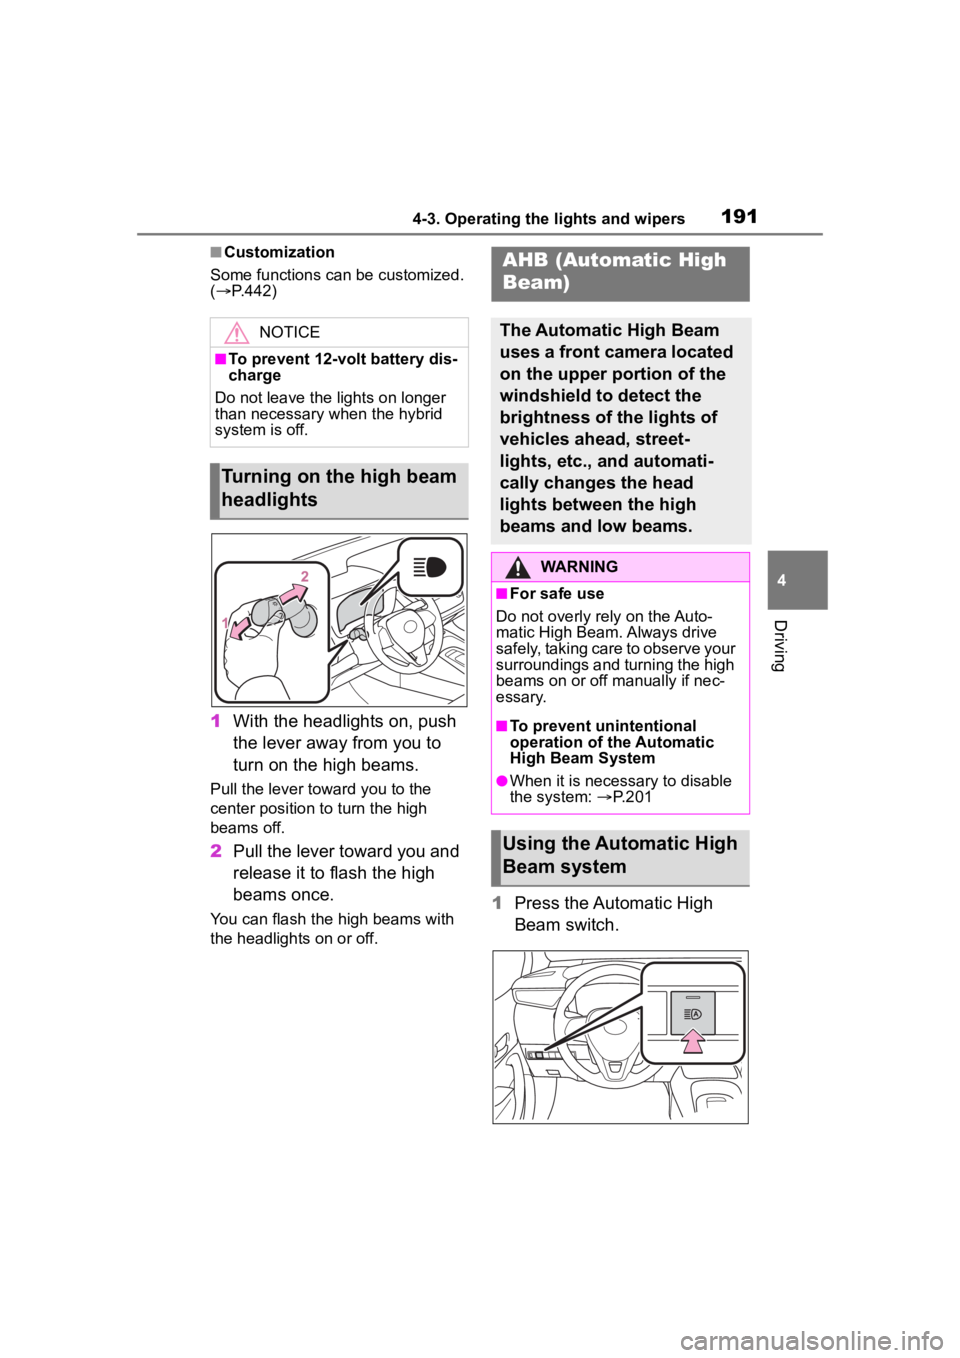
1 With the headlights on, push
the lever away from you to
turn on the high beams.
Pull the lever toward you to the
center position to turn the high
beams off.
2Pull the lever toward you and
release it to flash the high
beams once.
You can flash the high beams with
the headlights on or off.1Press the Automatic High
Beam switch.
NOTICE
■To prevent 12-volt battery dis-
charge
Do not leave the lights on longer
than necessary when the hybrid
system is off.
Turning on the high beam
headlights
AHB (Automatic High
Beam)
The Automatic High Beam
uses a front camera located
on the upper portion of the
windshield to detect the
brightness of the lights of
vehicles ahead, street-
lights, etc., and automati-
cally changes the head
lights between the high
beams and low beams.
WARNING
■For safe use
Do not overly rely on the Auto-
matic High Beam. Always drive
safely, taking care to observe your
surroundings and turning the high
beams on or off manually if nec-
essary.
■To prevent unintentional
operation of the Automatic
High Beam System
●When it is necessary to disable
the system: P.201
Using the Automatic High
Beam system
Page 192 of 496

1924-3. Operating the lights and wipers
2Turn the headlight switch to
the or position.
When the headlight switch lever is
in the low beam position, the AHB
system will be enabled and the
AHB indicator will illuminate.
■Automatic operating condi-
tions of the high beams
●When all of the following condi-
tions are met, the high beams will
illuminate automatically:
• The vehicle speed is approxi-
mately 21 mph (34 km/h) or more.
• The area ahead of the vehicle is dark.
• There are no vehicles ahead with lights on.
• There are few streetlights or other
lights on the road ahead.
●If any of the following conditions
are met, the headlights will
change to the low beams:
• Vehicle speed drops below
approximately 17 mph (27 km/h).
• The area ahead of the vehicle is not dark.
• There is a vehi cle ahead with
lights on.
• There are many streetlights or
other lights on the road ahead.
■Front camera detection
●In the following situations, the high
beams may not be automatically
changed to the low beams:
• When a vehicle cuts in front of your vehicle
• When another vehicle crosses in front of the vehicle • When vehicles ahead are repeat-
edly detected and then hidden
due to repeated curves, road
dividers or roadside trees
• When a vehicle ahead approaches from a far lane
• When a vehicle ahead is far away
• When a vehicle ahead has no lights
• When the lights of a vehicle ahead are dim
• When a vehicle ahead is reflecting
strong light, such as own head-
lights
• Situations in which the sensors
may not operate properly: P. 2 0 5
●The headlights may change to the
low beams if a vehicle ahead that
is using fog lights without its head-
lights turned on is detected.
●House lights, street lights, traffic
signals, and illuminated billboards
or signs may cause the high
beams to change to the low
beams, or the low beams to
remain on.
●The following may change the tim-
ing at which the headlights
change to the low beams:
• The brightness o f lights of vehi-
cles ahead
• The movement and direction of vehicles ahead
• The distance between the vehicle and a vehicle ahead
• When a vehicle ahead only has
lights illuminate d on one side
• When a vehicle ahead is a two-wheeled vehicle
• The condition of the road (gradi- ent, curve, condition of the road
surface, etc.)
• The number of passengers and amount of luggage
●The headlights may change
between the high beams and low
beams unexpectedly.
●Bicycles and other small vehicles
may not be detected.
●In the following situations, the sys-
tem may not be able to correctly
detect the brightness of the sur-
Page 193 of 496

1934-3. Operating the lights and wipers
4
Driving
roundings. This may cause the
low beams to remain on or the
high beams to flash or dazzle
pedestrians or vehicles ahead. In
such a case, it is necessary to
manually change between the
high beams and low beams.
• When there are lights similar to headlights or tail li ghts in the sur-
rounding area
• When headlights or tail lights of vehicles ahead are turned off,
dirty, changing color, or not aimed
properly
• When the headlights are repeat-
edly changing between the high
beams and low beams.
• When use of the high beams is
inappropriate or when the high
beams may be flashing or daz-
zling pedestrians or other drivers.
• When the vehicle is used in an area in which vehicles travel on
the opposite side of the road of
the country for wh ich the vehicle
was designed, for example using
a vehicle designed for right-hand
traffic in a left-hand traffic area, or
vice versa
• When it is necessary to disable
the system: P. 2 0 1
• Situations in which the sensors may not operate properly: P. 2 0 5
■Temporarily reducing front
camera sensitivity (for the
U.S.A.)
The sensitivity o f the front camera
can be temporarily reduced.
1 Press the power switch off with
the following conditions met.
• The headlight switch is in the
or position.
• The headlight switch lever is in the low beam position.
• The automatic High Beam switch is on.
2 Press the power switch to ON.
3 Within 60 seconds after perform-
ing step 2, push the headlight
switch lever to the high beam
position then pull it to the original position quickly 10 times, then
leave the lever in its original posi-
tion.
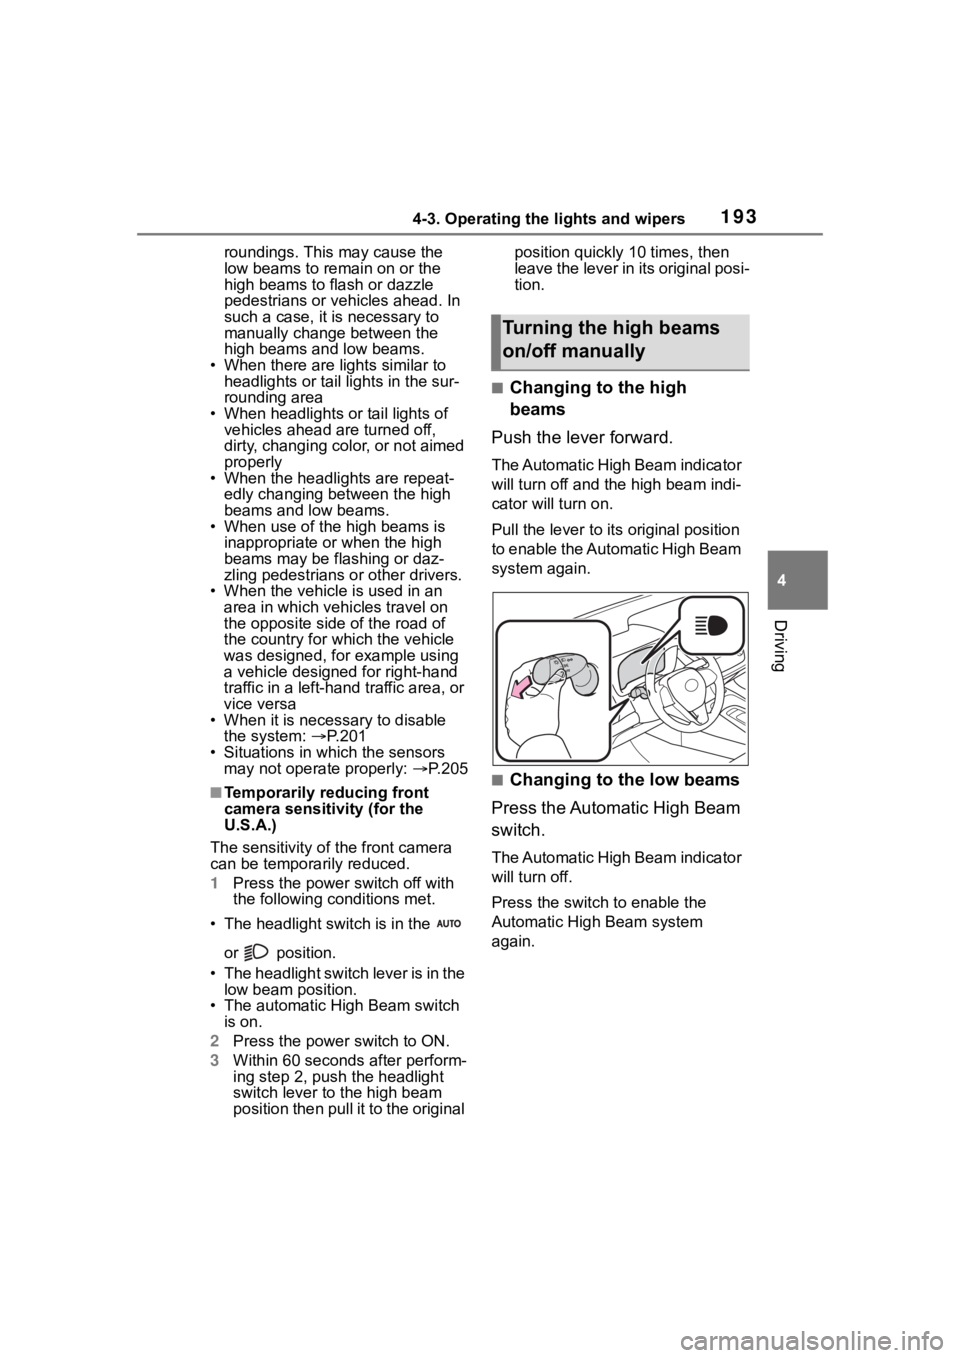
■Changing to the high
beams
Push the lever forward.
The Automatic High Beam indicator
will turn off and the high beam indi-
cator will turn on.
Pull the lever to its original position
to enable the Automatic High Beam
system again.
■Changing to the low beams
Press the Automatic High Beam
switch.
The Automatic High Beam indicator
will turn off.
Press the switch to enable the
Automatic High Beam system
again.
Turning the high beams
on/off manually
Page 194 of 496

1944-3. Operating the lights and wipers
■Temporarily changing to
the low beams
It is recommended to switch to
the low beams when use of the
high beams is inappropriate or
when the high beams may
cause problems or distress to
other drivers or pedestrians
nearby.
Pull the lever rearward and then
return it to its original position.
The high beams will illuminate
while the lever is pulled, however,
after the lever is returned to its orig-
inal position, t he low beams will
remain on for a certain amount of
time. After this, the Automatic High
Beam system will operate.
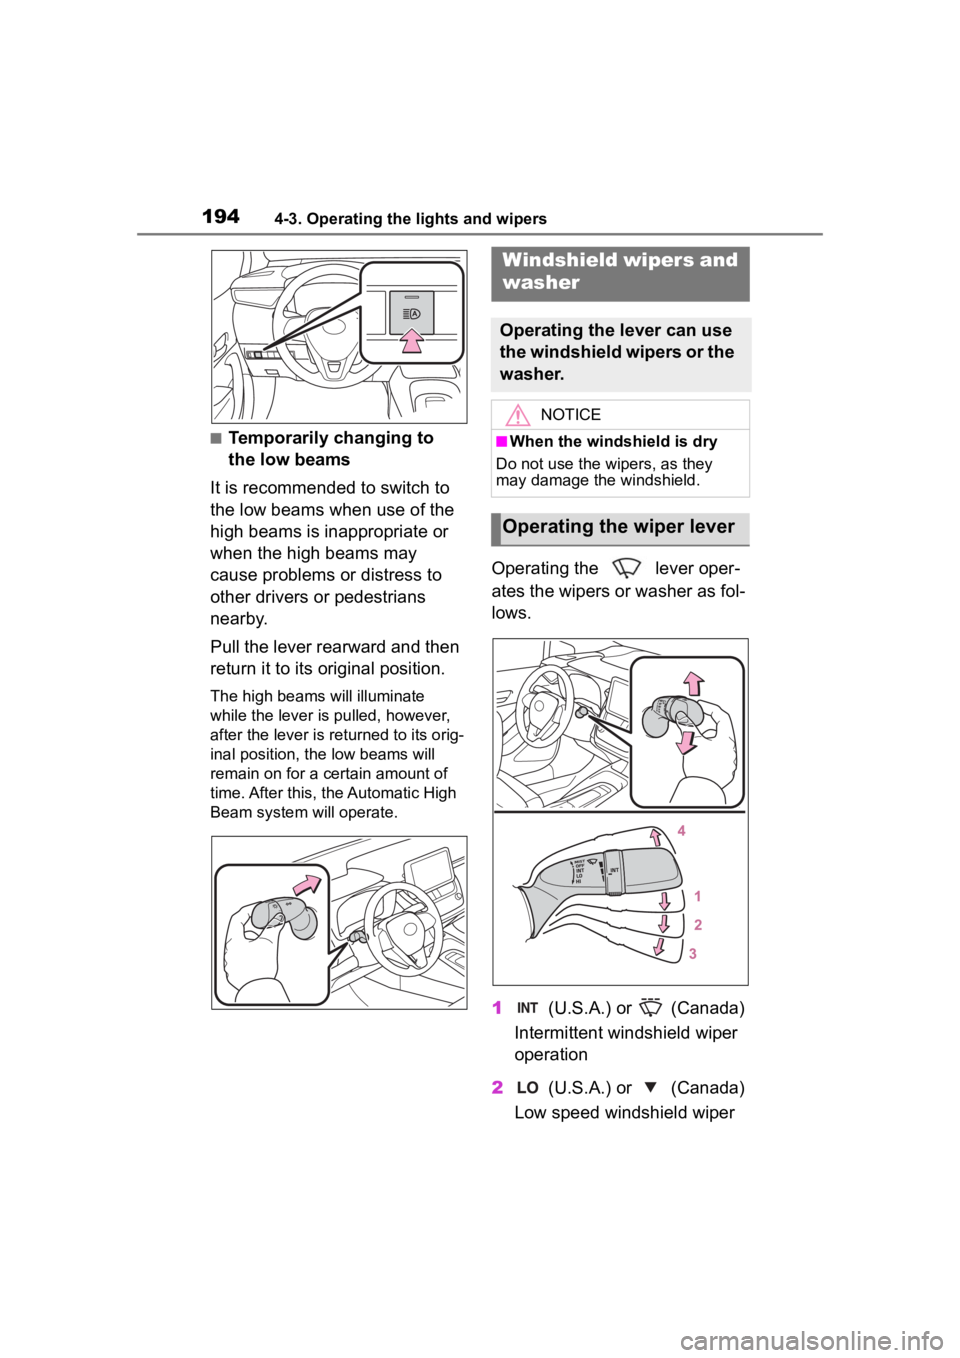
Operating the lever oper-
ates the wipers or washer as fol-
lows.
1 (U.S.A.) or (Canada)
Intermittent windshield wiper
operation
2 (U.S.A.) or (Canada)
Low speed windshield wiper
Windshield wipers and
washer
Operating the lever can use
the windshield wipers or the
washer.
NOTICE
■When the windshield is dry
Do not use the wipers, as they
may damage the windshield.
Operating the wiper lever
Page 202 of 496

2024-5. Using the driving support systems
■PCS (Pre-Collision System)
P.207
■LTA (Lane Tracing Assist)
P.218
■LDA (Lane Departure Alert)
P.223
■AHB (Automatic High
Beam)
P.191
■PDA (Proactive driving
assist)
P.228
■RSA (Road Sign Assist)*
P.234
*: If equipped
■Dynamic radar cruise con-
trol
P.236
■Cruise control
P.244
■Emergency Driving Stop
System
P.247
Various sensors are used to
obtain the necessary informa-
tion for system operation.
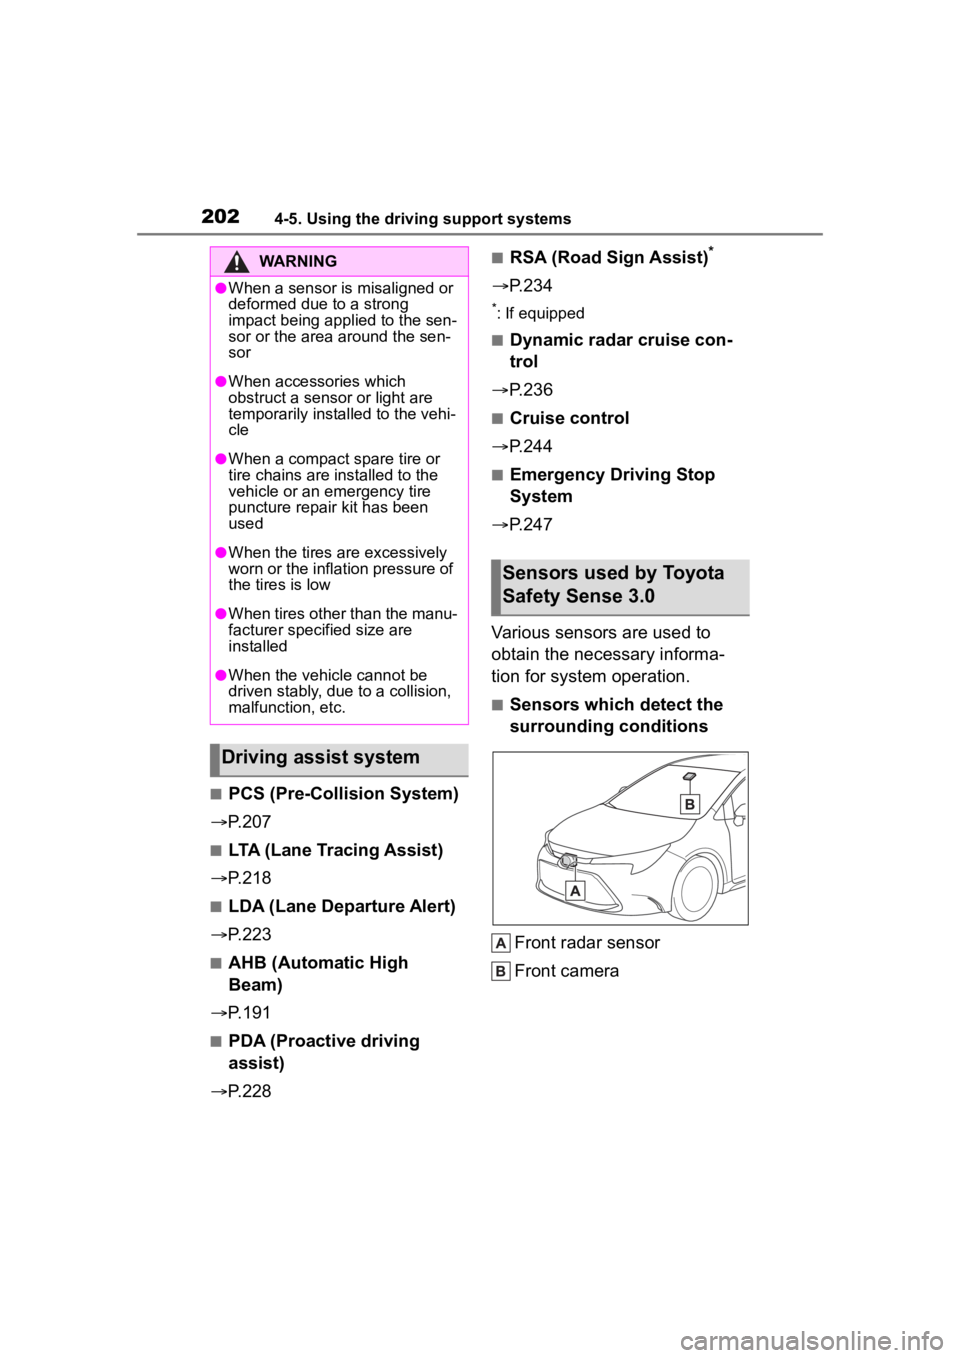
■Sensors which detect the
surrounding conditions
Front radar sensor
Front camera
WARNING
●When a sensor is misaligned or
deformed due to a strong
impact being applied to the sen-
sor or the area around the sen-
sor
●When accessories which
obstruct a sensor or light are
temporarily installed to the vehi-
cle
●When a compact spare tire or
tire chains are installed to the
vehicle or an emergency tire
puncture repair kit has been
used
●When the tires are excessively
worn or the inflation pressure of
the tires is low
●When tires other than the manu-
facturer specified size are
installed
●When the vehicle cannot be
driven stably, due to a collision,
malfunction, etc.
Driving assist system
Sensors used by Toyota
Safety Sense 3.0
Page 383 of 496

3837-2. Steps to take in an emergency
7
When trouble arises
the level of the engine oil, and add if
necessary.
This message may appear if the
vehicle is stopped on a slope. Move
the vehicle to a level surface and
check to see if the message disap-
pears.
■If “Hybrid System Stopped
Steering Power Low” is dis-
played
This message is displayed if the
hybrid system is stopped while driv-
ing.
When steering wheel operations are
heavier than usual, grip the steering
wheel firmly and operate it using
more force th an usual.
■If “Hybrid System Overheated
Output Power Reduced” is dis-
played
This message may be displayed
when driving under severe operat-
ing conditions. (For example, when
driving up a long steep hill.)
Handling method: P. 4 1 4
■If “Traction Battery Needs to be
Protected Refrain from the Use
of N Position” is displayed
This message may be displayed
when the shift lever is in N.
As the hybrid batte ry (traction bat-
tery) cannot be charged when the
shift lever is in N, shift the shift lever
to P when the vehicle is stopped.
■If “Traction Battery Needs to be
Protected Shift into P to
Restart” is displayed
This message is displayed when the
hybrid battery (traction battery)
charge has become extremely low
because the shift lever has been left
in N for a certain amount of time.
When operating the vehicle, shift to
P and restart the hybrid system.
■If “Shift is in N Release Acceler-
ator Before Shif ting” is dis-
played
The accelerator pedal has been depressed when the shift lever is in
N.
Release the accelerator pedal and
shift the shift
lever to D or R.
■If “Press Brake when Vehicle is
Stopped Hybrid System may
Overheat” is displayed
The message may be displayed
when the accelerator pedal is
depressed to hold the vehicle while
the vehicle is stopped on an incline,
etc. The hybrid system may over-
heat. Release the accelerator pedal
and depress the brake pedal.
■If “Auto Power OFF to Conserve
Battery” is displayed
Power was cut off due to the auto-
matic power off function. Next time
when starting the hybrid system,
operate the hybrid system for
approximately 5 minutes to
recharge the 12-volt battery.
■If “Headlight System Malfunc-
tion Visit Your Dealer” is dis-
played
The following systems may be mal-
functioning. Hav e the vehicle
inspected by your Toyota dealer
immediately.
●The LED headlight system
●AHB (Automatic High Beam)
■If “System Malfunction Visi-
tYour Dealer” is displayed
Indicates one of the following sys-
tems is disabled.
●PCS (Pre-Collision system)
●LDA (Lane Departure Alert)
●LTA (Lane Tracing Assist)
●AHB (Automatic High Beam)
●Dynamic radar cruise control
●RSA (Road Sign Assist) (if
equipped)
●BSM (Blind Spot Monitor) (if
equipped)
Page 384 of 496

3847-2. Steps to take in an emergency
●RCTA (Rear Cross Traffic
Alert) (if equipped)
●SEA (Safe Exit Assist) (if
equipped)
Have the vehicle inspected by your
Toyota dealer immediately.
■If “System Stopped See
Owner’s Manual” is displayed
Indicates one of the following sys-
tems is disabled.
●PCS (Pre-Collision system)
●LDA (Lane Departure Alert)
●LTA (Lane Tracing Assist)
●AHB (Automatic High Beam)
●Dynamic radar cruise control
●RSA (Road Sign Assist) (if
equipped)
●BSM (Blind Spot Monitor) (if
equipped)
●RCTA (Rear Cross Traffic
Alert) (if equipped)
●SEA (Safe Exit Assist) (if
equipped)
Follow the followi ng correction
methods.
• Check the voltage of the battery
• Check the sensors that the Toyota
Safety Sense 3.0 u ses for foreign
matter covering them. Remove
them if any. ( P.202)
Indicates the sensors may not be
operating properly. ( P.205)
When problems are solved and the
sensors are operatio nal, this indica-
tion may disappear by itself.
■If “System Stopped Front Cam-
era Low Visibility See Owner’s
Manual” is displayed
Indicates one of the following sys-
tems is disabled.
●PCS (Pre-Collision system)
●LDA (Lane Departure Alert)
●LTA (Lane Tracing Assist)
●AHB (Automatic High Beam)
●Dynamic radar cruise control
●RSA (Road Sign Assist) (if
equipped)
Follow the following correction
methods.
• Using the windshield wipers, remove the dirt or foreign matter
from the windshield.
• Using the air conditioning system, defog the windshield.
• Close the hood, remove any stick- ers, etc. to clear the obstruction in
front of the front camera.
■If “System Stopped Front Cam-
era Out of Temperature Range
Wait until Normal Temperature”
is displayed
Indicates one of the following sys-
tems is disabled.
●PCS (Pre-Collision system)
●LDA (Lane Departure Alert)
●LTA (Lane Tracing Assist)
●AHB (Automatic High Beam)
●Dynamic radar cruise control
●RSA (Road Sign Assist) (if
equipped)
Follow the following correction
methods.
• If the front camer a is hot, such as
after the vehicle is parked in the
sun, use the air conditioning sys-
tem to decrease the temperature
around the front camera
• If a sunshade was used when the vehicle was parked, depending on
its type, the sunlight reflected from
the surface of the sunshade may
cause the temperature of the front
camera to become excessively
high
• If the front camera is cold, such after the vehicle is parked in an
extremely cold environment, use
Page 385 of 496

3857-2. Steps to take in an emergency
7
When trouble arises
the air conditioning system to
increase the temperature around
the front camera
■If “System Stopped Front Radar
Sensor Blocked Clean Radar
Sensor” is displayed
Indicates one of the following sys-
tems is disabled.
●PCS (Pre-Collision system)
●LDA (Lane Departure Alert)
●LTA (Lane Tracing Assist)
●AHB (Automatic High Beam)
●Dynamic radar cruise control
Follow the followi ng correction
methods.
• Check if there is any foreign mat- ter attached to the radar sensor or
radar sensor cover and clean
them if necessary ( P.203)
• This message may be displayed when driving in an open area with
few nearby vehicles or structures,
such as a desert, grasslands, sub-
urbs, etc.
The message may be cleared by
driving the vehicle in an area with
structures, vehicles, etc., nearby.
■If “System Stopped Front Radar
Sensor Out of Temperature
Range Wait until Normal Tem-
perature” is displayed
Indicates one of the following sys-
tems is disabled.
●PCS (Pre-Collision system)
●LDA (Lane Departure Alert)
●LTA (Lane Tracing Assist)
●AHB (Automatic High Beam)
●Dynamic radar cruise control
Follow the followi ng correction
methods.
The temperature of the radar sensor
is outside of the operating range.
Wait for the temperature to become
appropriate.
■If “System Stopped Front Radar
In Self Calibration See Owner’s
Manual” is displayed
Indicates one of the following sys-
tems is disabled.
●PCS (Pre-Collision system)
●LDA (Lane Departure Alert)
●LTA (Lane Tracing Assist)
●AHB (Automatic High Beam)
●Dynamic radar cruise control
Follow the following correction
methods.
• Check if there is any foreign mat- ter attached to the radar sensor or
radar sensor cover and clean
them if necessary ( P.203)
• The radar sensor may be mis- aligned and will be adjusted auto-
matically while d riving. Continue
driving for a while.
■If “Cruise Control Unavailable
See Owner’s Manual” is dis-
played
Indicates one of the following sys-
tems is disabled.
●Dynamic radar cruise control
●Cruise control
A message is displayed when the
driving assist s witch is pushed
repeatedly.
Press the driving assist switch
quickly and firmly.
■If “Maintenance Required
Soon” is displayed
Indicates that all maintenance
according to the driven distance on
the maintenance schedule
* should
be performed soon.
Comes on approximately 4500
miles (7200 km) after the message
has been reset. If necessary, per-
form maintenance. Please reset the
message after the maintenance is
performed. ( P.309)
*: Refer to the separate “Scheduled
Maintenance” or “Owner’s Man-