Page 298 of 500

2985-1. Using the air conditioning system and defogger
Indicator illuminated: Airflow
to the front seats only
Indicator off: Airflow to all the
seats
■Operation of automatic airflow
control
●In order to maintain a comfortable
interior, airflow may be directed to
seats without passengers immedi-
ately after the e ngine is started
and at other times depending on
the outside temperature.
●After the engine is started, if pas-
sengers move around inside or
enter/exit the vehicle, the system
cannot accurately detect the pres-
ence of passengers and automatic
airflow control will not operate.
■Operation of manual airflow
control
Even if the function is manually
switched to directing airflow to only
the front seats, whe n a rear seat is
occupied, it may automatically direct
airflow to all seats.
■To return to automatic airflow
control
1 With the indicator off, turn the
engine switch off.
2 After 60 minutes or more elapse,
turn the engine switch to ON.
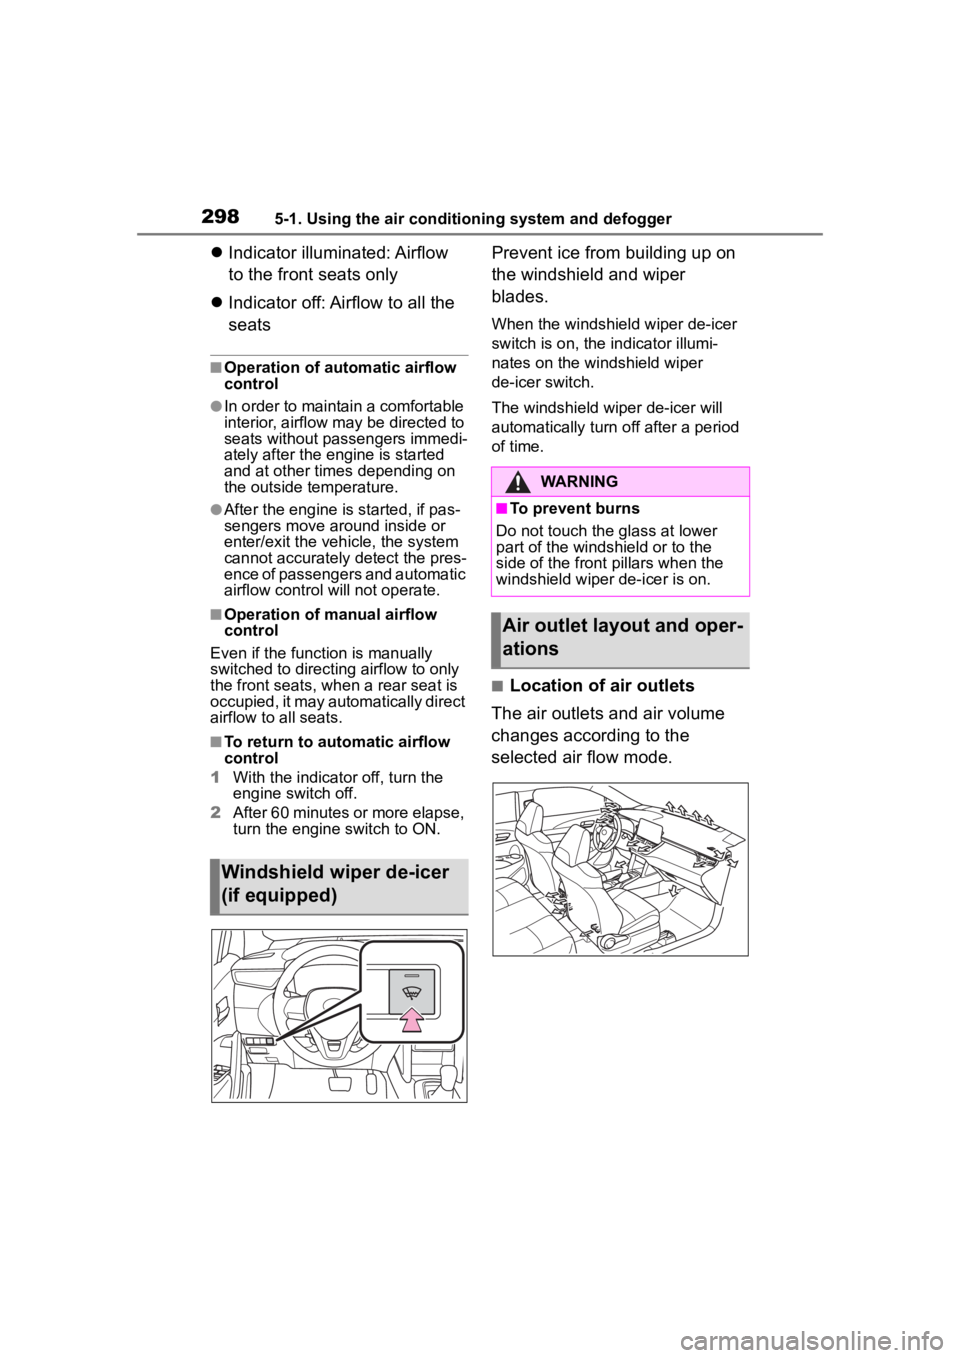
Prevent ice from building up on
the windshield and wiper
blades.
When the windshield wiper de-icer
switch is on, the indicator illumi-
nates on the windshield wiper
de-icer switch.
The windshield wiper de-icer will
automatically turn off after a period
of time.
■Location of air outlets
The air outlets and air volume
changes according to the
selected air flow mode.
Windshield wiper de-icer
(if equipped)
WARNING
■To prevent burns
Do not touch the glass at lower
part of the windshield or to the
side of the front p illars when the
windshield wiper de-icer is on.
Air outlet layout and oper-
ations
Page 299 of 500
2995-1. Using the air conditioning system and defogger
5
Interior features
■Adjusting the position of
and opening and closing
the air outlets
Front center
Direct air flow to the left or right, up
or down
Front right-hand side
1 Direct air flow to the left or
right, up or down
2 Close the vent
3 Open the vent
Front left-hand side
1 Direct air flow to the left or right, up or down
2 Close the vent
3 Open the vent
Rear
1 Direct air flow to the left or
right, up or down
2 Turn the knob to open or
close the vents
WARNING
■To prevent the windshield
defogger from operating
improperly
Do not place anything on the
instrument panel which may cover
the air outlets. Otherwise, air flow
may be obstructed, preventing the
windshield defoggers from defog-
ging.
Page 300 of 500

3005-1. Using the air conditioning system and defogger
*: If equipped
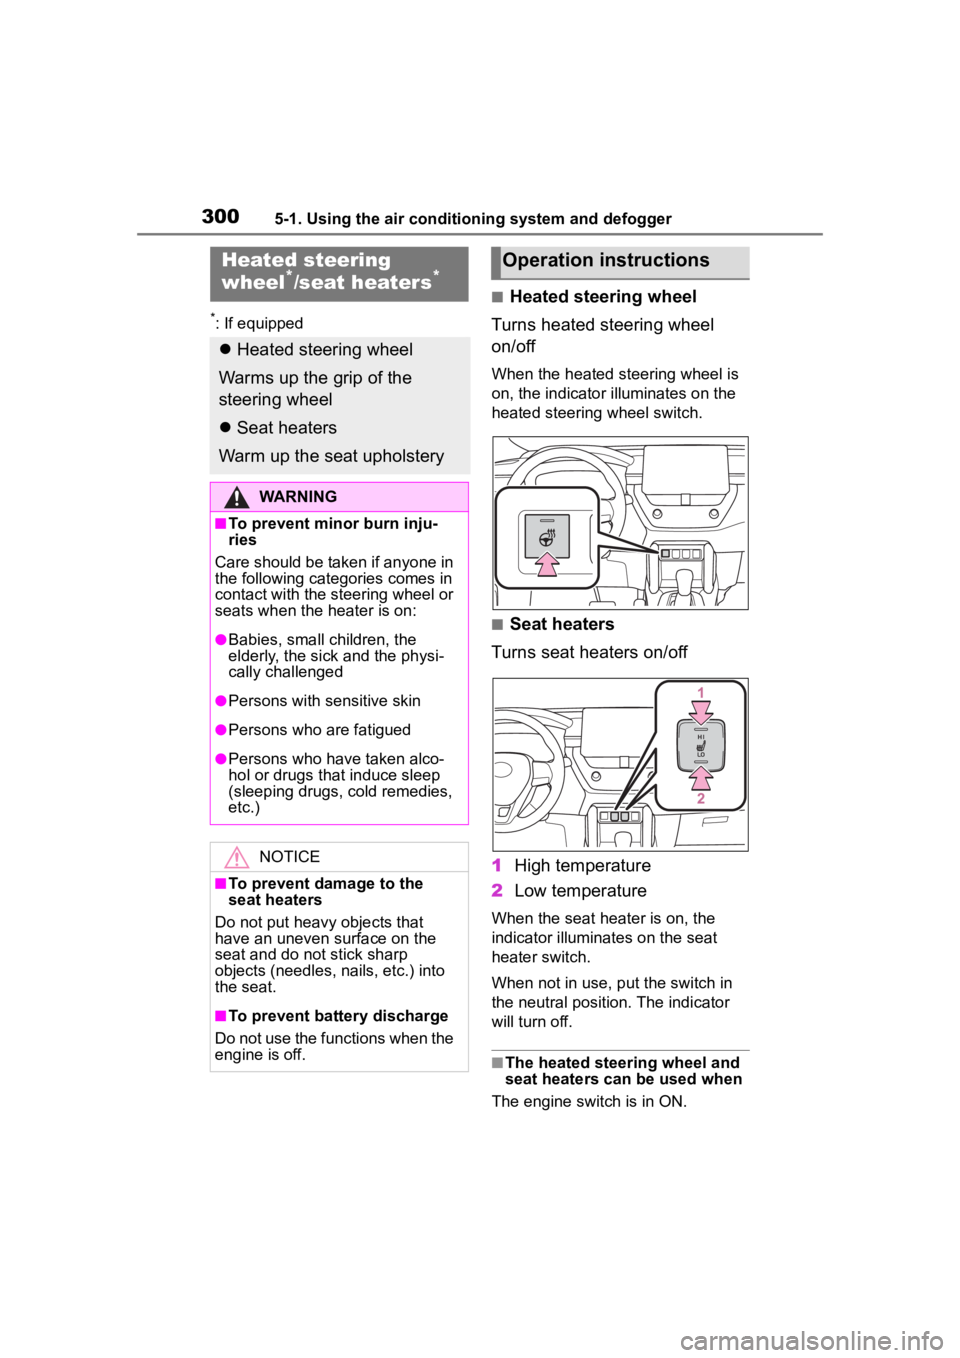
■Heated steering wheel
Turns heated steering wheel
on/off
When the heated steering wheel is
on, the indicator illuminates on the
heated steering wheel switch.
■Seat heaters
Turns seat heaters on/off
1 High temperature
2 Low temperature
When the seat heater is on, the
indicator illuminates on the seat
heater switch.
When not in use, put the switch in
the neutral position. The indicator
will turn off.
■The heated steering wheel and
seat heaters can be used when
The engine switch is in ON.
Heated steering
wheel*/seat heaters*
Heated steering wheel
Warms up the grip of the
steering wheel
Seat heaters
Warm up the seat upholstery
WARNING
■To prevent minor burn inju-
ries
Care should be taken if anyone in
the following categories comes in
contact with the steering wheel or
seats when the heater is on:
●Babies, small children, the
elderly, the sick and the physi-
cally challenged
●Persons with sensitive skin
●Persons who are fatigued
●Persons who have taken alco-
hol or drugs that induce sleep
(sleeping drugs, cold remedies,
etc.)
NOTICE
■To prevent damage to the
seat heaters
Do not put heavy objects that
have an uneven surface on the
seat and do not stick sharp
objects (needles, nails, etc.) into
the seat.
■To prevent battery discharge
Do not use the functions when the
engine is off.
Operation instructions
Page 301 of 500
3015-1. Using the air conditioning system and defogger
5
Interior features
WARNING
■To prevent overheating and
minor burn injuries
Observe the following precautions
when using the seat heaters.
●Do not cover the seat with a
blanket or cushion when using
the seat heater.
●Do not use seat heater more
than necessary.
Page 327 of 500
327
6
6
Maintenance and care
Maintenance and care
.6-1. Maintenance and careCleaning and protecting the vehicle exterior .......... 328
Cleaning and protecting the vehicle interior ........... 331
6-2. Maintenance Maintenance requirements.................................. 334
General maintenance.. 336
Emission inspection and maintenance (I/M) pro-
grams ........................ 338
6-3. Do-it-yourself mainte- nance
Do-it-yourself service pre- cautions ..................... 340
Hood ........................... 342
Positioning a floor jack .................................. 343
Engine compartment ... 344
Tires ............................ 351
Tire inflation pressure.. 363
Wheels ......... ...............365
Air conditioning filter .... 366
Wireless remote con- trol/electronic key battery.................................. 368
Checking and replacing fuses.......................... 371
Headlight aim .............. 373
Light bulbs................... 374
Page 330 of 500

3306-1. Maintenance and care
NOTICE
■To prevent damage to the
windshield wiper arms
When lifting the wiper arms away
from the windshield, pull the driver
side wiper arm upward first, and
repeat for the passenger side.
When returning the wipers to their
original position, do so from the
passenger side first.
■When using a high pressure
car wash
●When washing the vehicle, do
not spray the came ra or its sur-
rounding area directly with a
high pressure washer. Shock
applied from high pressure
water may cause the device to
not operate normally.
●Do not spray water directly on
the radar which is equipped
behind the emblem. Otherwise
it may cause the device to be
damaged.
●Do not bring the nozzle tip close
to boots (rubber or resin manu-
factured cover), connectors or
the following parts. The parts
may be damaged if they come
into contact with high-pressure
water.
• Traction related parts
• Steering parts
• Suspension parts
• Brake parts
●Keep the cleaning nozzle at
least 11.9 in. (30 cm) away from
the vehicles bod y. Otherwise
resin section, such as moldings
and bumpers, may be deformed
and damaged. Also, do not con-
tinuously hold the nozzle in the
same place.
●Do not spray the lower part of
the windshield continuously. If
water enters the air conditioning
system intake located near the
lower part of the windshield, the
air conditioning system may not
operate correctly.
●Do not wash the underside of
the vehicle using a high pres-
sure car washer.
Page 366 of 500

3666-3. Do-it-yourself maintenance
Use only Toyota wheel nuts
and wheel nut wrenches
designed for use with your
aluminum wheels.
When rotating, repairing or
changing your tires, check
that the wheel nuts are still
tight after driving 1000 miles
(1600 km).
Use only Toyota genuine bal-
ance weights or equivalent
and a plastic or rubber ham-
mer when balancing your
wheels. 1
Turn the engine switch off.
2 Open the glove box. Slide off
the damper.
3 Push in the glove box on the
vehicle’s outer side to discon-
nect the claws. Then pull out
the glove box and disconnect
the lower claws.
4 Unlock the filter cover ( ),
pull the filter cover out of the
NOTICE
■Replacing tire pressure warn-
ing valves and transmitters
●Because tire repair or replace-
ment may affect the tire pres-
sure warning valves and
transmitters, make sure to have
tires serviced by your Toyota
dealer or other qualified service
shop. In addition, make sure to
purchase your tire pressure
warning valves and transmit-
ters at your Toyota dealer.
●Ensure that only genuine Toyota
wheels are used on your vehi-
cle.
Tire pressure warning valves
and transmitters may not work
properly with non-genuine
wheels.
Aluminum wheel precau-
tions (if equipped)
Air conditioning filter
The air conditioning filter
must be changed regularly
to maintain air conditioning
efficiency.
Removing the air condi-
tioning filter
Page 367 of 500

3676-3. Do-it-yourself maintenance
6
Maintenance and care
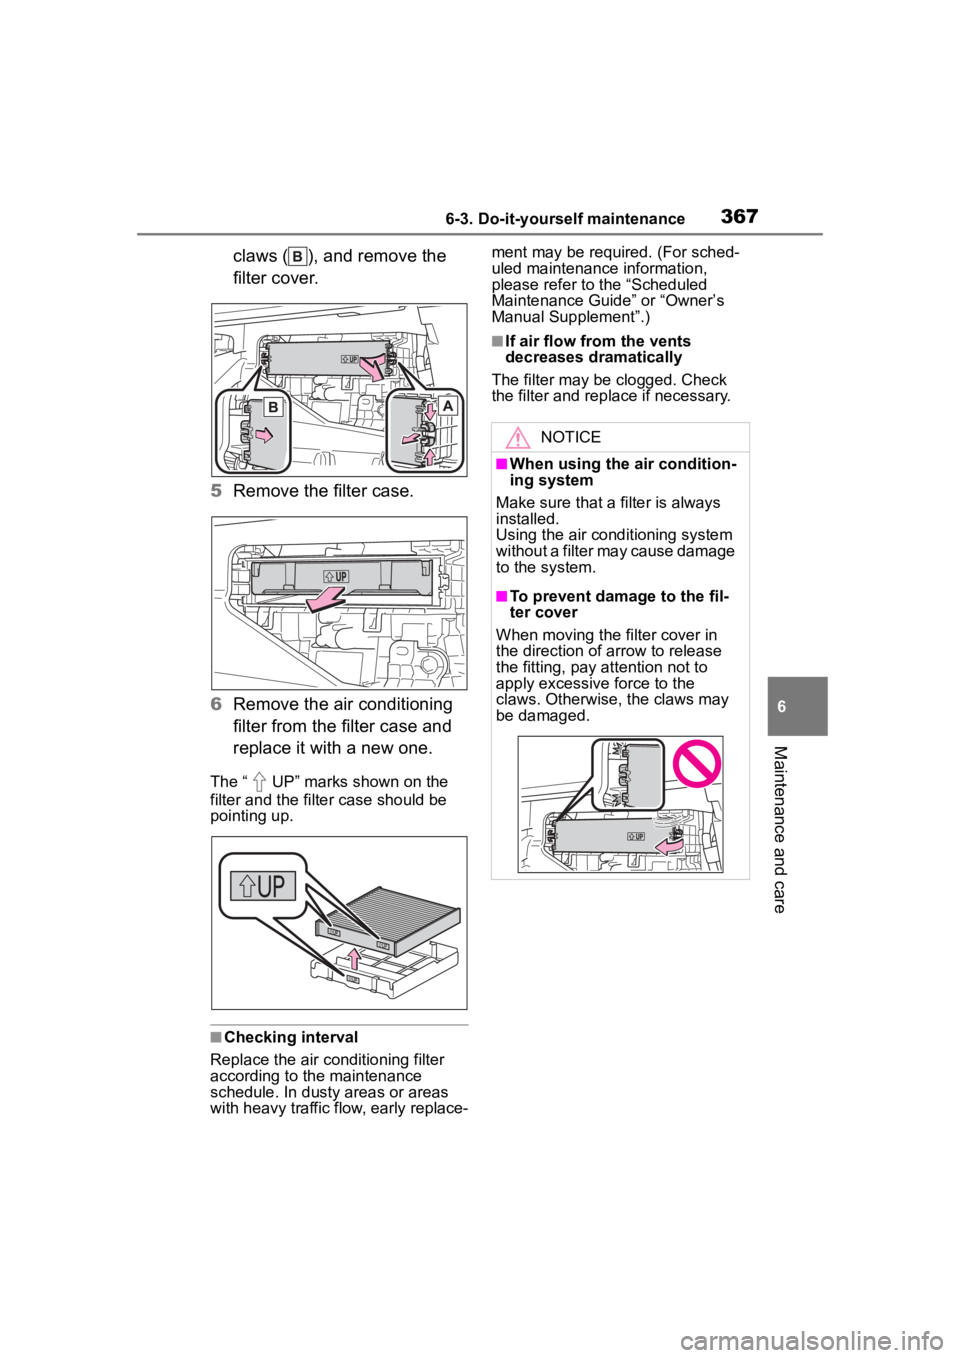
claws ( ), and remove the
filter cover.
5 Remove the filter case.
6 Remove the air conditioning
filter from the filter case and
replace it with a new one.
The “ UP” marks shown on the
filter and the filter case should be
pointing up.
■Checking interval
Replace the air conditioning filter
according to the maintenance
schedule. In dusty areas or areas
with heavy traffic flow, early replace- ment may be required. (For sched-
uled maintenance information,
please refer to the “Scheduled
Maintenance Guide” or “Owner’s
Manual Supplement”.)
■If air flow from the vents
decreases dramatically
The filter may be clogged. Check
the filter and rep lace if necessary.
NOTICE
■When using the air condition-
ing system
Make sure that a filter is always
installed.
Using the air conditioning system
without a filter may cause damage
to the system.
■To prevent damage to the fil-
ter cover
When moving the filter cover in
the direction of arrow to release
the fitting, pay attention not to
apply excessive force to the
claws. Otherwise, the claws may
be damaged.