2023 TOYOTA COROLLA CROSS reset
[x] Cancel search: resetPage 92 of 500
922-1. Instrument cluster
Route guidance to destination
Compass display (head-
ing-up display)
Select to enable selection of an
audio source or track on the
meter using the meter control
switches.
This menu icon can be set to be
displayed/not displayed in .
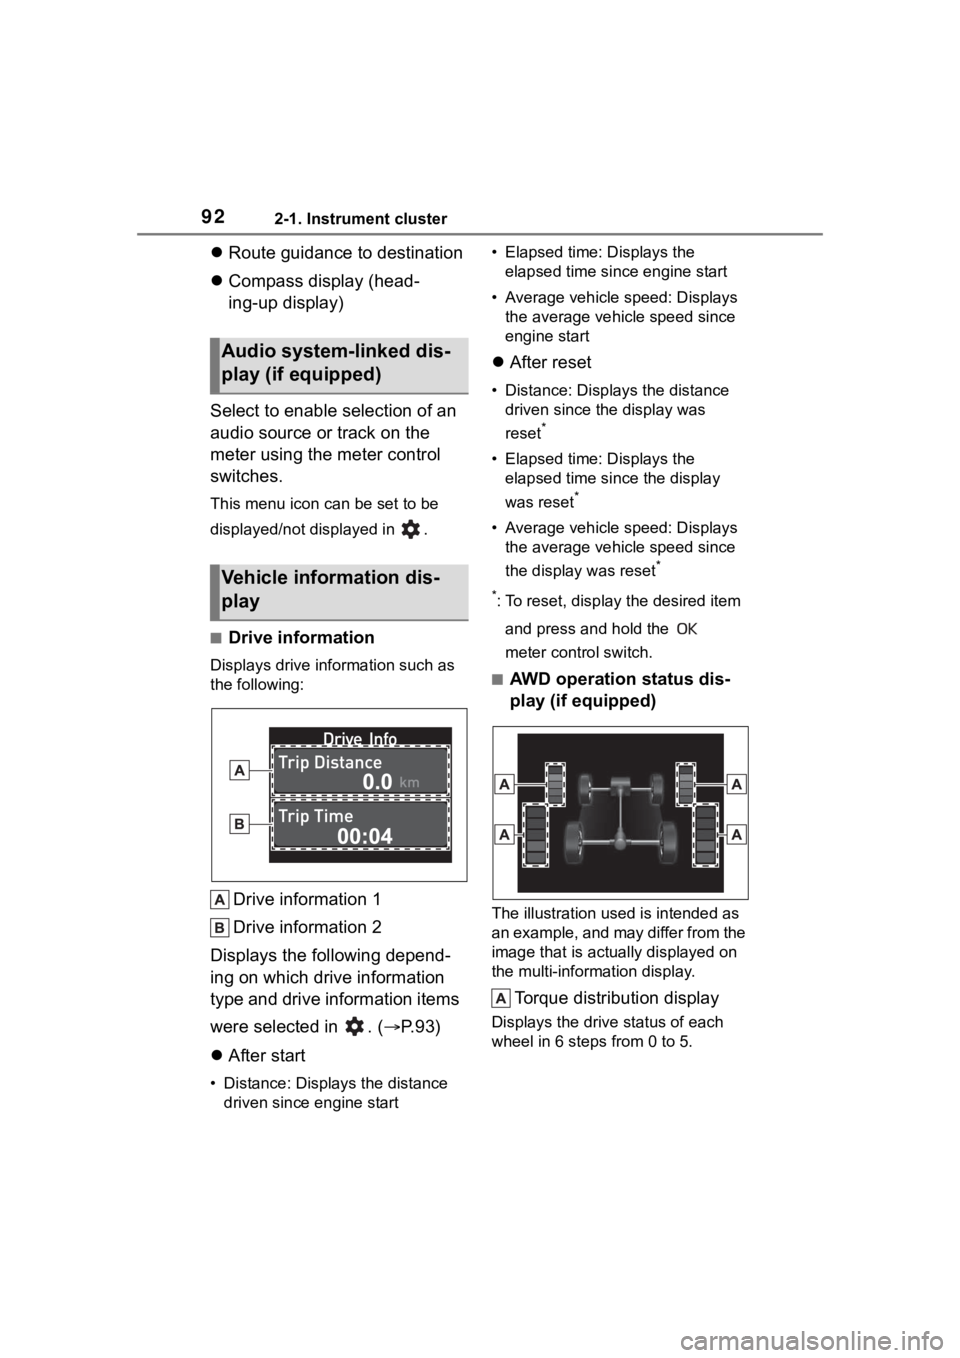
■Drive information
Displays drive information such as
the following:
Drive information 1
Drive information 2
Displays the following depend-
ing on which drive information
type and drive information items
were selected in . ( P.93)
After start
• Distance: Displays the distance
driven since e ngine start • Elapsed time: Displays the
elapsed time since engine start
• Average vehicle speed: Displays the average vehicle speed since
engine start
After reset
• Distance: Displays the distance
driven since the display was
reset
*
• Elapsed time: Displays the elapsed time since the display
was reset
*
• Average vehicle speed: Displays the average vehicle speed since
the display was reset
*
*
: To reset, display the desired item and press and hold the
meter control switch.
■AWD operation status dis-
play (if equipped)
The illustration used is intended as
an example, and may differ from the
image that is actually displayed on
the multi-information display.
Torque distribution display
Displays the drive status of each
wheel in 6 steps from 0 to 5.
Audio system-linked dis-
play (if equipped)
Vehicle information dis-
play
Page 93 of 500
932-1. Instrument cluster
2
Vehicle status information and indicators
■Meter display settings that
can be changed
Language
Select to change the language dis-
played.
Units
Select to change t he units of mea-
sure displayed.
Meter Type
Select to change the meter type.
Dial Type
Select to change the display of the
speedometer or tachometer.
Eco Driving Indicator Light
Select to enable/disable the Eco
Driving Indicator Light.
Fuel economy display
Select to change the average fuel
consumption display to any of the
following: trip ave rage/total aver-
age/tank average. ( P. 9 0 )
Select to display/not display the
audio system linked display.
Select to change the displayed con-
tent of the following:
• Drive information type
Select to change the drive informa-
tion type display between trip infor-
mation/total information.
• Drive information items
Select to set the first and second items of the drive information dis-
play to any of the following: aver-
age vehicle
speed/distance/elapsed time.
Pop-up display
Select to enable/disable pop-up
displays for each relevant system.
Multi-information display off
Select to turn the multi-information
display off.
To turn the multi-information display
on again, press any of the following
meter control switches
//// /.
Default setting
Select to reset the meter display
settings to the default setting.
■Vehicle functions and set-
tings that can be changed
P.449
■Suspension of the settings dis-
play
●Some settings cannot be changed
while driving. When changing set-
tings, park the vehicle in a safe
place.
●If a warning message is displayed,
operation of the settings display
will be suspended.
Settings display
Page 95 of 500
952-1. Instrument cluster
2
Vehicle status information and indicators
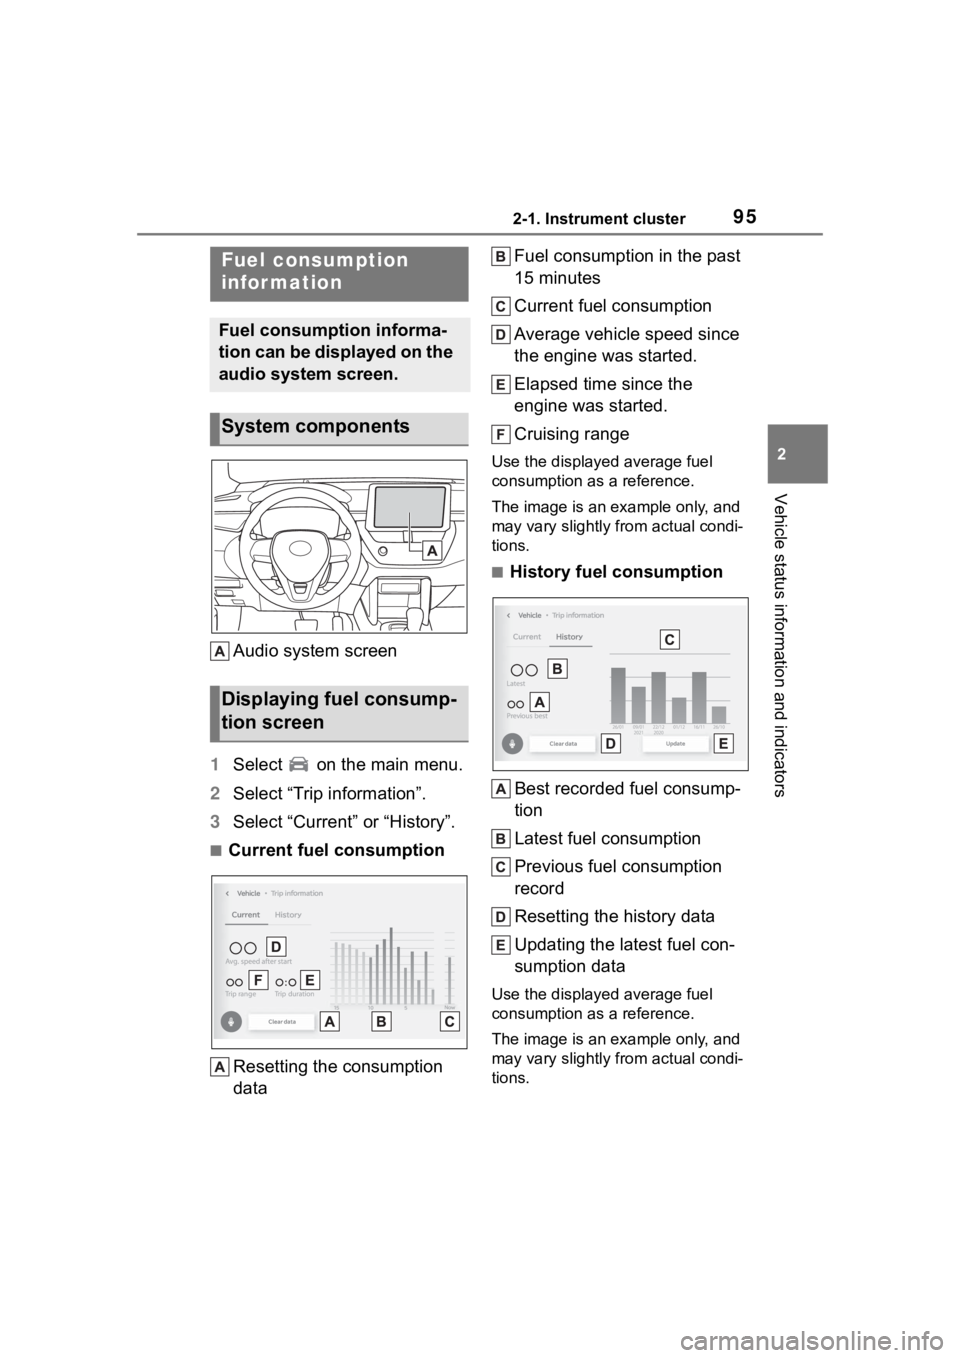
Audio system screen
1 Select on the main menu.
2 Select “Trip information”.
3 Select “Current” or “History”.
■Current fuel consumption
Resetting the consumption
data Fuel consumption in the past
15 minutes
Current fuel consumption
Average vehicle speed since
the engine was started.
Elapsed time since the
engine was started.
Cruising range
Use the displayed average fuel
consumption as a reference.
The image is an example only, and
may vary slightly from actual condi-
tions.
■History fuel consumption
Best recorded fuel consump-
tion
Latest fuel consumption
Previous fuel consumption
record
Resetting the history data
Updating the latest fuel con-
sumption data
Use the displayed average fuel
consumption as a reference.
The image is an example only, and
may vary slightly from actual condi-
tions.
Fuel consumption
infor mation
Fuel consumption informa-
tion can be displayed on the
audio system screen.
System components
Displaying fuel consump-
tion screen
Page 96 of 500

962-1. Instrument cluster
■Updating the history data
Update the latest fuel consumption
by selecting “Upda te” to measure
the current fuel consumption again.
■Resetting the data
The fuel consumption data can be
deleted by selecting “Clear data”.
■Cruising range
Displays the estimated maximum
distance that can be driven with the
quantity of fuel remaining.
This distance is computed based on
your average fuel consumption.
As a result, the actual distance that
can be driven may differ from that
displayed.
Page 165 of 500

1654-2. Driving procedures
4
Driving
1Stop the vehicle completely.
2 Set the parking brake
( P.172), and shift the shift
lever to P.
Check the parking brake indicator
is illuminated.
Do not press the shift lever button
after shifting the shit position to P.
3 Press the engine switch.
The engine will stop, and the meter
display will be extinguished.
4Release the brake pedal and
check that “ACCESSORY” or
“IGNITION ON” is not shown
on the multi-information dis-
p l a y.
■Automatic engine shut off fea-
ture
●The vehicle is equipped with a
feature that automatically shuts off
the engine when the shift lever is
in P with the engine running for an
extended period.
●The engine will automatically shut
off after approximately 1 hour if it
has been left running while the
shift lever is in P.
●The timer for the automatic engine
shut off feature will reset if the
brake pedal is depre ssed or if the shift lever is in a position other
than P.
●After the vehicle
is parked, if the
door is locked with the door lock
switch ( P.107) from the inside or
the mechanical key (P.417) from
the outside, the automatic engine
shut off feature will be disabled.
The timer for the automatic engine
shut off feature will be re-enabled
if the driver’s door is opened.
NOTICE
■Symptoms indicating a mal-
function with the engine
switch
If the engine switch seems to be
operating somewh at differently
than usual, such as the switch
sticking slightly, there may be a
malfunction. Contact your Toyota
dealer immediately.
Stopping the engineWARNING
■Stopping the engine in an
emergency
●If you want to stop the engine in
an emergency while driving the
vehicle, press and hold the
engine switch for more than 2
seconds, or press it briefly 3
times or more in succession.
(
P.382)
However, do not touch the
engine switch while driving
except in an emergency. Turn-
ing the engine off while driving
will not cause loss of steering or
braking control, but the power
assist to these systems will be
lost. This will make it more diffi-
cult to steer and brake, so you
should pull over and stop the
vehicle as soon as it is safe to
do so.
●If the engine switch is operated
while the vehicle is running, a
warning message will be shown
on the multi-information display
and a buzzer sounds.
●To restart the engine after per-
forming an emergency shut-
down, shift the shift lever to N
and then press the engine
switch.
Page 335 of 500
3356-2. Maintenance
6
Maintenance and care
■Resetting the message indicat-
ing maintenance is required
After the required maintenance is
performed according to the mainte-
nance schedule, please reset the
message.
To reset the messa ge, follow the
procedure described below:
4.2-inch display
1 Press or of the meter
control switch to select .
2 Press or to select “Vehi-
cle Settings” and then press and
hold .
3 Press or to select
“Scheduled Maintenance” and
then press .
4 Press or to select “Yes”
and then press .
A message will be displayed on the
multi-information display when the
reset procedure has been com-
pleted.
7-inch display
1 Press or of the meter
control switch to select .
2 Press or to select “Vehi-
cle Settings” and then press and
hold .
3 Press or to select
“Scheduled Maintenance” and
then press .
4 Press or to select “Yes”
and then press .
A message will be displayed on the
multi-information display when the
reset procedure has been com-
pleted.
You can perform some mainte-
nance procedures by yourself.
Please be aware that do-it-your-
self maintenance may affect
warranty coverage.
The use of Toyota repair manuals is
recommended.
For details about warranty cover-
age, refer to the separate “Owner’s
Warranty Informat ion Booklet” or
“Owner’s Manual Supplement”.
Do-it-yourself mainte-
nance
Page 358 of 500
3586-3. Do-it-yourself maintenance
ization when initialization is not
necessary, adjust the tire inflation
pressure to the specified level
when the tires are cold, and con-
duct initialization again.
●While the position of each tire is
being determined and the inflation
pressures are not being displayed
on the multi-information display, if
the inflation pres sure of a tire
drops, the tire pressure warning
light will come on.
■If the tire pressure warning sys-
tem is not initialized properly
●In the following situations, initial-
ization may take longer than usual
to be completed or may not be
possible. Normally, initialization
completes within approximately
30 minutes.
• Vehicle is not driven at approxi- mately 25 mph ( 40 km/h) or more
• Vehicle is driven on unpaved
roads
• Vehicle is driven near other vehi- cles and system cannot recog-
nize tire pressure warning valve
and transmitters of your vehicle
over those of other vehicles.
• If the vehicle is driven in heavy traffic or another situation where
other vehicles are driven close by,
it may take time for the system to
recognize the tire pressure warn-
ing valve and tran smitters of your
vehicle over those of other vehi-
cles.
●If initialization does not complete
after driving for 1 hour or more,
park the vehicle in a safe place for
approximately 20 minutes and
then drive the vehicle again.
●If the vehicle is reversed during
initialization, the data up to that
point is reset, so perform the ini-
tialization procedure again from
the beginning.
●In the following situations, initial-
ization will not be started or was
not completed properly and the
system will not operate properly. Perform the initialization proce-
dure again.
• If, when attempting to start initial-
ization, the tire pressure warning
light does not blink 3 times.
• If, when the veh icle has been
driven for about 20 minutes after
performing initialization, the tire
pressure warning light blinks for
approximately 1 minute and then
illuminates.
●If the inflation pr essure of each
tire is still not displayed, have the
vehicle inspected by your Toyota
dealer.
Every tire pressure warning
valve and transmitter has a
unique ID code. When replacing
a tire pressure warning valve
and transmitter, it is necessary
to register the ID code.
When registering the ID codes,
perform the following procedure.
1 Park the vehicle in a safe
place, wait for approximately
20 minutes, and then start
the engine.
WARNING
■When initializing the tire pres-
sure warning system
Do not initializing tire inflation
pressure without f irst adjusting
the tire inflation pressure to the
specified level. Otherwise, the tire
pressure warning light may not
come on even if the tire inflation
pressure is low, or it may come on
when the tire inflation pressure is
actually normal.
Registering ID codes
Page 360 of 500

3606-3. Do-it-yourself maintenance
tire will be displayed on the
multi-information display.
Even if the vehicle is not driven at
approximately 25 mph (40 km/h) or
more, registration can be com-
pleted by driving for a long time.
However, if regist ration does not
complete after driving for 1 hour or
more, perform the procedure again
from the beginning.
9 Initialize the tire pressure
warning system. ( P.356)
■When registering ID codes
●ID code registration is performed
while driving at a vehicle speed of
approximately 25 mph (40 km/h)
or more.
●Before performin g ID code regis-
tration, make sure that no wheels
with tire pressur e warning valve
and transmitters installed are near
the vehicle.
●Make sure to initialize the tire
pressure warning system after
registering the ID codes. If the
system is initializ ed before regis-
tering the ID codes, the initialized
values will be invalid.
●ID codes can be registered by
yourself, but depending on the
driving conditions and driving
environment, registration may
take some time to complete.
●As the tires will be warm when
registration is completed, make
sure to allow the tires to cool
before performing initialization.
■Canceling ID code registration
●To cancel ID code registration
after it has been started, select
“Identify Wheel” o n the multi-infor-
mation display and press and hold
again.
●If ID code registration has been
canceled, the tire pressure warn-
ing light will blink for approxi-
mately 1 minute when the engine switch is turned to ON and then
illuminate. The tire pressure warn-
ing system will be operational
when the tire pressure warning
light turns off.
●If the warning lig
ht does not turn
off even after several minutes
have elapsed, ID code registration
may not have been canceled cor-
rectly. To cancel registration, per-
form the ID code registration start
procedure again and then turn the
engine switch off before driving.
■If ID codes are not registered
properly
In the following situations, ID code
registration may take longer than
usual to be completed or may not be
possible. Normally, registration com-
pletes within appr oximately 30 min-
utes.
●Vehicle is not parked for approxi-
mately 20 minutes or more before
driving
●Vehicle is not driven at approxi-
mately 25 mph (40 km/h) or more
●Vehicle is driven on unpaved
roads
●Vehicle is driven near other vehi-
cles and system cannot recog-
nize tire pressure warning valve
and transmitters o f your vehicle
over those of other vehicles
●Wheel with tire p ressure warning
valve and transmitter installed is
inside or near the vehicle
If registration does not complete
after driving for 1 hour or more, per-
form the ID code registration proce-
dure again from the beginning.
●If the vehicle is reversed during
registration, the data up to that
point is reset, so p erform the reg-
istration procedure again from the
beginning.
●In the following situations, ID code
registration will not be started or
was not completed properly and
the system will not operate prop-