Page 290 of 449

2906-1. Maintenance and care
NOTICE
• If liquids such as benzene and gasoline are spilled on the paint
surface
●If the paint is chipped or
scratched, have it repaired
immediately.
●To prevent the wheels from cor-
roding, remove any dirt and
store in a place with low humid-
ity when storing the wheels.
■Protective film for side sill
plates (if equipped)
Make sure to remove the protec-
tive film. Failure to do so may
cause rust, depending on condi-
tions.
■Cleaning the exterior lights
●Wash carefully. Do not use
organic substances or scrub
with a hard brush. This may
damage the surfaces of the
lights.
●Do not apply wax to the sur-
faces of the lights.
Wax may cause damage to the
lenses.
■To prevent damage to the
windshield wiper arms
When lifting the wiper arms away
from the windshield, pull the driver
side wiper arm upward first, and
repeat for the passenger side.
When returning the wipers to their
original position, do so from the
passenger side first.
■When using a high pressure
car wash
●When washing the vehicle, do
not spray the came ra or its sur-
rounding area directly with a
high pressure washer. Shock
applied from high pressure
water may cause the device to
not operate normally.
●Do not bring the nozzle tip close
to boots (rubber or resin manu-
factured cover), connectors or
the following parts. The parts
may be damaged if they come
into contact with high-pressure
water.
• Traction related parts
• Suspension parts
• Steering parts
• Brake parts
●Keep the cleaning nozzle at
least 11.9 in. (30 cm) away from
the vehicle body. Otherwise
resin section, s uch as moldings
and bumpers, may be deformed
and damaged.
Also, do not continuously hold the
nozzle in the same place.
●Do not spray the lower part of
the windshield continuously.
If water enters the air conditioning
system intake located near the
lower part of the windshield, the
air conditioning system may not
operate correctly.
●Do not wash the underside of
the vehicle using a high pres-
sure car washer.
Page 297 of 449
2976-2. Maintenance
6
Maintenance and care
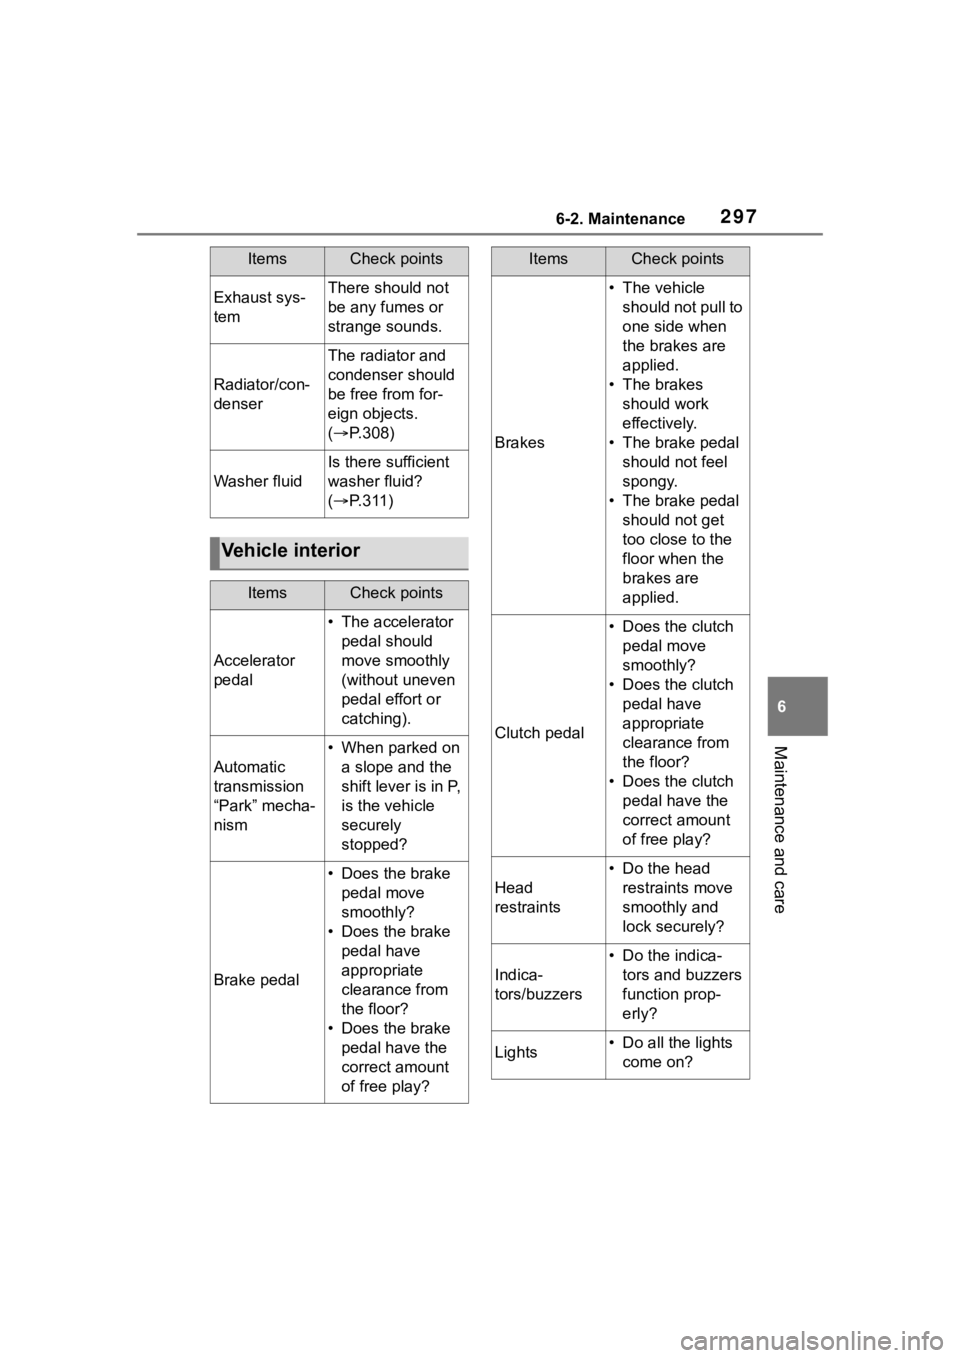
Exhaust sys-
temThere should not
be any fumes or
strange sounds.
Radiator/con-
denser
The radiator and
condenser should
be free from for-
eign objects.
( P.308)
Washer fluid
Is there sufficient
washer fluid?
( P.311)
Vehicle interior
ItemsCheck points
Accelerator
pedal
• The accelerator
pedal should
move smoothly
(without uneven
pedal effort or
catching).
Automatic
transmission
“Park” mecha-
nism
• When parked on a slope and the
shift lever is in P,
is the vehicle
securely
stopped?
Brake pedal
• Does the brake pedal move
smoothly?
• Does the brake pedal have
appropriate
clearance from
the floor?
• Does the brake pedal have the
correct amount
of free play?
ItemsCheck points
Brakes
• The vehicle should not pull to
one side when
the brakes are
applied.
• The brakes should work
effectively.
• The brake pedal should not feel
spongy.
• The brake pedal should not get
too close to the
floor when the
brakes are
applied.
Clutch pedal
• Does the clutch pedal move
smoothly?
• Does the clutch pedal have
appropriate
clearance from
the floor?
• Does the clutch pedal have the
correct amount
of free play?
Head
restraints
• Do the head restraints move
smoothly and
lock securely?
Indica-
tors/buzzers
• Do the indica-tors and buzzers
function prop-
erly?
Lights• Do all the lights come on?
ItemsCheck points
Page 331 of 449
3316-3. Do-it-yourself maintenance
6
Maintenance and care
using the pullout tool.
4Check if the fuse is blown.
Type A and B:
Replace the blown fuse with a new
fuse of an appropriate amperage
rating. The amperage rating can be
found on the fuse box lid.
Type C:
Contact your Toyota dealer.
Ty p e A
Normal fuse
Blown fuse
Ty p e BNormal fuse Blown fuse
Type C
Normal fuse
Blown fuse
■After a fuse is replaced
●If the lights do not turn on even
after the fuse has been replaced,
a bulb may need replacement.
●If the replaced fuse blows again,
have the vehicle inspected by
your Toyota dealer.
■If there is an ove rload in a cir-
cuit
The fuses are designed to blow, pro-
tecting the wiring harness from
damage.
■When replacing light bulbs
Toyota recommends that you use
genuine Toyota pr oducts designed
for this vehicle.
Because certain bulbs are con-
nected to circuits designed to pre-
vent overload, non-genuine parts or
parts not designed for this vehicle
may be unusable.
A
A
A
Page 333 of 449
3336-3. Do-it-yourself maintenance
6
Maintenance and care
1Using a Phillips-head screw-
driver, turn bolt A in either
direction.
Remember the turning direction
and the number of turns.
2Turn bolt B the same number
of turns and in the same
direction as step 1.
If the headlight cannot be adjusted
using this procedure, take the vehi-
cle to your Toyota dealer to adjust
the headlight aim.
Check the wattage of the light
bulb to be replaced. ( P.387)
Back-up light
■Bulbs that need to be
replaced by your Toyota
dealer
Headlights
Parking lights/daytime run-
ning lights
Front turn signal lights
Side marker lights
Stop/tail lights
Adjusting the headlight
aimLight bulbs
You may replace the follow-
ing bulbs by yourself. The
difficulty level of replace-
ment varies depending on
the bulb. If necessary bulb
replacement seems difficult
to perform, contact your
Toyota dealer.
Preparing for light bulb
replacement
Bulb locations
A
Page 334 of 449
3346-3. Do-it-yourself maintenance
Rear turn signal lights
High mounted stoplight
License plate lights
Door courtesy lights (if
equipped)
■LED light bulbs
The lights other than the back-up
light each consist of a number of
LEDs. If any of the LEDs burn out,
take your vehicle to your Toyota
dealer to have the light replaced.
■Condensation build-up on the
inside of the lens
Temporary condensation build-up
on the inside of the headlight lens
does not indicate a malfunction.
Contact your Toyota dealer for more
information in the following situa-
tions:
●Large drops of water have built up
on the inside of the lens.
●Water has built up inside the
headlight.
■When replacing light bulbs
P. 3 3 1
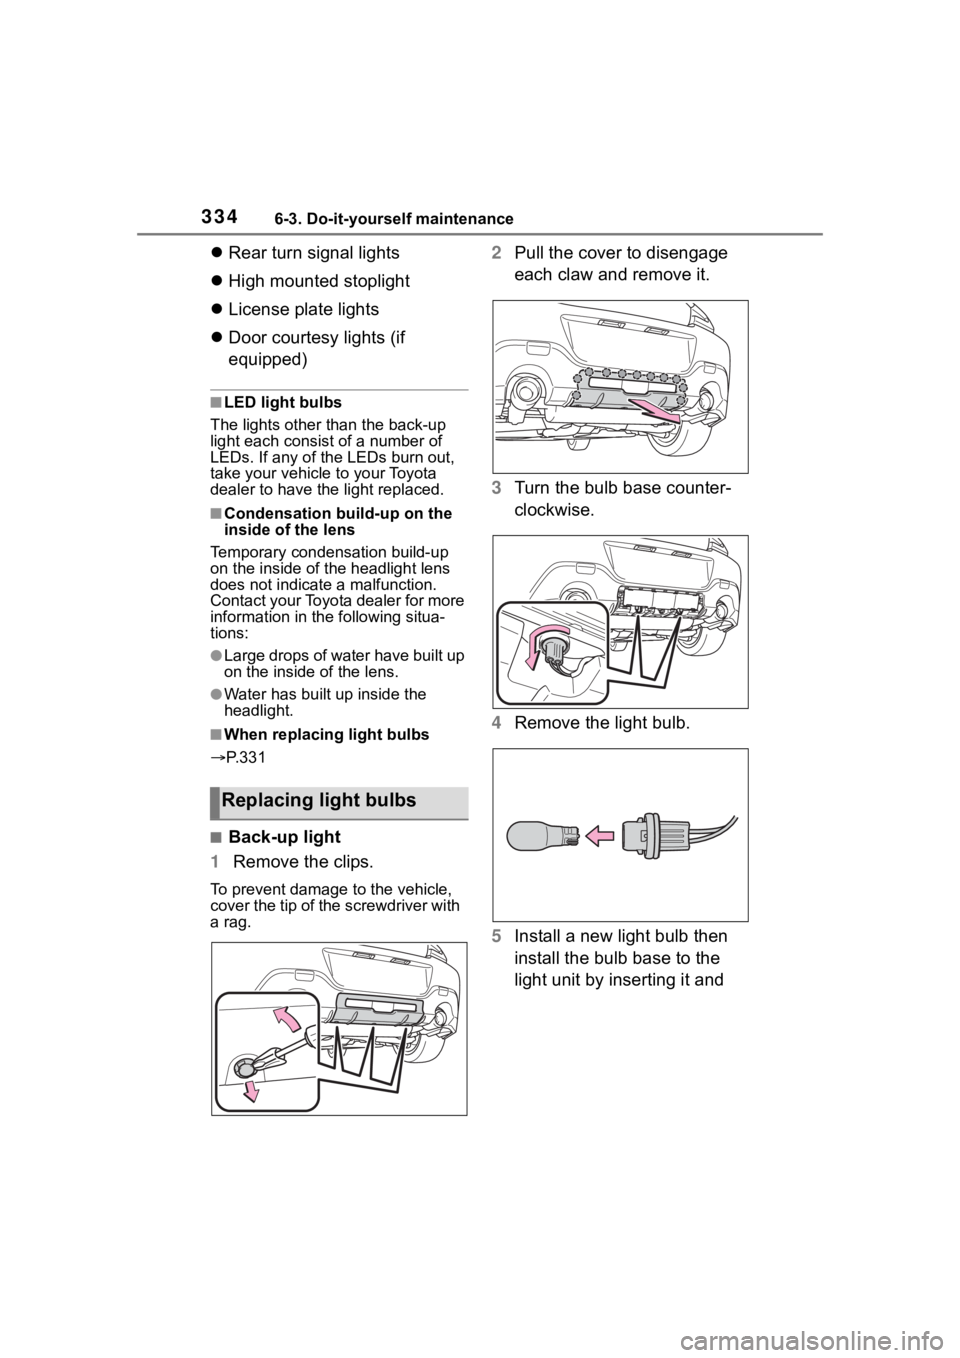
■Back-up light
1 Remove the clips.
To prevent damage to the vehicle,
cover the tip of the screwdriver with
a rag.
2Pull the cover to disengage
each claw and remove it.
3 Turn the bulb base counter-
clockwise.
4 Remove the light bulb.
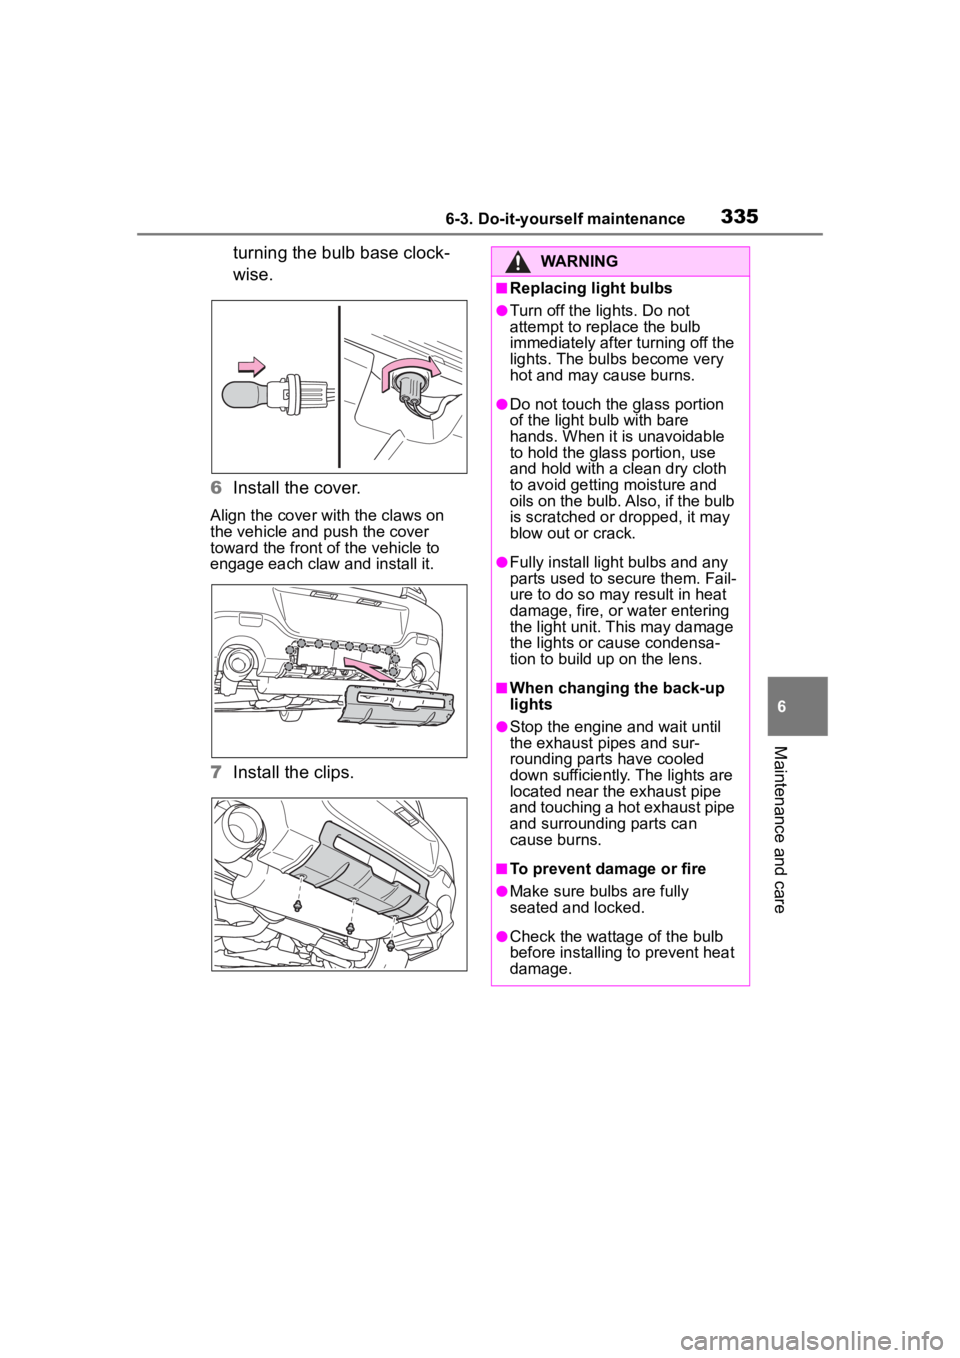
5 Install a new light bulb then
install the bulb base to the
light unit by inserting it and
Replacing light bulbs
Page 335 of 449
3356-3. Do-it-yourself maintenance
6
Maintenance and care
turning the bulb base clock-
wise.
6 Install the cover.
Align the cover with the claws on
the vehicle and push the cover
toward the front of the vehicle to
engage each claw and install it.
7Install the clips.
WARNING
■Replacing light bulbs
●Turn off the lights. Do not
attempt to replace the bulb
immediately after turning off the
lights. The bulbs become very
hot and may cause burns.
●Do not touch the glass portion
of the light bulb with bare
hands. When it is unavoidable
to hold the glass portion, use
and hold with a clean dry cloth
to avoid getting moisture and
oils on the bulb. Also, if the bulb
is scratched or dropped, it may
blow out or crack.
●Fully install light bulbs and any
parts used to secure them. Fail-
ure to do so may result in heat
damage, fire, or water entering
the light unit. This may damage
the lights or cause condensa-
tion to build up on the lens.
■When changing the back-up
lights
●Stop the engine and wait until
the exhaust pi pes and sur-
rounding parts have cooled
down sufficiently. The lights are
located near the exhaust pipe
and touching a hot exhaust pipe
and surrounding parts can
cause burns.
■To prevent damage or fire
●Make sure bulbs are fully
seated and locked.
●Check the wattage of the bulb
before installing to prevent heat
damage.
Page 338 of 449
3387-1. Essential information
7-1.Essential information
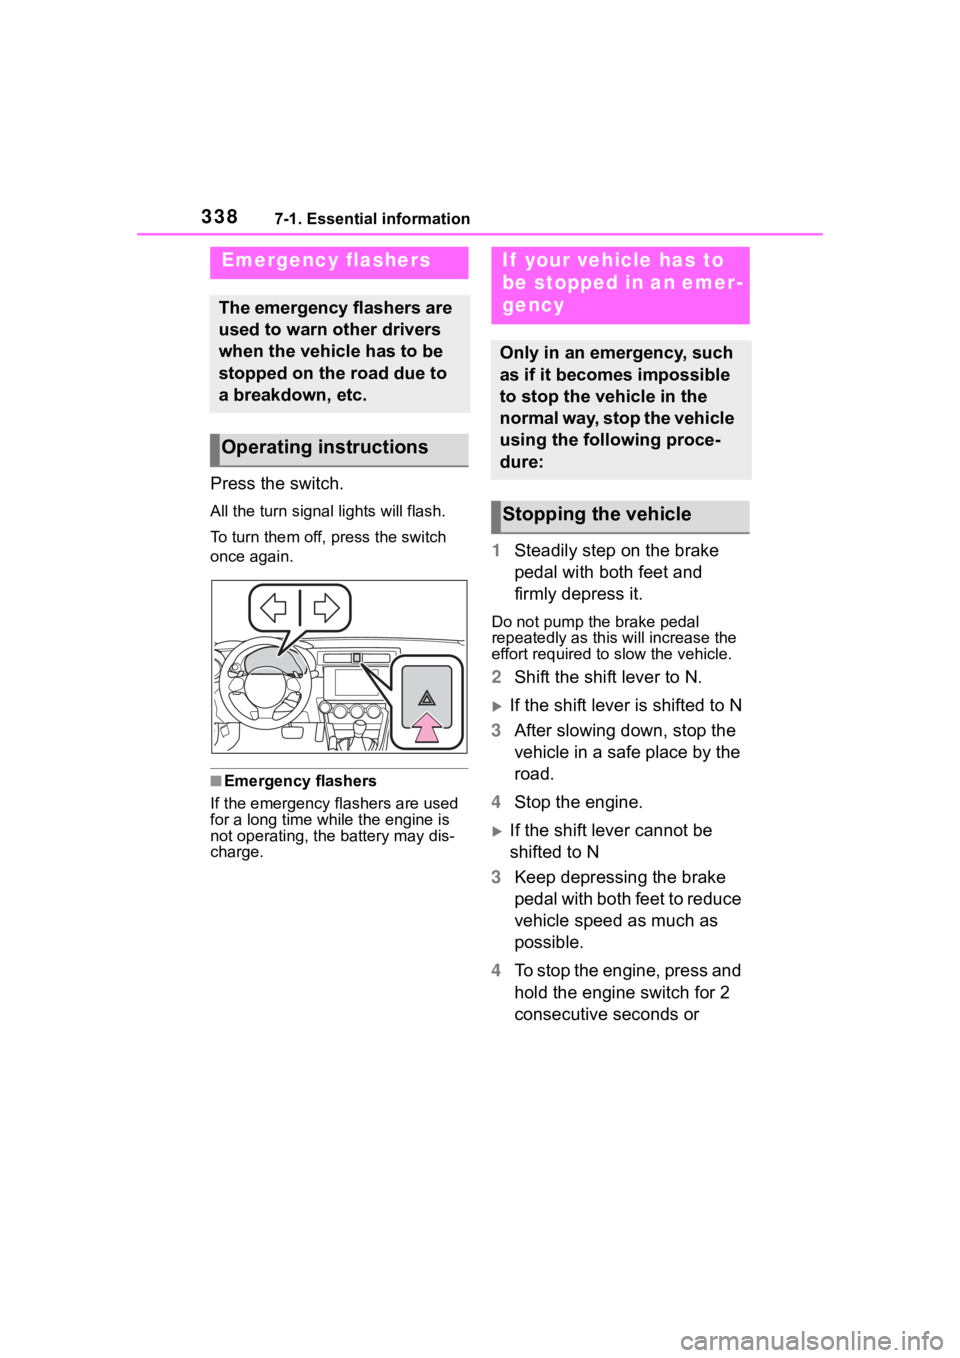
Press the switch.
All the turn signal lights will flash.
To turn them off, press the switch
once again.
■Emergency flashers
If the emergency fl ashers are used
for a long time while the engine is
not operating, the battery may dis-
charge.
1 Steadily step on the brake
pedal with both feet and
firmly depress it.
Do not pump the brake pedal
repeatedly as this will increase the
effort required to slow the vehicle.
2Shift the shift lever to N.
If the shift lever is shifted to N
3 After slowing down, stop the
vehicle in a safe place by the
road.
4 Stop the engine.
If the shift lever cannot be
shifted to N
3 Keep depressing the brake
pedal with both feet to reduce
vehicle speed as much as
possible.
4 To stop the engine, press and
hold the engine switch for 2
consecutive seconds or
Emergency flashers
The emergency flashers are
used to warn other drivers
when the vehicle has to be
stopped on the road due to
a breakdown, etc.
Operating instructions
If your vehicle has to
be stopped in an emer-
gency
Only in an emergency, such
as if it becomes impossible
to stop the vehicle in the
normal way, stop the vehicle
using the following proce-
dure:
Stopping the vehicle
Page 348 of 449
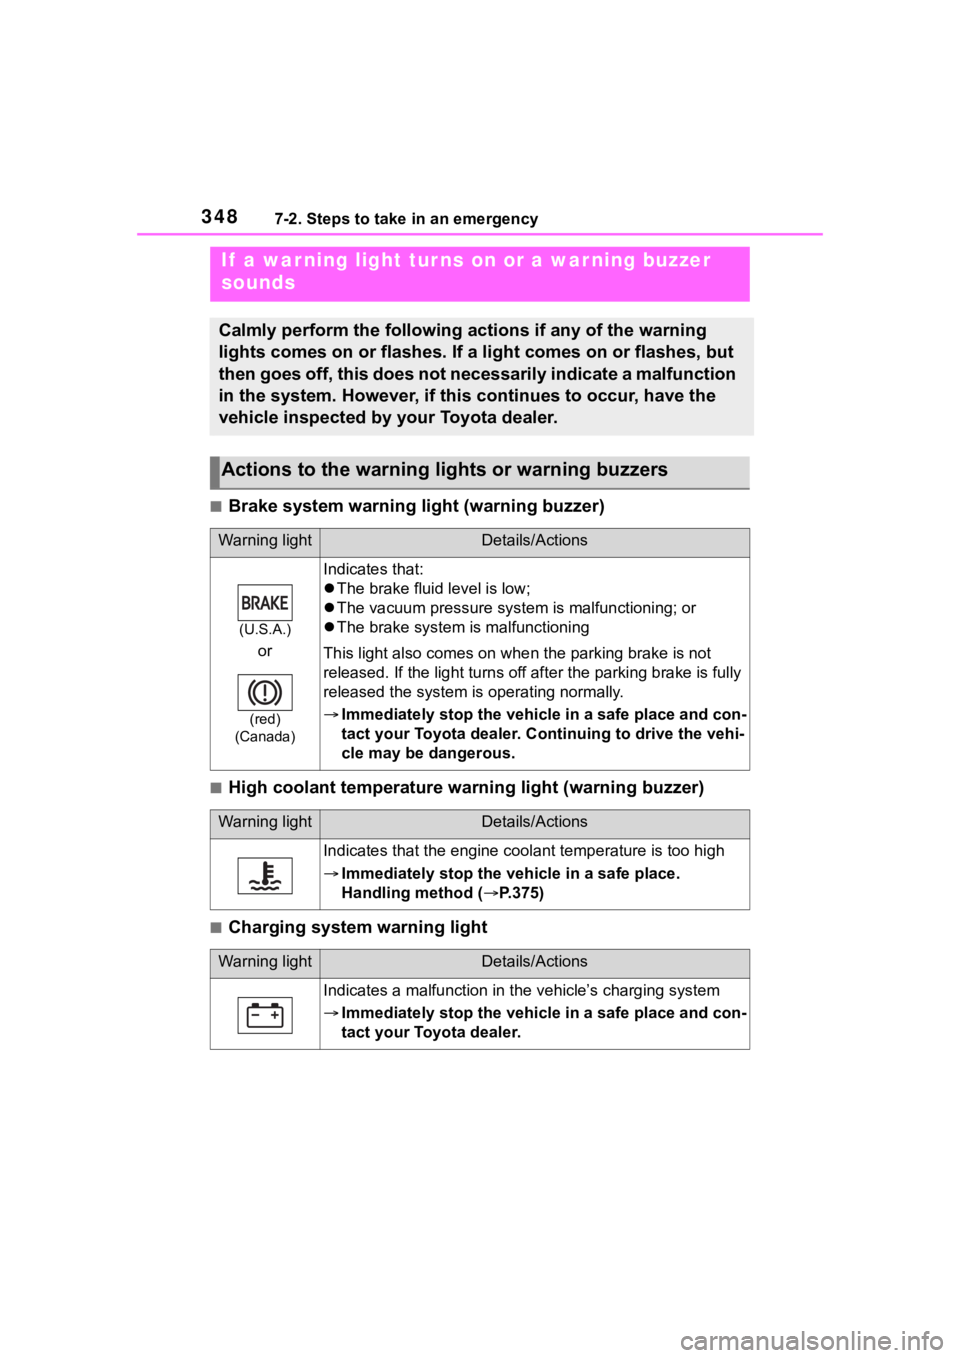
3487-2. Steps to take in an emergency
■Brake system warning light (warning buzzer)
■High coolant temperature warning light (warning buzzer)
■Charging system warning light
If a war ning light tur ns on or a war ning buzzer
sounds
Calmly perform the following actions if any of the warning
lights comes on or flashes. If a light comes on or flashes, but
then goes off, this does not necessarily indicate a malfunction
in the system. However, if this continues to occur, have the
vehicle inspected by your Toyota dealer.
Actions to the warning lights or warning buzzers
Warning lightDetails/Actions
(U.S.A.)
or
(red)
(Canada)
Indicates that:
The brake fluid level is low;
The vacuum press ure system is malfunctioning; or
The brake system is malfunctioning
This light also comes on whe n the parking brake is not
released. If the light turns off after the parking brake is ful ly
released the system is operating normally.
Immediately stop the vehicle in a safe place and con-
tact your Toyota dealer. Continuing to drive the vehi-
cle may be dangerous.
Warning lightDetails/Actions
Indicates that the engine coolant temperature is too high
Immediately stop the vehicle in a safe place.
Handling method ( P.375)
Warning lightDetails/Actions
Indicates a malfunction in the vehicle’s charging system
Immediately stop the vehicle in a safe place and con-
tact your Toyota dealer.