Page 70 of 449

701-2. Child safety
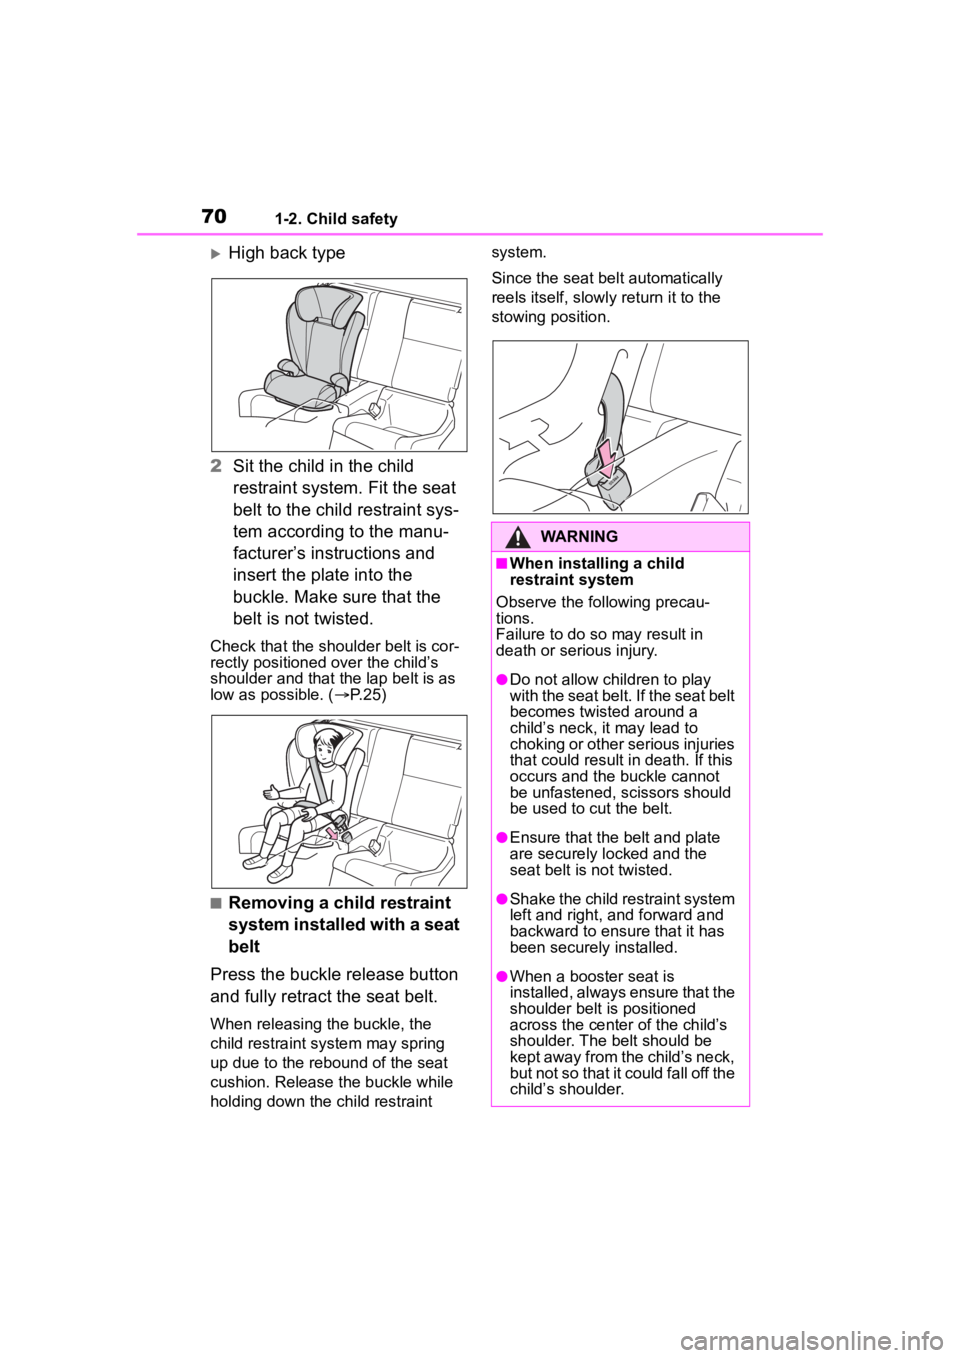
High back type
2 Sit the child in the child
restraint system. Fit the seat
belt to the child restraint sys-
tem according to the manu-
facturer’s instructions and
insert the plate into the
buckle. Make sure that the
belt is not twisted.
Check that the shoulder belt is cor-
rectly positioned over the child’s
shoulder and that the lap belt is as
low as possible. ( P.25)
■Removing a child restraint
system installed with a seat
belt
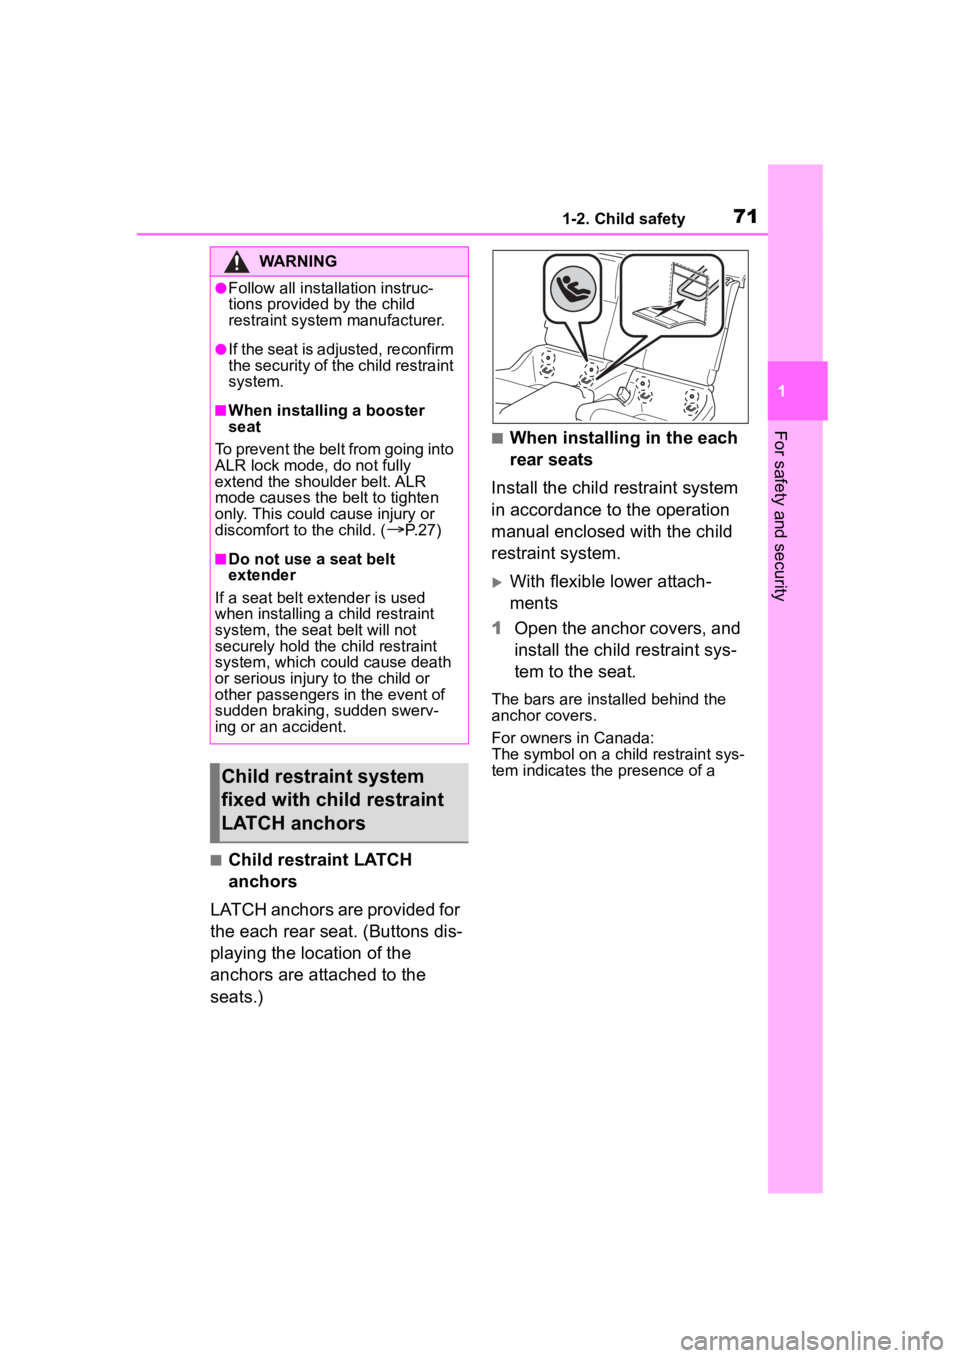
Press the buckle release button
and fully retract the seat belt.
When releasing the buckle, the
child restraint system may spring
up due to the rebound of the seat
cushion. Release the buckle while
holding down the child restraint system.
Since the seat belt automatically
reels itself, slowly return it to the
stowing position.
WARNING
■When installing a child
restraint system
Observe the following precau-
tions.
Failure to do so may result in
death or serious injury.
●Do not allow children to play
with the seat belt. If the seat belt
becomes twisted around a
child’s neck, it may lead to
choking or other serious injuries
that could result in death. If this
occurs and the buckle cannot
be unfastened, scissors should
be used to cut the belt.
●Ensure that the belt and plate
are securely locked and the
seat belt is not twisted.
●Shake the child restraint system
left and right, and forward and
backward to ensure that it has
been securely installed.
●When a booster seat is
installed, always ensure that the
shoulder belt is positioned
across the center of the child’s
shoulder. The belt should be
kept away from the child’s neck,
but not so that it could fall off the
child’s shoulder.
Page 71 of 449

711-2. Child safety
1
For safety and security
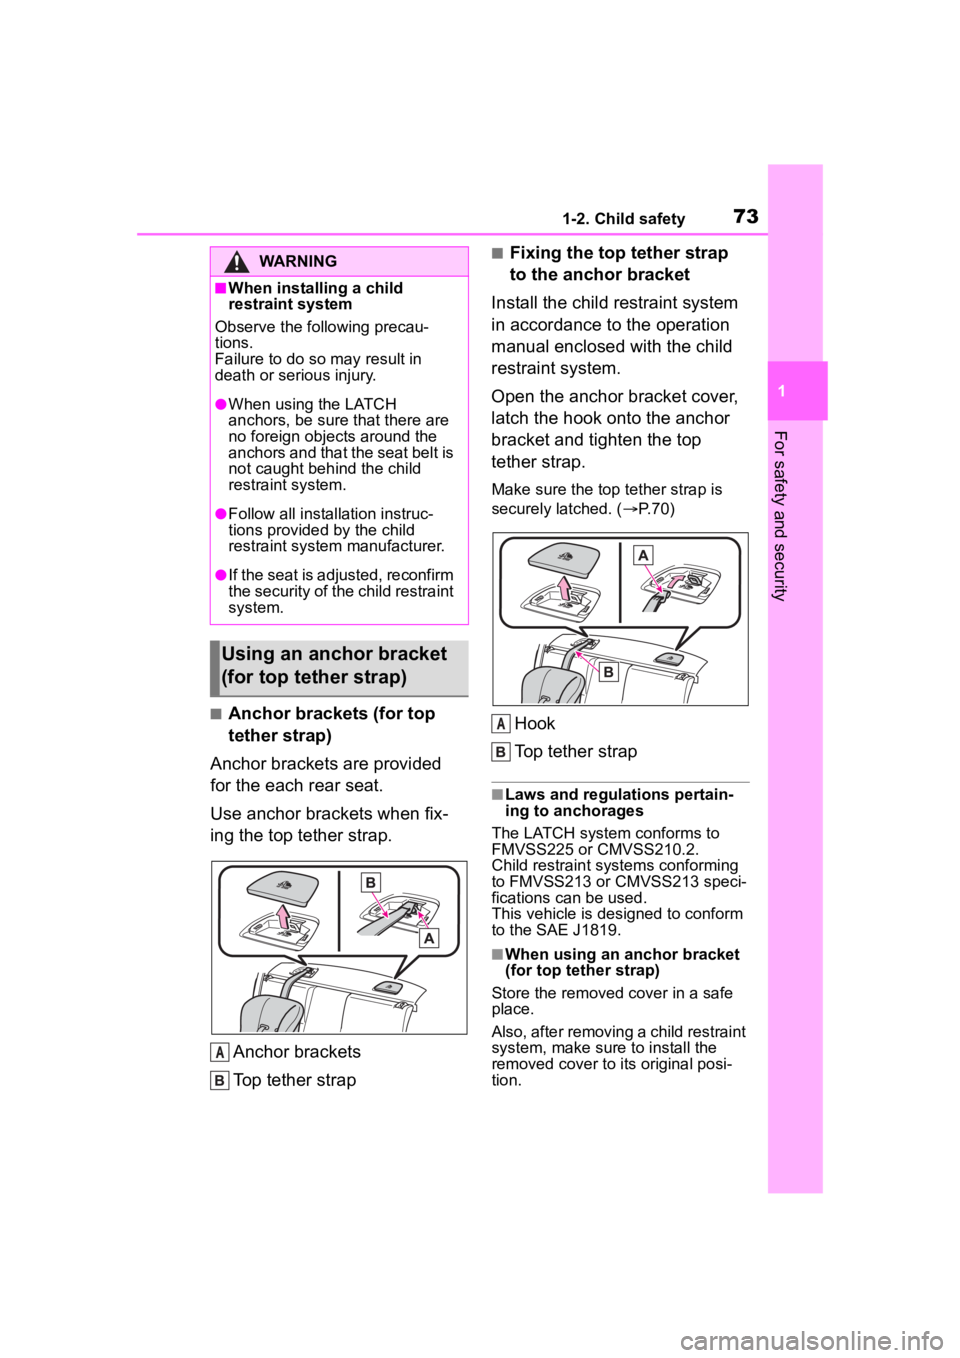
■Child restraint LATCH
anchors
LATCH anchors are provided for
the each rear seat. (Buttons dis-
playing the location of the
anchors are attached to the
seats.)
■When installing in the each
rear seats
Install the child restraint system
in accordance to the operation
manual enclosed with the child
restraint system.
With flexible lower attach-
ments
1 Open the anchor covers, and
install the child restraint sys-
tem to the seat.
The bars are installed behind the
anchor covers.
For owners in Canada:
The symbol on a child restraint sys-
tem indicates the presence of a
WARNING
●Follow all installation instruc-
tions provided by the child
restraint system manufacturer.
●If the seat is adjusted, reconfirm
the security of the child restraint
system.
■When installing a booster
seat
To prevent the belt from going into
ALR lock mode, do not fully
extend the shoulder belt. ALR
mode causes the belt to tighten
only. This could cause injury or
discomfort to the child. (
P. 2 7 )
■Do not use a seat belt
extender
If a seat belt extender is used
when installing a child restraint
system, the seat belt will not
securely hold the child restraint
system, which could cause death
or serious injury to the child or
other passengers in the event of
sudden braking, sudden swerv-
ing or an accident.
Child restraint system
fixed with child restraint
LATCH anchors
Page 73 of 449

731-2. Child safety
1
For safety and security
■Anchor brackets (for top
tether strap)
Anchor brackets are provided
for the each rear seat.
Use anchor brackets when fix-
ing the top tether strap.
Anchor brackets
Top tether strap
■Fixing the top tether strap
to the anchor bracket
Install the child restraint system
in accordance to the operation
manual enclosed with the child
restraint system.
Open the anchor bracket cover,
latch the hook onto the anchor
bracket and tighten the top
tether strap.
Make sure the top tether strap is
securely latched. ( P. 7 0 )
Hook
Top tether strap
■Laws and regulations pertain-
ing to anchorages
The LATCH system conforms to
FMVSS225 or CMVSS210.2.
Child restraint systems conforming
to FMVSS213 or CMVSS213 speci-
fications can be used.
This vehicle is designed to conform
to the SAE J1819.
■When using an anchor bracket
(for top tether strap)
Store the removed cover in a safe
place.
Also, after removing a child restraint
system, make sure to install the
removed cover to its original posi-
tion.
WARNING
■When installing a child
restraint system
Observe the following precau-
tions.
Failure to do so m ay result in
death or serious injury.
●When using the LATCH
anchors, be sure that there are
no foreign objects around the
anchors and that the seat belt is
not caught behind the child
restraint system.
●Follow all installation instruc-
tions provided by the child
restraint system manufacturer.
●If the seat is adjusted, reconfirm
the security of the child restraint
system.
Using an anchor bracket
(for top tether strap)
A
A
Page 74 of 449
741-2. Child safety
WARNING
■When installing a child
restraint system
Observe the following precau-
tions.
Failure to do so m ay result in
death or serious injury.
●Firmly attach t he top tether
strap and make sure that the
belt is not twisted.
●Do not attach the top tether
strap to anything other than the
anchor bracket.
●Follow all installation instruc-
tions provided by the child
restraint system manufacturer.
●If the seat is adjusted, reconfirm
the security of the child restraint
system.
Page 83 of 449
83
2
2
Vehicle status information and indicators
Vehicle status informationand indicators
.2-1. Instrument cluster
Warning lights and indica-tors ............................... 84
Gauges and meters ....... 88
Multi-information display ..................................... 93
Page 84 of 449
842-1. Instrument cluster
2-1.Instrument cluster
For the purpose of explanation, the following illustrations display all
warning lights and indicators illuminated.
Warning lights inform the driver
of malfunctions in the indicated
vehicle systems.
War ning lights and indicators
The warning lights and indicators on the instrument cluster
and overhead console inform the driver of the status of the
vehicle’s various systems.
Warning lights and indicators displayed on the instru-
ment cluster
Warning lights
(U.S.A.)
Brake system warning
light
*1 ( P.348)
(Canada)
Brake system warning
light
*1 ( P.348)
(red)
High coolant temperature
warning light
*1 ( P.348)
Charging system warning
light
*1 ( P.348)
Low engine oil pressure
warning light
*1 ( P.349)
(U.S.A.)
Malfunction indicator
lamp
*1 ( P.349)
(Canada)
Malfunction indicator
lamp
*1 ( P.349)
SRS warning light
*1
( P.54, 349)
(U.S.A.)
ABS warning light*1
( P.349)
Page 85 of 449

852-1. Instrument cluster
2
Vehicle status information and indicators
*1: These lights turn on when the
engine switch is turned to ON to
indicate that a system check is
being performed. They will turn
off after the engine is started, or
after a few seconds. There may
be a malfunction in a system if a
light does not come on, or turn
off. Have the vehicle inspected
by your Toyota dealer.
*2: The front passenger’s seat belt reminder light is located on the
overhead console.
*3: This light illuminates on the over-head console.
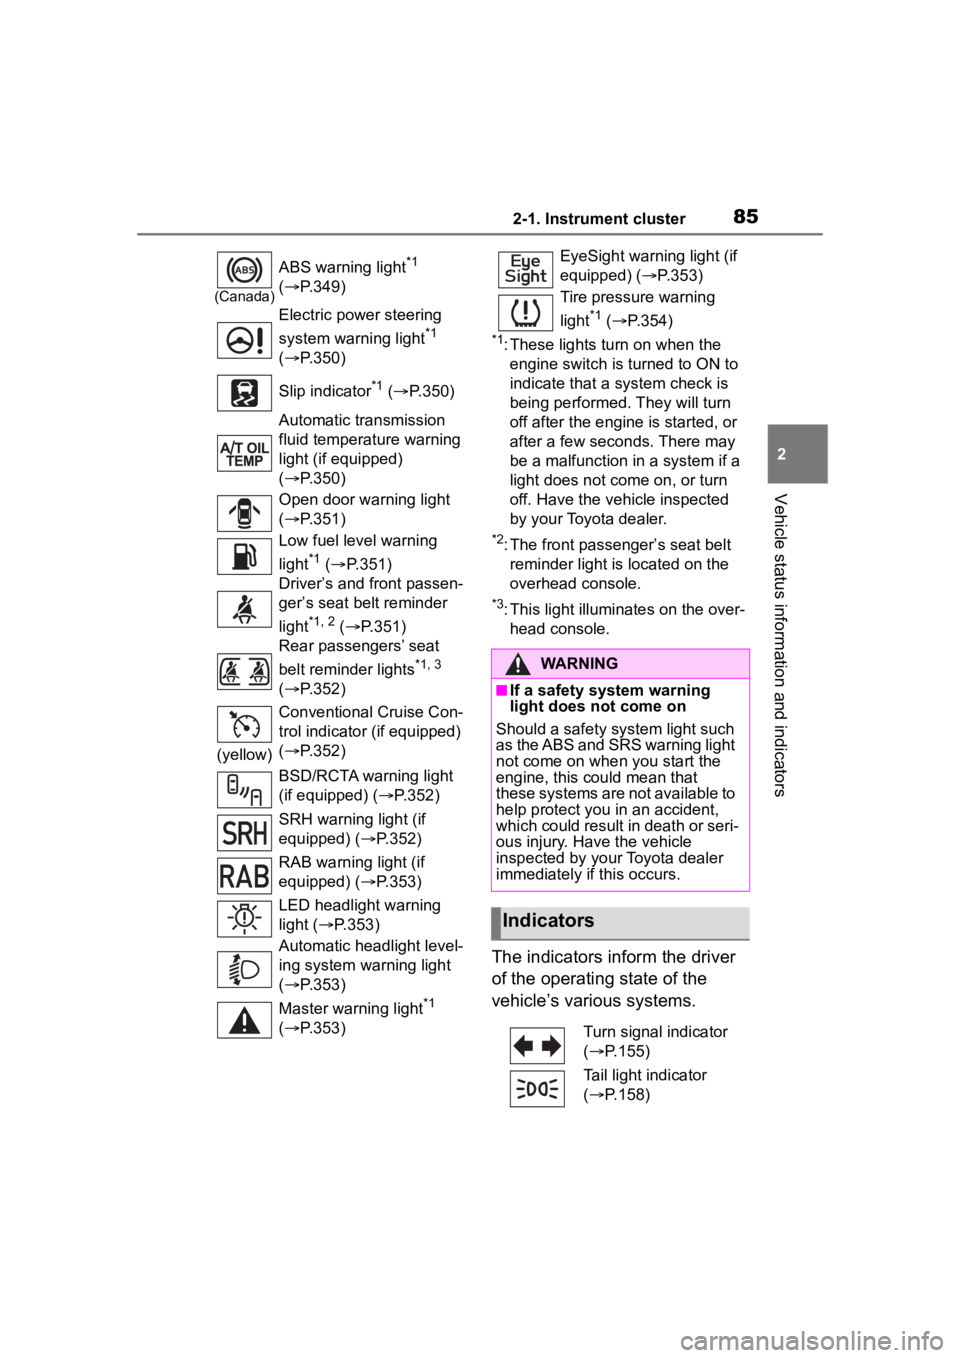
The indicators inform the driver
of the operating state of the
vehicle’s various systems.
(Canada)
ABS warning light*1
( P.349)
Electric power steering
system warning light
*1
( P.350)
Slip indicator
*1 ( P.350)
Automatic transmission
fluid temperature warning
light (if equipped)
( P.350)
Open door warning light
( P.351)
Low fuel level warning
light
*1 ( P.351)
Driver’s and front passen-
ger’s seat belt reminder
light
*1, 2 ( P.351)
Rear passengers’ seat
belt reminder lights
*1, 3
( P.352)
(yellow) Conventional Cruise Con-
trol indicator (if equipped)
(
P.352)
BSD/RCTA warning light
(if equipped) ( P.352)
SRH warning light (if
equipped) ( P.352)
RAB warning light (if
equipped) ( P.353)
LED headlight warning
light ( P.353)
Automatic headlight level-
ing system warning light
( P.353)
Master warning light
*1
( P.353)
EyeSight warning light (if
equipped) ( P.353)
Tire pressure warning
light
*1 ( P.354)
WARNING
■If a safety system warning
light does not come on
Should a safety system light such
as the ABS and SRS warning light
not come on when you start the
engine, this could mean that
these systems are not available to
help protect you in an accident,
which could result in death or seri-
ous injury. Have the vehicle
inspected by you r Toyota dealer
immediately if this occurs.
Indicators
Turn signal indicator
( P.155)
Tail light indicator
( P.158)
Page 88 of 449
882-1. Instrument cluster
■Locations of gauges and meters
Normal modeMulti-information display
Presents the driver with a variety of vehicle data (P.93)
Displays warning messages in case of a malfunction (P.357)
Tachometer
Displays the engine speed in revolutions per minute
The red zone will be lower than n ormal, when the engine is cold
Outside temperature
Displays the outside temperature within the range of -40°F (-40 °C) to 122°F
(50°C). Low outside temperature indicator comes on when the amb ient
temperature is 37°F (3°C) or lower.
Clock
Engine coolant temperature gauge
Displays the engine c oolant temperature
Fuel gauge
Speedometer
Shift position and gear position ( P.149, 154)
Odometer and trip meter display ( P.90)
Gauges and meters
Meter display
A
C
D