2023 TOYOTA 86 ECU
[x] Cancel search: ECUPage 81 of 449

811-4. Theft deterrent system
1
For safety and security
■Items to check before lock-
ing the vehicle
To prevent unexpected trigger-
ing of the alarm and vehicle
theft, make sure of the following:
Nobody is in the vehicle.
The windows are closed
before the alarm is set.
No valuables or other per-
sonal items are left in the
vehicle.
■Setting
Close the doors, trunk and hood, and lock both side doors
using the entry function or wire-
less remote control. The system
will set automatically after 30
seconds.
The indicator light changes from
being on to flashing when the sys-
tem is set.
■Canceling or stopping
Do one of the following to deac-
tivate or stop the alarms:
Unlock the doors or open the
trunk using the entry function
or wireless remote control.
Turn the engine switch to
ACC or ON, or start the
engine.
1 Check that both side doors
and the trunk are closed.
2 Turn the engine switch to
ON.
3 Open the driver’s door while
pressing and holding on
the door lock switch and con-
tinue to press for approxi-
Alarm
The alarm’s default setting
is set to off. To use the
alarm, perform the activat-
ing the alarm system proce-
dures.
The alarm uses light and
sound to give an alert when
an intrusion is detected.
The alarm is triggered in the
following situations when
the alarm is set:
A locked door or trunk is
unlocked or opened in any
way other than using the
entry function or wireless
remote control.
The hood is opened.
Setting/canceling/stop-
ping the alarm system
Activating/deactivating
the alarm system
Page 86 of 449

862-1. Instrument cluster
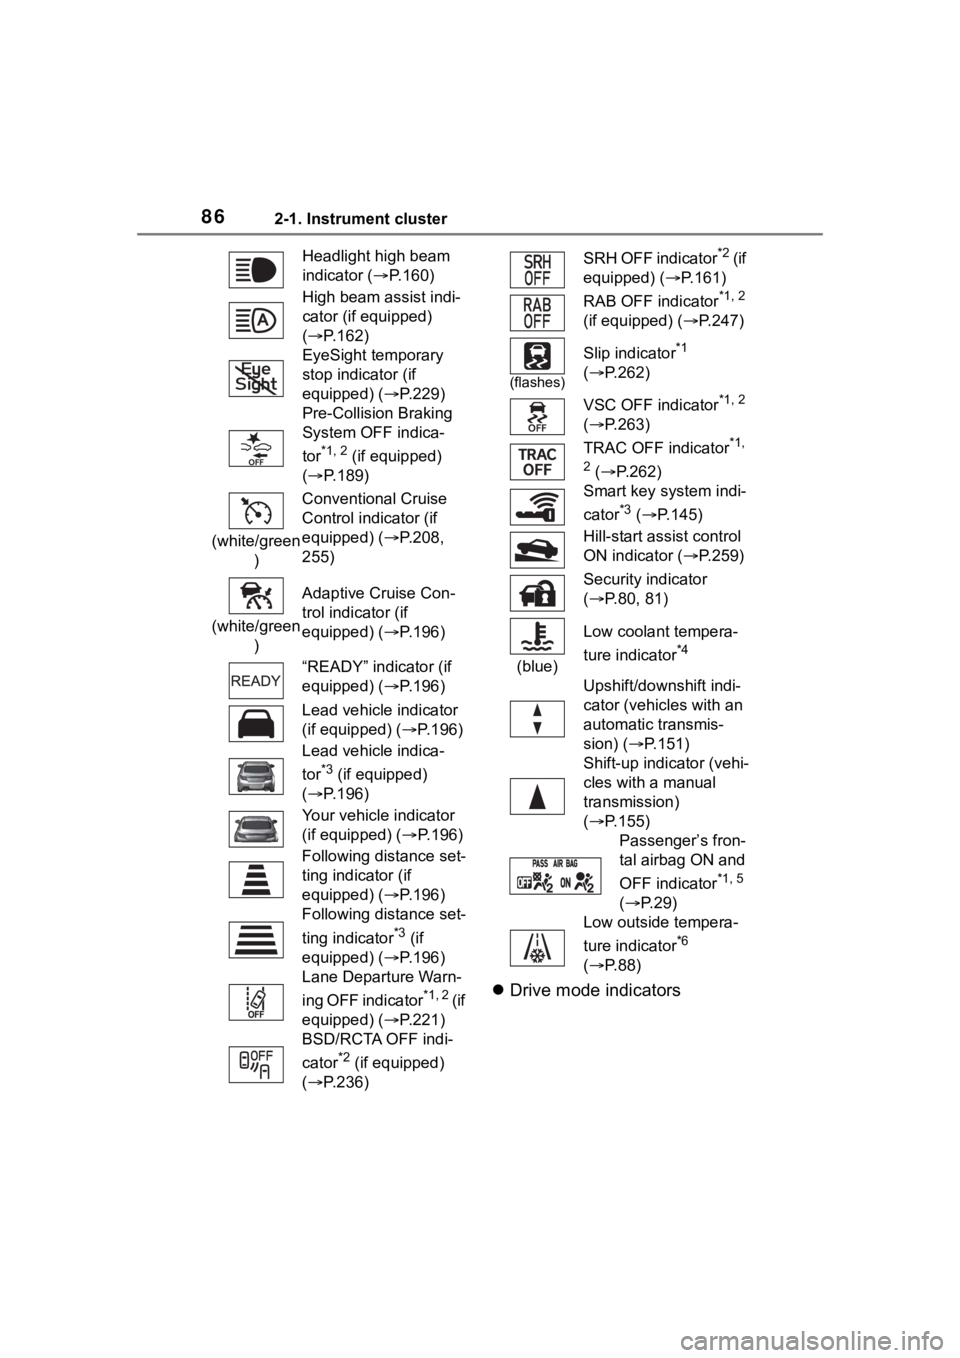
Drive mode indicators
Headlight high beam
indicator ( P.160)
High beam assist indi-
cator (if equipped)
( P.162)
EyeSight temporary
stop indicator (if
equipped) (P.229)
Pre-Collision Braking
System OFF indica-
tor
*1, 2 (if equipped)
( P.189)
(white/green ) Conventional Cruise
Control indicator (if
equipped) (P.208,
255)
(white/green ) Adaptive Cruise Con-
trol indicator (if
equipped) (P.196)
“READY” indicator (if
equipped) (P.196)
Lead vehicle indicator
(if equipped) (
P.196)
Lead vehicle indica-
tor
*3 (if equipped)
( P.196)
Your vehicle indicator
(if equipped) ( P.196)
Following distance set-
ting indicator (if
equipped) (P.196)
Following distance set-
ting indicator
*3 (if
equipped) (P.196)
Lane Departure Warn-
ing OFF indicator
*1, 2 ( i f
equipped) (P.221)
BSD/RCTA OFF indi-
cator
*2 (if equipped)
( P.236)
SRH OFF indicator*2 ( i f
equipped) ( P.161)
RAB OFF indicator
*1, 2
(if equipped) ( P.247)
(flashes)
Slip indicator*1
( P.262)
VSC OFF indicator
*1, 2
( P.263)
TRAC OFF indicator
*1,
2
( P.262)
Smart key system indi-
cator
*3 ( P.145)
Hill-start assist control
ON indicator ( P.259)
Security indicator
( P.80, 81)
(blue) Low coolant tempera-
ture indicator
*4
Upshift/downshift indi-
cator (vehicles with an
automatic transmis-
sion) (
P.151)
Shift-up indicator (vehi-
cles with a manual
transmission)
( P.155)
Passenger’s fron-
tal airbag ON and
OFF indicator
*1, 5
( P. 2 9 )
Low outside tempera-
ture indicator
*6
( P. 8 8 )
Page 105 of 449

1053-2. Opening, closing and locking the doors and trunk
3
Before driving
3-2.Opening, closing and locking the doors and trunk
■Smart key system
Carry the electronic key to
enable this function.
1 Grip the driver’s door handle
to unlock the door. Grip the
passenger’s door handle to
unlock all the doors.
*
Make sure to touch the sensor on
the back of the handle.
The doors cannot be unlocked for 3
seconds after the doors are locked.
*: The door unlock settings can be
changed.
2 Touch the lock sensor (inden-
tation on the side of the door
handle) to lock the doors.
Check that the door is securely
locked.
■Wireless remote control
1 Locks both side doors
Check that the d oor is securely
locked.
2 Unlocks both side doors
Pressing the button unlocks the
driver’s door. Pressing the button
again within 3 seconds unlocks the
other door.
■Side window open/close func-
tion linked to door operation
In order to make opening and clos-
ing the doors easier, completely
closed windows are linked to door
operations. Therefore, when a door
is opened, its window opens slightly.
When a door is closed, its window
closes completely.
However, if the battery has dis-
charged or is di sconnected, this
function will not operate. ( P.374)
■Operation signals
A buzzer sounds and the emer-
gency flashers flash to indicate that
the doors have been
locked/unlocked. (Locked: once;
Unlocked: twice)
■When the door cannot be
locked by the lock sensor on
the surface of the door handle
If the doors cannot be locked by
touching the lock se nsor with a fin-
ger, touch the lock sensor with the
palm of your hand.
If you are wearing gloves, remove
Doors
Unlocking and locking the
doors from the outside
Page 108 of 449

1083-2. Opening, closing and locking the doors and trunk
WARNING
■Using the trunk
Observe the following precau-
tions.
Failure to do so may cause parts
of the body to be caught, resulting
in serious injury.
●Remove any heavy loads, such
as snow and ice, from the trunk
lid before opening it. Failure to
do so may cause the trunk lid to
suddenly shut again after it is
opened.
●Be careful not to come into con-
tact with the exhaust gasses
when opening or closing the
trunk. If the eng ine is running,
there is a risk of being burned
by the exhaust gasses.
●When opening or closing the
trunk lid, thoroughly check to
make sure the surrounding area
is safe.
●If anyone is in the vicinity, make
sure they are safe and let them
know that the trunk is about to
open or close.
●Use caution when opening or
closing the trunk lid in windy
weather as it may move
abruptly in strong wind.
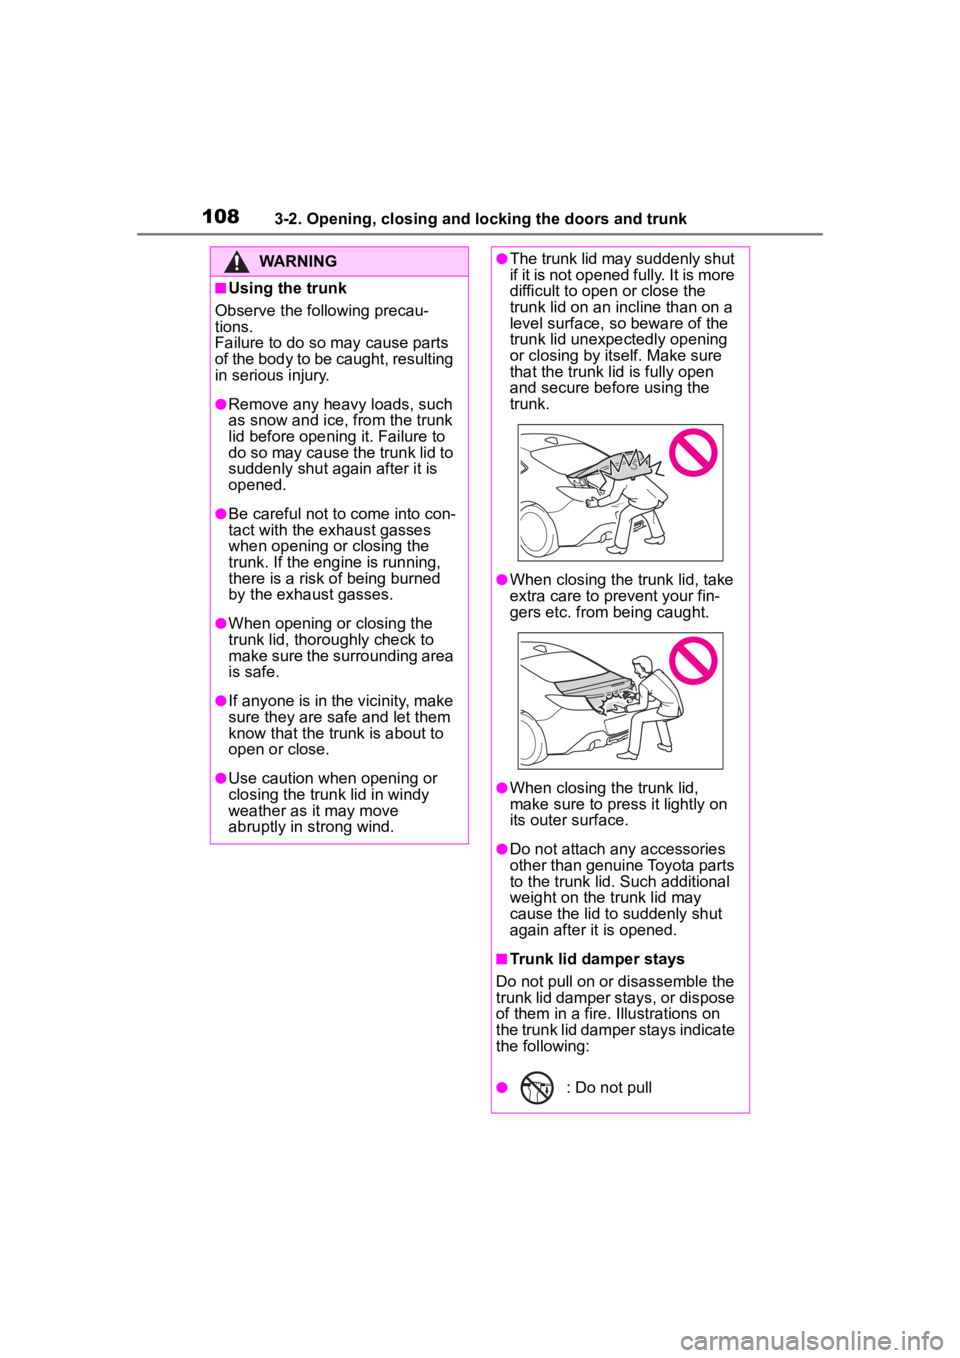
●The trunk lid may suddenly shut
if it is not opened fully. It is more
difficult to ope n or close the
trunk lid on an incline than on a
level surface, so beware of the
trunk lid unexpectedly opening
or closing by itself. Make sure
that the trunk lid is fully open
and secure before using the
trunk.
●When closing the trunk lid, take
extra care to pre vent your fin-
gers etc. from being caught.
●When closing the trunk lid,
make sure to press it lightly on
its outer surface.
●Do not attach any accessories
other than genuine Toyota parts
to the trunk lid. Such additional
weight on the trunk lid may
cause the lid to suddenly shut
again after it is opened.
■Trunk lid damper stays
Do not pull on or disassemble the
trunk lid damper stays, or dispose
of them in a fire. Illustrations on
the trunk lid damper stays indicate
the following:
●: Do not pull
Page 114 of 449

1143-2. Opening, closing and locking the doors and trunk
formed using the lock sensor, rec-
ognition signals will be shown up
to three consecuti ve times. After
this, no recogniti on signals will be
given.
●If the door handle becomes wet
while the electronic key is within
the effective ran ge, the door may
lock and unlock repeatedly. In this
case, follow the fo llowing correc-
tion procedures to wash the vehi-
cle:
• Place the electronic key in a loca- tion 6 ft. (2 m) or more away from
the vehicle. (Take care to ensure
that the key is not stolen.)
• Set the electronic key to bat-
tery-saving mode to disable the
smart key system. ( P. 1 1 2 )
●If the electronic key is inside the
vehicle and a door handle
becomes wet during a car wash, a
message may be shown on the
multi-information display and a
buzzer will sound outside the vehi-
cle. To turn off the alarm, lock both
side doors.
●The lock sensor may not work
properly if it com es into contact
with ice, snow, mud, etc. Clean
the lock sensor and attempt to
operate it again.
●A sudden handle operation or a
handle operation immediately
after entering the effective range
may prevent the doors from being
unlocked. Touch the door unlock
sensor and check that the doors
are unlocked bef ore pulling the
door handle again.
●Unlocking the vehicle may take
more time if another electronic key
is within the effective range.
■When the vehicle is not driven
for extended periods
●To prevent theft of the vehicle, do
not leave the electronic key within
6 ft. (2 m) of the vehicle.
●The smart key system can be
deactivated in advance. ( P. 1 1 5 )
●Setting the electronic key to bat-
tery-saving mode helps to reduce
key battery depletion. ( P. 1 1 2 )
■To operate the system properly
●Make sure to carry the electronic
key when operating the system.
Do not get the electronic key too
close to the vehicle when operat-
ing the system from the outside of
the vehicle.
Depending on the position and hold-
ing condition of the electronic key,
the key may not be detected cor-
rectly and the system may not oper-
ate properly. (The alarm may go off
accidentally, or the door lock pre-
vention function m ay not operate.)
●Do not leave the electronic key
inside the trunk.
The key confinement prevention
function may not operate, depend-
ing on the location of the key (the
inside edge of the Trunk), condi-
tions (inside a metal bag, close to
metallic objects) and the radio
waves in the surrounding area.
( P. 111 )
■If the smart key system does
not operate properly
●Locking and unlocking the doors:
P. 3 7 0
●Starting the engine: P. 3 7 0
■Customization
Some functions can be customized.
( P.400)
■If the smart key system has
been disabled
●Locking and unlocking the doors:
Use the wireless remote control or
mechanical key. ( P.105, 370)
●Starting the engi ne and changing
engine switch modes: P. 3 7 0
●Stopping the engine: P. 1 4 7
Page 118 of 449

1183-2. Opening, closing and locking the doors and trunk
●After registering a new PIN code,
make sure to check that the doors
can be unlocked using the code.
●If the smart key system has been
disabled using the wireless
remote control method, the PIN
code for the PIN code smart entry
cannot be cleared. (P. 1 1 5 )
●In the following cases, perform the
PIN code registration procedure
again.
• If the PIN code has been forgot-
ten.
• When you wish to change the PIN code.
●Make sure to change the PIN
code periodically.
●If the vehicle has been loaned to
another person, make sure that
the PIN code has not been
changed or cleared. If the PIN
code has been changed or
cleared, perform PIN code regis-
tration again.
■Unlocking method
●If an electronic key is within a
detection area, operation of the
smart entry will be given priority.
●I f a m i s t a k e i s m a d e w h i l e e n t e r i n g
the PIN code, wait 5 seconds or
more before performing the proce-
dure again.
●If the incorrect PIN code is
entered 5 times consecutively, a
buzzer will sound for approxi-
mately 2 seconds and operation
will not be possible for 5 minutes.
Page 122 of 449

1223-3. Adjusting the seats
■Seat dust cover
Always remove the seat dust cover
that may be attached at the time of
purchase before using the seat.
WARNING
Observe the following precau-
tions. Failure to do so may result
in death or serious injury.
■When folding the rear seat-
backs down
●Do not fold the seatbacks down
while driving.
●Stop the vehicle on level
ground, set the parking brake
and shift the shift lever to P
(automatic transmission) or N
(manual transmission).
●Do not allow anyo ne to sit on a
folded seatback or in the trunk
while driving.
●Do not allow child ren to enter
the trunk.
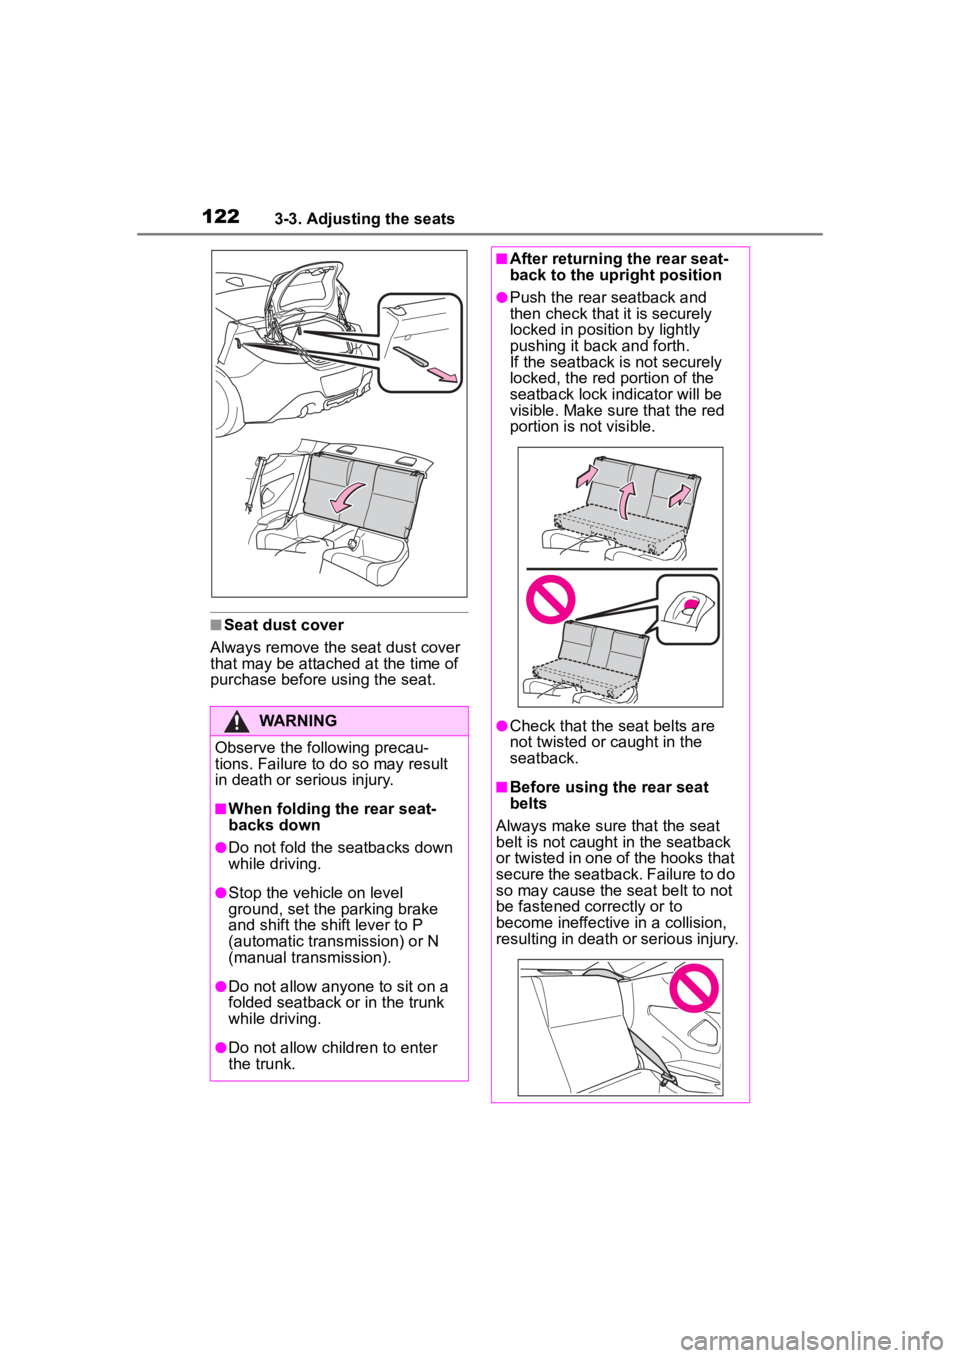
■After returning the rear seat-
back to the upright position
●Push the rear seatback and
then check that it is securely
locked in position by lightly
pushing it back and forth.
If the seatback is not securely
locked, the red portion of the
seatback lock indicator will be
visible. Make sure that the red
portion is not visible.
●Check that the seat belts are
not twisted or caught in the
seatback.
■Before using the rear seat
belts
Always make sure that the seat
belt is not caught in the seatback
or twisted in one of the hooks that
secure the seatback. Failure to do
so may cause the seat belt to not
be fastened correctly or to
become ineffective in a collision,
resulting in death o r serious injury.
Page 125 of 449

1253-4. Adjusting the steering wheel and mirrors
3
Before driving
3-4.Adjusting the steering wheel and mirrors
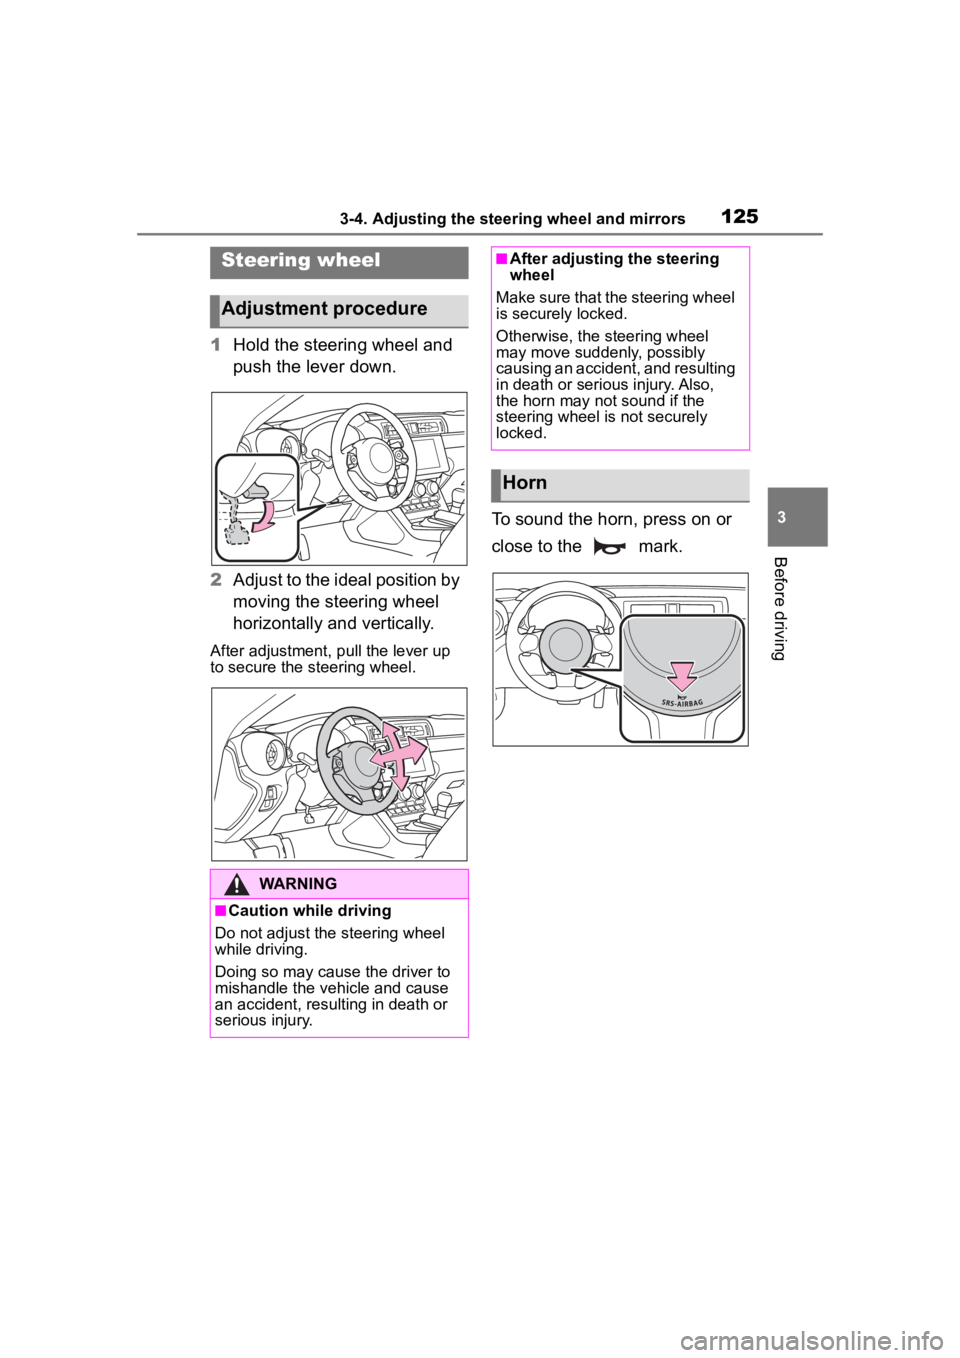
1Hold the steering wheel and
push the lever down.
2 Adjust to the ideal position by
moving the steering wheel
horizontally and vertically.
After adjustment, pull the lever up
to secure the steering wheel.
To sound the horn, press on or
close to the mark.
Steering wheel
Adjustment procedure
WARNING
■Caution while driving
Do not adjust the steering wheel
while driving.
Doing so may cause the driver to
mishandle the vehicle and cause
an accident, resul ting in death or
serious injury.
■After adjusting the steering
wheel
Make sure that the steering wheel
is securely locked.
Otherwise, the steering wheel
may move suddenly, possibly
causing an accident, and resulting
in death or serious injury. Also,
the horn may not sound if the
steering wheel is not securely
locked.
Horn