2023 TOYOTA 86 flat tire
[x] Cancel search: flat tirePage 356 of 449
3567-2. Steps to take in an emergency
WARNING
As an added safety feature, your
vehicle has been equipped with a
tire pressure m onitoring system
(TPMS-tire pressure warning sys-
tem) that illuminates a low tire
pressure telltale (tire pressure
warning light) when one or more
of your tires is significantly
under-inflated. Accordingly, when
the low tire pressure telltale (tire
pressure warning light) illumi-
nates, you should stop and check
your tires as soon as possible,
and inflate them to the proper
pressure. Driving on a signifi-
cantly under-inflated tire causes
the tire to overheat and can lead
to tire failure. Under-inflation also
reduces fuel efficiency and tire
tread life, and may affect the vehi-
cle’s handling and stopping ability.
Please note that the TPMS (tire
pressure warning system) is not a
substitute for pro per tire mainte-
nance, and it is the driver’s
responsibility to maintain correct
tire pressure, even if under-infla-
tion has not reach ed the level to
trigger illumination of the TPMS
low tire pressure telltale (tire pres-
sure warning light).
Your vehicle has also been
equipped with a TPMS (tire pres-
sure warning system) malfunc-
tion indicator to indicate when the
system is not operating properly.
The TPMS (tire pressure warning
system) malfunction indicator is
combined with the low tire pres-
sure telltale (tire pressure warning
light). When the system detects a
malfunction, the te lltale will flash
for approximately one minute and
then remain continuously illumi-
nated. This sequence will con-
tinue upon subsequent vehicle
start-ups as long as the malfunc-
tion exists. When the malfunction
indicator is illuminated, the sys-
tem may not be ab le to detect or
signal low tire pressure as
intended.
TPMS (tire pressure warning sys-
tem) malfunctions may occur for a
variety of reasons, including the
installation of replacement or
alternate tires or wheels on the
vehicle that prevent the TPMS
(tire pressure warning system)
from functioning properly. Always
check the TPMS (tire pressure
warning system) malfunction tell-
tale after replacing one or more
tires or wheels on your vehicle to
ensure that the replacement or
alternate tires and wheels allow
the TPMS (tire pressure warning
system) to continue to function
properly.
NOTICE
■To ensure the tire pressure
warning system operates
properly
Do not install tires with different
specifications or makers, as the
tire pressure warning system may
not operate properly.
Page 358 of 449
3587-2. Steps to take in an emergency
Stop the vehicle in a safe
place on a hard, flat surface.
Set the parking brake.
Shift the shift lever to P (auto-
matic transmission) or R
(manual transmission).
Stop the engine.
Turn on the emergency flash-
ers. ( P.338)
Check the degree of the tire damage.
A tire should only be repaired
with the emergency tire punc-
ture repair kit if the damage is
caused by a nail or screw pass-
ing through the tire tread.
• Do not remove the nail or screw from the tire. Removing
the object may widen the
opening and disenable emer-
gency repair with the kit.
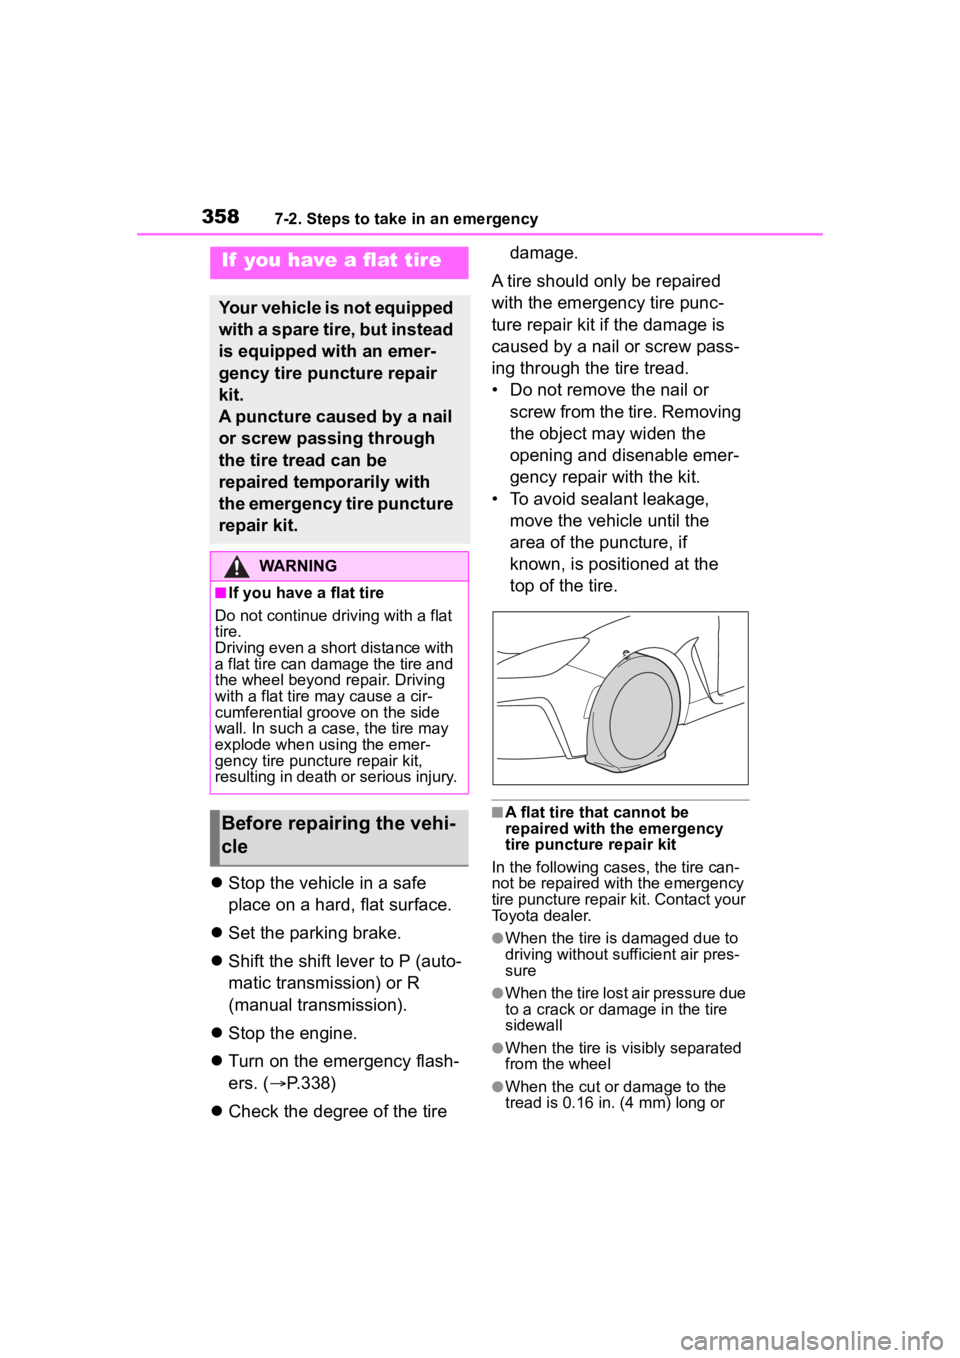
• To avoid sealant leakage, move the vehicle until the
area of the puncture, if
known, is positioned at the
top of the tire.
■A flat tire that cannot be
repaired with the emergency
tire puncture repair kit
In the following cases, the tire can-
not be repaired with the emergency
tire puncture repair kit. Contact your
Toyota dealer.
●When the tire is damaged due to
driving without sufficient air pres-
sure
●When the tire lost air pressure due
to a crack or damage in the tire
sidewall
●When the tire is visibly separated
from the wheel
●When the cut or damage to the
tread is 0.16 in. (4 mm) long or
If you have a flat tire
Your vehicle is not equipped
with a spare tire, but instead
is equipped with an emer-
gency tire puncture repair
kit.
A puncture caused by a nail
or screw passing through
the tire tread can be
repaired temporarily with
the emergency tire puncture
repair kit.
WARNING
■If you have a flat tire
Do not continue driving with a flat
tire.
Driving even a short distance with
a flat tire can damage the tire and
the wheel beyond repair. Driving
with a flat tire may cause a cir-
cumferential groove on the side
wall. In such a case, the tire may
explode when using the emer-
gency tire puncture repair kit,
resulting in death or serious injury.
Before repairing the vehi-
cle
Page 363 of 449
3637-2. Steps to take in an emergency
7
When trouble arises
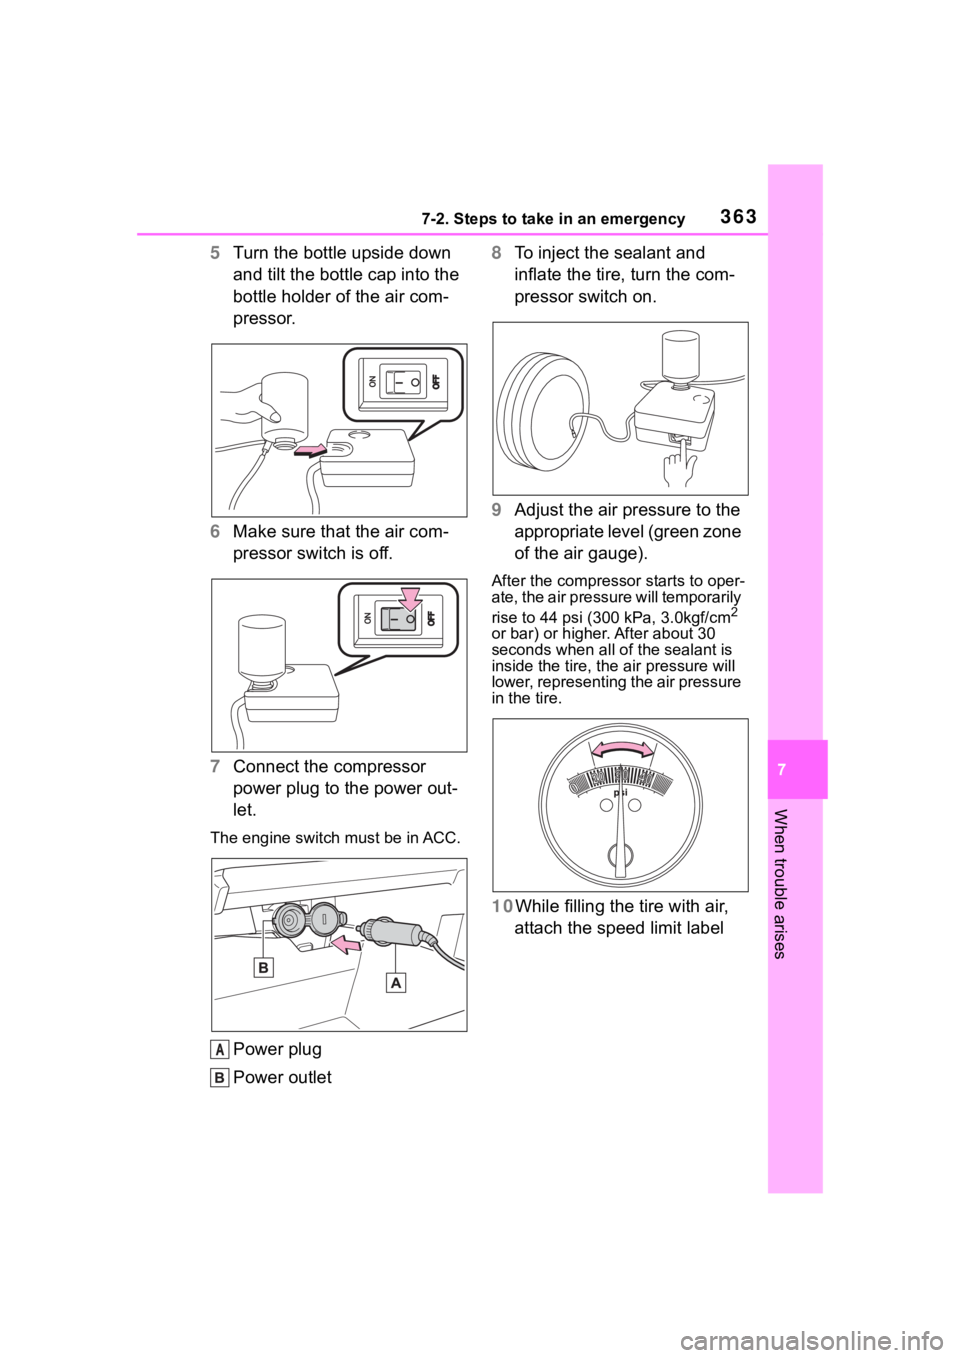
5Turn the bottle upside down
and tilt the bottle cap into the
bottle holder of the air com-
pressor.
6 Make sure that the air com-
pressor switch is off.
7 Connect the compressor
power plug to the power out-
let.
The engine switch must be in ACC.
Power plug
Power outlet 8
To inject the sealant and
inflate the tire, turn the com-
pressor switch on.
9 Adjust the air pressure to the
appropriate level (green zone
of the air gauge).
After the compress or starts to oper-
ate, the air pressure will temporarily
rise to 44 psi (300 kPa, 3.0kgf/cm
2
or bar) or higher. After about 30
seconds when all o f the sealant is
inside the tire, the air pressure will
lower, representing the air pressure
in the tire.
10While filling the tire with air,
attach the speed limit label
A
Page 365 of 449
3657-2. Steps to take in an emergency
7
When trouble arises
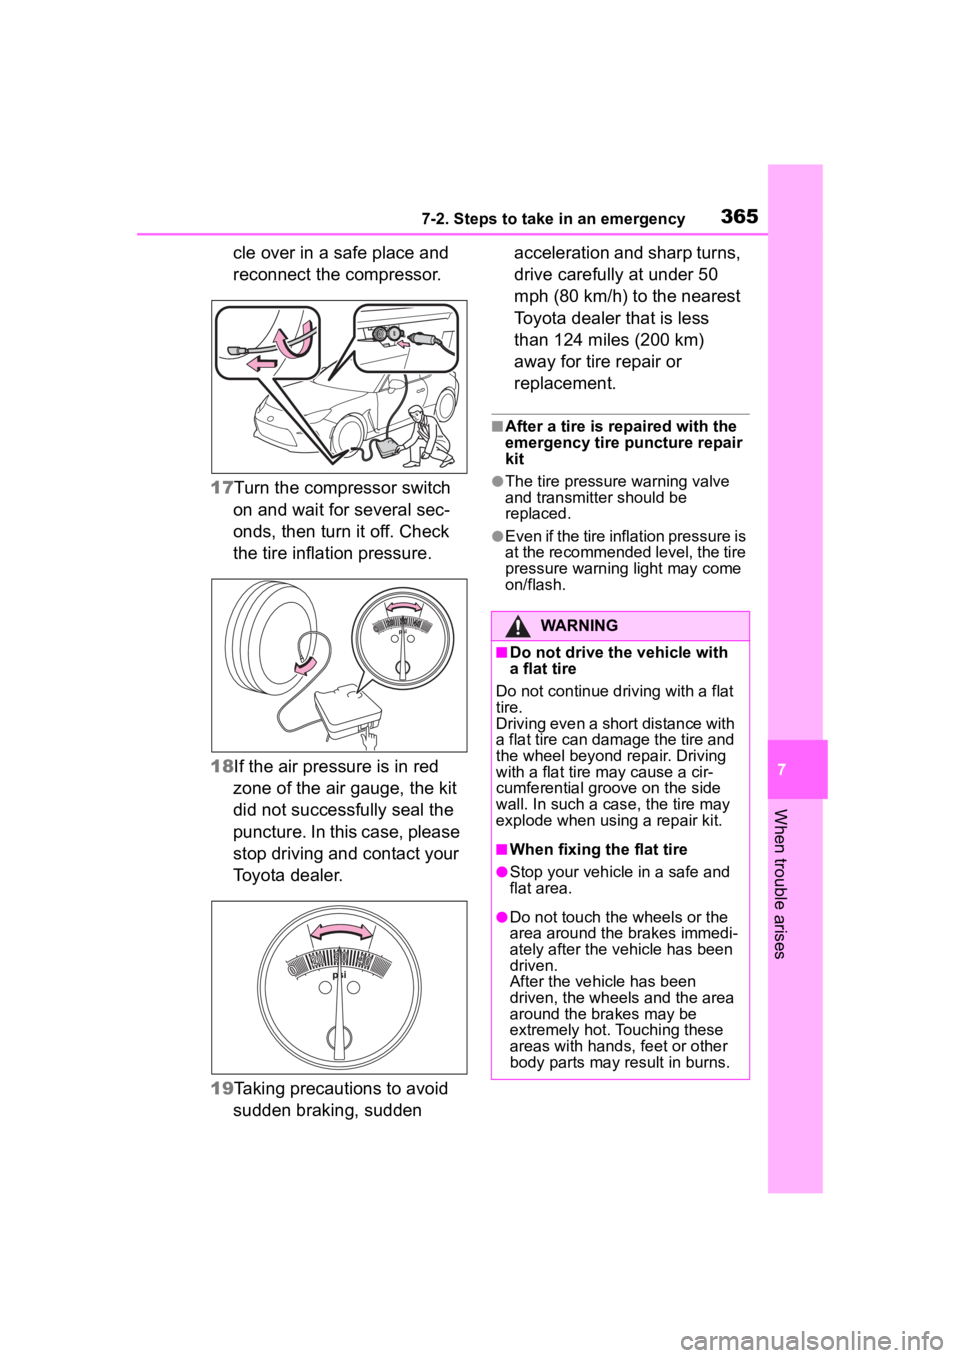
cle over in a safe place and
reconnect the compressor.
17 Turn the compressor switch
on and wait for several sec-
onds, then turn it off. Check
the tire inflation pressure.
18 If the air pressure is in red
zone of the air gauge, the kit
did not successfully seal the
puncture. In this case, please
stop driving and contact your
Toyota dealer.
19 Taking precautions to avoid
sudden braking, sudden acceleration and sharp turns,
drive carefully at under 50
mph (80 km/h) to the nearest
Toyota dealer that is less
than 124 miles (200 km)
away for tire repair or
replacement.
■After a tire is re
paired with the
emergency tire puncture repair
kit
●The tire pressure warning valve
and transmitter should be
replaced.
●Even if the tire inflation pressure is
at the recommended level, the tire
pressure warning light may come
on/flash.
WARNING
■Do not drive the vehicle with
a flat tire
Do not continue driving with a flat
tire.
Driving even a short distance with
a flat tire can damage the tire and
the wheel beyond repair. Driving
with a flat tire may cause a cir-
cumferential groove on the side
wall. In such a cas e, the tire may
explode when using a repair kit.
■When fixing the flat tire
●Stop your vehicle in a safe and
flat area.
●Do not touch the wheels or the
area around the brakes immedi-
ately after the vehicle has been
driven.
After the vehicle has been
driven, the whee ls and the area
around the brakes may be
extremely hot. Touching these
areas with hands, feet or other
body parts may result in burns.
Page 366 of 449
3667-2. Steps to take in an emergency
WARNING
●Connect the valve and hose
securely with the tire installed
on the vehicle.
●If the hose is not properly con-
nected to the valve, air leakage
may occur or sealant may be
sprayed out.
●If the hose comes off the valve
while inflating the tire, there is a
risk that the hose will move
abruptly due to air pressure.
●After inflation of the tire has
completed, the sealant may
splatter when the hose is dis-
connected or some air is let out
of the tire.
●Follow the operation procedure
to repair the tire. If the proce-
dure is not followed, the sealant
may spray out.
●Keep back from the tire while it
is being repaired, as there is a
chance of it bursting while the
repair operation is being per-
formed. If you notice any cracks
or deformation of the tire, turn
off the compressor switch and
stop the repair operation imme-
diately.
●The kit may overheat if operated
for a long period of time. Do not
operate the compressor contin-
uously for more than 10 min-
utes.
●Parts of the kit become hot
during operation. Be careful
handling the kit during and after
operation. Do not touch the
metal part around the connect-
ing area between the bottle and
compressor. It will be extremely
hot.
●Do not attach the vehicle speed
warning sticker to an area other
than the one indicated. If the
sticker is attached to an area
where an SRS airbag is located,
such as the pad of the steering
wheel, it may prevent the SRS
airbag from operating properly.
■Driving to spread the liquid
sealant evenly
Observe the following precautions
to reduce the risk of accidents.
Failing to do so may result in a
loss of vehicle control and cause
death or serious injury.
●Drive the vehicle carefully at a
low speed. Be especially careful
when turning and cornering.
●If the vehicle does not drive
straight or you feel a pull
through the steering wheel, stop
the vehicle and check the tire.
The tire may have separated
from the wheel.
NOTICE
■When performing an emer-
gency repair
●Perform the emergency repair
without removing the nail or
screw that has punctured the
tread of the tire. If the object
that has punctur ed the tire is
removed, repair by the emer-
gency tire puncture repair kit
may not be possible.
●The kit is not waterproof. Make
sure that the ki t is not exposed
to water, such as when it is
being used in the rain.
●Do not put the kit directly onto
dusty ground such as sand at
the side of the road. If the kit
vacuums up dust etc., a mal-
function may occur.
Page 386 of 449

3868-1. Specifications
*1: Minimum pedal clearance when depressed with a force of 67 lbf (300 N,
30 kgf) while the engine is running.
Carpet
Brake pedal
Pedal clearance
*2: Parking brake lever travel when pulled up with a force of 45.0 lbf (200 N,
20.4 kgf).
Ty p e A
Brake pad wear limit
Fro nt0.06 in. (1.5 mm)
Rea r0.06 in. (1.5 mm)
Parking brake lining wear limit0.06 in. (1.5 mm)
Parking brake lever travel*27 - 8 clicks
Fluid typeSAE J1703 or FMVSS No.116 DOT 3
A
C
Steering
Free playLess than 1.2 in. (30 mm)
Tires and wheels
Tire size215/45R17 87W
Tire inflation pressure
(Recommended cold tire
inflation pressure)Front: 35 psi (240 kPa, 2.4 kgf/cm2 or bar)
Rear: 35 psi (240 kPa, 2.4 kgf/cm
2 or bar)
Wheel size17 7 1/2 J
Wheel nut torque89 ft•lbf (120 N•m, 12.2 kgf•m)
Page 387 of 449

3878-1. Specifications
8
Vehicle specifications
Ty p e B
A: Wedge base bulbs (clear)
B: Double end bulbs
Tire size215/40R18 85Y
Tire inflation pressure
(Recommended cold tire
inflation pressure)Driving under nor mal conditions
Front: 35 psi (240 kPa, 2.4 kgf/cm
2 or bar)
Rear: 35 psi (240 kPa, 2.4 kgf/cm
2 or bar)
Wheel size18 7 1/2 J
Wheel nut torque89 ft•lbf (120 N•m, 12.2 kgf•m)
Light bulbs
Light bulbsBulb No.WTy p e
ExteriorBack-up lightsW16W16A
Interior
Vanity lights (if equipped)2B
Interior light8A
Door courtesy lights (if equipped)W5W5A
Trunk light#1943.8A
Page 390 of 449
3908-1. Specifications
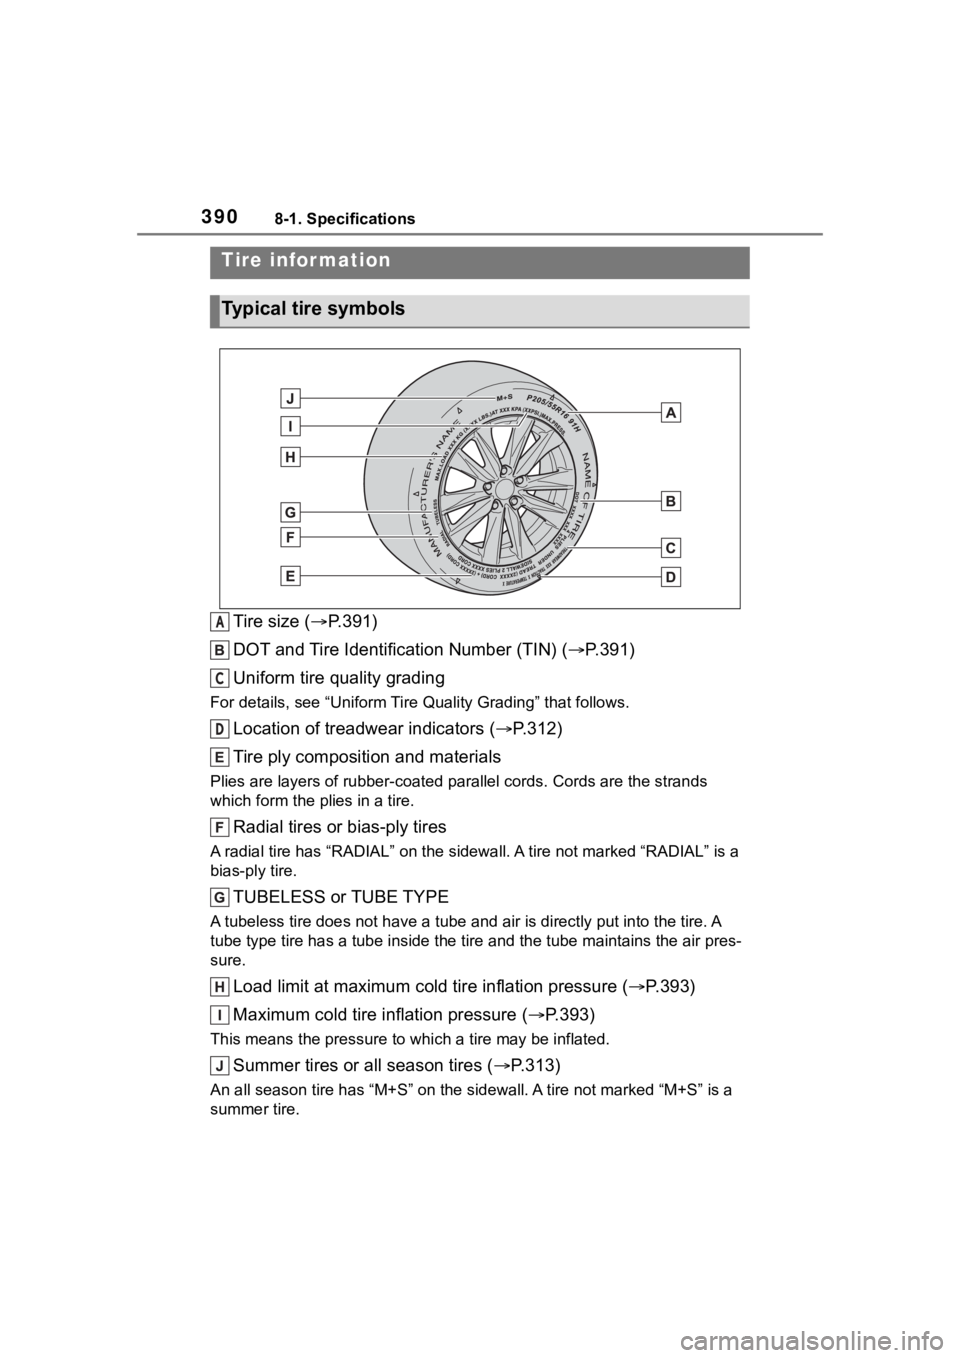
Tire size (P.391)
DOT and Tire Identification Number (TIN) ( P.391)
Uniform tire quality grading
For details, see “Uniform Tire Quality Grading” that follows.
Location of treadwear indicators ( P.312)
Tire ply composition and materials
Plies are layers of rubber-coat ed parallel cords. Cords are the strands
which form the pl ies in a tire.
Radial tires or bias-ply tires
A radial tire has “RADIAL” on th e sidewall. A tire not marked “RADIAL” is a
bias-ply tire.
TUBELESS or TUBE TYPE
A tubeless tire does not have a tube and air is directly put into the tire. A
tube type tire has a tube inside t he tire and the tube maintains the air pres-
sure.
Load limit at maximum cold tire inflation pressure (P.393)
Maximum cold tire inflation pressure ( P.393)
This means the pressure to w hich a tire may be inflated.
Summer tires or all season tires ( P.313)
An all season tire has “M+S” on the sidewal l. A tire not marked “M+S” is a
summer tire.
Tire information
Typical tire symbols
A
C
D