2023 TOYOTA 86 tow
[x] Cancel search: towPage 300 of 449
3006-3. Do-it-yourself maintenance
6-3.Do-it-yourself maintenance
Do-it-yourself ser vice
precautions
If you perform maintenance
by yourself, be sure to fol-
low the correct procedure
as given in these sections.
Maintenance
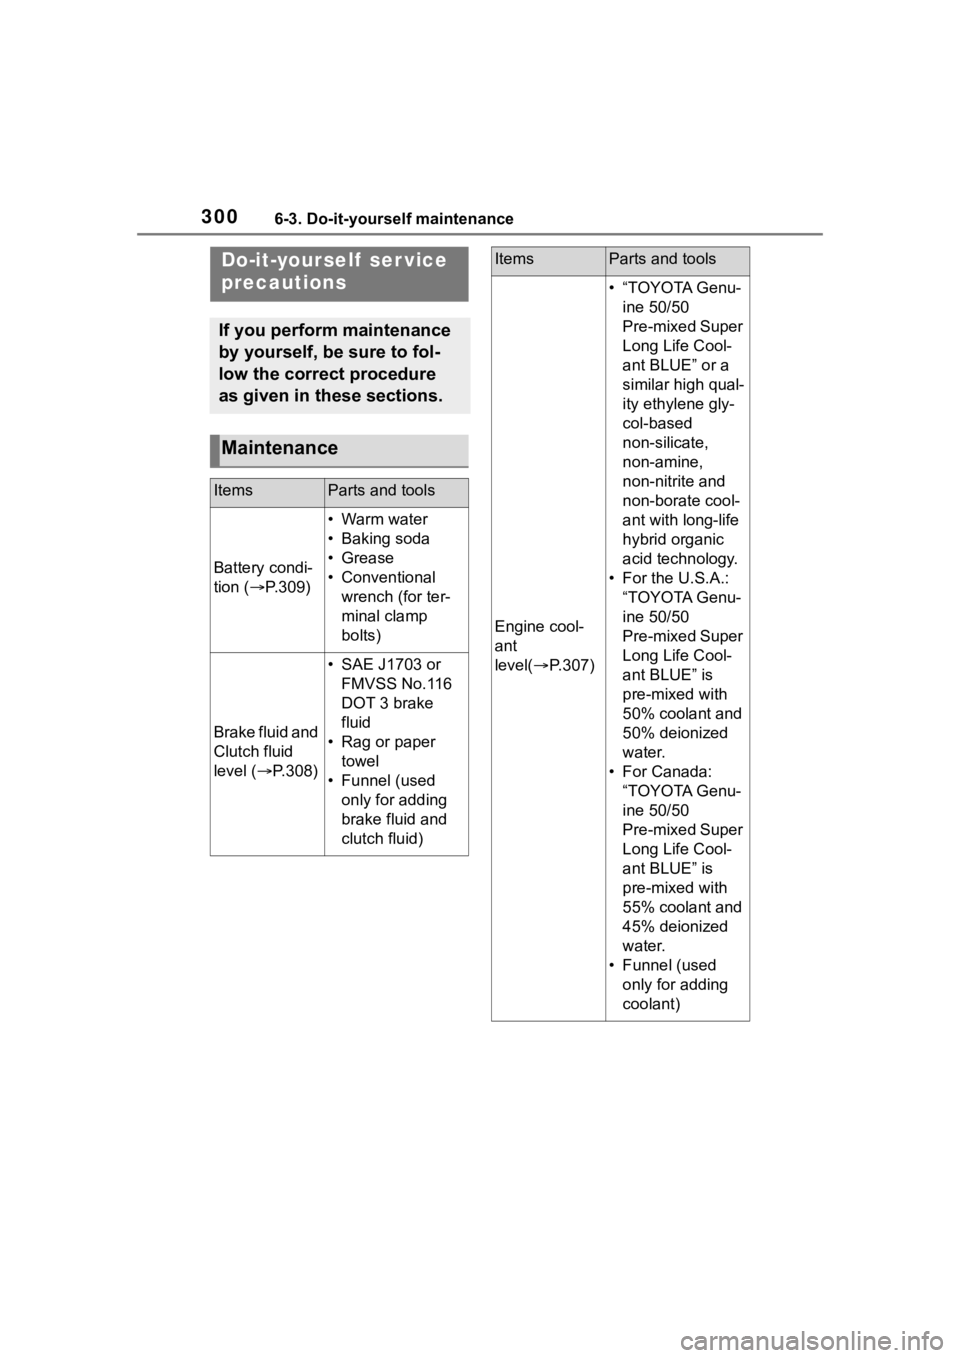
ItemsParts and tools
Battery condi-
tion (P.309)
• Warm water
• Baking soda
•Grease
• Conventional
wrench (for ter-
minal clamp
bolts)
Brake fluid and
Clutch fluid
level ( P.308)
• SAE J1703 or
FMVSS No.116
DOT 3 brake
fluid
• Rag or paper towel
• Funnel (used only for adding
brake fluid and
clutch fluid)
Engine cool-
ant
level( P.307)
• “TOYOTA Genu-
ine 50/50
Pre-mixed Super
Long Life Cool-
ant BLUE” or a
similar high qual-
ity ethylene gly-
col-based
non-silicate,
non-amine,
non-nitrite and
non-borate cool-
ant with long-life
hybrid organic
acid technology.
• For the U.S.A.: “TOYOTA Genu-
ine 50/50
Pre-mixed Super
Long Life Cool-
ant BLUE” is
pre-mixed with
50% coolant and
50% deionized
water.
• For Canada: “TOYOTA Genu-
ine 50/50
Pre-mixed Super
Long Life Cool-
ant BLUE” is
pre-mixed with
55% coolant and
45% deionized
water.
• Funnel (used only for adding
coolant)
ItemsParts and tools
Page 301 of 449
3016-3. Do-it-yourself maintenance
6
Maintenance and care
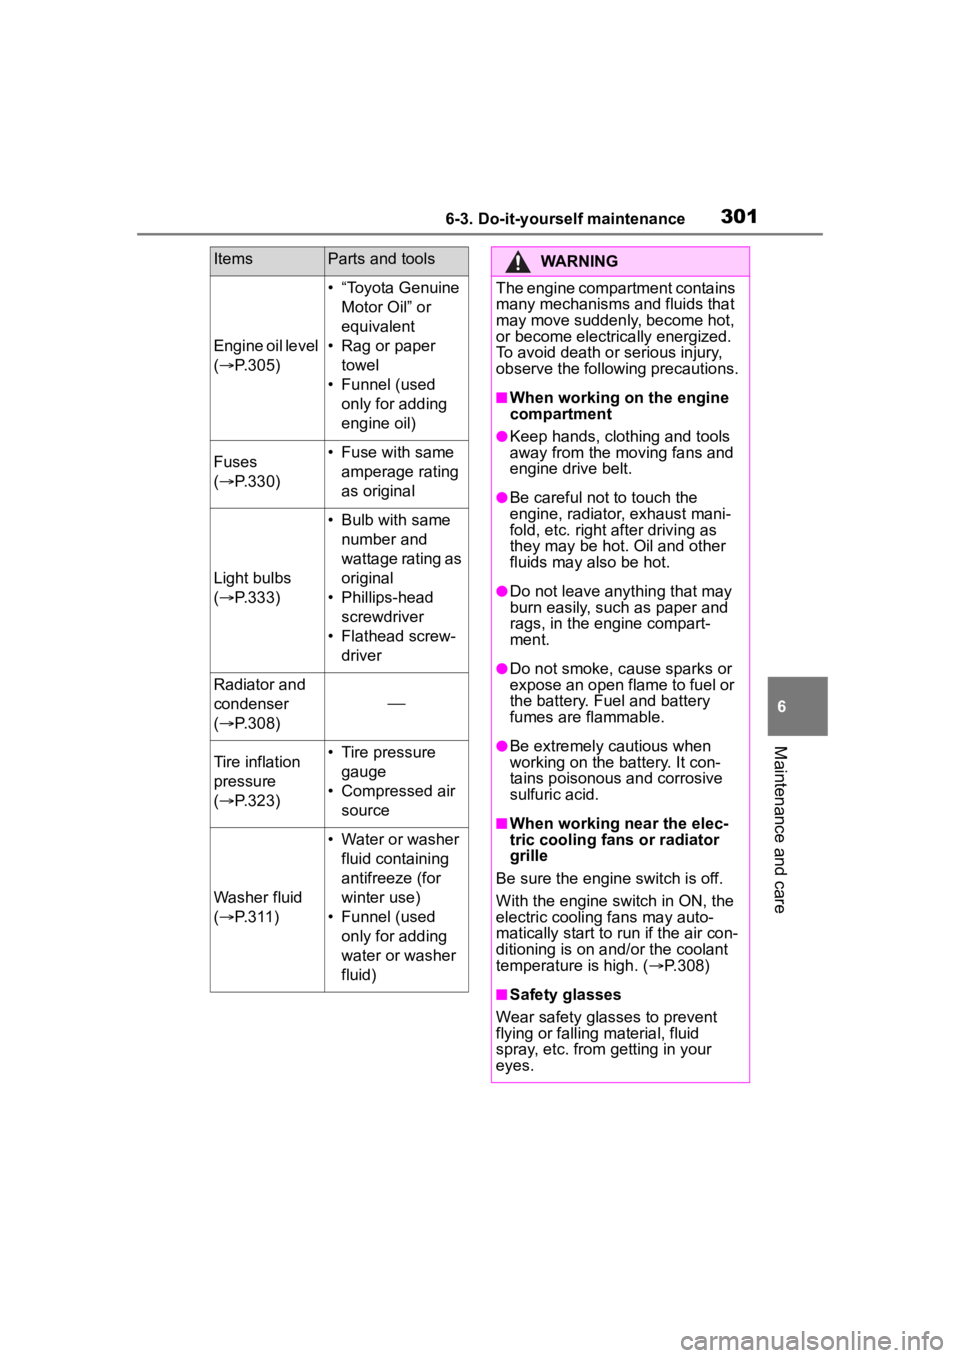
Engine oil level
( P.305)
• “Toyota Genuine
Motor Oil” or
equivalent
• Rag or paper towel
• Funnel (used only for adding
engine oil)
Fuses
( P.330)• Fuse with same
amperage rating
as original
Light bulbs
( P.333)
• Bulb with same
number and
wattage rating as
original
• Phillips-head screwdriver
• Flathead screw- driver
Radiator and
condenser
( P.308)
Tire inflation
pressure
( P.323)• Tire pressure
gauge
• Compressed air source
Washer fluid
( P.311)
• Water or washer
fluid containing
antifreeze (for
winter use)
• Funnel (used only for adding
water or washer
fluid)
ItemsParts and toolsWARNING
The engine compartment contains
many mechanisms and fluids that
may move suddenly, become hot,
or become electrically energized.
To avoid death or serious injury,
observe the following precautions.
■When working on the engine
compartment
●Keep hands, clothing and tools
away from the moving fans and
engine drive belt.
●Be careful not to touch the
engine, radiator, exhaust mani-
fold, etc. right a fter driving as
they may be hot. Oil and other
fluids may also be hot.
●Do not leave anything that may
burn easily, such as paper and
rags, in the engine compart-
ment.
●Do not smoke, cause sparks or
expose an open flame to fuel or
the battery. Fuel and battery
fumes are flammable.
●Be extremely cautious when
working on the battery. It con-
tains poisonous and corrosive
sulfuric acid.
■When working near the elec-
tric cooling fans or radiator
grille
Be sure the engine switch is off.
With the engine switch in ON, the
electric cooling fans may auto-
matically start to r un if the air con-
ditioning is on an d/or the coolant
temperature is high. ( P.308)
■Safety glasses
Wear safety glasses to prevent
flying or falling material, fluid
spray, etc. from getting in your
eyes.
Page 316 of 449
3166-3. Do-it-yourself maintenance
is equipped.
• If a window tint that affects the radio wave signals is installed.
• If there is a lot of snow or ice on the vehicle, particularly around the
wheels or wheel housings.
• If the tire inflation pressure is extremely higher than the speci-
fied level.
• If tires not equipped with tire pres- sure warning valves and transmit-
ters are used.
• If the ID code on the tire pressure warning valves and transmitters is
not registered in the tire pressure
warning computer.
●Performance may be affected in
the following situations.
• When driving near a TV tower, electric power plant, gas station,
radio station, large display, airport
or other facility that generates
strong radio waves or electrical
noise
• When carrying a portable radio, cellular phone, cordless phone or
other wireless communication
device
If tire position information is not cor-
rectly displayed due to the radio
wave conditions, the display may be
corrected by driving and changing
the radio wave conditions.
●When the vehicle is parked, the
time taken for the warning to start
or go off could be extended.
●When tire inflation pressure
declines rapidly for example when
a tire has burst, the warning may
not function.
■Warning performance of the tire
pressure warning system
The warning of the tire pressure
warning system will change in
accordance with driving conditions.
For this reason, the system may
give a warning even if the tire pres-
sure does not reach a low enough
level, or if the p ressure is higher
than the pressure that was adjusted
to when the system was initialized.
When replacing tires or wheels,
tire pressure warning valves and
transmitters must also be
installed.
When new tire pressure warning
valves and transmitters are
installed, new ID codes must be
registered in the tire pressure
warning computer and the tire
pressure warning system must
be initialized. Have tire pressure
warning valve and transmitter ID
codes registered by your Toyota
dealer. ( P.318)
■Replacing tires and wheels
If the ID code of the tire pressure
warning valve and tr ansmitter is not
registered, the tire pressure warning
system will not work properly. After
driving for about 20 minutes, the tire
pressure warning light blinks for 1
minute and stays on to indicate a
system malfunction.
Installing tire pressure
warning valves and trans-
mitters
NOTICE
■Repairing or replacing tires,
wheels, tire pressure warn-
ing valves, transmitters and
tire valve caps
●When removing or fitting the
wheels, tires or the tire pressure
warning valves and transmit-
ters, contact your Toyota dealer
as the tire pressure warning
valves and transmitters may be
damaged if not handled cor-
rectly.
Page 320 of 449
3206-3. Do-it-yourself maintenance
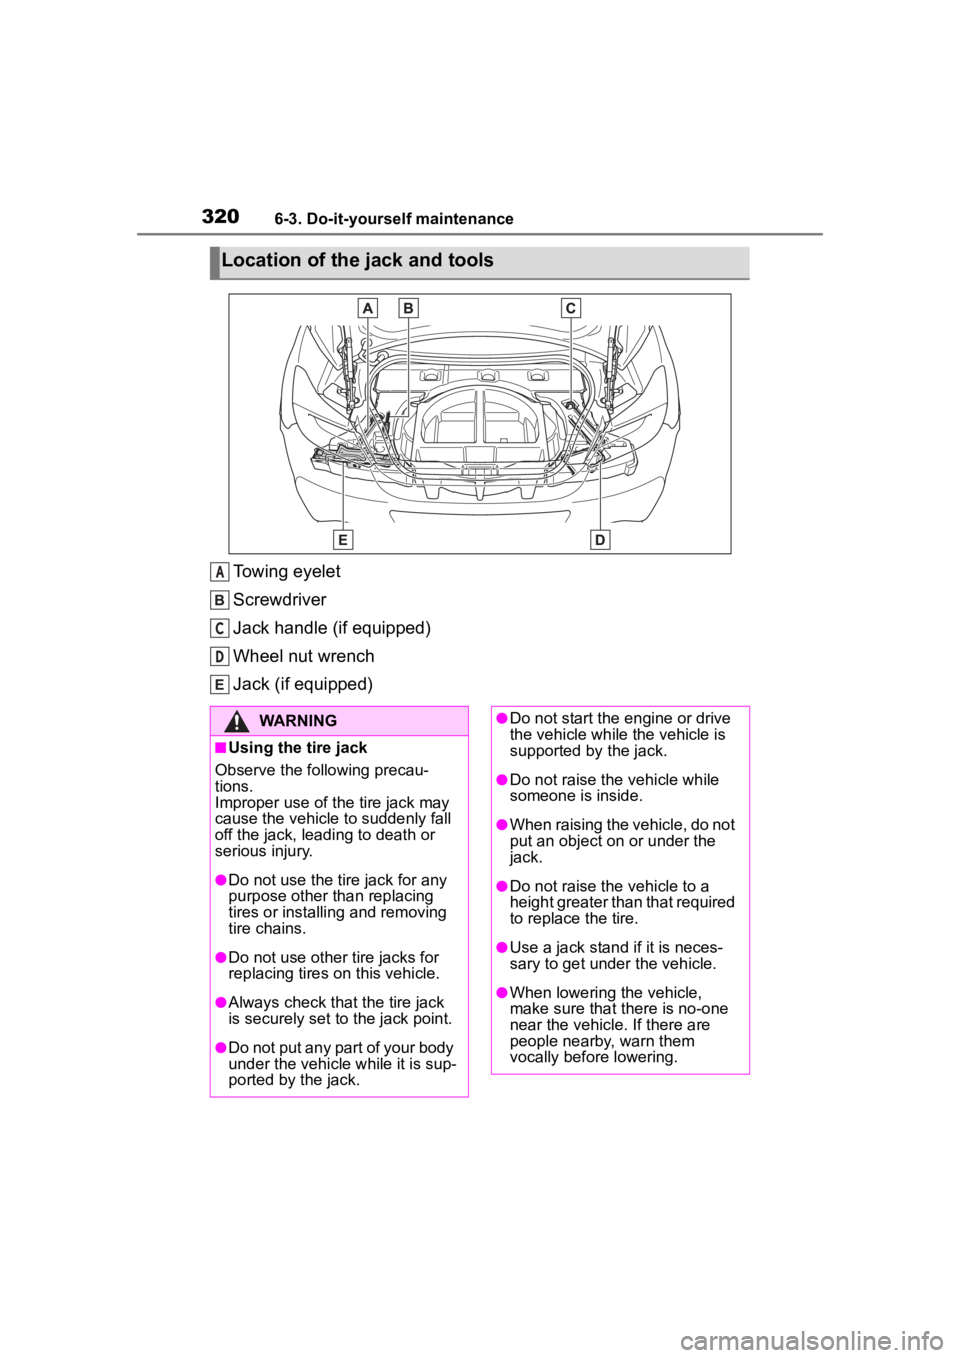
Towing eyelet
Screwdriver
Jack handle (if equipped)
Wheel nut wrench
Jack (if equipped)
Location of the jack and tools
A
C
D
WARNING
■Using the tire jack
Observe the following precau-
tions.
Improper use of the tire jack may
cause the vehicle to suddenly fall
off the jack, leading to death or
serious injury.
●Do not use the tire jack for any
purpose other than replacing
tires or installing and removing
tire chains.
●Do not use other tire jacks for
replacing tires on this vehicle.
●Always check that the tire jack
is securely set to the jack point.
●Do not put any part of your body
under the vehicle while it is sup-
ported by the jack.
●Do not start the engine or drive
the vehicle while the vehicle is
supported by the jack.
●Do not raise the vehicle while
someone is inside.
●When raising the vehicle, do not
put an object on or under the
jack.
●Do not raise the vehicle to a
height greater than that required
to replace the tire.
●Use a jack stand if it is neces-
sary to get under the vehicle.
●When lowering the vehicle,
make sure that there is no-one
near the vehicle. If there are
people nearby, warn them
vocally before lowering.
Page 322 of 449
3226-3. Do-it-yourself maintenance
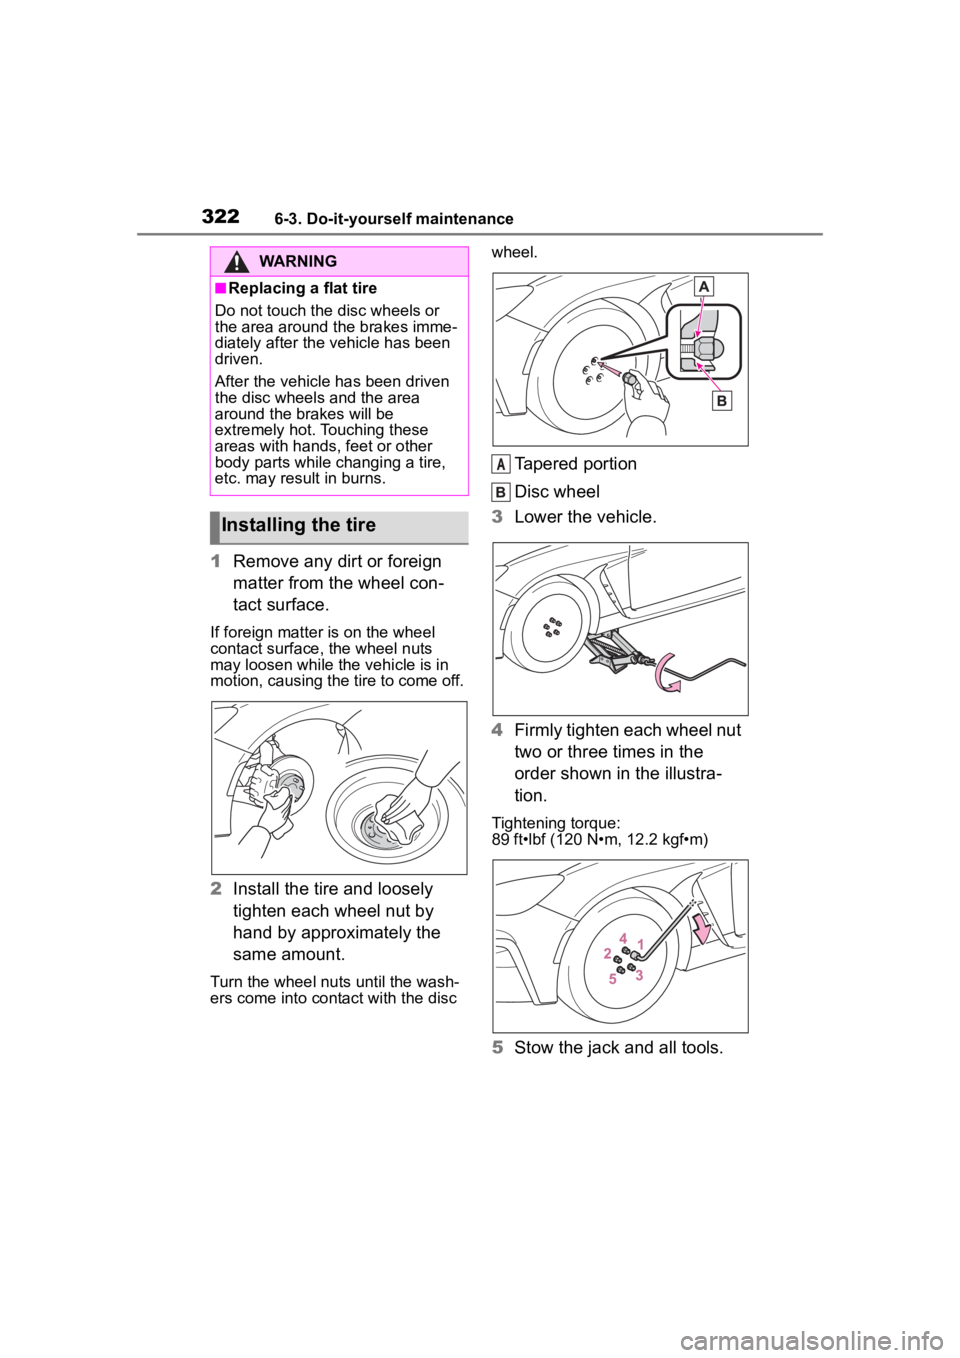
1Remove any dirt or foreign
matter from the wheel con-
tact surface.
If foreign matter is on the wheel
contact surface, the wheel nuts
may loosen while the vehicle is in
motion, causing the tire to come off.
2Install the tire and loosely
tighten each wheel nut by
hand by approximately the
same amount.
Turn the wheel nuts until the wash-
ers come into contact with the disc wheel.
Tapered portion
Disc wheel
3 Lower the vehicle.
4 Firmly tighten each wheel nut
two or three times in the
order shown in the illustra-
tion.
Tightening torque:
89 ft•lbf (120 N•m, 12.2 kgf•m)
5Stow the jack and all tools.
WARNING
■Replacing a flat tire
Do not touch the disc wheels or
the area around the brakes imme-
diately after the vehicle has been
driven.
After the vehicle has been driven
the disc wheels and the area
around the brakes will be
extremely hot. Touching these
areas with hands, feet or other
body parts while changing a tire,
etc. may result in burns.
Installing the tire
A
Page 327 of 449
3276-3. Do-it-yourself maintenance
6
Maintenance and care
1Turn the engine switch off.
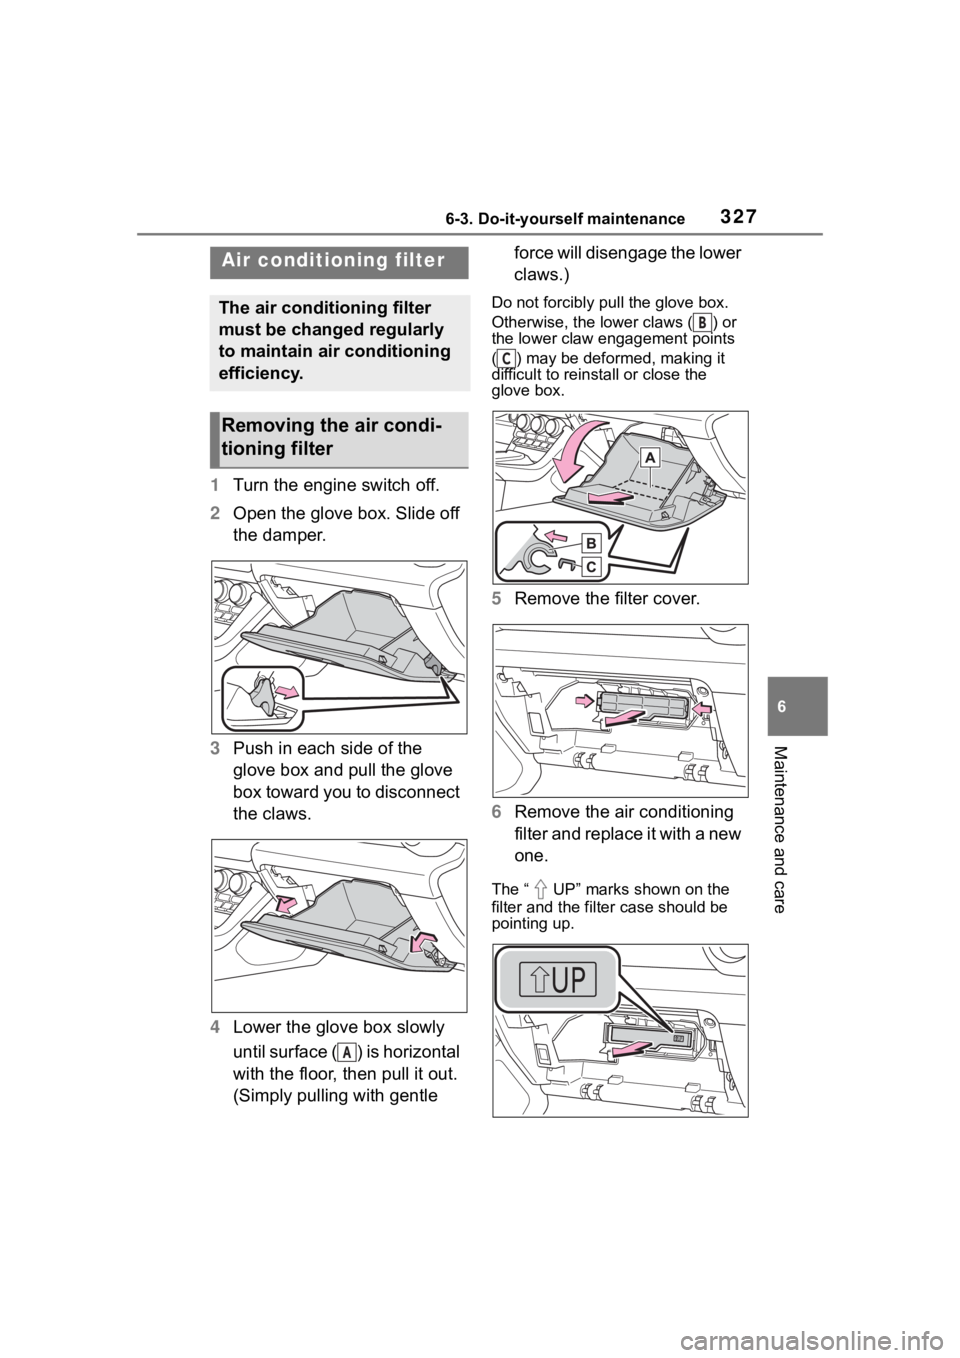
2 Open the glove box. Slide off
the damper.
3 Push in each side of the
glove box and pull the glove
box toward you to disconnect
the claws.
4 Lower the glove box slowly
until surface ( ) is horizontal
with the floor, then pull it out.
(Simply pulling with gentle force will disengage the lower
claws.)
Do not forcibly pull the glove box.
Otherwise, the lower claws ( ) or
the lower claw engagement points
( ) may be deformed, making it
difficult to reinstall or close the
glove box.
5
Remove the filter cover.
6 Remove the air conditioning
filter and replace it with a new
one.
The “ UP” marks shown on the
filter and the filter case should be
pointing up.
Air condition ing filter
The air conditioning filter
must be changed regularly
to maintain air conditioning
efficiency.
Removing the air condi-
tioning filter
A
B
C
Page 330 of 449
3306-3. Do-it-yourself maintenance
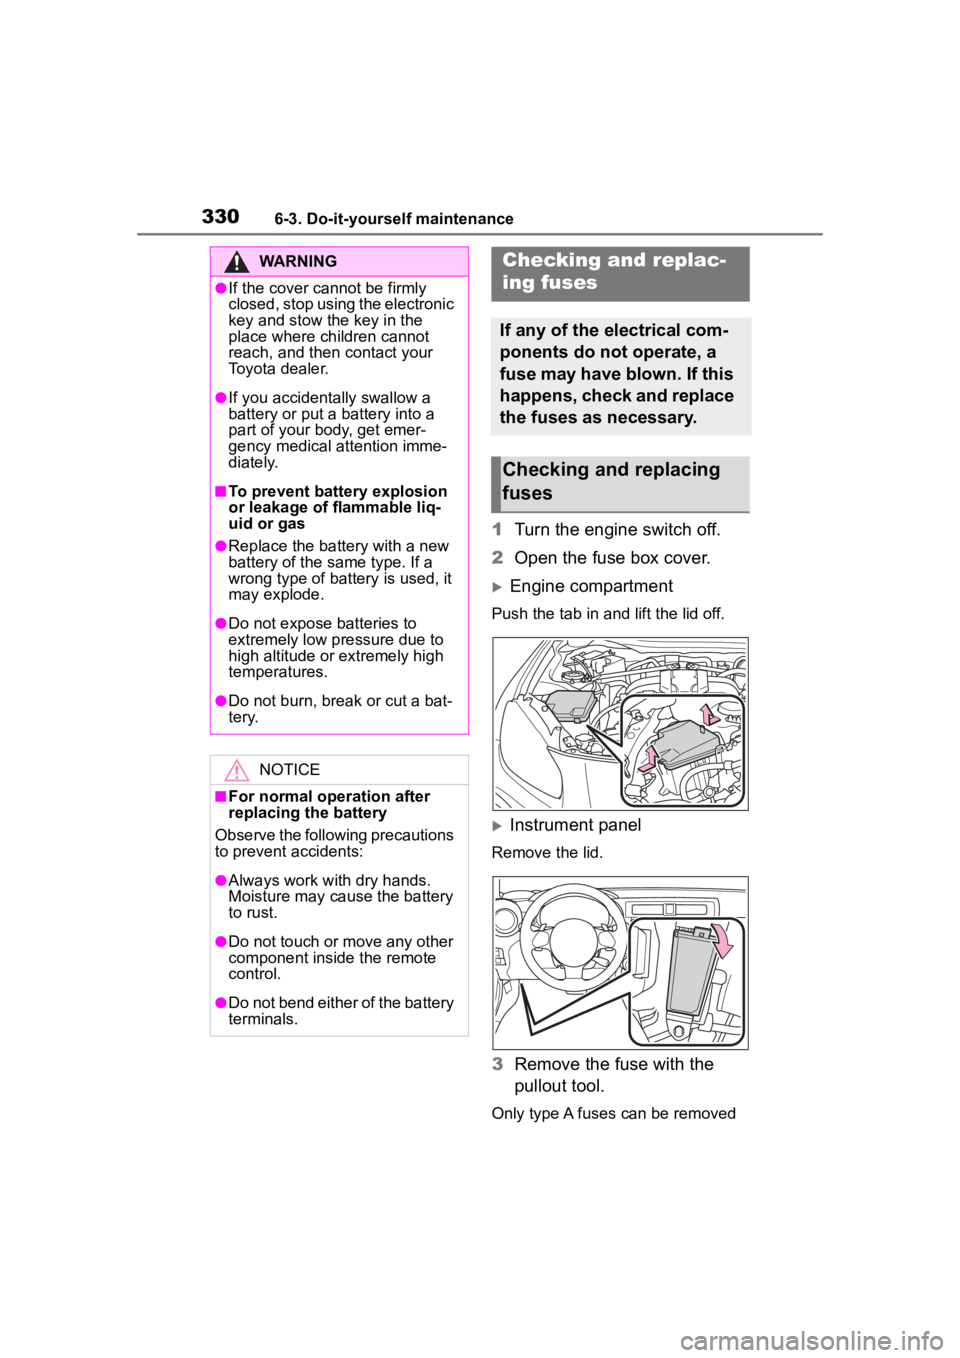
1Turn the engine switch off.
2 Open the fuse box cover.
Engine compartment
Push the tab in and lift the lid off.
Instrument panel
Remove the lid.
3Remove the fuse with the
pullout tool.
Only type A fuses can be removed
WARNING
●If the cover cannot be firmly
closed, stop using the electronic
key and stow the key in the
place where children cannot
reach, and then contact your
Toyota dealer.
●If you accidentally swallow a
battery or put a b attery into a
part of your body, get emer-
gency medical attention imme-
diately.
■To prevent battery explosion
or leakage of flammable liq-
uid or gas
●Replace the battery with a new
battery of the same type. If a
wrong type of battery is used, it
may explode.
●Do not expose batteries to
extremely low pressure due to
high altitude or extremely high
temperatures.
●Do not burn, bre ak or cut a bat-
tery.
NOTICE
■For normal operation after
replacing the battery
Observe the following precautions
to prevent accidents:
●Always work with dry hands.
Moisture may cau se the battery
to rust.
●Do not touch or move any other
component inside the remote
control.
●Do not bend either of the battery
terminals.
Checking a nd replac-
ing fuses
If any of the electrical com-
ponents do not operate, a
fuse may have blown. If this
happens, check and replace
the fuses as necessary.
Checking and replacing
fuses
Page 335 of 449
3356-3. Do-it-yourself maintenance
6
Maintenance and care
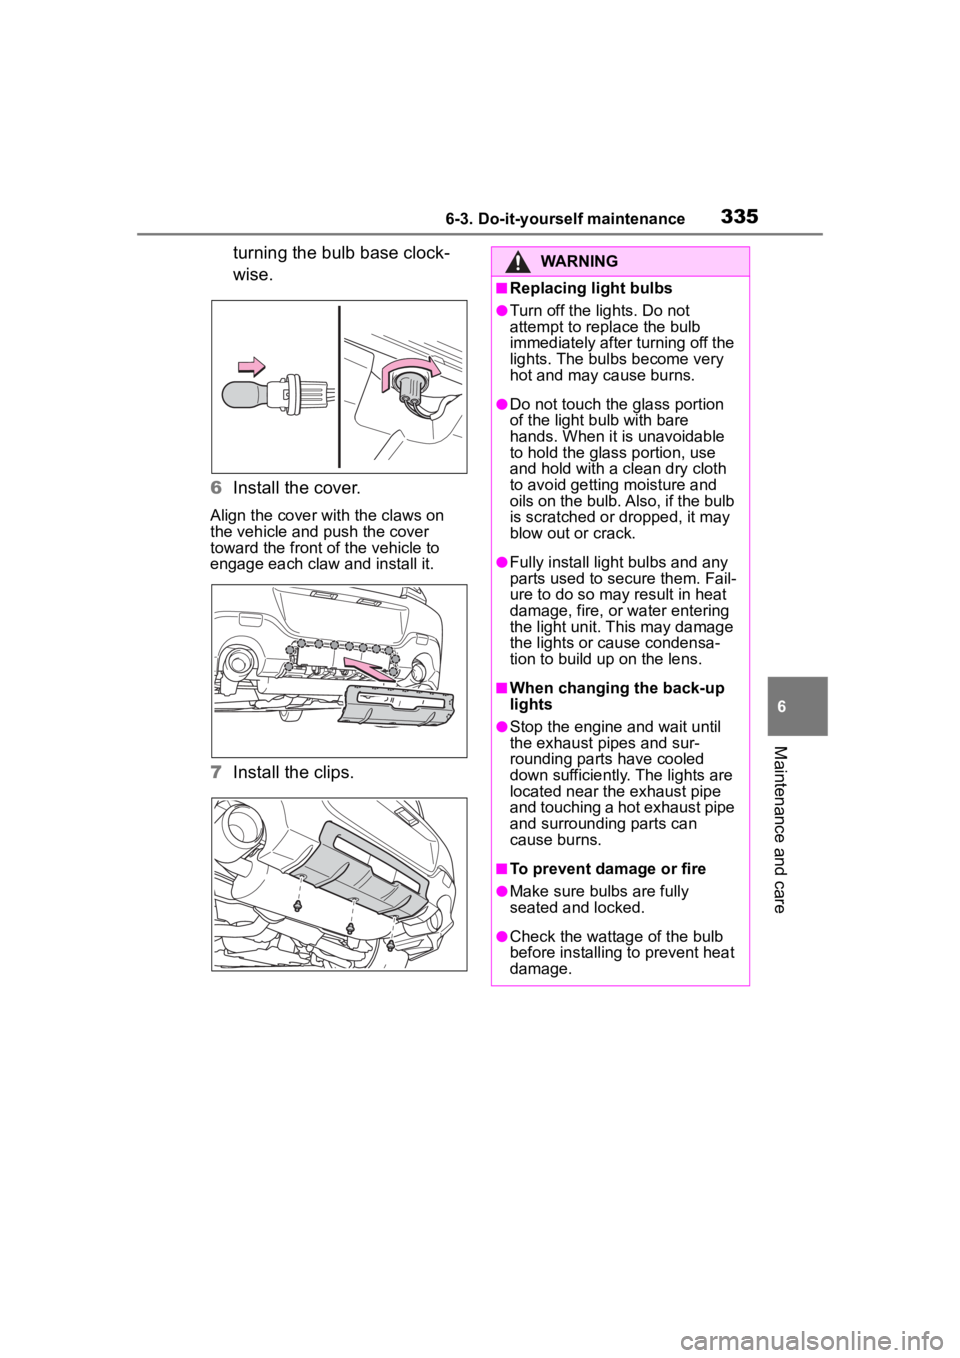
turning the bulb base clock-
wise.
6 Install the cover.
Align the cover with the claws on
the vehicle and push the cover
toward the front of the vehicle to
engage each claw and install it.
7Install the clips.
WARNING
■Replacing light bulbs
●Turn off the lights. Do not
attempt to replace the bulb
immediately after turning off the
lights. The bulbs become very
hot and may cause burns.
●Do not touch the glass portion
of the light bulb with bare
hands. When it is unavoidable
to hold the glass portion, use
and hold with a clean dry cloth
to avoid getting moisture and
oils on the bulb. Also, if the bulb
is scratched or dropped, it may
blow out or crack.
●Fully install light bulbs and any
parts used to secure them. Fail-
ure to do so may result in heat
damage, fire, or water entering
the light unit. This may damage
the lights or cause condensa-
tion to build up on the lens.
■When changing the back-up
lights
●Stop the engine and wait until
the exhaust pi pes and sur-
rounding parts have cooled
down sufficiently. The lights are
located near the exhaust pipe
and touching a hot exhaust pipe
and surrounding parts can
cause burns.
■To prevent damage or fire
●Make sure bulbs are fully
seated and locked.
●Check the wattage of the bulb
before installing to prevent heat
damage.