2023 TOYOTA 86 change time
[x] Cancel search: change timePage 175 of 449
1754-5. EyeSight
4
Driving
NOTICE
●The stereo camera monitors
and detects smears or blurs on
the front of the camera. How-
ever, detection is not 100%
accurate.
Under certain conditions, the
function may fail to detect
smears or blurs on the front of
the stereo camera accurately. In
addition, this function may not
detect that there is snow or ice
on the windshield close to the
stereo camera. In such condi-
tions, be sure to keep the wind-
shield clean at all times
(indicated by ). Otherwise
the system may not operate cor-
rectly. When this function
detects that the front of the ste-
reo camera is smeared or
blurred, no EyeSight functions
can be activated except for
Conventional Cruise Control.
●The stereo camera lenses are
precision components. Always
observe the following precau-
tions especially when handling
them.
• Never touch the stereo camera lenses, and do not attempt to
wipe or clean the lenses. Doing
so could damage or soil the
lens, and lead to improper sys-
tem performance. If you ever
touch a lens for any reason, be
sure to contact your Toyota
dealer.
• When cleaning the windshield, cover the front of the camera
casing with paper that does not
collect dust, such as copy
paper. Affix the paper to prevent
glass cleaner from getting on
the camera lenses. At this point,
make sure that the tape’s adhe-
sive surface does not come in
contact with the windshield or
the lens. Be sure to remove the
paper after cleaning.
• When having the inside of wind- shield cleaned at a service sta-
tion, etc., be sure to request that
the attendant covers the cam-
era covers before washing the
vehicle.
• Do not subject the stereo cam- era to a strong impact.
• Do not remove or disassemble the stereo camera.
• Do not change the positions where the stereo camera is
installed or mod ify any of the
surrounding structures.
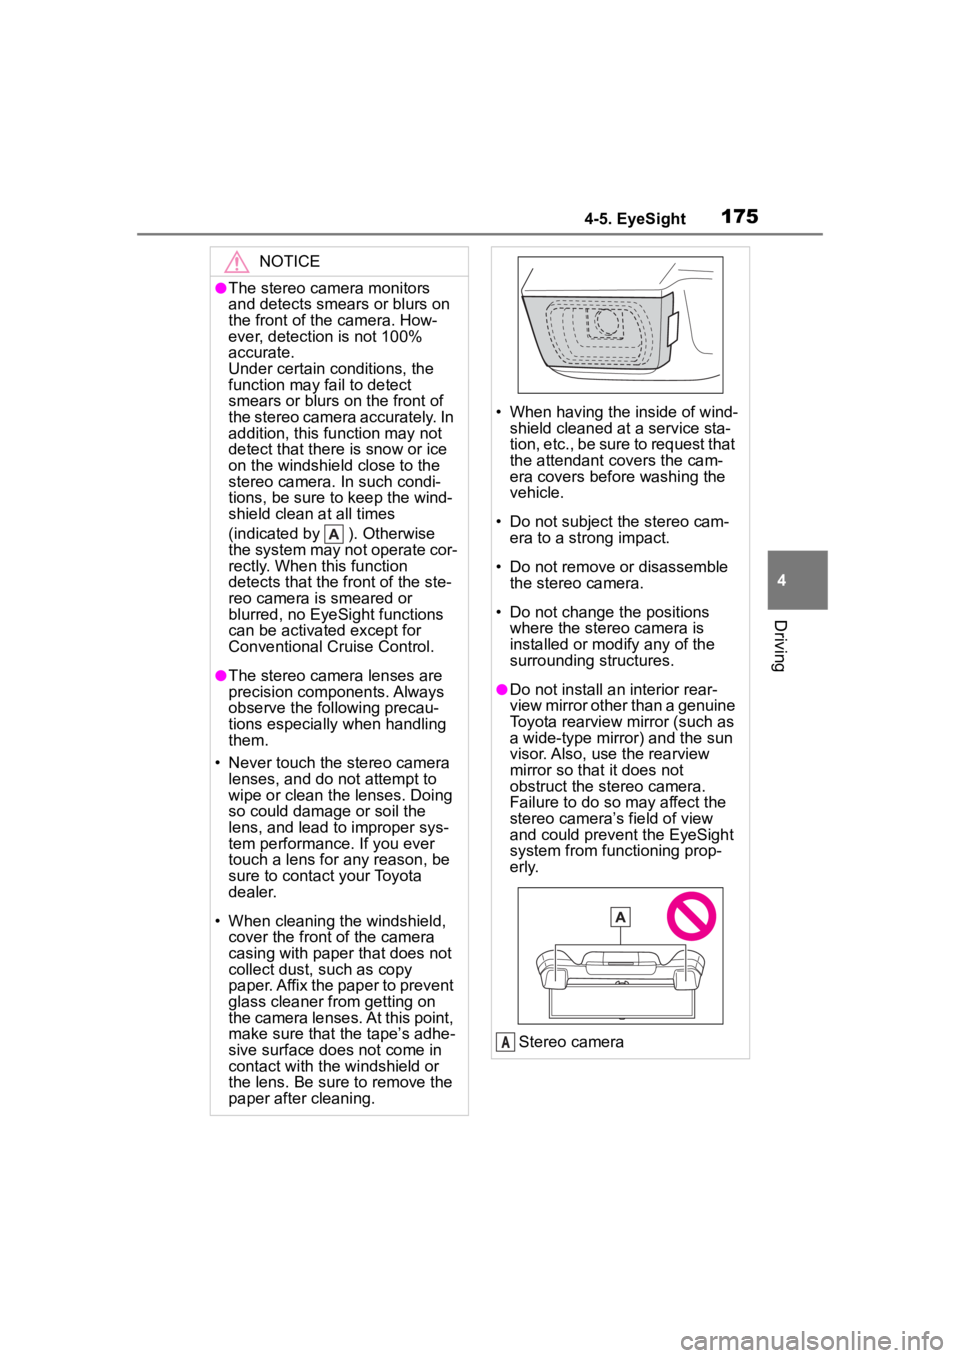
●Do not install an interior rear-
view mirror other than a genuine
Toyota rearview mirror (such as
a wide-type mirror) and the sun
visor. Also, use the rearview
mirror so that it does not
obstruct the stereo camera.
Failure to do so may affect the
stereo camera’s field of view
and could prevent the EyeSight
system from functioning prop-
erly.
Stereo camera
A
Page 177 of 449
1774-5. EyeSight
4
Driving
EyeSight includes the following
functions.
■Pre-Collision Braking Sys-
tem
This function uses a following
distance warning feature to
warn the driver to take evasive
action when there is the possi-
bility of a collision with a vehicle,
pedestrian or obstacle in front of
you. If the driver does not take
evasive action, the brakes are
applied automatically to help
reduce vehicle collision dam-
age or, if possible, help prevent
a collision. ( P.179)
■Adaptive Cruise Control
This function maintains the set
vehicle speed and when there is
a vehicle in front in the same
traffic lane, it follows the speed
of the vehicle in front up to the
maximum of the set vehicle
speed. ( P.190)
■Conventional Cruise Con-
trol
In this mode, the system main-
tains a constant vehicle speed.
It does not follow the vehicle in
front. This function can be used
even when the stereo camera
has temporarily stopped operat-
ing ( P.229). This function is
used by switching from Adaptive
Cruise Control to Conventional
Cruise Control. ( P.207)
NOTICE
●Keep the windshield (outside
and inside) clean at all times.
When the windshield has
become fogged, or it has a dirt
or an oil film on it, the stereo
camera may not detect objects
accurately and the EyeSight
system may not operate cor-
rectly. Never mount any device
to the center air vent, as any air-
flow change may impact Eye-
Sight performance.
●Do not place any stickers or
accessories on the windshield
(outside or inside). If you have
to do so (for example, legally
required or electronic toll tag),
avoid the area directly in front of
the camera. Otherwise, it may
adversely affect the field of view
of the stereo camera and can
cause improper operation of the
system. For details, contact a
Toyota dealer.
●Do not use any glass coating
agents or similar substances on
the windshield. Doing so may
interfere with the proper opera-
tion of the system.
●Do not install any film or an
additional layer of glass on the
windshield. The system may not
operate correctly.
●If there are scratches or cracks
on the windshield, contact a
Toyota dealer.
●To have the windshield replaced
or repaired, contact a Toyota
dealer. Do not install a wind-
shield other than a genuine Toy-
ota windshield. The stereo
camera may not be able to
detect objects accurately and
the EyeSight system may not
operate properly.
EyeSight functions
Page 187 of 449
1874-5. EyeSight
4
Driving
If the system then determines that the risk of collision is ext remely high, the
alert changes to a continuous beeping sound and stronger brakin g control
is activated. Despite any evasive action taken by the driver, if the system
subsequently determine s that a collision is unavoidable, brakin g and
engine output are con trolled by the system.
When the vehicle is completely stopped by the automatic braking system, a
short tone “3 intermittent beeps , 1 short beep and 1 long beep” will sound
and braking will be gradually released and the vehicle will sta rt creeping. To
stop the vehicle completely, d epress the brake pedal after the vehicle has
stopped.
●Neither first braking nor secondary braki ng will operate in the following
cases.
• The vehicle speed is approximately 1 mph (1 km/h) or less (Whe n the shift
lever is in the N position and your vehicle speed is approximat ely 2 mph (4
km/h) or less) or 100 mph (160 km/h) or more.
• VSC is active.
●If the system detects the stop lights of the vehicle in front, your vehicle will
start decelerating earlier than if it does not.
●There are some cases where the first braking is applied for a l onger period
of time. One of the reasons for t his is due to a large speed difference with
an obstacle in front. In those cases, stronger or weaker brakin g control
may be activated.
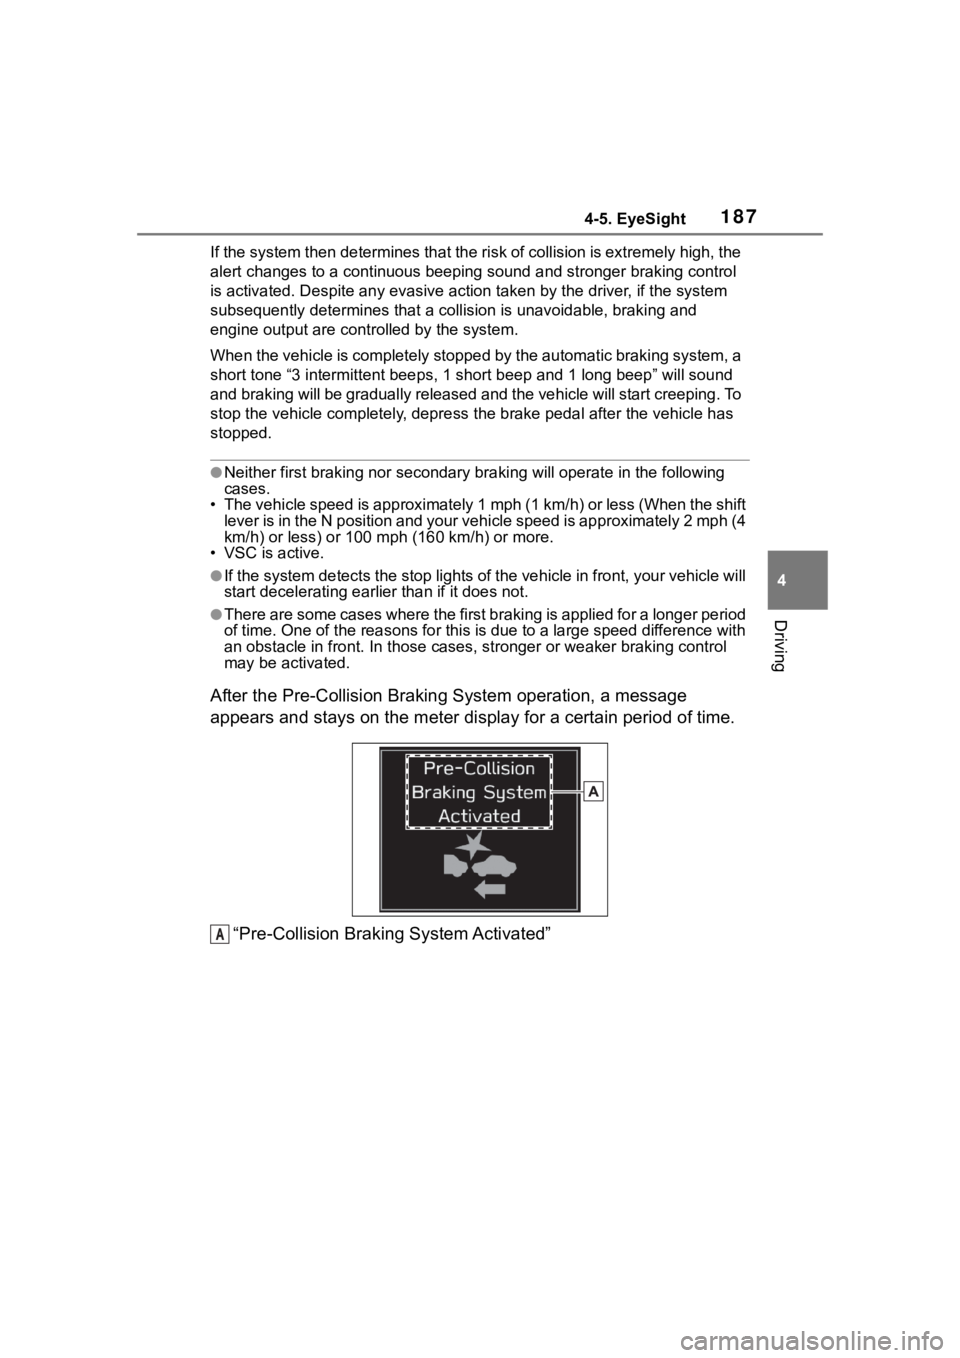
After the Pre-Collision Braki ng System operation, a message
appears and stays on the meter display for a certain period of time.
“Pre-Collision Braking System Activated”
A
Page 197 of 449
1974-5. EyeSight
4
Driving
indicator
Following distance setting
indicator (icon)
When the multi-information display
is set to display content other than
the driving suppor t system informa-
tion display, the following distance
setting indicator is shown as an
icon.
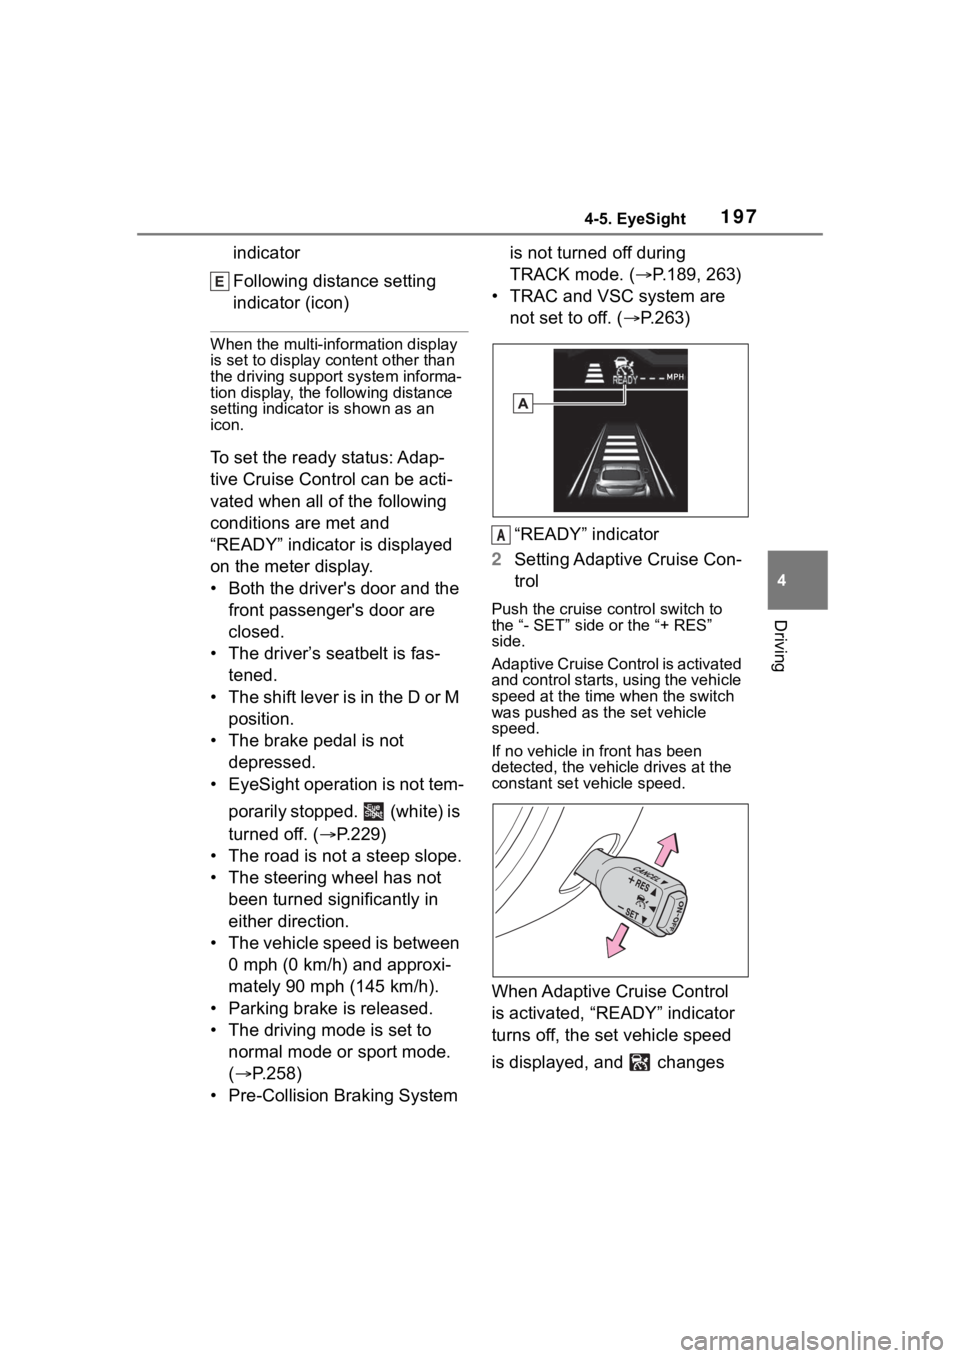
To set the ready status: Adap-
tive Cruise Control can be acti-
vated when all of the following
conditions are met and
“READY” indicator is displayed
on the meter display.
• Both the driver's door and the
front passenger's door are
closed.
• The driver’s seatbelt is fas- tened.
• The shift lever is in the D or M position.
• The brake pedal is not depressed.
• EyeSight operation is not tem-
porarily stopped. (white) is
turned off. ( P.229)
• The road is not a steep slope.
• The steering wheel has not been turned significantly in
either direction.
• The vehicle speed is between 0 mph (0 km/h) and approxi-
mately 90 mph (145 km/h).
• Parking brake is released.
• The driving mode is set to normal mode or sport mode.
( P.258)
• Pre-Collision Braking System is not turned off during
TRACK mode. (
P.189, 263)
• TRAC and VSC system are not set to off. ( P.263)
“READY” indicator
2 Setting Adaptive Cruise Con-
trol
Push the cruise control switch to
the “- SET” side or the “+ RES”
side.
Adaptive Cruise Control is activated
and control starts, using the vehicle
speed at the time when the switch
was pushed as the set vehicle
speed.
If no vehicle in front has been
detected, the vehicle drives at the
constant set vehicle speed.
When Adaptive Cruise Control
is activated, “READY” indicator
turns off, the set vehicle speed
is displayed, and changes
A
Page 200 of 449
2004-5. EyeSight
approximately 37 mph (60 km/h),
the system starts acceleration to
the set vehicle speed more quickly
because it is linked with the turn
signal.
• If the setting of driving lane is dif-
ferent from the actual driving
direction, the vehicle may start to
accelerate faster than usual when
the driver signals a lane change to
move from the passing lane to the
driving lane. ( P.400)
●Cruise control acceleration char-
acteristics can be set to one of
four levels. ( P.400)
■Increasing the set vehicle
speed
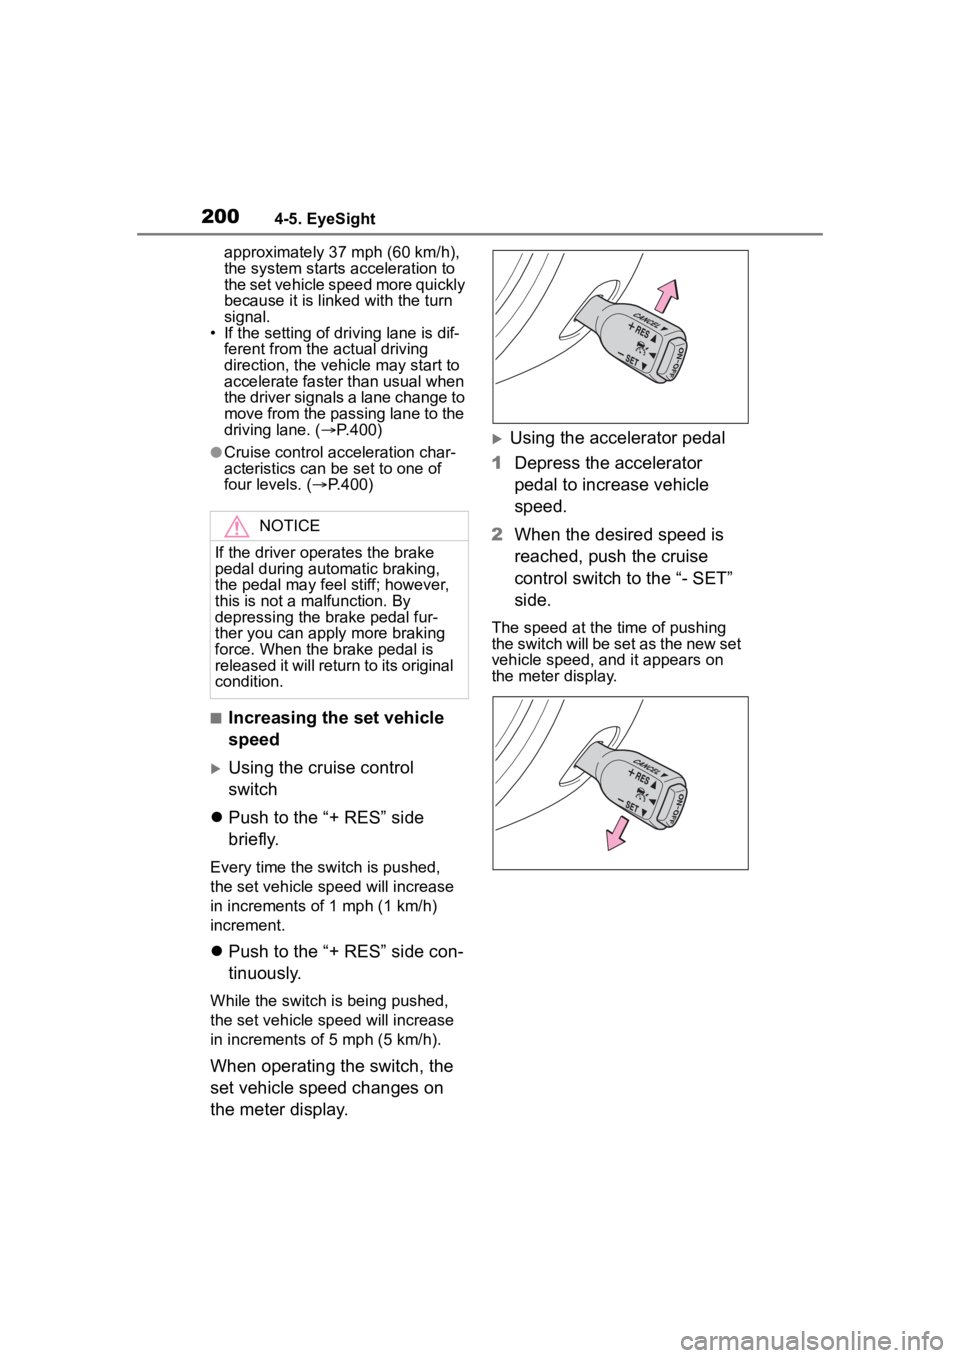
Using the cruise control
switch
Push to the “+ RES” side
briefly.
Every time the switch is pushed,
the set vehicle sp eed will increase
in increments of 1 mph (1 km/h)
increment.
Push to the “+ RES” side con-
tinuously.
While the switch is being pushed,
the set vehicle sp eed will increase
in increments of 5 mph (5 km/h).
When operating the switch, the
set vehicle speed changes on
the meter display.
Using the accelerator pedal
1 Depress the accelerator
pedal to increase vehicle
speed.
2 When the desired speed is
reached, push the cruise
control switch to the “- SET”
side.
The speed at the time of pushing
the switch will be set as the new set
vehicle speed, and it appears on
the meter display.
NOTICE
If the driver operates the brake
pedal during automatic braking,
the pedal may feel stiff; however,
this is not a malfunction. By
depressing the brake pedal fur-
ther you can apply more braking
force. When the brake pedal is
released it will return to its original
condition.
Page 201 of 449
2014-5. EyeSight
4
Driving
■Decreasing the set vehicle
speed
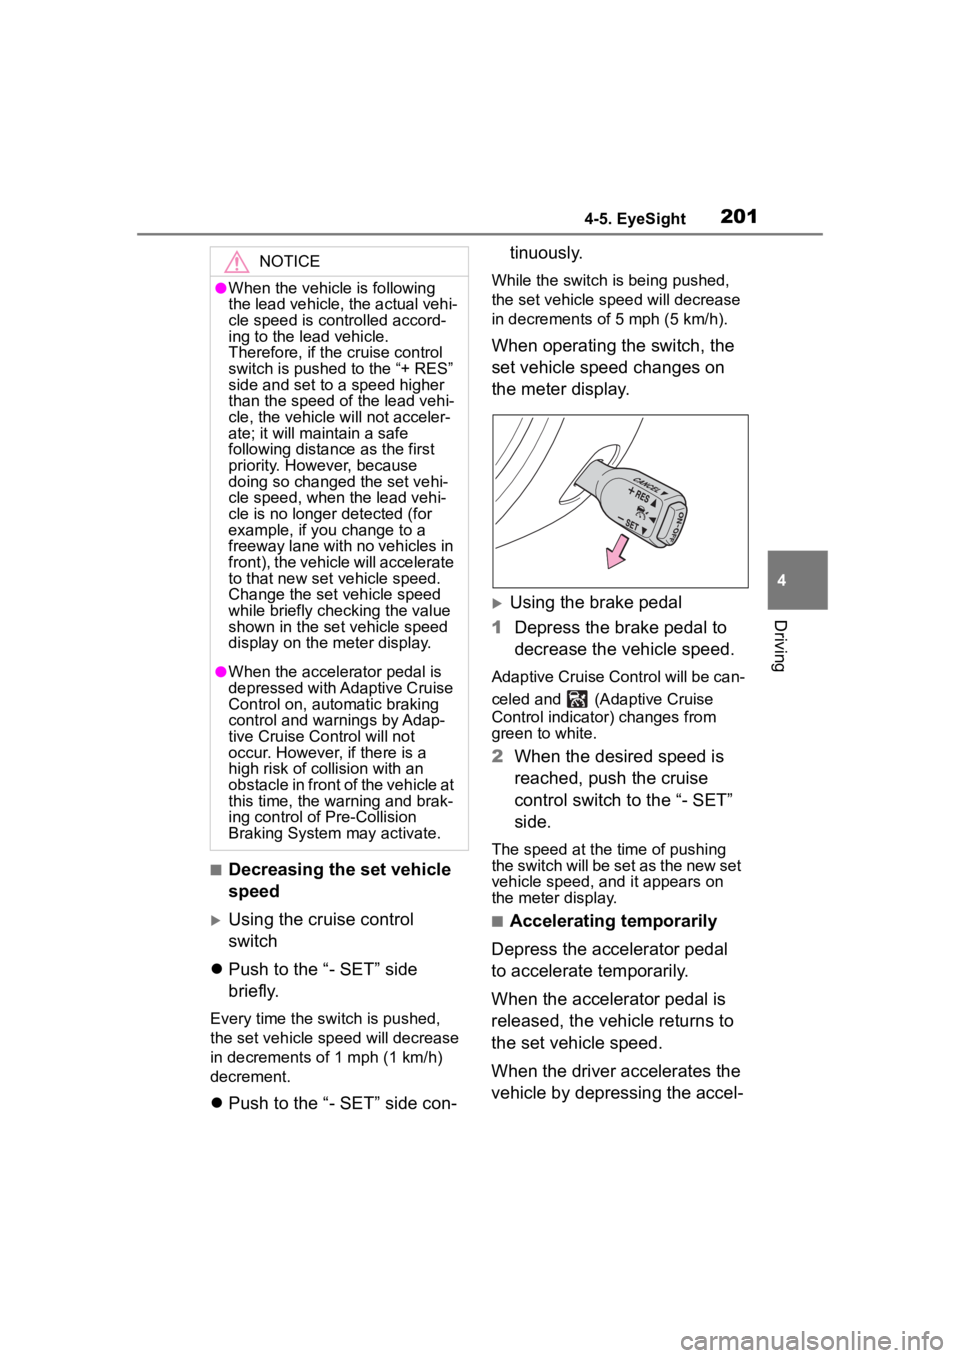
Using the cruise control
switch
Push to the “- SET” side
briefly.
Every time the switch is pushed,
the set vehicle speed will decrease
in decrements o f 1 mph (1 km/h)
decrement.
Push to the “- SET” side con- tinuously.
While the switch is being pushed,
the set vehicle spee
d will decrease
in decrements of 5 mph (5 km/h).
When operating the switch, the
set vehicle speed changes on
the meter display.
Using the brake pedal
1 Depress the brake pedal to
decrease the vehicle speed.
Adaptive Cruise Control will be can-
celed and (Adaptive Cruise
Control indicator) changes from
green to white.
2When the desired speed is
reached, push the cruise
control switch to the “- SET”
side.
The speed at the time of pushing
the switch will be set as the new set
vehicle speed, and it appears on
the meter display.
■Accelerating temporarily
Depress the accelerator pedal
to accelerate temporarily.
When the accelerator pedal is
released, the vehicle returns to
the set vehicle speed.
When the driver accelerates the
vehicle by depressing the accel-
NOTICE
●When the vehicle is following
the lead vehicle, the actual vehi-
cle speed is controlled accord-
ing to the lead vehicle.
Therefore, if the cruise control
switch is pushed to the “+ RES”
side and set to a speed higher
than the speed of the lead vehi-
cle, the vehicle will not acceler-
ate; it will maintain a safe
following distance as the first
priority. However, because
doing so changed the set vehi-
cle speed, when the lead vehi-
cle is no longer detected (for
example, if you change to a
freeway lane with no vehicles in
front), the vehicle will accelerate
to that new set vehicle speed.
Change the set vehicle speed
while briefly checking the value
shown in the set vehicle speed
display on the meter display.
●When the accelerator pedal is
depressed with Adaptive Cruise
Control on, automatic braking
control and warnings by Adap-
tive Cruise Control will not
occur. However, if there is a
high risk of collision with an
obstacle in front of the vehicle at
this time, the warning and brak-
ing control o f Pre-Collision
Braking System may activate.
Page 202 of 449
2024-5. EyeSight
erator pedal while Adaptive
Cruise Control is operating,
turns white. When the accelera-
tion is completed, returns to
green.
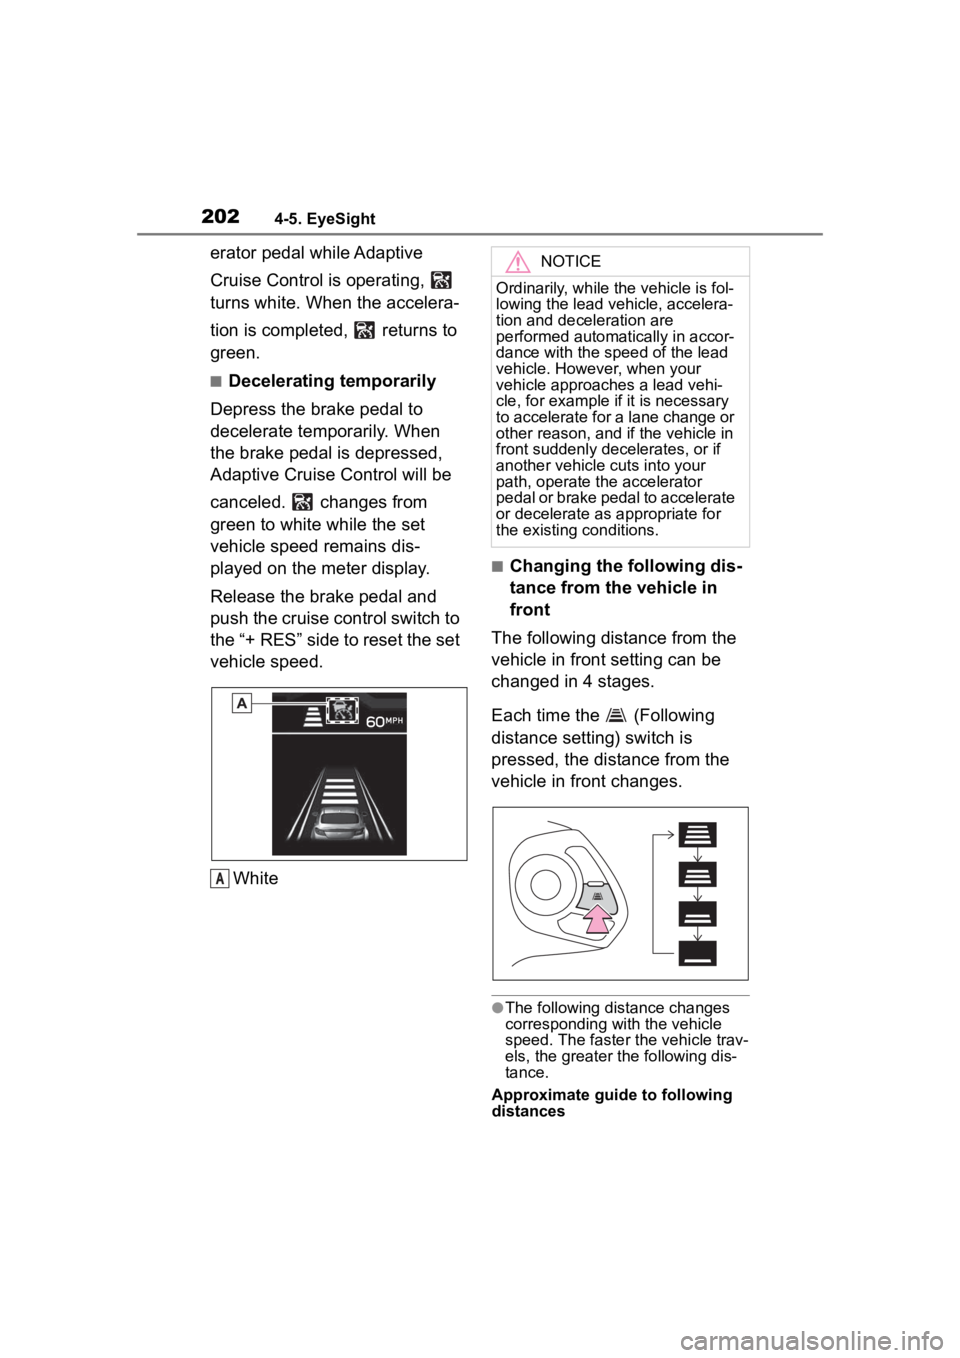
■Decelerating temporarily
Depress the brake pedal to
decelerate temporarily. When
the brake pedal is depressed,
Adaptive Cruise Control will be
canceled. changes from
green to white while the set
vehicle speed remains dis-
played on the meter display.
Release the brake pedal and
push the cruise control switch to
the “+ RES” side to reset the set
vehicle speed.
White
■Changing the following dis-
tance from the vehicle in
front
The following distance from the
vehicle in front setting can be
changed in 4 stages.
Each time the (Following
distance setting) switch is
pressed, the distance from the
vehicle in front changes.
●The following distance changes
corresponding with the vehicle
speed. The faster the vehicle trav-
els, the greater the following dis-
tance.
Approximate guide to following
distances
A
NOTICE
Ordinarily, while the vehicle is fol-
lowing the lead veh icle, accelera-
tion and deceleration are
performed automatically in accor-
dance with the speed of the lead
vehicle. However, when your
vehicle approaches a lead vehi-
cle, for example if it is necessary
to accelerate for a lane change or
other reason, and if the vehicle in
front suddenly decelerates, or if
another vehicle cuts into your
path, operate the accelerator
pedal or brake pedal to accelerate
or decelerate as appropriate for
the existing conditions.
Page 210 of 449
2104-5. EyeSight
• The vehicle speed is between approximately 20 mph (30
km/h) and 90 mph (145 km/h).
• Parking brake is released.
• The driving mode is set to normal mode or sport mode.
( P.258)
• Pre-Collision Braking System is not turned off during
TRACK mode. ( P.189, 263)
• TRAC and VSC system are not set to off. ( P.263)
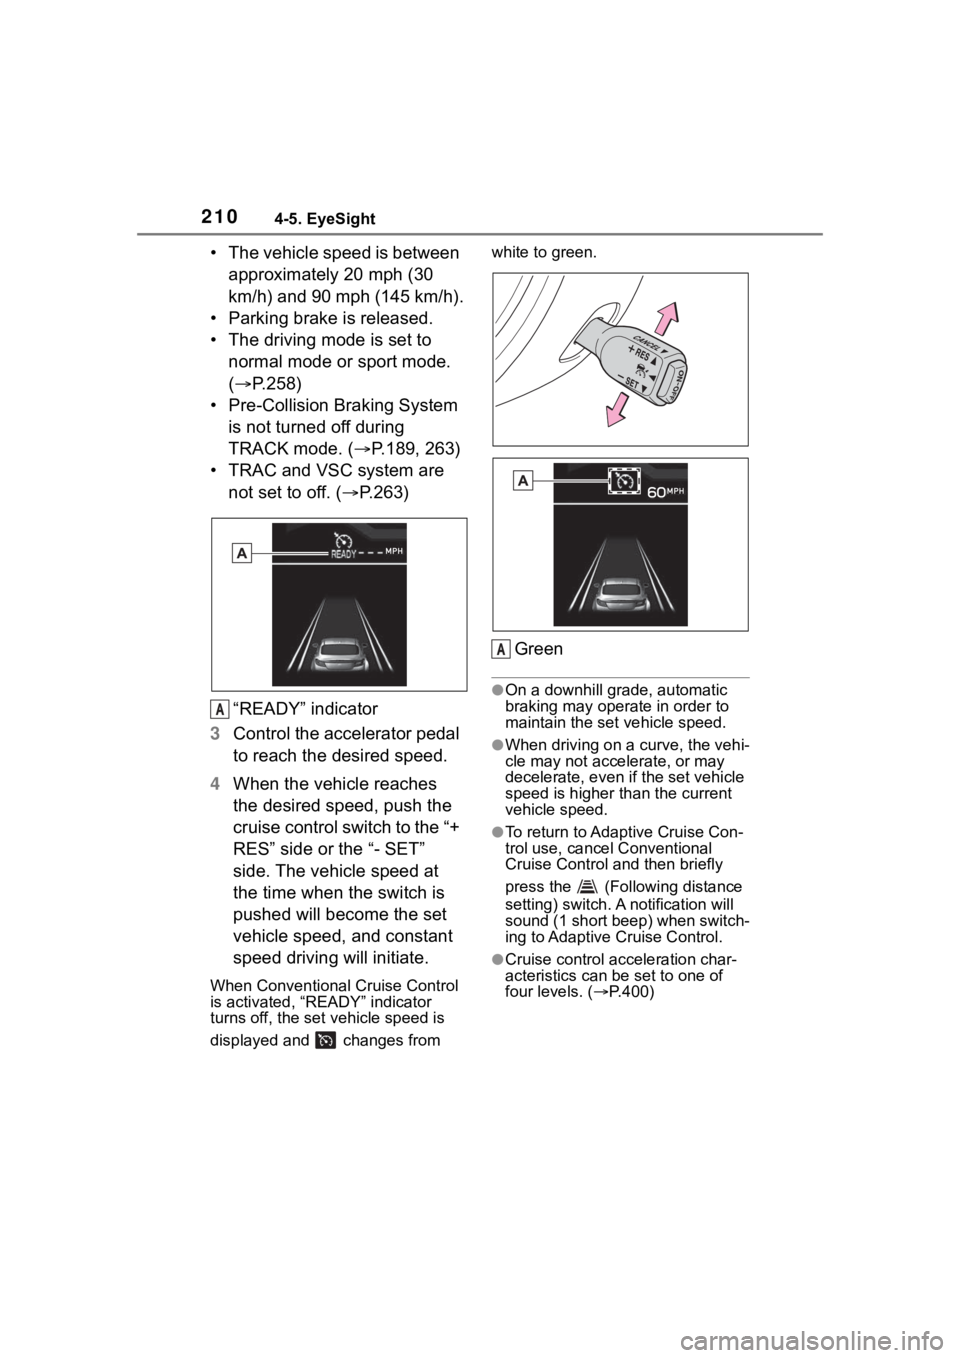
“READY” indicator
3 Control the accelerator pedal
to reach the desired speed.
4 When the vehicle reaches
the desired speed, push the
cruise control switch to the “+
RES” side or the “- SET”
side. The vehicle speed at
the time when the switch is
pushed will become the set
vehicle speed, and constant
speed driving will initiate.
When Conventional Cruise Control
is activated, “READY” indicator
turns off, the set vehicle speed is
displayed and changes from white to green.
Green
●On a downhill grade, automatic
braking may operate in order to
maintain the set vehicle speed.
●When driving on a curve, the vehi-
cle may not accelerate, or may
decelerate, e
ven if the set vehicle
speed is higher than the current
vehicle speed.
●To return to Adaptive Cruise Con-
trol use, cancel Conventional
Cruise Control and then briefly
press the (Following distance
setting) switch. A notification will
sound (1 short beep) when switch-
ing to Adaptive Cruise Control.
●Cruise control acceleration char-
acteristics can be set to one of
four levels. ( P.400)
A
A