2023 TOYOTA 86 emergency towing
[x] Cancel search: emergency towingPage 2 of 449

2TABLE OF CONTENTS
For your information ........................5
Reading this manual ...................... 10
How to search ................................ 11
Pictorial index ................................ 12
1-1. For safe use Before driving ........................ 22
For safe driving ..................... 23
Seat belts .............................. 25
SRS airbags .......................... 29
Front passenger occupant clas- sification system.................. 56
Exhaust gas precautions....... 62
1-2. Child safety Riding with children ............... 63
Child restraint systems .......... 64
1-3. Emergency assistance Safety Connect ..................... 75
1-4. Theft deterrent system Engine immobilizer system ... 80
Alarm ..................................... 81
2-1. Instrument cluster Warning lights and indicators............................................ 84
Gauges and meters .............. 88
Multi-information display ....... 93
3-1. Key information Keys ................................... 102
3-2. Opening, closing and locking the doors and trunk
Doors ................................. 105
Trunk .................................. 107Smart key system ..............
111
3-3. Adjusting the seats Front seats ......................... 119
Rear seats.......................... 121
Head restraints................... 123
3-4. Adjusting the steering wheel and mirrors
Steering wheel ................... 125
Inside rear view mirror ....... 126
Outside rear view mirrors ... 127
3-5. Opening, closing the windows Power windows .................. 129
4-1. Before driving Driving the vehicle.............. 132
Cargo and luggage ............ 140
Vehicle load limits .............. 143
Trailer towing...................... 143
Dinghy towing .................... 144
4-2. Driving procedures Engine (ignition) switch ...... 145
Automatic transmission ...... 149
Manual transmission .......... 153
Turn signal lever................. 155
Parking brake ..................... 156
ASC (Active Sound Control) ......................................... 157
4-3. Operating the lights and wip- ers
Headlight switch ................. 158
High Beam Assist ............... 16
2
Windshield wipers an
d washer
......................................... 165
4-4. Refueling Opening the fuel tank cap .. 167
4-5. EyeSight EyeSight............................. 170
1For safety and security
2Vehicle status information
and indicators
3Before driving
4Driving
Page 14 of 449

14Pictorial index
■Instrument panel
Engine switch ..................................................................... P.145
Starting the engine/changing the mode .......................... ..... P.145
Emergency stop of the engin e ............................................. P.338
When the engine will not start ................................. ............. P.367
Warning messages ............................................... ............... P.357
Shift lever.................................................... ................. P.149,153
Changing the shift position.................................... ........ P.150,153
Precautions for towing .. ....................................... ................ P.341
When the shift lever does not move
*1.................................. P.150
Multi-information display . ................................................... P.93
Display ........................................................ ........................... P.93
When a warning message is displayed ............................ .... P.357
Meters ......................................................... .......................... P.88
Reading the meters/adjusting the instrument panel lights ..... P.88
Warning lights/indicator lights ................................ ................ P.84
When a warning light comes on .................................. ......... P.348
A
C
D
Page 78 of 449
781-3. Emergency assistance
connection screen on the multime-
dia system screen to cancel the
connection to a response-center
agent.
■Enhanced Roadside Assis-
tance (“i” button)
Enhanced Roadside Assistance
adds GPS data to the already
included warranty-based Toyota
roadside service.
Subscribers can press the “i”
button on the interior lights to
contact a Roadside Assistance
provider, who can help with a
wide range of needs, such as:
towing, flat tire, fuel delivery, etc.
For a description of the
Enhanced Roadside Assistance
services and their limitations,
please see the Safety Connect
Terms and Conditions, which
are available at Toyota.com in
the United States and Toyota.ca
in Canada.
If the “i” button on the interior
lights is pressed unintentionally,
press and hold the “i” button for
approximately 2 seconds or
more or operate the connection
screen on the multimedia sys-
tem screen to cancel the con-
nection to a roadside assistance
provider.
Important! Read this informa-
tion before using Safety Con- nect.
■Exposure to radio fre-
quency signals
The Safety Connect system
installed in your vehicle is a
low-power radio transmitter and
receiver. It receives and also
sends out radio frequency (RF)
signals.
In August 1996, the Federal
Communications Commission
(FCC) adopted RF exposure
guidelines with safety levels for
mobile wireless phones. Those
guidelines are consistent with
the safety standards previously
set by the following U.S. and
international standards bodies.
ANSI (American National
Standards Institute) C95.1
[1992]
NCRP (National Council on
Radiation Protection and
Measurement) Report 86
[1986]
ICNIRP (International Com-
mission on Non-Ionizing Radi-
ation Protection) [1996]
Those standards were based on
comprehensive and periodic
evaluations of the relevant sci-
entific literature. Over 120 scien-
tists, engineers, and physicians
from universities, and govern-
ment health agencies and
industries reviewed the avail-
able body of research to
develop the ANSI Standard
Safety information for
Safety Connect
Page 255 of 449
2554-6. Using other driving systems
4
Driving
●Conventional Cruise Control
enables you to maintain a con-
stant vehicle speed without hold-
ing your foot on the accelerator
pedal and it is operative when the
vehicle speed is 20 mph (30 km/h)
or more.
●Make sure the Conventional
Cruise Control system is turned
off when the Conventional Cruise
Control is not in use to avoid unin-
tentionally setting of the Conven-
tional Cruise Control.
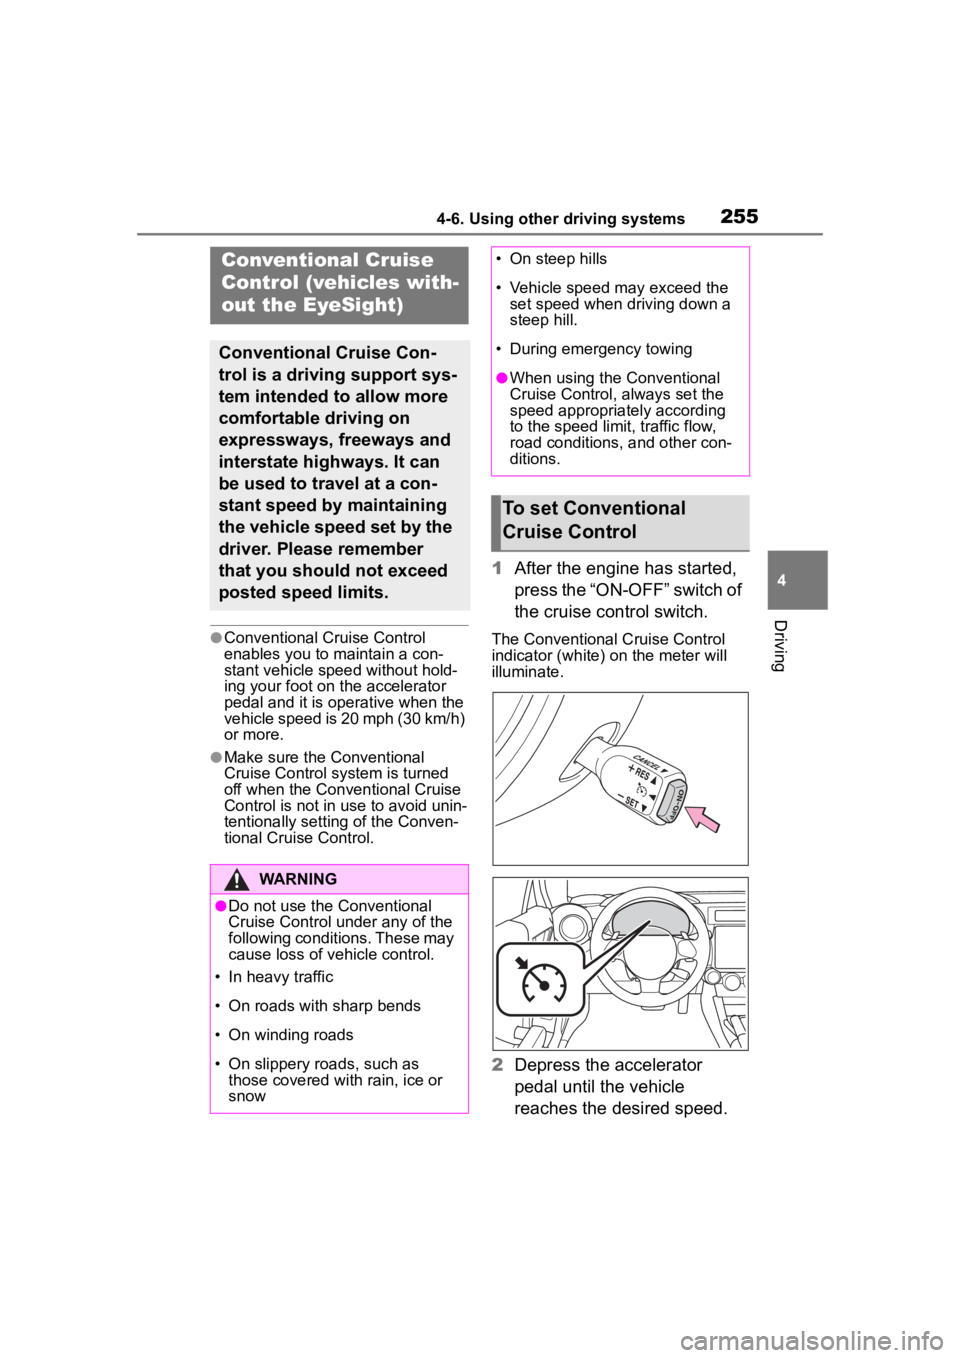
1After the engine has started,
press the “ON-OFF” switch of
the cruise control switch.
The Conventional Cruise Control
indicator (white) on the meter will
illuminate.
2Depress the accelerator
pedal until the vehicle
reaches the desired speed.
Conventional Cruise
Control (vehicles with-
out the EyeSight)
Conventional Cruise Con-
trol is a driving support sys-
tem intended to allow more
comfortable driving on
expressways, freeways and
interstate highways. It can
be used to travel at a con-
stant speed by maintaining
the vehicle speed set by the
driver. Please remember
that you should not exceed
posted speed limits.
WARNING
●Do not use the Conventional
Cruise Control under any of the
following conditions. These may
cause loss of vehicle control.
• In heavy traffic
• On roads with sharp bends
• On winding roads
• On slippery roads, such as those covered with rain, ice or
snow
• On steep hills
• Vehicle speed may exceed the set speed when d riving down a
steep hill.
• During emergency towing
●When using the Conventional
Cruise Control, always set the
speed appropriately according
to the speed limit, traffic flow,
road conditions, and other con-
ditions.
To set Conventional
Cruise Control
Page 341 of 449
3417-2. Steps to take in an emergency
7
When trouble arises
7-2.Steps to take in an emergency
If your vehicle needs
to be towed
If towing is necessary, we
recommend having your
vehicle towed by your Toy-
ota dealer or commercial
towing service, using a
wheel-lift type truck or flat-
bed truck.
Use a safety chain system
for all towing, and abide by
all state/provincial and local
laws.
If towing your vehicle with a
wheel-lift type truck from
the front, the vehicle's rear
wheels and axles must be in
good conditions. ( P.342)
If they are damaged, use a
towing dolly or flatbed
truck.
WARNING
Observe the following precau-
tions.
Failure to do so m ay result in
death or serious injury.
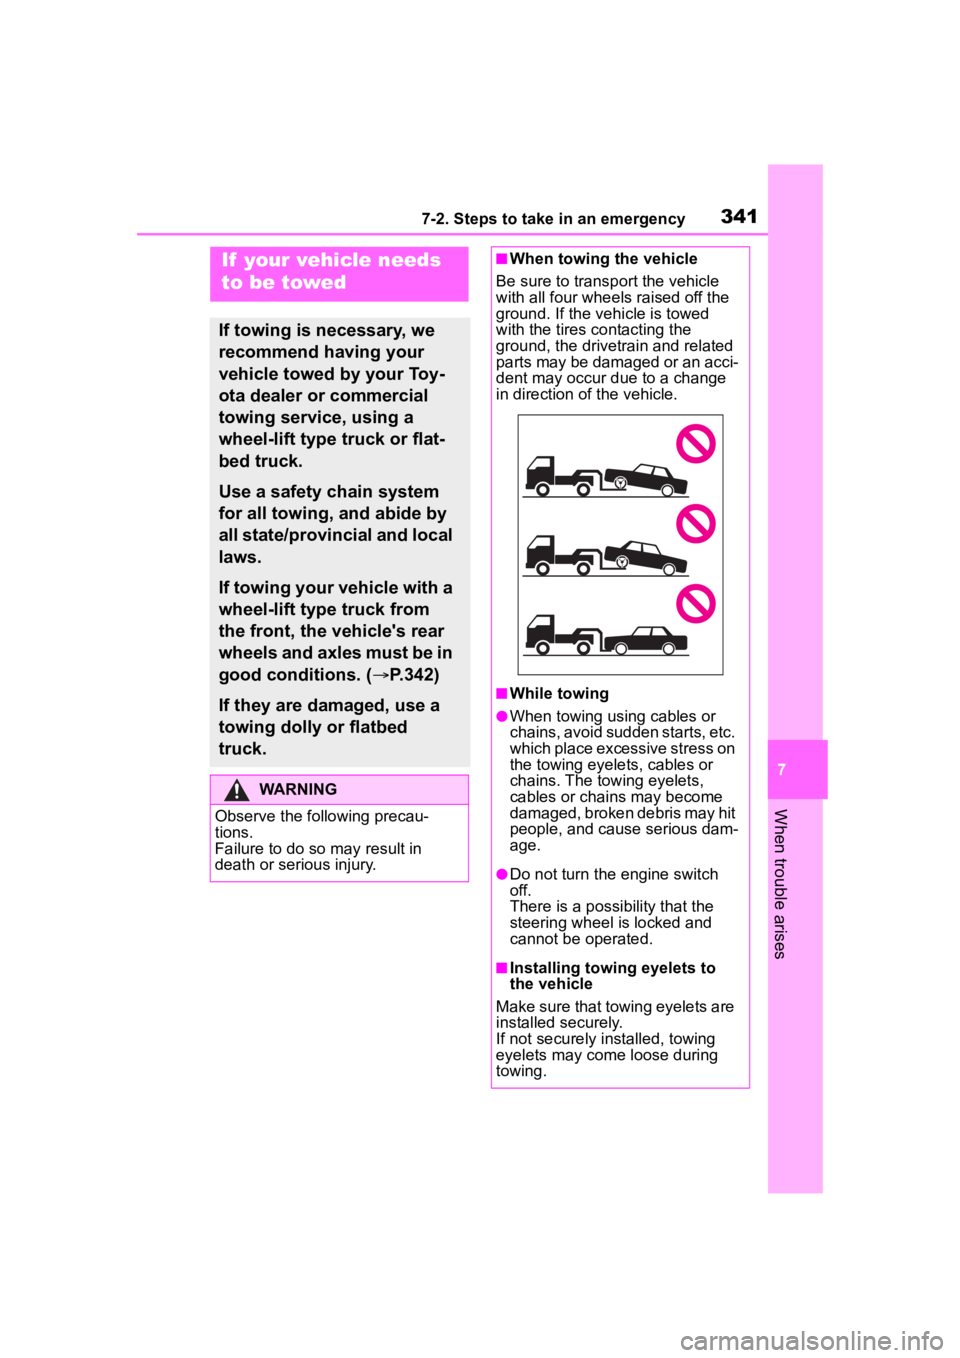
■When towing the vehicle
Be sure to transp ort the vehicle
with all four wheels raised off the
ground. If the vehicle is towed
with the tires co ntacting the
ground, the drivetrain and related
parts may be damaged or an acci-
dent may occur due to a change
in direction of the vehicle.
■While towing
●When towing using cables or
chains, avoid sudden starts, etc.
which place excessive stress on
the towing eyelets, cables or
chains. The towing eyelets,
cables or chains may become
damaged, broken debris may hit
people, and cause serious dam-
age.
●Do not turn the engine switch
off.
There is a possibility that the
steering wheel is locked and
cannot be operated.
■Installing towing eyelets to
the vehicle
Make sure that towing eyelets are
installed securely.
If not securely installed, towing
eyelets may come loose during
towing.
Page 342 of 449

3427-2. Steps to take in an emergency
The following may indicate a
problem with your transmission.
Contact your Toyota dealer or
commercial towing service
before towing.
The engine is running but the
vehicle does not move.
The vehicle makes an abnor-
mal sound.
From the front
Use a towing dolly under the
rear wheels.
From the rear
WARNING
■After towing
Make sure to remove the towing
eyelet.
If not removed, the SRS airbags
may not deploy correctly if the
vehicle is involved in a frontal col-
lision, or the fuel pump shutoff
system may not operate correctly
if involved in a rear collision.
NOTICE
■To prevent damage to the
vehicle when towing using a
wheel-lift type truck
●Do not tow the vehicle from the
rear when the engine switch is
off. The steering lock mecha-
nism is not strong enough to
hold the front wheels straight.
●When raising the vehicle,
ensure adequate ground clear-
ance for towing at the opposite
end of the raised vehicle. With-
out adequate clearance, the
vehicle could be damaged while
being towed.
■To prevent damage to the
vehicle when towing with a
sling-type truck
Do not tow with a sling-type truck,
either from the front or rear.
■To prevent damage to the
vehicle during emergency
towing
Do not secure cables or chains to
the suspension components.
■When towing down a long
slope
Use a wheel lift-type or flat bed
truck.
If a wheel lift-type or flat bed truck
is not used, the brakes may over-
heat, leading to poor brake perfor-
mance.
Situations when it is nec-
essary to contact dealers
before towing
Towing with a wheel-lift
type truck
Page 343 of 449
3437-2. Steps to take in an emergency
7
When trouble arises
Use a towing dolly under the
front wheels.
When using a flat-bed truck to
transport the vehicle, use tire
strapping belts. Refer to the
owner’s manual of the flat-bed
truck for the tire strapping
method.
In order to suppress vehicle
movement during transporta-
tion, set the parking brake and
turn the engine switch off.
If a tow truck is not available in
an emergency, your vehicle may
be temporarily towed using
cables or chains secured to the
emergency towing eyelets. This
should only be attempted on
hard surfaced roads for at most
19 miles (30 km) at under 18
mph (30 km/h).
A driver must be in the vehicle to steer and operate the brakes.
The vehicle’s wheels, drive train,
axles, steering and brakes must
be in good condition.
For vehicles with an automatic
transmission, only the front tow-
ing eyelets may be used.
To have your vehicle towed by
another vehicle, the towing eye-
let must be installed to your
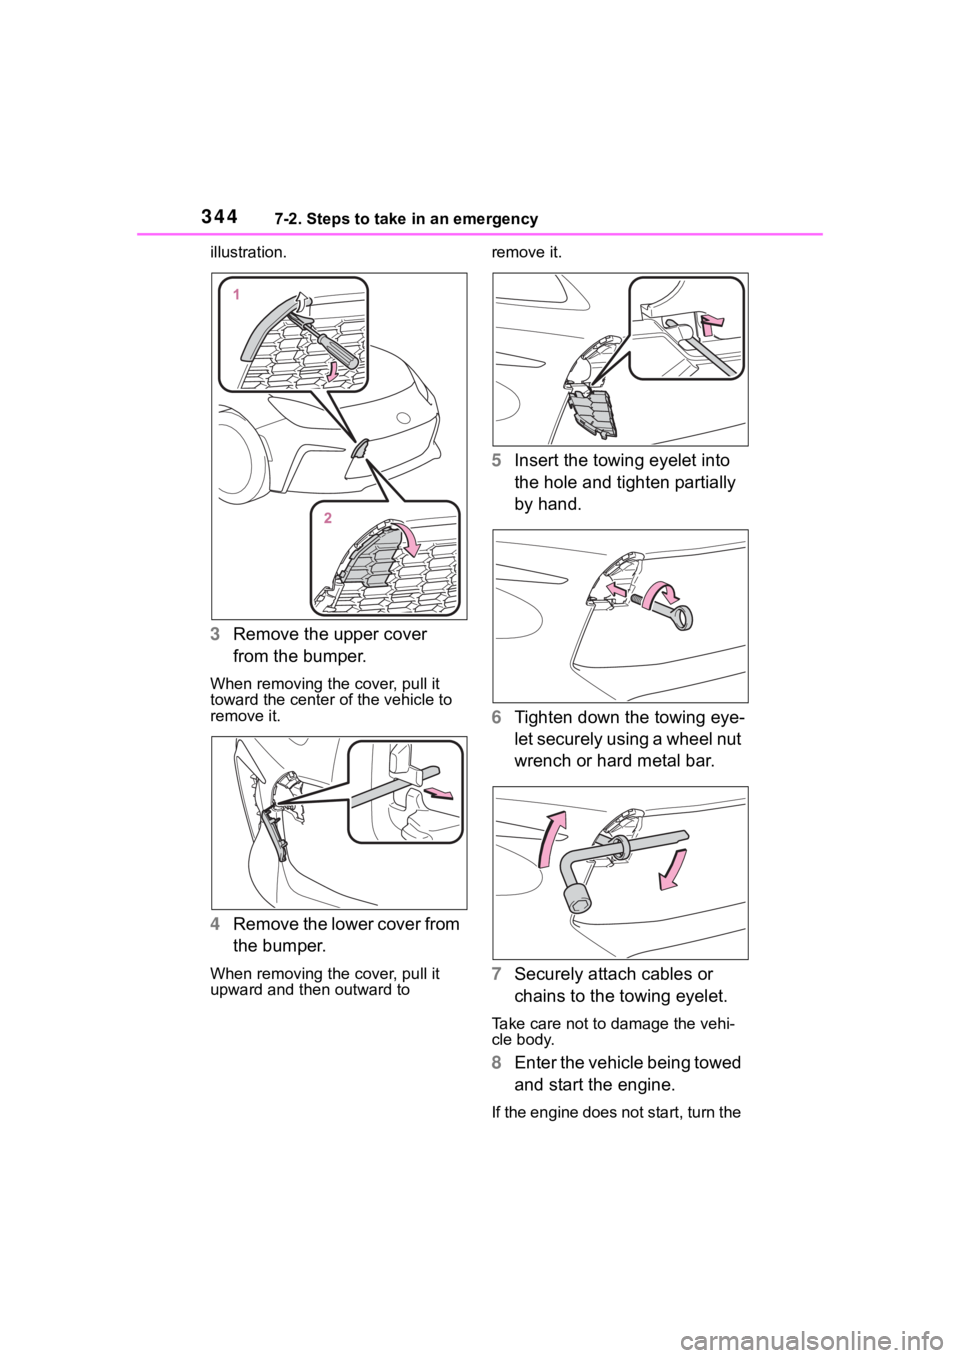
vehicle. Install the towing eyelet
using the following procedure.
1
Take out the wheel nut
wrench, flathead screwdriver
and towing eyelet. ( P.359)
2 Remove the eyelet cover
using a flathead screwdriver.
To protect the b odywork, place a
rag between the screwdriver and
the vehicle body as shown in the
NOTICE
■Towing with a sling-type truck
Do not tow with a sling-type truck
to prevent body damage.
Using a flatbed truck
Emergency towing
Emergency towing proce-
dure
Page 344 of 449
3447-2. Steps to take in an emergency
illustration.
3Remove the upper cover
from the bumper.
When removing the cover, pull it
toward the center of the vehicle to
remove it.
4Remove the lower cover from
the bumper.
When removing the cover, pull it
upward and then outward to remove it.
5
Insert the towing eyelet into
the hole and tighten partially
by hand.
6 Tighten down the towing eye-
let securely using a wheel nut
wrench or hard metal bar.
7 Securely attach cables or
chains to the towing eyelet.
Take care not to damage the vehi-
cle body.
8Enter the vehicle being towed
and start the engine.
If the engine does not start, turn the