Page 5 of 296
NOTE: Depending on market region, vehicle configuration, and options purchased, your vehicle may look slightly
different than described.
1.
Exterior lights (Lights on page 68)
2.
Door handles (Doors on page 19)
3.
Charge port (Charging Instructions on page 180)
4.
Autopilot cameras (About Autopilot on page 98)
5.
Exterior mirrors (Mirrors on page 62)
6.
Hood/Front trunk (Front Trunk on page 27)
7.
Front/rear tow eye cover (Instructions for Transporters on page 221)
8.
Wheels and tires (Wheels and Tires on page 213)
9.
Rear view camera (Rear Facing Camera(s) on page 85 and About Autopilot on page 98)
10.
Tow hitch cover (Towing and Accessories on page 87)
Exterior Overview
3Overview
Page 8 of 296
13. Wireless phone chargers (Wireless Phone Chargers on page 31)14.
Hazard warning lights (Hazard Warning Flashers on page 70)
15.
Secondary drive mode selector (Shifting on page 65)
16.
Glovebox (Glovebox on page 30)
1.
Rear touchscreen (Rear Touchscreen on page 10)
2.
USB ports (USB Ports on page 30)
3.
Rear cup holders (Interior Storage and Electronics on page 30)
4.
Adjustable climate control vents (Climate Controls on page 136)
Interior Overview
6MODEL X Owner
Page 19 of 296

NOTE: CR2354 batteries can be purchased from any
retailer that sells batteries.
4.
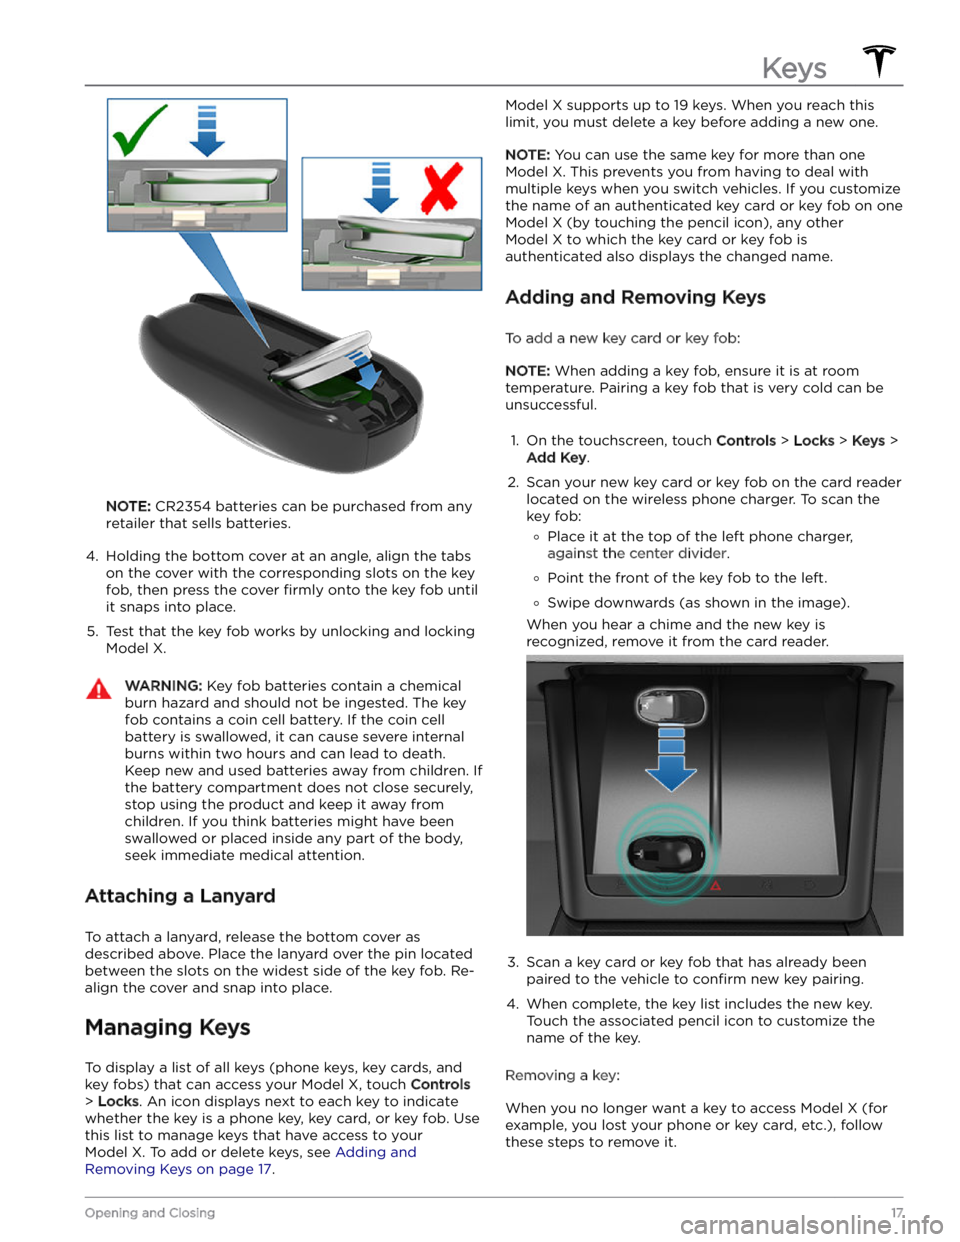
Holding the bottom cover at an angle, align the tabs on the cover with the corresponding slots on the key
fob, then press the cover
firmly onto the key fob until
it snaps into place.
5.
Test that the key fob works by unlocking and locking
Model X.
WARNING: Key fob batteries contain a chemical
burn hazard and should not be ingested. The key
fob contains a coin cell battery. If the coin cell
battery is swallowed, it can cause severe internal
burns within two hours and can lead to death.
Keep new and used batteries away from children. If
the battery compartment does not close securely,
stop using the product and keep it away from
children. If you think batteries might have been
swallowed or placed inside any part of the body,
seek immediate medical attention.
Attaching a Lanyard
To attach a lanyard, release the bottom cover as
described above. Place the lanyard over the pin located between the slots on the widest side of the key fob. Re-align the cover and snap into place.
Managing Keys
To display a list of all keys (phone keys, key cards, and key fobs) that can access your
Model X, touch Controls
> Locks. An icon displays next to each key to indicate
whether the key is a phone key, key card, or key fob. Use
this list to manage keys that have access to your
Model X. To add or delete keys, see Adding and
Removing Keys on page 17.
Model X supports up to 19 keys. When you reach this
limit, you must delete a key before adding a new one.
NOTE: You can use the same key for more than one
Model X. This prevents you from having to deal with
multiple keys when you switch vehicles. If you customize the name of an authenticated key card or key fob on one
Model X (by touching the pencil icon), any other
Model X to which the key card or key fob is
authenticated also displays the changed name.
Adding and Removing Keys
To add a new key card or key fob:
NOTE: When adding a key fob, ensure it is at room
temperature. Pairing a key fob that is very cold can be unsuccessful.
1.
On the touchscreen, touch Controls > Locks > Keys >
Add Key.
2.
Scan your new key card or key fob on the card reader located on the wireless phone charger. To scan the
key fob:
�
Page 32 of 296

Center Console
In addition to housing an RFID transmitter that reads key fobs and key cards (see
Keys on page 13), the center
console includes cup holders, two storage
compartments, wireless phone chargers, and a rear
touchscreen.
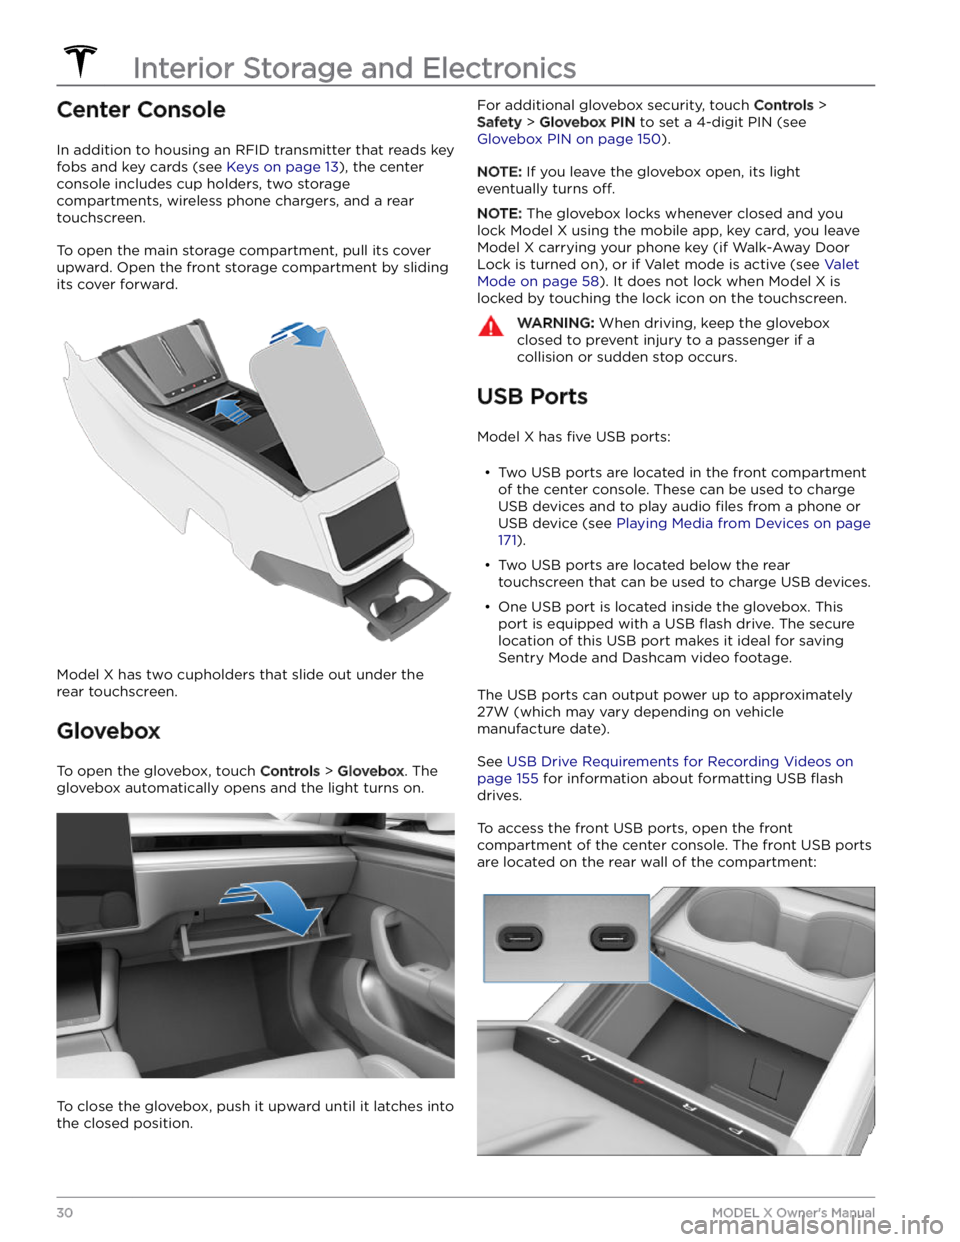
To open the main storage compartment, pull its cover upward. Open the front storage compartment by sliding its cover forward.
Model X has two cupholders that slide out under the
rear touchscreen.
Glovebox
To open the glovebox, touch Controls > Glovebox. The
glovebox automatically opens and the light turns on.
To close the glovebox, push it upward until it latches into the closed position.
For additional glovebox security, touch Controls >
Safety > Glovebox PIN to set a 4-digit PIN (see
Glovebox PIN on page 150).
NOTE: If you leave the glovebox open, its light
eventually turns
off.
NOTE: The glovebox locks whenever closed and you
lock
Model X using the mobile app, key card, you leave
Model X carrying your phone key (if Walk-Away Door
Lock is turned on), or if Valet mode is active (see
Valet
Mode on page 58). It does not lock when Model X is
locked by touching the lock icon on the touchscreen.
WARNING: When driving, keep the glovebox
closed to prevent injury to a passenger if a
collision or sudden stop occurs.
USB Ports
Model X has five USB ports:
Page 33 of 296

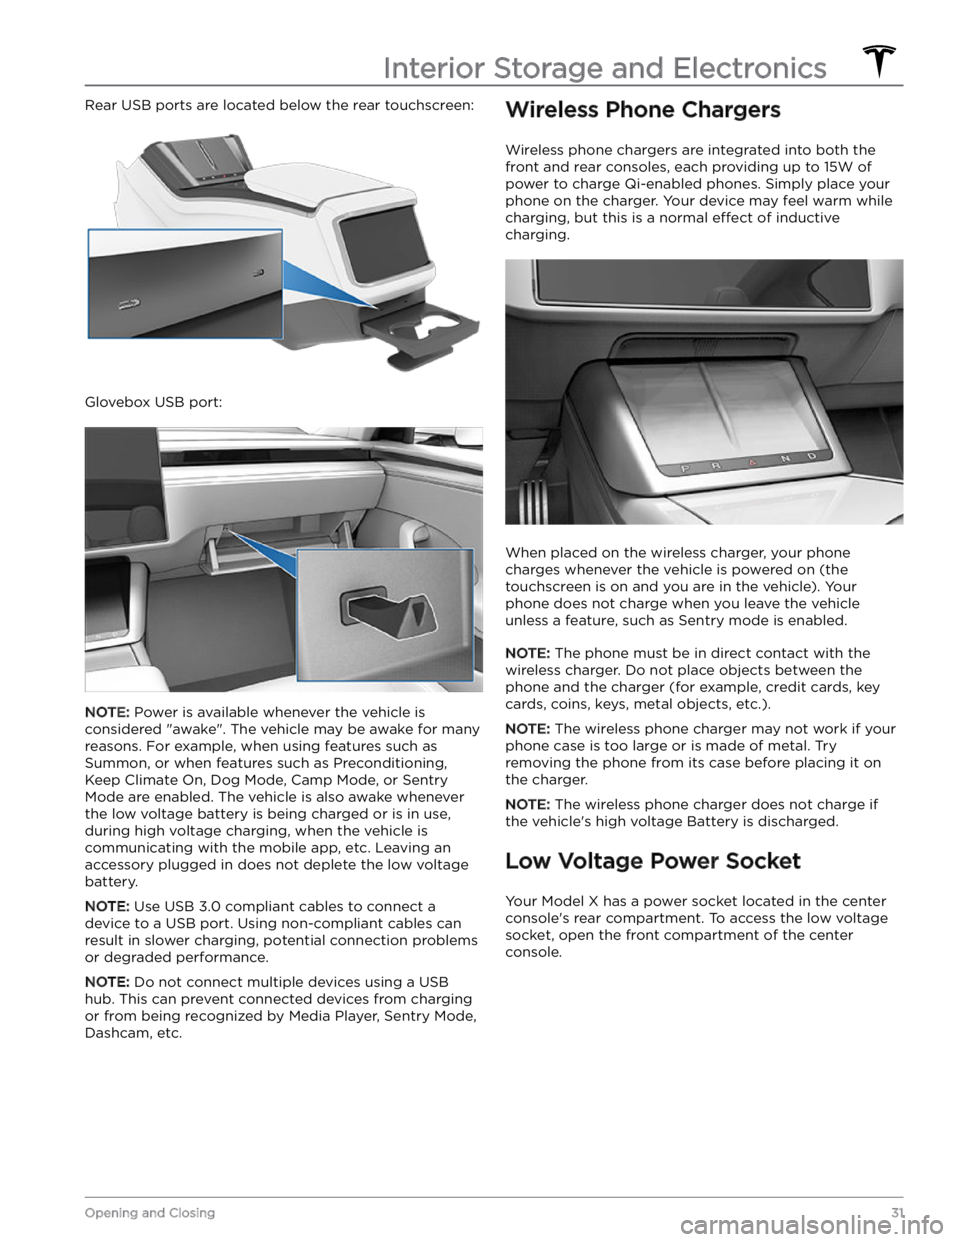
Rear USB ports are located below the rear touchscreen:
Glovebox USB port:
NOTE: Power is available whenever the vehicle is
considered "awake". The vehicle may be awake for many
reasons. For example, when using features such as
Summon, or when features such as Preconditioning,
Keep Climate On, Dog Mode, Camp Mode, or Sentry Mode are enabled. The vehicle is also awake whenever the
low voltage battery is being charged or is in use,
during high voltage charging, when the vehicle is communicating with the mobile app, etc. Leaving an accessory plugged in does not deplete the
low voltage
battery.
NOTE: Use USB 3.0 compliant cables to connect a
device to a USB port. Using non-compliant cables can result in slower charging, potential connection problems or degraded performance.
NOTE: Do not connect multiple devices using a USB
hub. This can prevent connected devices from charging or from being recognized by Media Player, Sentry Mode, Dashcam, etc.
Wireless Phone Chargers
Wireless phone chargers are integrated into both the
front and rear consoles, each providing up to 15W of power to charge Qi-enabled phones. Simply place your phone on the charger. Your device may feel warm while charging, but this is a normal
effect of inductive
charging.
When placed on the wireless charger, your phone
charges whenever the vehicle is powered on (the
touchscreen is on and you are in the vehicle). Your
phone does not charge when you leave the vehicle
unless a feature, such as Sentry mode is enabled.
NOTE: The phone must be in direct contact with the
wireless charger. Do not place objects between the phone and the charger (for example, credit cards, key
cards, coins, keys, metal objects, etc.).
NOTE: The wireless phone charger may not work if your
phone case is too large or is made of metal. Try removing the phone from its case before placing it on the charger.
NOTE: The wireless phone charger does not charge if
the vehicle
Page 34 of 296
The power socket is suitable for accessories requiring up to 12A continuous draw (16A peak).
NOTE: Power is available whenever the vehicle is
considered "awake". The vehicle may be awake for many
reasons. For example, when using features such as Summon, or when features such as Preconditioning, Cabin Overheat Protection, Keep Climate On, Dog Mode,
Camp Mode, Sentry Mode, etc. are enabled. The vehicle
is also awake whenever the
low voltage battery is being
charged or is in use, during high voltage charging, when
the vehicle is communicating with the mobile app, etc. Leaving an accessory plugged in does not deplete the
low voltage battery.
WARNING: The power socket and an accessory
Page 86 of 296
Displaying Trip Information
Trip information displays on the touchscreen when you touch
Controls > Trips. For the current trip, you can
display distance, duration and average energy usage.
You can also show distance and total and average
energy used since your last charge and for additional trips.
To name or rename a trip, touch the trip
Page 171 of 296

To remove Supercharger stops and display directions only, touch
Remove all charging stops at the bottom of
the turn-by-turn direction list. If you remove charging stops, the turn-by-turn direction list may display an alert indicating that charging is needed to reach your destination. To add Supercharger stops back to the turn- by-turn direction list, touch
Add charging stops.
While charging at a Supercharger, the charging screen displays the remaining charging time needed to drive to your next Supercharger stop, or destination (if no further charging is needed). If you charge for a shorter or longer length of time, charging time at subsequent
Supercharger stops is adjusted accordingly.
NOTE: You can also use the mobile app to monitor
remaining charging time needed.
NOTE: If a Supercharger on your navigation route
experiences an outage, Trip Planner displays a
notification and attempts to reroute you to a different
Supercharger location.
If Trip Planner estimates that you won