Page 185 of 296
2. Set limit: Adjust the charge limit by dragging the
arrow below the battery to indicate the level of charging you want. The setting you choose applies to
immediate and scheduled charging sessions.
NOTE: A portion of the battery image may appear
blue. This indicates that a small portion of the energy
stored in the battery is not available because the battery is cold. This is normal and no reason for concern. When the battery warms up, the blue portion no longer displays.
You can further adjust charge settings:
Page 187 of 296

Toggle between Scheduled Departure and Scheduled Charging by touching
Controls > Charging > Switch to
Scheduled Charging/Scheduled Departure when
Model X is in Park.
NOTE: Scheduled Charging/Scheduled Departure
settings are also available on the Climate Controls
screen and in the Tesla mobile app.
Think of Scheduled Charging as "When do I want
charging to start?" and think of
Scheduled Departure
Off-Peak Charging which is "When do I want charging to
be complete?"
Scheduled Charging can be used together with
Scheduled Departure Preconditioning but not with
Scheduled Departure Off-Peak Charging.
Scheduled Charging/Scheduled Departure settings are
automatically saved for each location.
NOTE: If you plug in Model X with both Off-Peak
Charging and Scheduled Charging deselected, your
vehicle charges immediately.
Using Scheduled Charging
Use Scheduled Charging to specify a daily time in which
you want
Model X to start charging.
With Scheduled Charging selected, enable the feature
then set a daily time to start charging.
NOTE: Scheduled Charging starts charging immediately
if
Model X is plugged in up to six hours after the
scheduled start time. However, if
Model X is plugged in
after six hours of the scheduled charging time, charging may not start until the scheduled time on the next day.
Using Scheduled Departure
Use Scheduled Departure to set a daily time when you
want
Model X to be ready to drive. Model X
automatically calculates when it needs to start preconditioning and/or charging. This ensures that charging is complete and/or the cabin climate and Battery are preconditioned by your departure time.
When Scheduled Departure is displayed, touch
Schedule to set a daily time when you want Model X to
be ready to drive. Specify a time, then touch
Settings to
enable one or both of the following departure features.
When plugging in with
Off-Peak Charging enabled, the
vehicle
briefly draws power (you may hear clicking) to
calculate the necessary charging start time.
After you
Page 189 of 296
Touch Chargers in the Navigation search
bar to toggle between types of chargers,
including Superchargers and destination charging sites.
When you are at risk of driving beyond the range of
known charging locations, the touchscreen displays a message giving you the opportunity to display a list of
charging locations that are within range. When you
select a charging location from the list,
Model X provides
navigation instructions and the turn-by-turn direction list
displays the predicted amount of energy that will remain when you arrive at the charging destination.
Trip Planner (if available in your market region) routes
you through Supercharger locations to minimize the amount of time you spend charging and driving. To
enable, touch
Controls > Navigation > Trip Planner (see
Trip Planner on page 168).
Energy App
The Energy app provides a visual representation of your vehicle
Page 192 of 296
Displaying Tire Pressures
Tire pressures display on the touchscreen by touching
Controls > Service. The pressure of each tire displays in
the visualization of your
Model X, in addition to what
time your tire pressures were last measured. You can choose whether you want to display tire pressures using Bar or PSI by touching
Controls > Display > Tire
Pressure. The touchscreen also displays your vehicle
Page 196 of 296
Automatic Reset of TPMS Sensors
After replacing one or more wheels (but not after replacing a tire or rotating wheels), the TPMS sensors are reset to ensure tire pressure warnings are accurate. TPMS sensors reset automatically after driving over
15 mph (25 km/h) for longer than 10 minutes.
NOTE: After replacing a wheel, false tire pressure
warnings may display before you
Page 200 of 296

CAUTION: The front seats are equipped with
microphones (see Active Road Noise Reduction on
page 32) that must not be exposed to liquids. To
prevent damage to these microphones when
cleaning, do not over-saturate the area of the seats
where these microphones are located.
Carpets
Avoid over-wetting carpets. For heavily soiled areas, use
a diluted upholstery cleaner.
Seat Belts
Extend the belts to wipe. Do not use any type of
detergent or chemical cleaning agent. Allow the belts to dry naturally while extended, preferably away from direct sunlight.
Door Seals
Wipe door seals with a damp cloth to remove any debris. Excessive debris on the door seals can cause
paint damage when contacting surrounding surfaces. Avoid using alcohol wipes or any chemical products that can potentially deteriorate the coating on the door seals.
Touchscreen, Rear Touchscreen, and
Instrument Panel
Clean the touchscreen and instrument panel using a soft
lint-free cloth
specifically designed to clean monitors
and displays. Do not use cleaners (such as a glass cleaner) or alcohol-based gel products (such as hand
sanitizer) and do not use a wet wipe or a dry statically- charged cloth (such as a recently washed
microfiber). To
wipe the touchscreen without activating buttons and
changing settings, you can enable Screen Clean Mode. Touch
Controls > Display > Screen Clean Mode. The
display darkens to make it easy to see dust and smudges. To exit Screen Clean Mode, press and hold
HOLD TO EXIT.
Chrome and Metal Surfaces
Polish, abrasive cleaners, alcohol-based gel products (such as hand sanitizer), and hard cloths can damage the
finish on chrome and metal surfaces.
Cautions for Interior Cleaning
CAUTION: Using solvents (including alcohol),
alcohol-based gel products (such as hand
sanitizer), bleach, citrus, naphtha, or silicone-based
products or additives on interior components can
cause damage.
CAUTION: Statically-charged materials can cause
damage to the touchscreen or instrument panel.
WARNING: If you notice any damage on an airbag
or seat belt, contact Tesla immediately.
WARNING: Do not allow any water, cleaners, or
fabric to enter a seat belt mechanism.
WARNING: Exposure to chemical cleaners can be
hazardous and can irritate eyes and skin. Read and
observe the instructions provided by the
manufacturer of the chemical cleaner.
Polishing, Touch Up, and Body
Repair
To preserve the cosmetic appearance of the body, you
can occasionally treat the paint surfaces with an approved polish containing:
Page 202 of 296

Topping Up Windshield Washer
Fluid
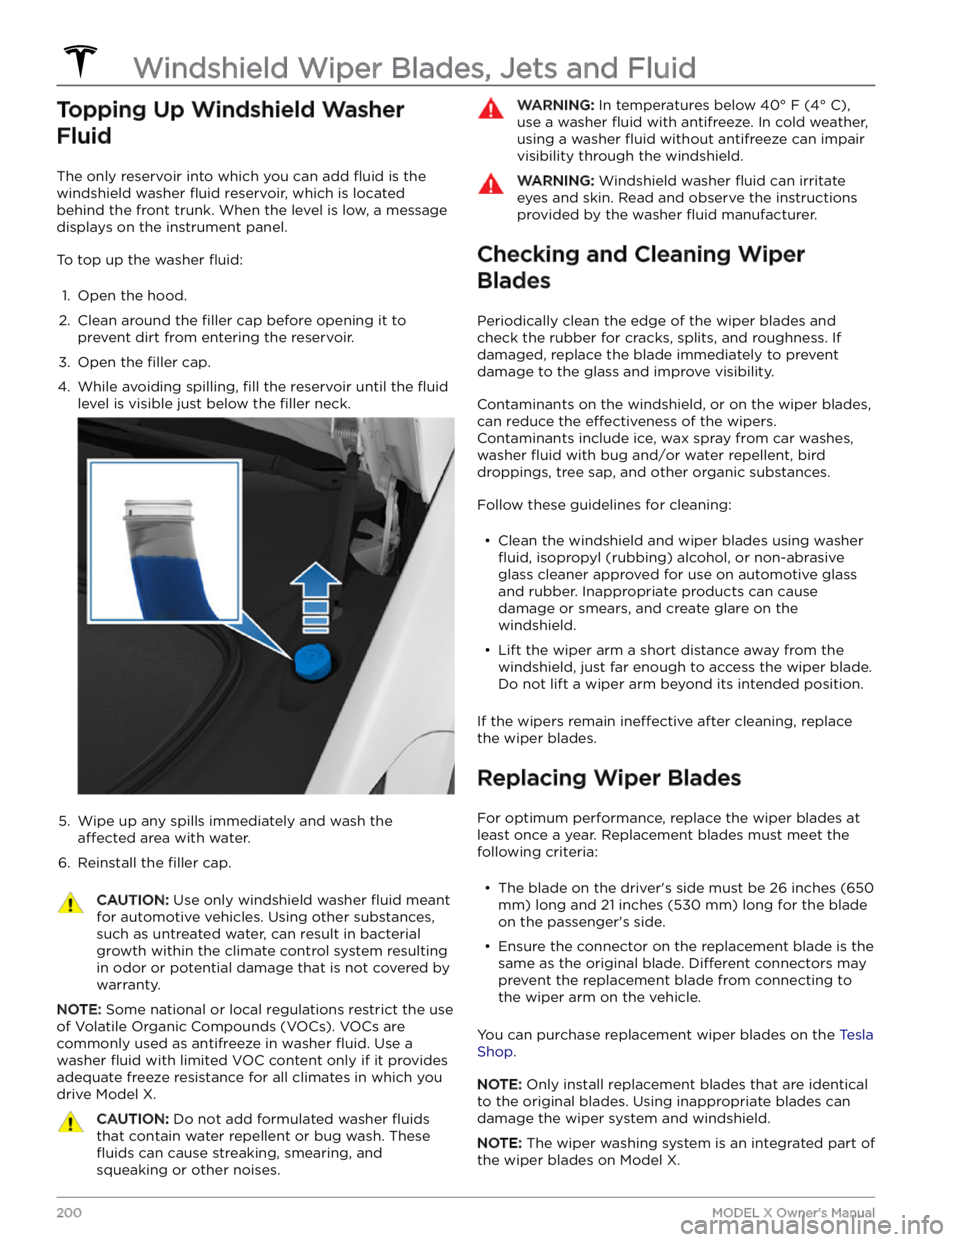
The only reservoir into which you can add fluid is the
windshield washer
fluid reservoir, which is located
behind the front trunk. When the level is low, a message
displays on the
instrument panel.
To top up the washer fluid:
1.
Open the hood.
2.
Clean around the filler cap before opening it to
prevent dirt from entering the reservoir.
3.
Open the filler cap.
4.
While avoiding spilling, fill the reservoir until the fluid
level is visible just below the filler neck.
5.
Wipe up any spills immediately and wash the
affected area with water.
6.
Reinstall the filler cap.
CAUTION: Use only windshield washer fluid meant
for automotive vehicles. Using other substances,
such as untreated water, can result in bacterial
growth within the climate control system resulting
in odor or potential damage that is not covered by
warranty.
NOTE: Some national or local regulations restrict the use
of Volatile Organic Compounds (VOCs). VOCs are commonly used as antifreeze in washer
fluid. Use a
washer
fluid with limited VOC content only if it provides
adequate freeze resistance for all climates in which you drive
Model X.
CAUTION: Do not add formulated washer fluids
that contain water repellent or bug wash. These
fluids can cause streaking, smearing, and
squeaking or other noises.
WARNING: In temperatures below 40
Page 224 of 296
Disable the Self-Leveling Air Suspension System
NOTE: If Model X has no low voltage power, you need an
external
low voltage power supply to use the
touchscreen. See
If Vehicle Has No Power on page 224.
Your Model X is equipped with an air suspension system
that automatically self-levels the vehicle, even when
power is
off. To prevent damage, you must activate Jack
mode to disable self-leveling:
1.
Touch Controls > Suspension on the touchscreen.
2.
Press the brake pedal, and then touch Very High to
maximize height.
3.
Touch Controls > Service > Jack Mode.
NOTE: Jack mode cancels when driving speed exceeds
4 mph (7 km/h).
Activate Transport Mode
Transport Mode keeps the parking brake disengaged
while winching
Model X onto a flatbed truck. When
active, Transport Mode displays a message indicating that the vehicle will remain free-rolling. The following are required to enable Transport Mode: