2023 SUBARU SOLTERRA lock
[x] Cancel search: lockPage 406 of 628
4066-1. Using the air conditioning system and defogger
Owners Manual_USA_M42C01_en
1Press the automatic mode
switch.
The dehumidification function begins to operate. Air outlets and
fan speed are automatically
adjusted according to the tempera-
ture setting and humidity.
2
Adjust the temperature set-
ting.
3 To stop the operation, press
the “OFF” switch.
If the fan speed setting or air
flow modes are operated, the
automatic mode indicator goes
off. However, automatic mode
for functions other than that
operated is maintained.
■Using automatic mode
Fan speed is adjusted automati-
cally according to the temperature
setting and the ambient conditions.
Therefore, the fan may stop for a
while until warm or cool air is ready
to flow immediately after the auto-
matic mode switch is pressed.
To turn on the “SYNC” mode,
perform any of the following pro-
cedures:
Press the “SYNC” mode
switch.
Adjust the front passenger’s
side temperature setting.
The indicator comes on when the
“SYNC” mode is on.
WARNING
■To prevent the windshield
from fogging up
Do not use the windshield defog-
ger switch during cool air opera-
tion in extremely humid weather.
The difference between the tem-
perature of the outside air and
that of the windshield can cause
the outer surface of the wind-
shield to fog up, blocking your
vision.
■To prevent burns
●Do not touch the rear view mir-
ror surfaces when the outside
rear view mirror defoggers are
on.
●Vehicles with windshield wiper
de-icer: Do not touch the glass
at lower part of the windshield
or to the side of the front pillars
when the windshield wiper de-
icer is on.
NOTICE
■To prevent 12-volt battery dis-
charge
Do not leave the air conditioning
system on longer than necessary
when the EV system is off.
■When repairing/replacing
parts of the air conditioning
system
Have repair/replacement per-
formed by your Toyota dealer.
When a part of the air conditioning
system, such as the evaporator, is
to be replaced, it must be
replaced with a new one.
Using automatic mode
Adjusting the temperature
for driver and front pas-
senger seats separately
(“SYNC” mode)
Page 410 of 628

4106-1. Using the air conditioning system and defogger
Owners Manual_USA_M42C01_en
System.
The system will shut off if a door is
opened.
The system can be stopped by
pressing “A/C” twice.
Ty p e A
Ty p e B
■Operating conditions
The system will only operate if all of
the following cond itions are met:
●The power switch is OFF.
●All doors are closed.
●The hood is closed.
■Remote Air Conditioning Sys-
tem automatic shut-off
The system will auto matically shut
off under the following conditions:
●About 20 minutes have passed
since operation began
●Any one of the operating condi-
tions is not met
The system may also shut off if the
charge level of the traction battery drops to low.
■Conditions affecting operation
The system may not start in the fol-
lowing situations:
●The charge level of the traction
battery is low
●When the EV system is cool (for
example, after being left for a long
time in low temperatures)
■Windshield defogger
When defogging the windshield
using the Remote Air Conditioning
System, defogging may be insuffi-
cient due to the power being
restricted more than during normal
air conditioning operation. Also, the
outside of the windshield may fog up
due to the outsi de temperature,
humidity or air conditioning set tem-
perature.
■Security feature
Any unlocked doors will be automat-
ically locked when the system is
operating. The emergency flashers
flash to indicate that the doors have
been locked.
■Conditions affecting operation
P.188
■While the Remote Air Condi-
tioning System is operating
●Depending on the operating con-
dition of the Remote Air Condition-
ing System, the e lectric fan may
spin and an operating noise may
be heard.
However, this does not indicate a
malfunction.
●The Remote Air Conditioning Sys-
tem may stop operating temporar-
ily if other features that use
electricity (for example, the seat
heater, lights, windshield wipers)
are in operation or if the charge
level of the 12-volt battery
becomes low.
●The headlights, windshield wiper,
meter, etc. will not operate.
Page 415 of 628
4156-2. Using the interior lights
Owners Manual_USA_M42C01_en
6
Interior features
6-2.Using the interior lights
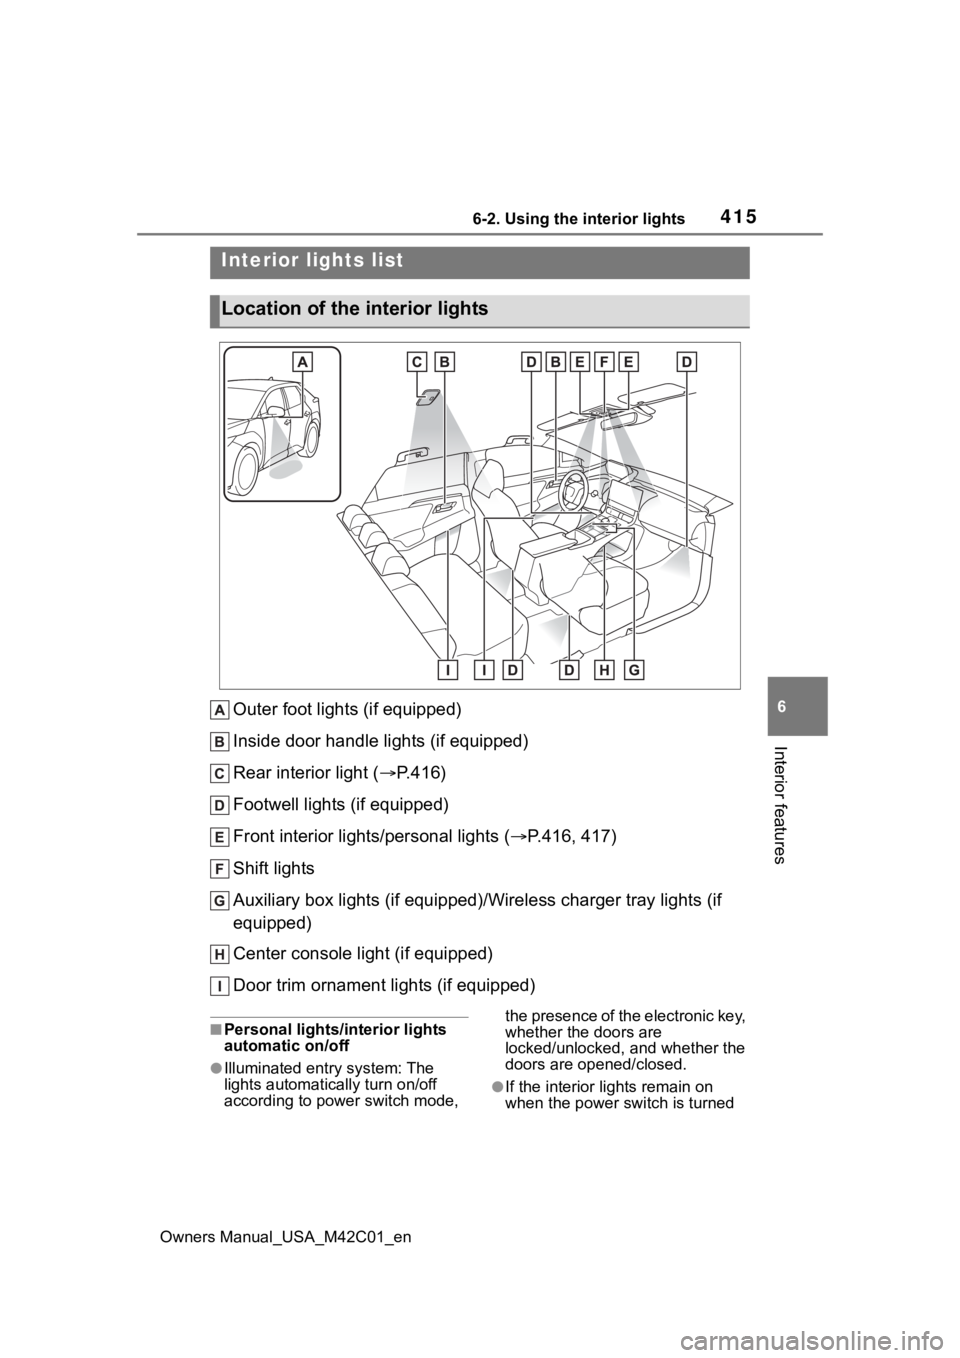
Outer foot lights (if equipped)
Inside door handle lights (if equipped)
Rear interior light ( P.416)
Footwell lights (if equipped)
Front interior lights/personal lights ( P.416, 417)
Shift lights
Auxiliary box lights (if equipped)/Wireless charger tray lights (if
equipped)
Center console light (if equipped)
Door trim ornament lights (if equipped)
■Personal lights/interior lights
automatic on/off
●Illuminated entry system: The
lights automatically turn on/off
according to power switch mode, the presence of the electronic key,
whether the doors are
locked/unlocked, and whether the
doors are opened/closed.
●If the interior
lights remain on
when the power switch is turned
Interior lights list
Location of the i nterior lights
Page 419 of 628
4196-3. Using the storage features
Owners Manual_USA_M42C01_en
6
Interior features
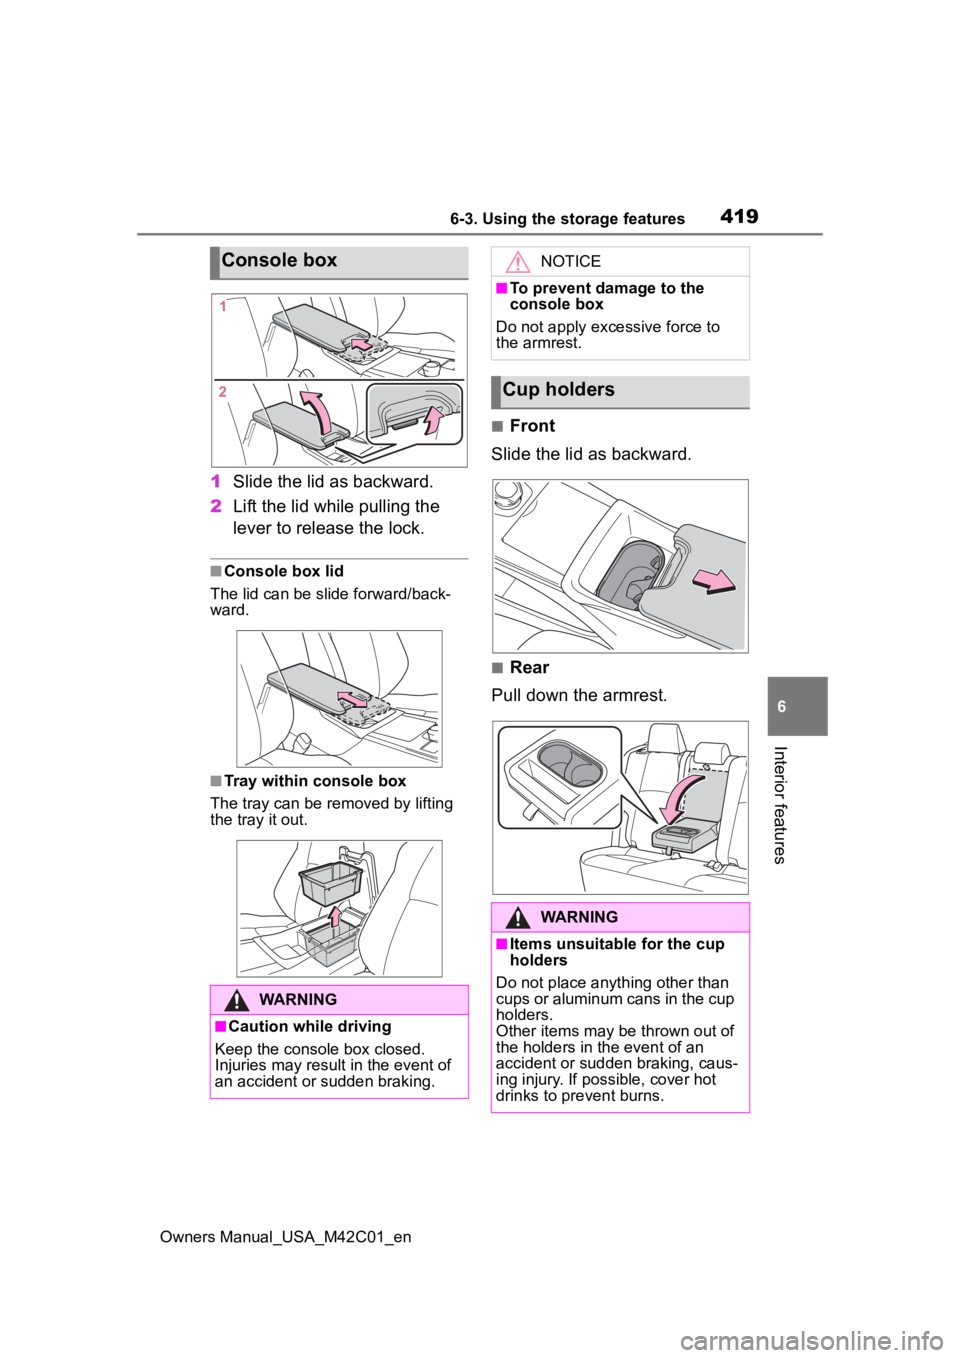
1 Slide the lid as backward.
2 Lift the lid while pulling the
lever to release the lock.
■Console box lid
The lid can be slide forward/back-
ward.
■Tray within console box
The tray can be removed by lifting
the tray it out.
■Front
Slide the lid as backward.
■Rear
Pull down the armrest.
Console box
WARNING
■Caution while driving
Keep the console box closed.
Injuries may result in the event of
an accident or sudden braking.
NOTICE
■To prevent damage to the
console box
Do not apply excessive force to
the armrest.
Cup holders
WARNING
■Items unsuitable for the cup
holders
Do not place anyth ing other than
cups or aluminum cans in the cup
holders.
Other items may be thrown out of
the holders in the event of an
accident or sudden braking, caus-
ing injury. If possible, cover hot
drinks to pre vent burns.
Page 424 of 628
4246-3. Using the storage features
Owners Manual_USA_M42C01_en
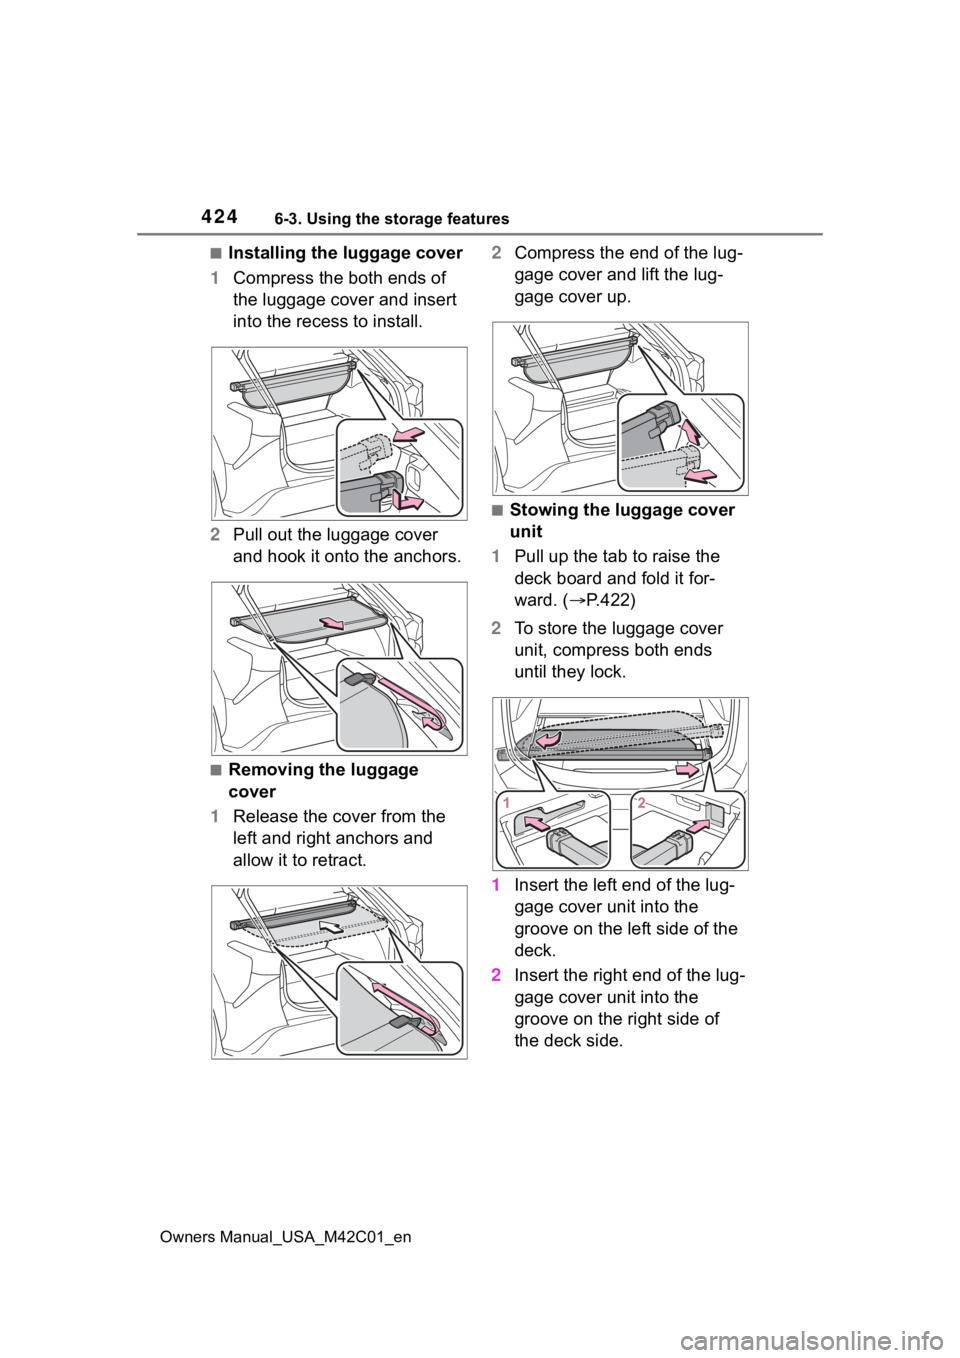
■Installing the luggage cover
1 Compress the both ends of
the luggage cover and insert
into the recess to install.
2 Pull out the luggage cover
and hook it onto the anchors.
■Removing the luggage
cover
1 Release the cover from the
left and right anchors and
allow it to retract. 2
Compress the end of the lug-
gage cover and lift the lug-
gage cover up.
■Stowing the luggage cover
unit
1 Pull up the tab to raise the
deck board and fold it for-
ward. ( P.422)
2 To store the luggage cover
unit, compress both ends
until they lock.
1 Insert the left end of the lug-
gage cover unit into the
groove on the left side of the
deck.
2 Insert the right end of the lug-
gage cover unit into the
groove on the right side of
the deck side.
Page 429 of 628

4296-4. Using the other interior features
Owners Manual_USA_M42C01_en
6
Interior features
The USB Type-C charging ports
are used to supply 3 A of elec-
tricity at 5 V to external devices.
The USB Type-C charging ports
are for charging only. They are
not designed for data transfer or
other purposes. Depending on the external
device, it may not charge prop-
erly. Refer to the manual
included with the device before
using a USB charging port.
Refer to “MULTIMEDIA
OWNER’S MANUAL” for USB
Type-A information.
■Using the USB Type-C
charging ports
Center console
Rear
■The USB Type-C charging ports
can be used when
The power switch is in ACC or ON.
■Situations in which the USB
Type-C charging ports may not
operate correctly
●If a device which consumes more
than 3 A at 5 V is connected
●If a device designed to communi-
cate with a personal computer,
NOTICE
■When power outlet is not in
use
To avoid damaging the power out-
let, close the p ower outlet lid
when the power outlet is not in
use.
Foreign objects or liquids that
enter the power outlet may cause
a short circuit.
■To prevent 12-volt battery dis-
charge
Do not use the power outlet lon-
ger than necessary when the EV
system is off.
■To prevent incorrect opera-
tion of the vehicle
When turning the power switch
off, make sure to disconnect
accessories designed for
charging, such as portable char-
gers, power banks, etc. from the
power outlets.
If such an accessory is left con-
nected, the following may occur:
●The doors will not be able to be
locked.
●The opening scr een will be dis-
played on the multi-information
display.
●The interior lights, instrument
panel lights, etc. will illuminate.
USB Type-C charging
ports
Page 439 of 628

4396-4. Using the other interior features
Owners Manual_USA_M42C01_en
6
Interior features
*: If equipped
■HomeLink® programming pro-
cedure
The programming procedures can
also be found at the following URL.
Website: www.homelink.com/toyota
For support, contact customer sup-
port at the following.
Help Line: 1-800-355-3515
The HomeLink® wireless control
system in your vehicle has 3
buttons which can be pro-
grammed to operate 3 different
devices. Refer to the program-
ming methods on the following
pages to determine the method
which is appropriate for the
device.
Vehicles with auto anti-glare
inside rear view mirror
HomeLink
® indicator light
Garage door operation indi-
cators
HomeLink
® icon
Illuminates while HomeLink® is
operating.
Buttons
Vehicles with Digital Rear-
view Mirror
HomeLink
® indicator light
Illuminates above each button
selected.
HomeLink® icon
Garage door opener*
The garage door opener can
be programmed using the
HomeLink
® to operate
garage doors, gates, entry
doors, door locks, home
lighting systems, security
systems, and other devices.
System components
Page 448 of 628
4487-1. Maintenance and care
Owners Manual_USA_M42C01_en
7-1.Maintenance and care
Working from top to bottom,
liberally apply water to the
vehicle body, wheel wells and
underside of the vehicle to
remove any dirt and dust.
Wash the vehicle body using
a sponge or soft cloth, such
as a chamois.
For hard-to-remove marks,
use car wash soap and rinse
thoroughly with water.
Wipe away any water.
Wax the vehicle when the
waterproof coating deterio-
rates.
If water does not bead on a clean
surface, apply wax when the vehi-
cle body is cool.
■Self-restoring coat
The vehicle body has a self-restor-
ing coating that is resistant to small
surface scratches caused in a car
wash, etc.
●The coating lasts for 5 to 8 years
from when the vehicle is delivered
from the plant.
●The restoration time differs
depending on t he depth of the scratch and outside temperature.
The restoration time may become
shorter when the coating is
warmed by applying warm water.
●Deep scratches caused by keys,
coins, etc., cannot be restored.
●Do not use wax that contain abra-
sives.
■Automatic car washes
●Before washing the vehicle:
• Fold the mirrors
• Turn off the power back door (if equipped)
Start washing from the front of the
vehicle. Make sure to extend the
mirrors before driving.
●Brushes used in automatic car
washes may scratch the vehicle
surface, parts (wheel, etc.) and
harm your vehicle’s paint.
●Rear spoiler may not be washable
in some automatic car washes.
There may also be an increased
risk of damage to vehicle.
●When the shift position needs to
be held in N, refer to P.239.
■High pressure car washes
As water may enter the cabin, do
not bring the nozzle tip near the
gaps around the doors or perimeter
of the windows, or spray these
areas continuously.
■Note for a smart key system
●If the door handle becomes wet
while the electronic key is within
the effective range, the door may
lock and unlock repeatedly. In that
case, follow the following correc-
tion procedures to wash the vehi-
cle:
• Place the key in a position 6 ft. (2 m) or more separate from the
vehicle while the vehicle is being
washed. (Take care to ensure that
the key is not stolen.)
• Set the electronic key to battery-
saving mode to disable the smart
key system. ( P.188)
Cleaning and protect-
ing the vehicle exte-
rior
Perform the following to
protect the vehicle and
maintain it in prime condi-
tion:
Cleaning instructions