2023 SUBARU BRZ door lock
[x] Cancel search: door lockPage 152 of 432
Warning and Indicator Lights
146
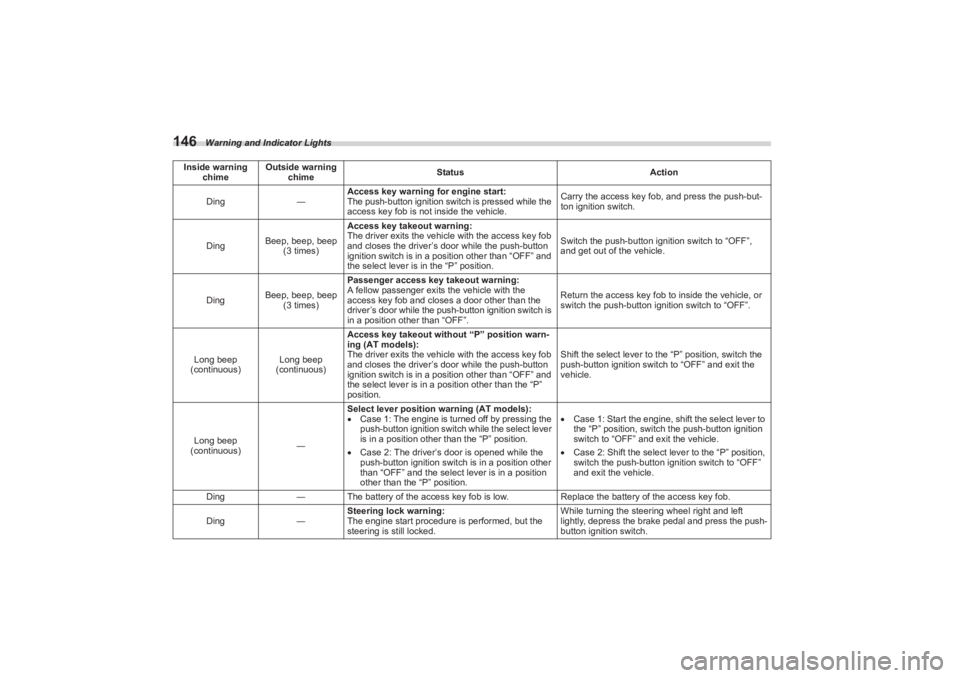
Ding―Access key warning for engine start:
The push-button ignition switch is pressed while the
access key fob is not
inside the vehicle. Carry the access key fob, and press the push-but-
ton ignition switch.
Ding Beep, beep, beep
(3 times) Access key takeout warning:
The driver exits the vehicl
e with the access key fob
and closes the driver’s door while the push-button
ignition switch is in a position other than “OFF” and
the select lever is in the “P” position. Switch the push-button ignition switch to “OFF”,
and get out of the vehicle.
Ding Beep, beep, beep
(3 times) Passenger access key takeout warning:
A fellow passenger exits the vehicle with the
access key fob and closes a door other than the
driver’s door while the push
-button ignition switch is
in a position other than “OFF”. Return the access key fob
to inside the vehicle, or
switch the push-button ignition switch to “OFF”.
Long beep
(continuous) Long beep
(continuous) Access key takeout without “P” position warn-
ing (AT models):
The driver exits the vehicl
e with the access key fob
and closes the driver’s door while the push-button
ignition switch is in a position other than “OFF” and
the select lever is in a position other than the “P”
position. Shift the select lever to the “P” position, switch the
push-button ignition switch to “OFF” and exit the
vehicle.
Long beep
(continuous) ―Select lever position warning (AT models):
Case 1: The engine is turned off by pressing the
push-button ignition switch while the select lever
is in a position other than the “P” position.
Case 2: The driver’s door is opened while the
push-button ignition switch is in a position other
than “OFF” and the select lever is in a position
other than the “P” position.
Case 1: Start the engine, shift the select lever to
the “P” position, switch the push-button ignition
switch to “OFF” and exit the vehicle.
Case 2: Shift the select lever to the “P” position,
switch the push-button ignition switch to “OFF”
and exit the vehicle.
Ding ―The battery of the access ke y fob is low.Replace the battery of the access key fob.
Ding ―Steering lock warning:
The engine start procedure is performed, but the
steering is still locked. While turning the steering wheel right and left
lightly, depress the brake pedal and press the push-
button ignition switch.
Inside warning
chime Outside warning
chime Status
Action
BRZ_U.book 146 ページ 2022年3月29日 火曜日 午後3時59分
Page 164 of 432

Combination Meter Display (Color TFT)
158*1: If equipped
*2: For details about EyeSight system, refer to the Owner’s Manual supplement for the EyeSight system.
Item
SettingsPage reference for
the vehicle system
operation
EyeSight
*1
Acquisition Sound ON/OFF
*2
Start AlertON/OFF
Accel Lv. Lv.1 (Eco)/Lv.2 (Comfort)/Lv.3 (Standard)/Lv.4 (Dynamic)
Select Drive Lane Right Lane/Left Lane
Units km, km/h, l/100km / miles, MPH, MPG127, 151 and *2
Warning Volume *1
Max/Mid/Min 277 and *2
Screen Settings Startup Scrn
ON/OFF -
GSI (MT models) ON/OFF 234
REV. Indicator
ON/OFF
130
RPM **00rpm
Buzzer ON/OFF
Car Settings Keyless Entry
Audible Signal
*1
ON/OFF
105 and 110
Hazard Flasher ON/OFF 106 and 110
Driver Door Unlock Driver Door Only/All 100
Defogger 15 minutes/Continuous 185
Interior Light 7.5 seconds/15 seconds/30 seconds 212
Auto Light Sensor Light Sensitivity Min/Low/Mid/High/Max
174
Wiper Link ON/OFF 175
Welcome Lighting Approaching Time Set 30 sec
onds/60 seconds/90 seconds/OFF
175
Leaving Time Set 30 seconds/60 seconds/90 seconds/OFF
1-Touch LN CHGR ON/OFF 182
BRZ_U.book 158 ページ 2022年3月29日 火曜日 午後3時59分
Page 172 of 432
Center Information Display (CID)
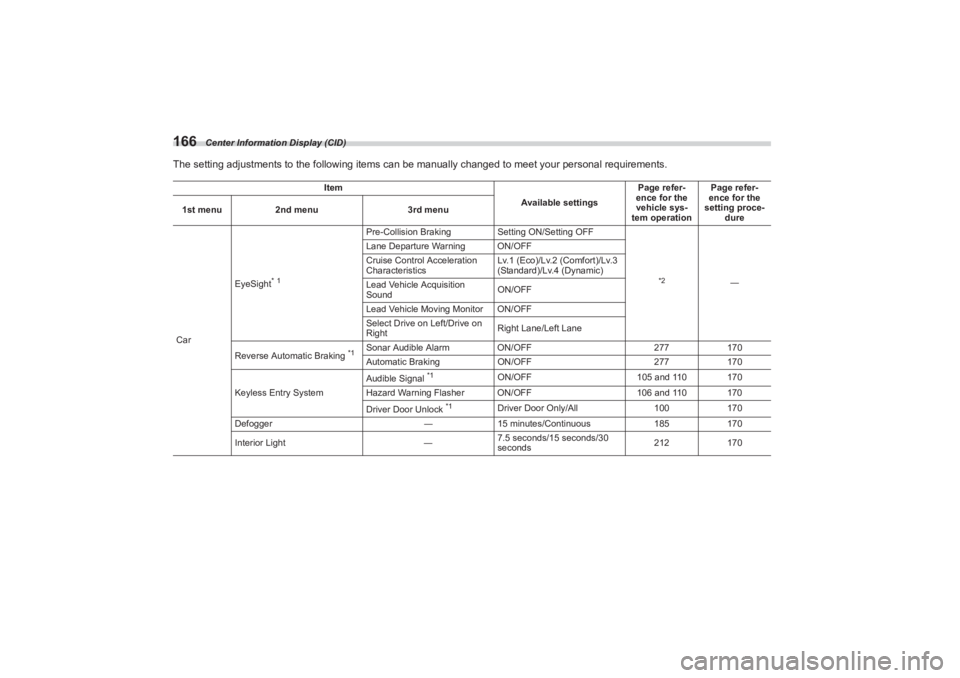
166The setting adjustments to the following items can be manually changed to meet your personal requirements.
Item
Available settingsPage refer-
ence for the
vehicle sys-
tem operation Page refer-
ence for the
setting proce- dure
1st menu
2nd menu 3rd menu
Car EyeSight
* 1
Pre-Collision Braking
Setting ON/Setting OFF
*2
―
Lane Departure Warning ON/OFF
Cruise Control Acceleration
Characteristics
Lv.1 (Eco)/Lv.2 (Comfort)/Lv.3
(Standard)/Lv.4 (Dynamic)
Lead Vehicle Acquisition
Sound ON/OFF
Lead Vehicle Moving Monitor ON/OFF
Select Drive on Left/Drive on
Right Right Lane/Left Lane
Reverse Automatic Braking
*1
Sonar Audible Alarm ON/OFF 277170
Automatic Braking ON/OFF 277170
Keyless Entry System Audible Signal
*1
ON/OFF
105 and 110 170
Hazard Warning Flasher ON/OFF 106 and 110 170
Driver Door Unlock
*1
Driver Door Only/All 100170
Defogger ―15 minutes/Continuous 185170
Interior Light ―7.5 seconds/15 seconds/30
seconds 212
170
BRZ_U.book 166 ページ 2022年3月29日 火曜日 午後3時59分
Page 181 of 432

Light Control Switch
175
Instruments and Controls3
– CONTINUED –
automatically be turned off after approxi-
mately 20 minutes.
If a door is opened or closed, the battery
saving function will temporarily be
canceled and the lights will automatically
be turned off after approximately 20
minutes.▼ Auto-on/off wiper-linked headlights
While the light control switch is in the
“AUTO” position, the headlights will auto-
matically turn on when the windshield
wipers operate several times. The head-
lights will automatica lly turn off approxi-
mately 1 minute after the wiper stops.
The ON/OFF setting of this function can
be changed by operating the combination
meter display (color TFT) or the center
information display. For details, refer to
"Settings Display" P157 or "Car
settings" P165. Also, the setting can be
changed by a SUBARU dealer. Consult
your SUBARU dealer for details.
▼ Welcome lighting function
The welcome lighting function turns on the
low beam headlight for smooth
approaching to or exiting from the vehicle
at night or in a dark place.
The function is activated while all of the
following conditions are met.
The light control swit ch is in the “AUTO”
position
It is dark enough to turn on the auto on/
off headlights
NOTEIf the engine is turn ed off after turning
off the light swit ch, the welcome
lighting function may not operate (for
Canada models).
▽ When approaching
While the welcome lighting function is acti-
vated, the low beam headlights will auto-
matically illuminate when unlocking the
doors by using the remote keyless entry
system.
The low beam headlights will remain illu-
minated for 30 seconds
*1 and then turn
off. However, if any of the following opera-
tions is done, the low beam headlights will
turn off.
The ignition switch is turned to the “ON”
position.
The doors are locked.
The light control switch is turned to a
position other than “AUTO”. ▽
When exiting
While the welcome lighting function is acti-
vated, the low beam headlights will remain
illuminated even when the push-button
ignition switch is turned to the “OFF”
status.
The low beam headlights will turn off
under any of the following conditions.
30 seconds have passed since the
door is opened and closed.
*1
The light control switch is turned to a
position other than “AUTO”.
The locking procedure is performed
twice. When performing the unlocking
procedure after performing the locking
procedure, perform the locking procedure
twice again.*1: The setting for the period of time in which
the low beam headlights remain on by the
welcome lighting function can be changed
by a SUBARU dealer. Contact your
SUBARU dealer for details. Also, you can
change the setting by operating the combi-
nation meter display (color TFT) or the
center information display. For details, refer
to "Settings Display" P157 or "Car
settings" P165.
BRZ_U.book 175 ページ 2022年3月29日 火曜日 午後3時59分
Page 193 of 432
Mirrors
187
Instruments and Controls3
– CONTINUED –
dimming feature will default to on with
each ignition cycle.▼ To Operate the Compass Feature
1. To turn the compass feature on/off,
press and hold the “ ” switch for more
than 3 seconds or until the display turns
on/off. The compass feature will default to
on with each ignition cycle.
2. If the display reads “C”, slowly drive
the vehicle in circles until compass is cali-
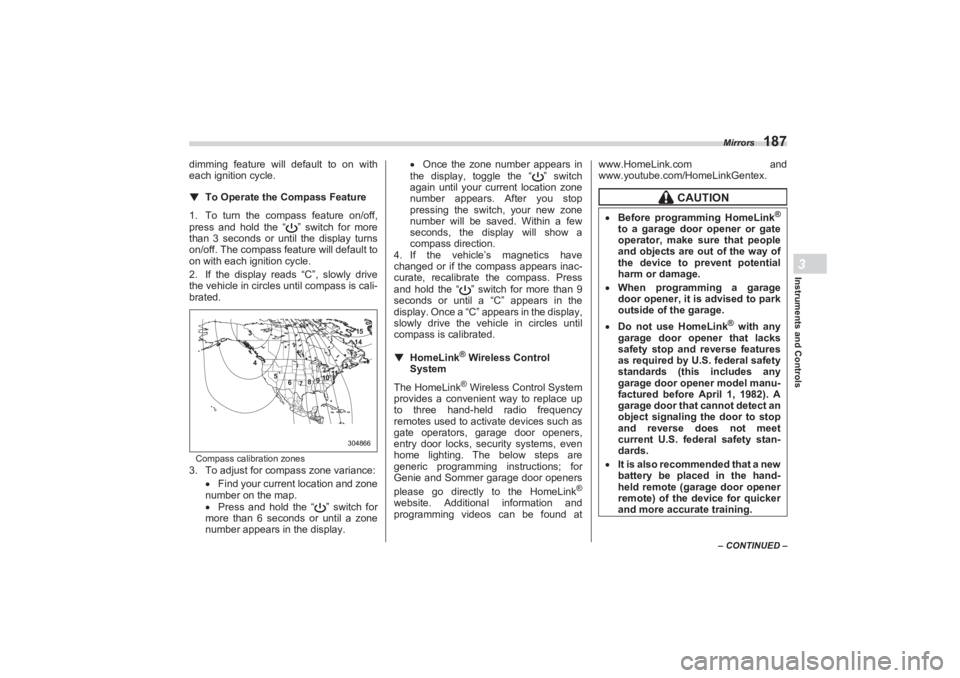
brated.Compass calibration zones3. To adjust for compass zone variance:
Find your current location and zone
number on the map.
Press and hold the “ ” switch for
more than 6 seconds or until a zone
number appears in the display.
Once the zone number appears in
the display, toggle the “ ” switch
again until your current location zone
number appears. After you stop
pressing the switch, your new zone
number will be saved. Within a few
seconds, the disp lay will show a
compass direction.
4. If the vehicle’s magnetics have
changed or if the compass appears inac-
curate, recalibrate the compass. Press
and hold the “ ” switch for more than 9
seconds or until a “C” appears in the
display. Once a “C” a ppears in the display,
slowly drive the vehicle in circles until
compass is calibrated.
▼ HomeLink
® Wireless Control
System
The HomeLink
® Wireless Control System
provides a convenient way to replace up
to three hand-held radio frequency
remotes used to acti vate devices such as
gate operators, garage door openers,
entry door locks, se curity systems, even
home lighting. The below steps are
generic programming instructions; for
Genie and Sommer garage door openers
please go directly to the HomeLink
®
website. Additional information and
programming videos can be found at www.HomeLink.com and
www.youtube.com/HomeLinkGentex.
304866 15
14
13
12
11
10
9
8
7
6
5
4
3
CAUTION
Before programming HomeLink
®
to a garage door opener or gate
operator, make sure that people
and objects are out of the way of
the device to prevent potential
harm or damage.
When programming a garage
door opener, it is advised to park
outside of the garage. Do not use HomeLink
® with any
garage door opener that lacks
safety stop and reverse features
as required by U.S. federal safety
standards (this includes any
garage door opener model manu-
factured before April 1, 1982). A
garage door that cannot detect an
object signaling the door to stop
and reverse does not meet
current U.S. federal safety stan-
dards.
It is also recommended that a new
battery be placed in the hand-
held remote (garage door opener
remote) of the device for quicker
and more accurate training.
BRZ_U.book 187 ページ 2022年3月29日 火曜日 午後3時59分
Page 197 of 432
Mirrors
191
Instruments and Controls3
– CONTINUED –
Proceed with “Programming a New
HomeLink
® button” step 4 to complete.
▽ Using HomeLink
®
To operate, simply press and release the
programmed HomeLink
® button. Activa-
tion will now occur for the trained device
(i.e. garage door opener, gate operator,
security system, entry door lock, home/
office lighting, etc.). For convenience, the
hand-held remote of the device may also
be used at any time.
▽Erasing HomeLink® buttons
To erase programming from the three
buttons (individual buttons cannot be
erased but can be “reprogrammed” as
outlined below), follow the step noted:
Press and hold the two outer HomeLink
®
buttons for at least 10 seconds. The LED
indicator will change from continuously lit
to rapidly flashing. Release both buttons.
Do not hold for longer than 20 seconds.
HomeLink
® is now ready to be
programmed at any time beginning with
“Programming a New HomeLink
® button”-
step 1. ▽
Reprogramming a Single
HomeLink
® button
To program a previously trained button,
follow these steps:
1. Press and hold the desired
HomeLink
® button. DO NOT release the
button.
2. The indicator light will begin to slowly
flash orange after 20 seconds. The
HomeLink® button can be released at this
point. Proceed with “Programming a New
HomeLink® button”- step 3.
3. If you do not complete the program-
ming of a new device to the button, it will
revert to the previously stored program-
ming.
▽Garage Door Two-Way Commu -
nication
HomeLink® has the capability of commu-
nicating with your garage door opener.
HomeLink® can receive and display
“closing” or “opening” status messages
from compatible garage door opener
systems. At any time, HomeLink
® can
also recall and display the last recorded
status communicated by the garage door
opener to indicate your garage door being
“closed” or “opened”. HomeLink
® has the capability of receiving
this communication from the garage door
opener at a range up to 820 feet (250 m).
Range may be reduced by obstacles such
as houses or trees. You may have to slow
your vehicle speed to successfully receive
the garage door opener communication.
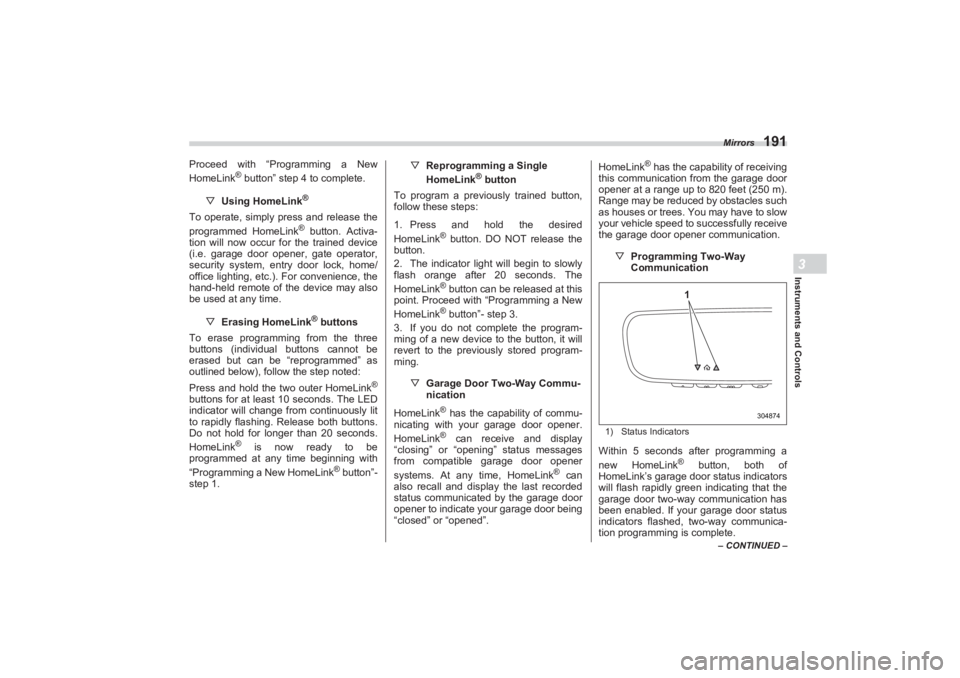
▽Programming Two-Way
Communication
1) Status IndicatorsWithin 5 seconds after programming a
new HomeLink
® button, both of
HomeLink’s garage door status indicators
will flash rapidly green indicating that the
garage door two-way communication has
been enabled. If your garage door status
indicators flashed, two-way communica-
tion programming is complete.
304874
1
BRZ_U.book 191 ページ 2022年3月29日 火曜日 午後3時59分
Page 218 of 432
Interior Light
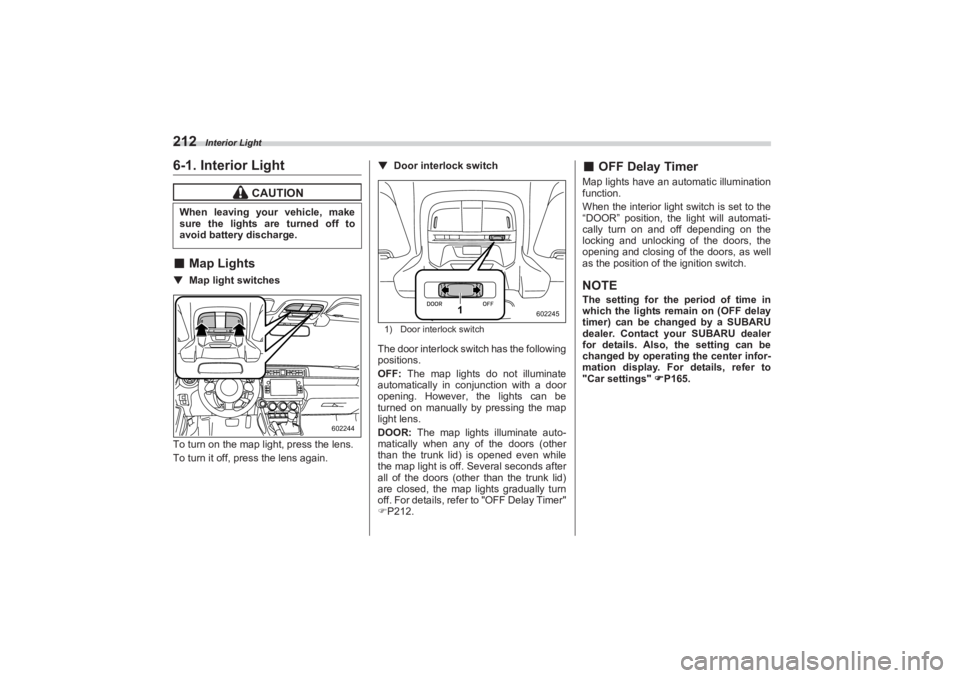
2126-1. Interior Light■Map Lights▼ Map light switches
To turn on the map light, press the lens.
To turn it off, press the lens again. ▼
Door interlock switch
1) Door interlock switchThe door interlock switch has the following
positions.
OFF: The map lights do not illuminate
automatically in conjunction with a door
opening. However, the lights can be
turned on manually by pressing the map
light lens.
DOOR: The map lights illuminate auto-
matically when any of the doors (other
than the trunk lid) is opened even while
the map light is off. Several seconds after
all of the doors (other than the trunk lid)
are closed, the map lights gradually turn
off. For details, refer to "OFF Delay Timer"
P212.
■ OFF Delay TimerMap lights have an automatic illumination
function.
When the interior light switch is set to the
“DOOR” position, the light will automati-
cally turn on and off depending on the
locking and unlocking of the doors, the
opening and closing of the doors, as well
as the position of the ignition switch.NOTEThe setting for the period of time in
which the lights remain on (OFF delay
timer) can be changed by a SUBARU
dealer. Contact your SUBARU dealer
for details. Also, the setting can be
changed by operating the center infor-
mation display. For details, refer to
"Car settings" P165.
CAUTION
When leaving your vehicle, make
sure the lights are turned off to
avoid battery discharge.
602244
1
602245
BRZ_U.book 212 ページ 2022年3月29日 火曜日 午後3時59分
Page 231 of 432
Fuel
225
Starting and Operating7
– CONTINUED –
Press the unlock side of the power
door locking switch.
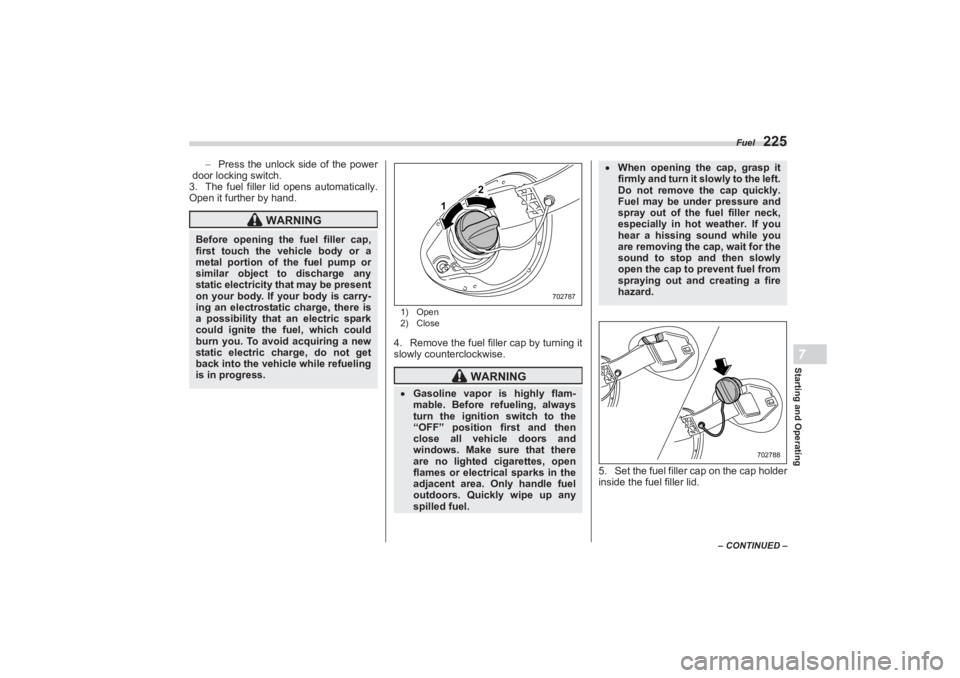
3. The fuel filler lid opens automatically.
Open it further by hand.
1) Open
2) Close4. Remove the fuel filler cap by turning it
slowly counterclockwise.
5. Set the fuel filler cap on the cap holder
inside the fuel filler lid.
WARNING
Before opening the fuel filler cap,
first touch the veh icle body or a
metal portion of the fuel pump or
similar object to discharge any
static electricity that may be present
on your body. If your body is carry-
ing an electrostatic charge, there is
a possibility that an electric spark
could ignite the fuel, which could
burn you. To avoid acquiring a new
static electric charge, do not get
back into the vehicle while refueling
is in progress.
WARNING
Gasoline vapor is highly flam-
mable. Before refueling, always
turn the ignition switch to the
“OFF” position first and then
close all vehicle doors and
windows. Make sure that there
are no lighted cigarettes, open
flames or electrical sparks in the
adjacent area. Only handle fuel
outdoors. Quickly wipe up any
spilled fuel.
1
2
702787
When opening the cap, grasp it
firmly and turn it slowly to the left.
Do not remove the cap quickly.
Fuel may be under pressure and
spray out of the fuel filler neck,
especially in hot weather. If you
hear a hissing sound while you
are removing the cap, wait for the
sound to stop and then slowly
open the cap to prevent fuel from
spraying out and creating a fire
hazard.
702788
BRZ_U.book 225 ページ 2022年3月29日 火曜日 午後3時59分