2023 PEUGEOT LANDTREK check engine
[x] Cancel search: check enginePage 4 of 164
2
Contents
■
Overview
■
Eco-driving
1Dashboard instrumentsInstrument panels 8
Warning and indicator lamps 9
Total distance recorder 16
Lighting dimmer 16
Trip computer 16
Monochrome screen 17
Touch screen 18
2AccessElectronic key with remote control function
and built-in key 20
Keyless Entry and Start 22
Central locking 23
Back-up procedures 24
Doors 25
Tailgate 26
Alarm 27
Electric windows 28
3Ease of use and comfortFront seats 30
2-seat front bench seat 31
Steering wheel adjustment 32
Mirrors 33
Rear bench seat 34
Heating and Ventilation 36
Heating 37
Manual air conditioning 37
Dual-zone automatic air conditioning 38
Front demisting/defrosting 40
Rear screen demisting/defrosting 40
Front fittings 40
Courtesy lamps 42
Rear fittings 43
Tipper body fittings 44
4Lighting and visibilityExterior lighting control stalk 47
Cornering lighting 48
Direction indicators 49
Headlamp beam height adjustment 49
Automatic illumination of headlamps 49
Guide-me-home and welcome lighting 50
Wiper control stalk 50
Changing a wiper blade 51
Automatic wipers 52
5SafetyGeneral safety recommendations 53
Hazard warning lamps 53
Horn 54
Electronic stability control (ESC) 54
Hill Assist Descent Control 56
Seat belts 57
Airbags 59
Child seats 62
Deactivating the front passenger airbag 63
ISOFIX child seats 64
Child lock 65
6DrivingDriving recommendations 66
Starting / Switching off the engine with the key 68
Starting/Switching off the engine
with Keyless Entry and Start
70
Manual parking brake 72
Locking the rear differential 72
4-wheel drive transmission selector 73
6-speed manual gearbox 74
6-speed automatic gearbox 75
Driving mode 77
Hill start assist 77
Gear shift indicator 78
Tyre under-inflation detection 78
Driving and manoeuvring aids -
General recommendations
80
Speed limiter 81
Overspeed alert at 75 mph (120
km/h) 82
Cruise control - Specific recommendations 82
Cruise control 82
Lane departure warning 84
Parking sensors 86
Reversing camera 87
"Off-Road" camera 88
360° camera 89
7Practical informationRecommended fuel 94
Refuelling 94
Towing device 95
Snow chains 95
Roof bars 96
Bonnet 96
Engine compartment 97
Checking levels 98 CarM an uals 2 .c o m
Page 5 of 164
3
Contents
Checks 100
AdBlue® (BlueHDi) 103
Maintenance 105
Free-wheeling 111
Advice on care and maintenance 111
8In the event of a breakdownWarning triangle 11 4
Fire extinguisher 11 4
Running out of fuel (Diesel) 11 5
Tool kit 11 5
Spare wheel 11 6
Changing a bulb 120
Fuses 124
12
V battery 124
Towing the vehicle 128
9Technical dataEngine technical data and towed loads 131
Petrol engines 132
Diesel engines 133
Dimensions 135
Identification markings 135
10Bluetooth® audio systemMenus 137
Steering mounted controls 138
Radio 138
Media 139
Telephone 139
11Peugeot Connect 10" TouchscreenFirst steps 141
Steering mounted controls 141
Menus 142
Navigation 143
Radio 143
Music player 143
Telephone 144
Applications 145
Settings 146
12Vehicle data recording and privacy
■
Alphabetical index CarM an uals 2 .c o m
Page 8 of 164
6
Eco-driving
Eco-driving
Eco-driving refers to a range of everyday
practices that allow the motorist to optimise
the vehicle's energy consumption (fuel and/or
electricity) and CO
2 emissions.
Optimise your use of the gearbox
With a manual gearbox, move off gently and
change up promptly. While accelerating, change
up early.
With an automatic gearbox, favour automatic
mode. Do not depress the accelerator pedal
heavily or suddenly.
With a 4-wheel drive vehicle, favour 2H
transmission (standard) mode over 4H mode.
With a manual gearbox, the gear shift indicator
prompts you to engage the most suitable gear.
Whenever this indication is displayed on the
instrument panel, follow it straight away.
Drive smoothly
Maintain a safe distance between vehicles, use
engine braking rather than the brake pedal and
press the accelerator gradually. These practices
help to save on energy consumption, reduce
CO
2 emissions and decrease general traffic
noise.
Favour the use of the "Eco" driving mode.
When the traffic is flowing smoothly, select the
cruise control.
Control the use of electrical equipment
Before moving off, if the passenger compartment
is too warm, ventilate it by opening the windows
and air vents before using the air conditioning.
At speeds above 31
mph (50 km/h), close the
windows and leave the air vents open.
Consider using equipment that can help keep
the temperature in the passenger compartment
down.
Unless automatically regulated, switch off the air
conditioning as soon as the desired temperature
has been reached.
Switch off the demisting and defrosting functions,
if they are not managed automatically.
Switch off the heated seat as soon as possible.
Adapt your use of the headlamps and/or
foglamps to the level of visibility, in accordance
with current legislation in the country in which
you are driving.
Avoid running the engine before moving off,
particularly in winter (other than in severe wintry
conditions: temperature below -23°C). The
vehicle will warm up much faster while driving.
As a passenger, avoid connecting your
multimedia devices (e.g.
film, music, video
game) to help reduce the consumption of energy.
Disconnect all portable devices before leaving
the vehicle.
Limit the causes of excess consumption
Spread loads throughout the vehicle.
Limit the loads carried in the vehicle and
minimise wind resistance (e.g.
roof bars, roof rack, bicycle carrier, trailer). Preferably, use a
roof box.
Remove roof bars and roof racks after use.
At the end of winter, remove snow tyres and refit
summer tyres.
Comply with the servicing instructions
Check tyre pressures regularly, with the tyres
cold, referring to the label in the door aperture on
the left-hand side.
Carry out this check in particular:
–
before a long journey
.
–
at each change of season.
–
after a long period out of use.
Do not forget the spare wheel and, where
applicable, the tyres on your trailer or caravan.
Have your vehicle serviced regularly (e.g.
engine
oil, oil filter, air filter, passenger compartment
filter, etc.). Observe the schedule of operations in
the manufacturer's service schedule.
With a BlueHDi Diesel engine, if the SCR system
has a fault, your vehicle will emit pollution. Visit
a PEUGEOT dealer or a qualified workshop
as soon as possible to restore your vehicle's
nitrogen oxide emissions to legal levels.
With an HDi Diesel engine, if the particle filter
is faulty, your vehicle will emit pollution. Visit a
PEUGEOT dealer or a qualified workshop as
soon as possible to restore your vehicle's particle
emissions to legal levels.
When filling the fuel tank, do not continue after
the third cut-out of the nozzle, to avoid overflow. CarM an uals 2 .c o m
Page 15 of 164
13
Dashboard instruments
1Lane departure warningFixed.
(white)
The function has been activated, but no lane has
been detected by the camera.
Lane departure detection is not operational.
Fixed.
(green)
The system camera has detected lanes.
The function is operational.
4-wheel drive position (high speed)
4HFlashing.
The 4-wheel driving mode ( 4x4) is
selected but not yet activated.
4HFixed.
The 4-wheel driving mode ( 4x4) is
activated.
The vehicle can travel at high speed
4-wheel drive position (low speed)
4LFlashing.
The 4-wheel driving mode ( 4x4) is
selected but not yet activated.
4LFixed.
The 4-wheel driving mode ( 4x4) is
activated.
The vehicle can only travel at low speed.
Direction indicatorsFlashing with audible signal.
The direction indicators are on.
Front foglampsFixed.
The front foglamps are on.
SidelampsFixed.
The lamps are on.
Dipped beam headlampsFixed.
The lamps are on.
Blue warning/indicator lamps
Main beam headlamps
Fixed.
The lamps are on.
Coolant temperature
indicator
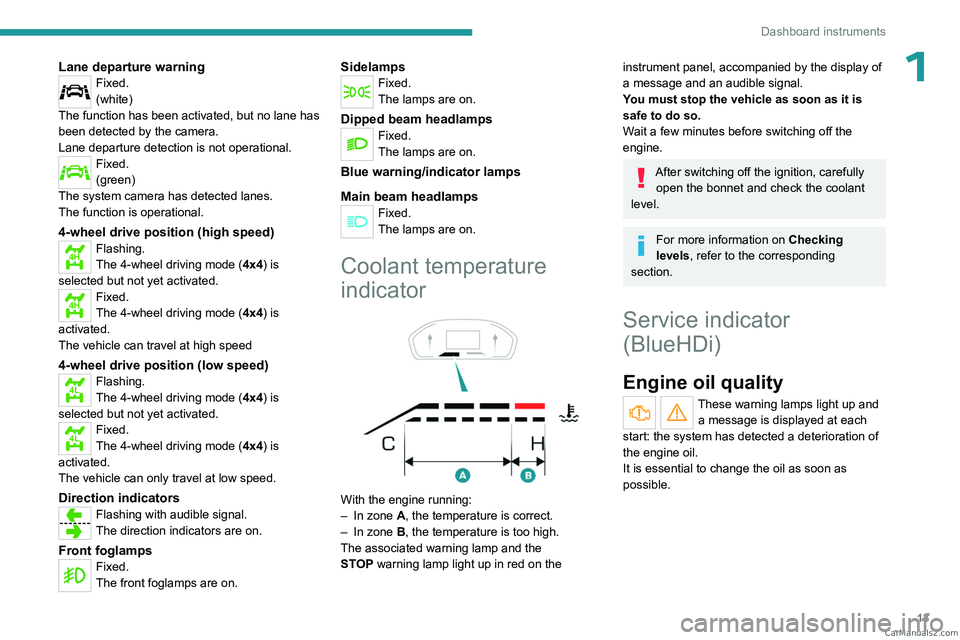
With the engine running:
– In zone A, the temperature is correct.
–
In zone
B, the temperature is too high.
The associated warning lamp and the
STOP
warning lamp light up in red on the
instrument panel, accompanied by the display of
a message and an audible signal.
You must stop the vehicle as soon as it is
safe to do so.
Wait a few minutes before switching off the
engine.
After switching off the ignition, carefully open the bonnet and check the coolant
level.
For more information on Checking
levels, refer to the corresponding
section.
Service indicator
(BlueHDi)
Engine oil quality
These warning lamps light up and a message is displayed at each
start: the system has detected a deterioration of
the engine oil.
It is essential to change the oil as soon as
possible. CarM an uals 2 .c o m
Page 16 of 164
14
Dashboard instruments
Resetting the service
indicator
A qualified workshop, equipped with the
diagnostic tool, will stop the permanent lighting
of the warning lamps after each service.
If you have serviced the vehicle yourself, reset
the service indicator as follows:
►
Insert the key into the ignition switch and turn
it to the
3-Ignition
position.
or
►
Press the "
START/STOP" button.
►
In both cases, simultaneously depress the
brake and accelerator pedals for more than
15
seconds.
Refer to the checklist in the
Manufacturer's service schedule
provided on delivery of the vehicle.
AdBlue® range indicators
(BlueHDi)
The Diesel BlueHDi engines are equipped with
a system that associates the SCR (Selective
Catalytic Reduction) emissions control system
and the Diesel particle filter (DPF) for the
treatment of exhaust gases. They cannot
function without AdBlue
® fluid.
When the level of AdBlue® falls below the
reserve level (between 1,500 and 0 miles (2,400
and 0
km)), a warning lamp lights up when
the ignition is switched on and an estimate
of the distance that can be travelled before
engine starting is prevented is displayed in the
instrument panel.
The engine starting prevention system required by regulations is activated
automatically once the AdBlue
® tank is empty.
It is then no longer possible to start the
engine until the minimum level of AdBlue
® has
been topped up.
Manual display of driving
range
While the driving range is greater than
1,500 miles (2,400 km), it is not displayed
automatically.
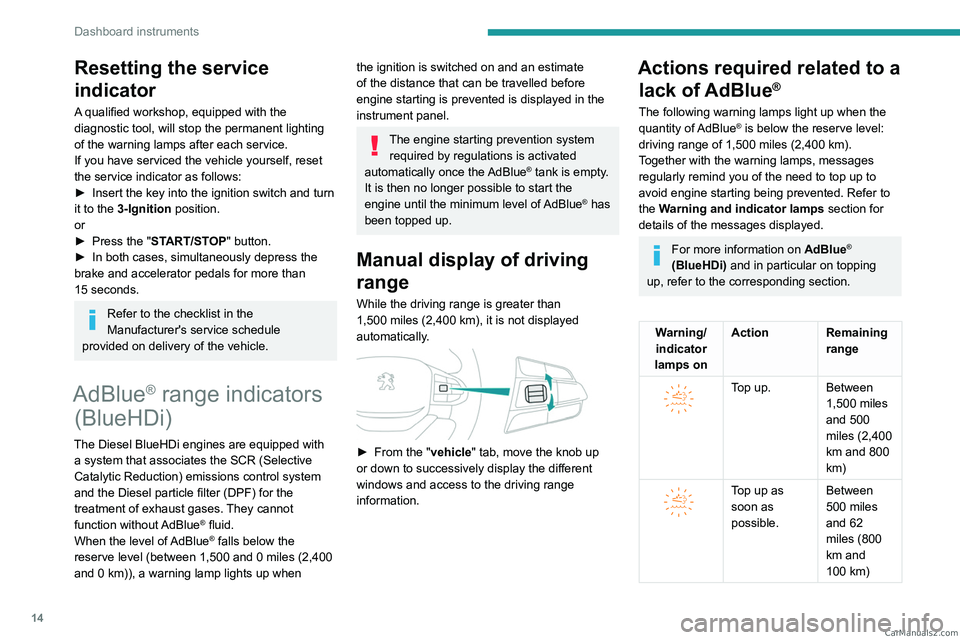
► From the " vehicle" tab, move the knob up
or down to successively display the different
windows and access to the driving range
information.
Actions required related to a lack of AdBlue
®
The following warning lamps light up when the
quantity of AdBlue® is below the reserve level:
driving range of 1,500 miles (2,400 km).
Together with the warning lamps, messages
regularly remind you of the need to top up to
avoid engine starting being prevented. Refer to
the Warning and indicator lamps section for
details of the messages displayed.
For more information on AdBlue®
(BlueHDi) and in particular on topping
up, refer to the corresponding section.
Warning/ indicator
lamps on Action Remaining
range
Top up. Between 1,500 miles
and 500
miles (2,400
km and 800
km)
Top up as
soon as
possible.Between
500 miles
and 62
miles (800
km and
100
km) CarM an uals 2 .c o m
Page 17 of 164
15
Dashboard instruments
1Warning/indicator
lamps on Action Remaining
range
A top-up is
vital, there is
a risk that the
engine will
be prevented
from starting.Between 62
miles and 0
miles (100
km and 0
km)
To be able
to restart the
engine, add at
least 10
litres
of AdBlue
® to
the tank. 0 miles (km)
Taking into account of top-up
Top-up detection may not be
instantaneous after addition. It may take a few
minutes of driving before the top-up detection
is effective.
Malfunction of the SCR
emissions control system
Malfunction detection
If a malfunction is detected,
these warning lamps come
on, accompanied by an
audible signal and the
display of one of the following
messages (depending on the
context):
–
Emissions fault: starting
impossible in X
miles (km)
–
Additive quality fault:
starting impossible in
X
miles (km)
–
Additive consumption
fault: starting impossible in
X
miles (km)
The alert is triggered while driving when the
fault is detected for the first time, and thereafter
when switching on the ignition for subsequent
journeys, for as long as the cause of the fault
persists.
If the fault is temporary, the alert
disappears during the next journey, after
self-diagnostic checks of the SCR emissions
control system.
Malfunction confirmed during the
permitted driving phase (between 685
miles and 0
miles (1,100 km and 0 km))
If the fault indication is still displayed
permanently after 31 miles (50 km) of driving, the
fault in the SCR system is confirmed.
The AdBlue and SCR warning lamps come on
and one of the messages above is displayed
("... fault: starting impossible in X miles
(kms)"), indicating the driving range in miles or
kilometres, accompanied by an audible signal.
While driving, the message is displayed every 30
seconds. The alert is repeated when switching
on the ignition.
You can continue driving for up to 685 miles
(1,100
km) before the engine starting
prevention system is triggered.
Have it checked by a PEUGEOT dealer
or a qualified workshop.
Starting impossible
Every time the ignition is switched on, one of the
messages above " ... fault: Starting impossible "
is displayed, accompanied by an audible signal.
To restart the engine
Contact a PEUGEOT dealer or a
qualified workshop. CarM an uals 2 .c o m
Page 26 of 164
24
Access
Back-up procedures
Lost keys, remote control,
electronic key
Go to a PEUGEOT dealer with the vehicle's
registration certificate, your personal
identification documents and if possible, the label
bearing the key code.
The PEUGEOT dealer will be able to retrieve the
key code and the transponder code, enabling a
new key to be ordered.
Complete unlocking/locking
of the vehicle with the key
Use this procedure in the following situations:
– Remote control battery discharged.
–
Remote control malfunction.
–
V
ehicle battery discharged.
–
V
ehicle in an area subject to strong
electromagnetic interference.
In the first case, change the remote control
battery.
In the second case, reinitialise
the remote
control.
Refer to the corresponding sections.
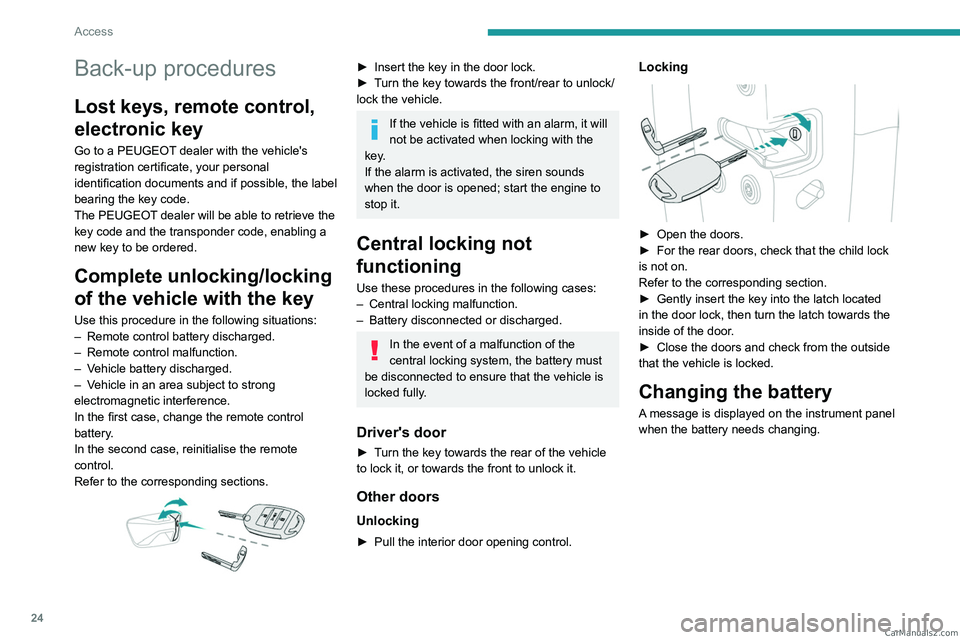
► Insert the key in the door lock.
► T urn the key towards the front/rear to unlock/
lock the vehicle.
If the vehicle is fitted with an alarm, it will
not be activated when locking with the
key.
If the alarm is activated, the siren sounds
when the door is opened; start the engine to
stop it.
Central locking not
functioning
Use these procedures in the following cases:
– Central locking malfunction.
–
Battery disconnected or discharged.
In the event of a malfunction of the
central locking system, the battery must
be disconnected to ensure that the vehicle is
locked fully.
Driver's door
► Turn the key towards the rear of the vehicle
to lock it, or towards the front to unlock it.
Other doors
Unlocking
► Pull the interior door opening control.
Locking
► Open the doors.
► For the rear doors, check that the child lock
is not on.
Refer to the corresponding section.
►
Gently insert the key into the latch located
in the door lock, then turn the latch towards the
inside of the door
.
►
Close the doors and check from the outside
that the vehicle is locked.
Changing the battery
A message is displayed on the instrument panel
when the battery needs changing. CarM an uals 2 .c o m
Page 28 of 164
26
Access
From inside
► Pull the interior opening control of a door; this
unlocks the vehicle completely .
With selective unlocking activated:
– Opening the driver's door unlocks
the driver's door only (if the vehicle has not
already been completely unlocked).
–
Opening one of the passenger doors
unlocks the rest of the vehicle.
Closing
If a door is not properly closed, a message is
displayed on the instrument panel if the engine
is running, accompanied by an audible signal
when the vehicle is travelling at more than 12
mph (20
km/h).
Tailgate
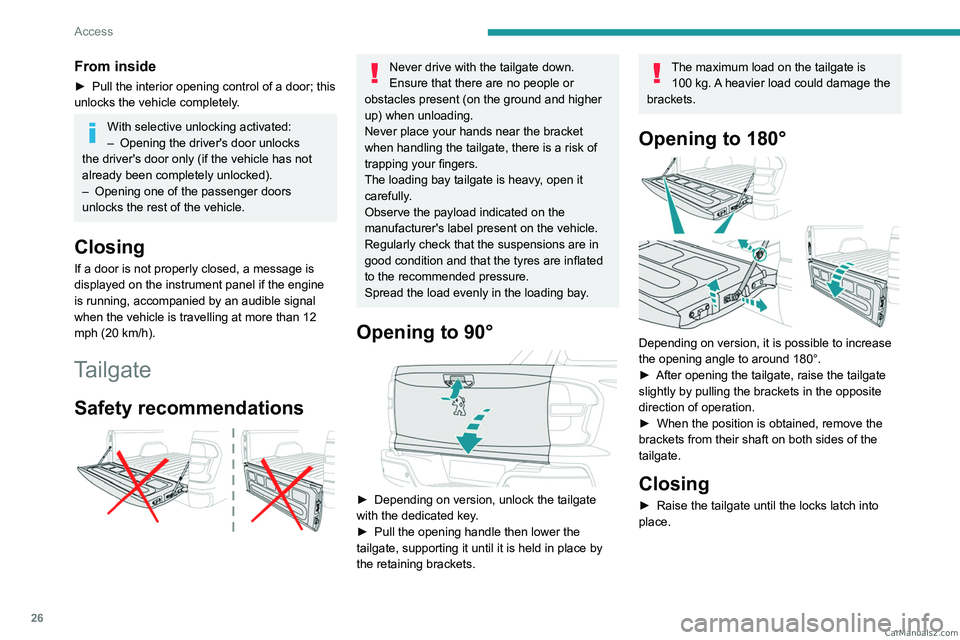
Safety recommendations
Never drive with the tailgate down.
Ensure that there are no people or
obstacles present (on the ground and higher
up) when unloading.
Never place your hands near the bracket
when handling the tailgate, there is a risk of
trapping your fingers.
The loading bay tailgate is heavy, open it
carefully.
Observe the payload indicated on the
manufacturer's label present on the vehicle.
Regularly check that the suspensions are in
good condition and that the tyres are inflated
to the recommended pressure.
Spread the load evenly in the loading bay.
Opening to 90°
► Depending on version, unlock the tailgate
with the dedicated key .
►
Pull the opening handle then lower the
tailgate, supporting it until it is held in place by
the retaining brackets.
The maximum load on the tailgate is 100 kg. A heavier load could damage the
brackets.
Opening to 180°
Depending on version, it is possible to increase
the opening angle to around 180°.
►
After opening the tailgate, raise the tailgate
slightly by pulling the brackets in the opposite
direction of operation.
►
When the position is obtained, remove the
brackets from their shaft on both sides of the
tailgate.
Closing
► Raise the tailgate until the locks latch into
place. CarM an uals 2 .c o m