2023 PEUGEOT 508 ESP
[x] Cancel search: ESPPage 174 of 244
172
In the event of a breakdown
Warning triangle
This reflective and dismantlable device is to be
installed on the side of the road when a vehicle
is broken down or damaged.
Before getting out of the vehicle
Turn on the hazard warning lamps, then
put on the safety vest to assemble and install
the triangle.
Storage compartment
There is a compartment in the interior trim of the
tailgate to store a warning triangle.
►
After opening the tailgate, release the cover
by turning the screw a quarter turn to the left.
Assembling and placing the triangle
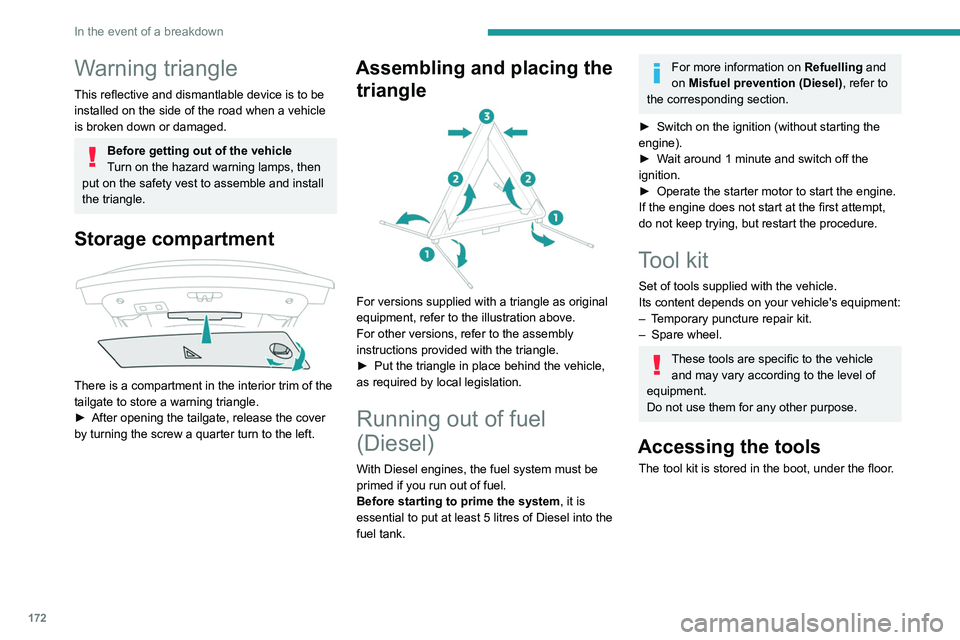
For versions supplied with a triangle as original
equipment, refer to the illustration above.
For other versions, refer to the assembly
instructions provided with the triangle.
►
Put the triangle in place behind the vehicle,
as required by local legislation.
Running out of fuel
(Diesel)
With Diesel engines, the fuel system must be
primed if you run out of fuel.
Before starting to prime the system, it is
essential to put at least 5
litres of Diesel into the
fuel tank.
For more information on Refuelling and
on Misfuel prevention (Diesel), refer to
the corresponding section.
►
Switch on the ignition (without starting the
engine).
►
W
ait around 1 minute and switch off the
ignition.
►
Operate the starter motor to start the engine.
If the engine does not start at the first attempt,
do not keep trying, but restart the procedure.
Tool kit
Set of tools supplied with the vehicle.
Its content depends on your vehicle's equipment:
–
T
emporary puncture repair kit.
–
Spare wheel.
These tools are specific to the vehicle and may vary according to the level of
equipment.
Do not use them for any other purpose.
Accessing the tools
The tool kit is stored in the boot, under the floor.
Page 175 of 244
173
In the event of a breakdown
8
Sedan
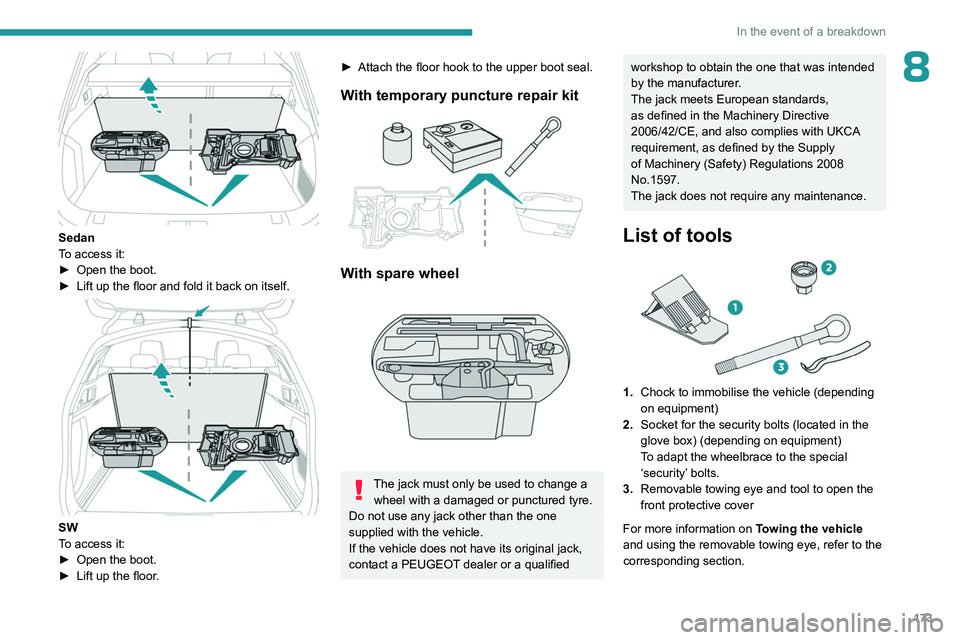
To access it:
►
Open the boot.
►
Lift up the floor and fold it back on itself.
SW
To access it:
►
Open the boot.
►
Lift up the floor
.
► Attach the floor hook to the upper boot seal.
With temporary puncture repair kit
With spare wheel
The jack must only be used to change a wheel with a damaged or punctured tyre.
Do not use any jack other than the one
supplied with the vehicle.
If the vehicle does not have its original jack,
contact a PEUGEOT dealer or a qualified
workshop to obtain the one that was intended
by the manufacturer.
The jack meets European standards,
as defined in the Machinery Directive
2006/42/CE, and also complies with UKCA
requirement, as defined by the Supply
of Machinery (Safety) Regulations 2008
No.1597.
The jack does not require any maintenance.
List of tools
1. Chock to immobilise the vehicle (depending
on equipment)
2. Socket for the security bolts (located in the
glove box) (depending on equipment)
To adapt the wheelbrace to the special
‘security’ bolts.
3. Removable towing eye and tool to open the
front protective cover
For more information on Towing the vehicle
and using the removable towing eye, refer to the
corresponding section.
Page 176 of 244
174
In the event of a breakdown
With temporary puncture repair kit
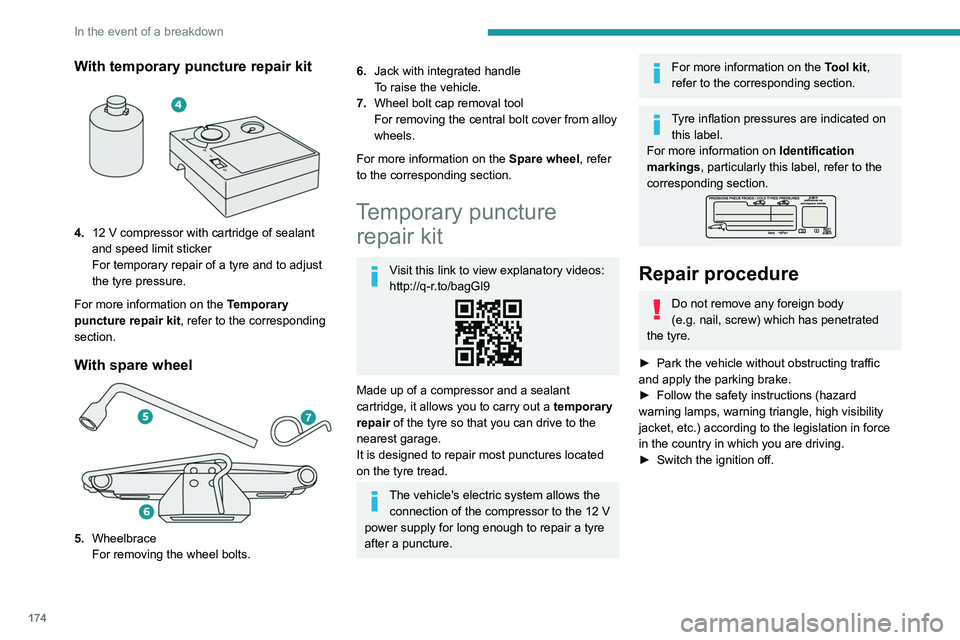
4.12 V compressor with cartridge of sealant
and speed limit sticker
For temporary repair of a tyre and to adjust
the tyre pressure.
For more information on the Temporary
puncture repair kit, refer to the corresponding
section.
With spare wheel
5. Wheelbrace
For removing the wheel bolts.
6.Jack with integrated handle
To raise the vehicle.
7. Wheel bolt cap removal tool
For removing the central bolt cover from alloy
wheels.
For more information on the Spare wheel, refer
to the corresponding section.
Temporary puncture repair kit
Visit this link to view explanatory videos:
http://q-r.to/bagGl9
Made up of a compressor and a sealant
cartridge,
it allows you to carry out a temporary
repair of the tyre so that you can drive to the
nearest garage.
It is designed to repair most punctures located
on the tyre tread.
The vehicle's electric system allows the connection of the compressor to the 12 V
power supply for long enough to repair a tyre
after a puncture.
For more information on the Tool kit,
refer to the corresponding section.
Tyre inflation pressures are indicated on this label.
For more information on Identification
markings, particularly this label, refer to the
corresponding section.
Repair procedure
Do not remove any foreign body
(e.g. nail, screw) which has penetrated
the tyre.
►
Park the vehicle without obstructing traffic
and apply the parking brake.
►
Follow the safety instructions (hazard
warning lamps, warning triangle, high visibility
jacket, etc.) according to the legislation in force
in the country in which you are driving.
►
Switch the ignition off.
Page 178 of 244
176
In the event of a breakdown
► Stop to check the repair and the tyre
pressure using the kit:
•
If the tyre pressure is incorrect, contact a
PEUGEOT
dealer to have the tyre changed.
•
If the tyre pressure is correct, drive a second
time for approximately 3
miles (5 kilometres)
at reduced speed (between 12 and 37
mph
(20 and 60
km/h)), stop then check again
the tyre pressure using the kit to confirm the
effective repair of the tyre.
With a tyre repaired using this type of kit,
do not exceed a speed of 50 mph
(80
km/h) and do not drive more than
125
miles (200 km).
You must contact a PEUGEOT dealer or a
qualified workshop to have the repair checked
and the tyre changed.
Checking/adjusting tyre
pressures
The compressor can be used, without injecting
sealant, to check and, if necessary, adjust the
tyre pressures.
►
Remove the valve cap from the tyre and keep
it in a clean place.
►
Uncoil
the pipe stowed under the compressor.
►
Screw the pipe onto the valve and tighten
firmly
.
►
Check that the compressor switch is in
position
"O".
► Fully uncoil the electric cable stowed under
the compressor .
►
Connect the compressor's electric plug to the
vehicle's 12
V socket.
►
Switch the ignition on.
►
Start the compressor by placing the switch at
position
"I" and adjust the pressure to the value
shown on the vehicle's tyre pressure label. To
deflate: press the black button located on the
compressor pipe, near the valve connection.
If after 7 minutes the pressure of 2 bar is
not reached, the tyre is damaged;
contact a PEUGEOT
dealer or a qualified
workshop for assistance.
►
Once the correct pressure is reached, put the
switch in position
"O".
►
Remove the kit and stow it.
►
Refit the cap on the valve.
Should the pressure of one or more tyres
be adjusted, it is necessary to reinitialise
the under-inflation detection system.
For more information on Tyre under-inflation
detection, refer to the corresponding section.
Spare wheel
Visit this link to view explanatory videos:
http://q-r.to/bagGl9
For more information on the Tool kit,
refer to the corresponding section.
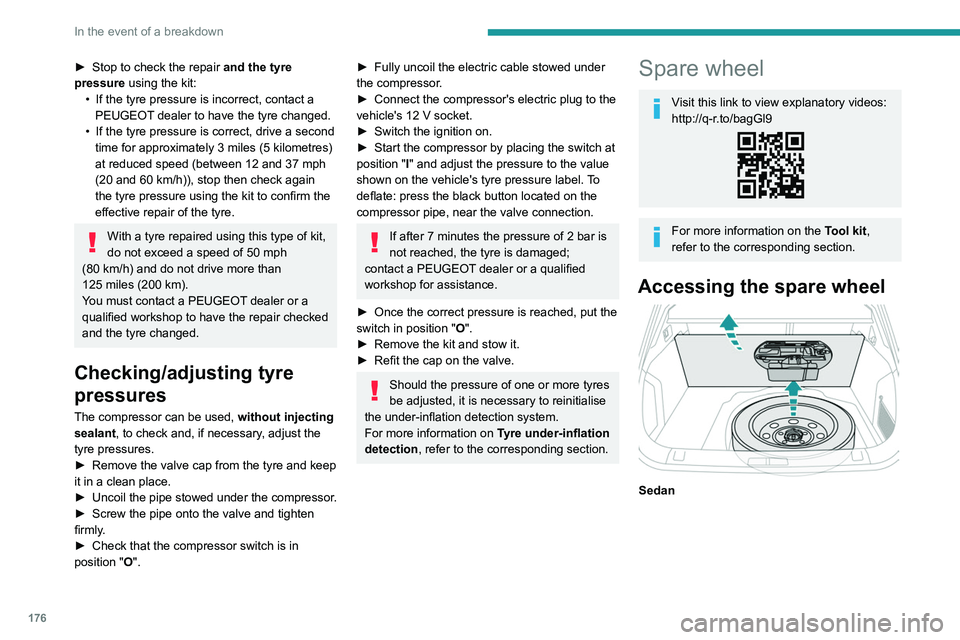
Accessing the spare wheel
Sedan
Page 184 of 244
182
In the event of a breakdown
To change the bulb within a few minutes of switching off the ignition, take care not
to touch the exhaust - risk of burns!
Fuses
Changing a fuse
All work must be carried out only by a
PEUGEOT dealer or a qualified workshop
The replacement of a fuse by a third party
could cause a serious malfunction of the
vehicle.
Installing electrical accessories
The vehicle's electrical system is
designed to operate with standard or optional
equipment.
Before fitting other electrical equipment
or accessories to your vehicle, contact a
PEUGEOT dealer or a qualified workshop.
PEUGEOT accepts no responsibility for
the cost incurred in repairing the vehicle
or for rectifying malfunctions resulting from
the installation of accessories not supplied or
not recommended by PEUGEOT and not
installed in accordance with its
recommendations, in particular when the
combined power consumption of all of the
additional equipment connected exceeds 10
milliamperes.
12 V battery/Accessory
batteries
Lead-acid starter batteries
These batteries contain harmful
substances (sulphuric acid and lead).
They must be disposed of in accordance
with regulations and must never under any
circumstances be discarded with household
waste.
Dispose of used batteries at a designated
collection point.
Protect your eyes and face before
handling the battery.
All operations on the battery must be carried
out in a well ventilated area and away from
naked flames and sources of sparks, to avoid
any risk of explosion or fire.
Wash your hands afterwards.
Electronic control units/LED
technology headlamps
Never connect the negative jump lead to the
metal part of the electronic control units or at
the back of the headlamps.
Risk of destroying the electronic control units
and/or headlamps!
Connect to the remote earth point provided
for this purpose.
Frozen battery
Never try to charge a frozen battery - risk
of explosion!
If the battery has frozen, have it checked by a
PEUGEOT dealer or by a qualified workshop,
who will verify that the internal components
have not been damaged and that the case
has not cracked, which could lead to a risk of
leakage of toxic and corrosive acid.
Never try to start the engine by pushing
the vehicle.
Symbols
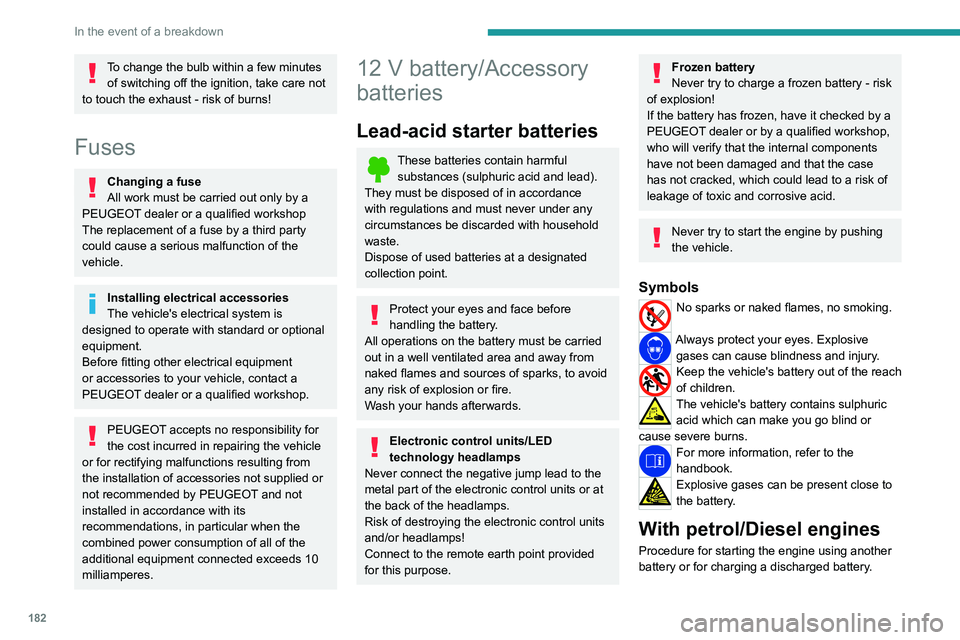
No sparks or naked flames, no smoking.
Always protect your eyes. Explosive gases can cause blindness and injury.
Keep the vehicle's battery out of the reach
of children.
The vehicle's battery contains sulphuric acid which can make you go blind or
cause severe burns.
For more information, refer to the
handbook.
Explosive gases can be present close to
the battery.
With petrol/Diesel engines
Procedure for starting the engine using another
battery or for charging a discharged battery.
Page 191 of 244
189
In the event of a breakdown
8Accessing the tools
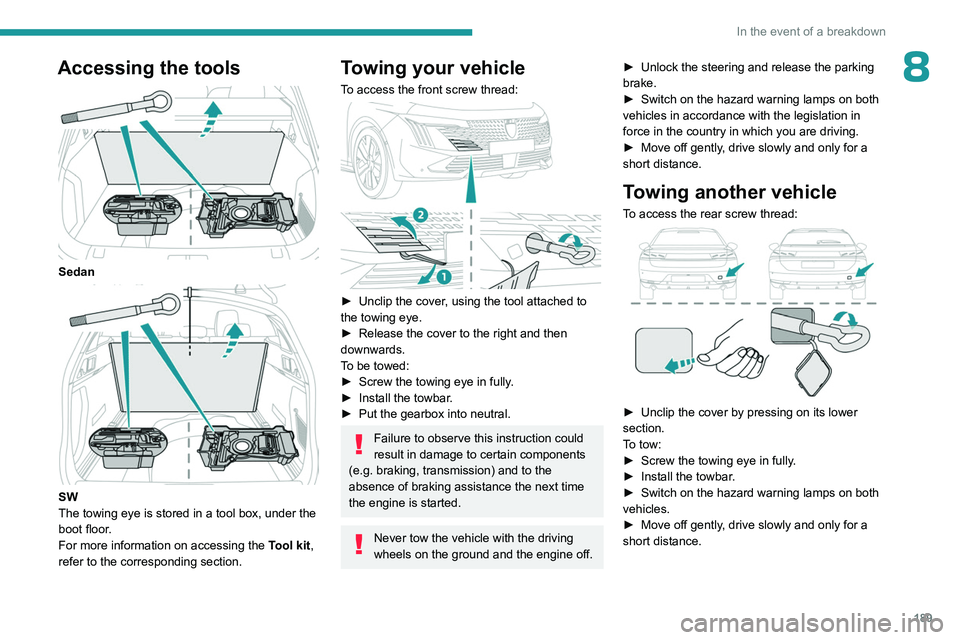
Sedan
SW
The towing eye is stored in a tool box, under the
boot floor.
For more information on accessing the Tool kit,
refer to the corresponding section.
Towing your vehicle
To access the front screw thread:
► Unclip the cover , using the tool attached to
the towing eye.
►
Release the cover to the right and then
downwards.
T
o be towed:
►
Screw the towing eye in fully
.
►
Install the towbar
.
►
Put the gearbox into neutral.
Failure to observe this instruction could
result in damage to certain components
(e.g. braking, transmission) and to the
absence of braking assistance the next time
the engine is started.
Never tow the vehicle with the driving
wheels on the ground and the engine off. ►
Unlock the steering and release the parking
brake.
►
Switch on the hazard warning lamps on both
vehicles in accordance with the legislation in
force in the country in which you are driving.
►
Move off gently
, drive slowly and only for a
short distance.
Towing another vehicle
To access the rear screw thread:
► Unclip the cover by pressing on its lower
section.
T
o tow:
►
Screw the towing eye in fully
.
►
Install the towbar
.
►
Switch on the hazard warning lamps on both
vehicles.
►
Move off gently
, drive slowly and only for a
short distance.
Page 192 of 244
190
Technical data
Engine technical data and
towed loads
Engines
The engine characteristics are given in the
vehicle's registration document, as well as in
sales brochures.
Only the values available at the time of
publication are presented in the tables.
Contact a PEUGEOT dealer or a qualified
workshop to obtain missing values.
The maximum power corresponds to the value type-approved on a test bed, under
conditions defined by European legislation
(Directive 1999/99/EC).
For more information, contact a PEUGEOT
dealer or a qualified workshop.
Weights and towed loads
The weights and towed loads relating to
the vehicle are indicated on the registration
document, as well as in sales brochures.
These values are also indicated on the
manufacturer's plate or label.
For more information, contact a PEUGEOT
dealer or a qualified workshop.
The GTW (Gross Train Weight) and towed load
values indicated are valid up to a maximum
altitude of 1,000 metres. The towed load value
must be reduced by 10% for each additional
1,000 metres of altitude.
The maximum authorised nose weight
corresponds to the weight permitted on the
towball.
When exterior temperatures are high, the
vehicle performance may be limited in
order to protect the engine. When the exterior
temperature is higher than 37°C, reduce the
towed weight.
Towing even with a lightly loaded vehicle can adversely affect its road holding.
Braking distances are increased when towing
a trailer.
When using a vehicle to tow, never exceed
a speed of 62 mph (100
km/h) (observe the
local legislation in force).
Page 193 of 244
191
Technical data
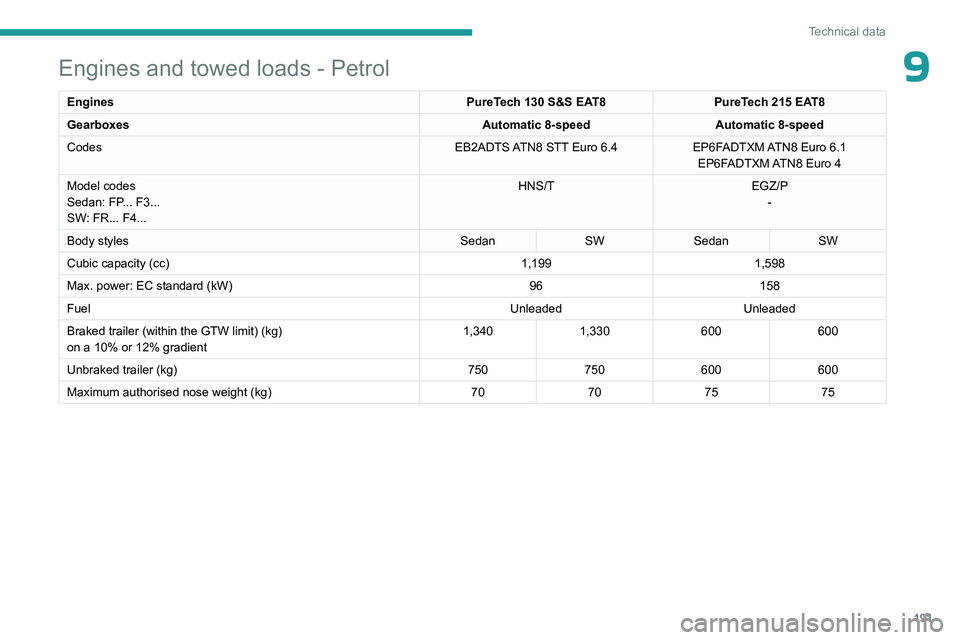
9Engines and towed loads - Petrol
EnginesPureTech 130 S&S EAT8PureTech 215 EAT8
Gearboxes Automatic 8-speedAutomatic 8-speed
Codes EB2ADTS ATN8 STT Euro
6.4EP6FADTXM ATN8 Euro
6.1
EP6FADTXM ATN8 Euro
4
Model codes
Sedan: FP... F3...
SW: FR... F4... HNS/T
EGZ/P
-
Body styles SedanSWSedan SW
Cubic capacity (cc) 1,1991,598
Max. power: EC standard (kW) 96158
Fuel UnleadedUnleaded
Braked trailer (within the GTW limit) (kg)
on a 10% or 12% gradient 1,340
1,330 600600
Unbraked trailer (kg) 750750600600
Maximum authorised nose weight (kg) 70707575