2023 PEUGEOT 408 lights
[x] Cancel search: lightsPage 15 of 244

13
Dashboard instruments
1Identify the cause of the fault using the message
displayed on the instrument panel.
You may be able to deal with some faults
yourself, such as changing the battery in the
remote control.
For other faults, such as with the tyre under-
inflation detection system, carry out (3).
Fixed, accompanied by the display of a
message.
One or more major faults, for which there is/are
no specific warning lamp(s), have been detected.
Identify the cause of the fault using the message
displayed on the instrument panel, then carry
out (3).
Fixed, accompanied by the message
"Parking brake fault".
Automatic release of the electric parking brake is
unavailable.
Carry out (2).
BrakingFixed.
A minor fault with the braking system has
been detected.
Drive carefully.
Carry out (3).
Malfunction (with electric parking brake)Fixed, accompanied by the
message "Parking brake fault".
The vehicle cannot be immobilised with the
engine running. If manual application and release commands are
not working, the electric parking brake control is
faulty.
The automatic functions must be used at all
times and are automatically reactivated in the
event of a fault with the control.
Carry out (2).
Fixed, accompanied by the
message "Parking brake
fault".
The electric parking brake is faulty: manual and
automatic functions may not be working.
When stationary, to immobilise the vehicle:
►
Pull the electric parking brake control and
hold it for approximately 7 to 15
seconds, until
the indicator lamp lights up on the instrument
panel.
If this procedure does not work, secure the
vehicle:
►
Park on a level surface.
►
Select mode
P on the automatic gearbox,
then place the supplied chock against one of the
wheels.
Then carry out (2).
Automatic functions deactivated (electric
parking brake)
Fixed.
The "automatic application" (on switching
off the engine) and "automatic release" (on
acceleration) functions are deactivated.
If automatic application/release is no longer
possible:
►
Start the engine. ►
Use the control to apply the electric parking
brake.
►
T
ake your foot fully off the brake pedal.
►
Hold the control pressed in the release
direction for between 10 and 15
seconds.
►
Release the control.
►
Depress and hold the brake pedal.
►
Pull the control in the application direction for
2
seconds.
►
Release the control and the brake pedal.
Anti-lock braking system (ABS)Fixed.
The anti-lock braking system has a fault.
The vehicle retains conventional braking.
Drive carefully at moderate speed, then carry
out (3).
Power steeringFixed.
A minor fault in the power steering has
been detected.
Drive carefully at moderate speed, then carry
out (3).
Engine self-diagnostic systemFlashing.
The engine management system has a
fault.
There is a risk that the catalytic converter will be
destroyed.
You must carry out (2).
Fixed.
The emissions control system has a fault. CarM an uals 2 .c o m
Page 18 of 244

16
Dashboard instruments
Peugeot Matrix LED Technology 2.0Fixed, accompanied by an audible signal
and a message.
A malfunction
of the Peugeot Matrix LED
Technology 2.0 headlamps or of the camera has
been detected.
Carry out (2).
Automatic headlamp dippingFixed, accompanied by an audible signal
and a message.
A function or camera malfunction is detected.
Carry out (2).
Green warning/indicator lamps
Stop & Start
Fixed.
When the vehicle stops, the Stop & Start
system puts the engine into STOP mode.
Flashing temporarily.
STOP mode is momentarily unavailable
or START mode is automatically triggered.
For more information, refer to the Driving
section.
Vehicle ready to drive (Rechargeable
hybrid)
Fixed, accompanied by an audible signal
when it comes on.
The vehicle is ready to drive.
The indicator lamp goes out upon reaching a
speed of approximately 3 mph (5
km/h) and
lights up again when the vehicle stops moving.
The lamp will go out when you switch off the
motor and exit the vehicle.
Seat unoccupied/Seat belt not fastenedFixed.
(grey)
With the ignition on, one of the front or rear
passenger seats is considered to be unoccupied.
Seat occupied/Seat belt fastenedFixed.
With the ignition on, the driver or a
passenger has fastened their seat belt.
Direction indicatorsFlashing with audible signal.
The direction indicators are on.
Daytime running lamps/SidelampsFixed.
With adequate ambient light, the daytime
running lamps are on.
With inadequate ambient light, the sidelamps
are on.
Dipped beam headlampsFixed.
The lamps are on.
Night Vision
Fixed.
(grey)
The function is activated, but not available.
Fixed.
The function is active.
All of the conditions are met: the system is
operating.
For more information, refer to the Lighting and
visibility section.
Peugeot Matrix LED Technology 2.0Fixed.
(grey)
The function is activated, but not available.
All the operating conditions have not been met.
Fixed.
The function is active.
All of the conditions are met: the system is
operating.
For more information, refer to the Lighting and
visibility section.
Automatic headlamp dippingFixed.
The function has been activated
via the touch screen.
The lighting control stalk ring is in the “ AUTO”
position.
For more information, refer to the Lighting and
visibility section.
Blue warning/indicator lamps
Main beam headlamps
Fixed.
The lamps are on.
Black/white warning lamps
Foot on the brake
Fixed.
Insufficient or no pressure on the brake
pedal.
With the engine running, before releasing the
parking brake, to move out of mode P on an
automatic gearbox. CarM an uals 2 .c o m
Page 52 of 244
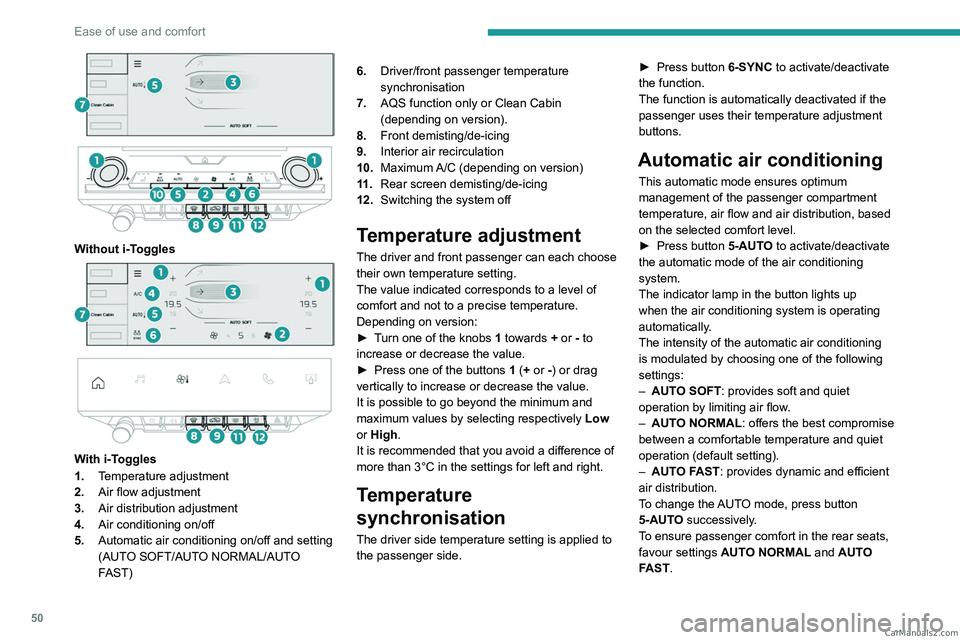
50
Ease of use and comfort
Without i-Toggles
With i-Toggles
1. Temperature adjustment
2. Air flow adjustment
3. Air distribution adjustment
4. Air conditioning on/off
5. Automatic air conditioning on/off and setting
(AUTO SOFT/AUTO NORMAL/AUTO
FAST) 6.
Driver/front passenger temperature
synchronisation
7. AQS function only or Clean Cabin
(depending on version).
8. Front demisting/de-icing
9. Interior air recirculation
10. Maximum A/C (depending on version)
11 . Rear screen demisting/de-icing
12. Switching the system off
Temperature adjustment
The driver and front passenger can each choose
their own temperature setting.
The value indicated corresponds to a level of
comfort and not to a precise temperature.
Depending on version:
►
T
urn one of the knobs 1 towards + or - to
increase or decrease the value.
►
Press one of the buttons
1 (+ or -) or drag
vertically to increase or decrease the value.
It is possible to go beyond the minimum and
maximum values by selecting respectively Low
or High.
It is recommended that you avoid a difference of
more than 3°C in the settings for left and right.
Temperature
synchronisation
The driver side temperature setting is applied to
the passenger side. ►
Press button
6-SYNC to activate/deactivate
the function.
The function is automatically deactivated if the
passenger uses their temperature adjustment
buttons.
Automatic air conditioning
This automatic mode ensures optimum
management of the passenger compartment
temperature, air flow and air distribution, based
on the selected comfort level.
►
Press button
5-AUTO to activate/deactivate
the automatic mode of the air conditioning
system.
The indicator lamp in the button lights up
when the air conditioning system is operating
automatically.
The intensity of the automatic air conditioning
is modulated by choosing one of the following
settings:
–
AUT
O SOFT : provides soft and quiet
operation by limiting air flow.
–
AUT
O NORMAL: offers the best compromise
between a comfortable temperature and quiet
operation (default setting).
–
AUT
O FAST: provides dynamic and efficient
air distribution.
To change the AUTO mode, press button
5-AUTO successively.
To ensure passenger comfort in the rear seats,
favour settings AUTO NORMAL and AUTO
FAST. CarM an uals 2 .c o m
Page 54 of 244
52
Ease of use and comfort
– It increase the effectiveness of the demisting,
in winter , above 3°C.
►
Press button
4-A/C to switch the air
conditioning on/off.
When the system is switched on, the indicator
lamp in the button comes on or “ A/C” changes
colour (depending on version).
Air conditioning does not operate when the air flow is deactivated.
To obtain cool air more quickly, enable interior
air recirculation for a brief period. Then return
to the intake of exterior air.
Switching off the air conditioning may result in
some discomfort (humidity or misting).
Maximum air conditioning
This function automatically adjusts the
temperature setting to the lowest possible, the
air distribution towards the central and side air
vents, the air flow to maximum and, if necessary,
activates interior air recirculation.
► Press this button to activate/deactivate
the function (confirmed by the
illumination/extinction of the indicator lamp).
Once the function is deactivated, the system
returns to the previous settings.
Switching off the air
conditioning system
► Press button 12-OFF.
Its indicator lamp lights up and all the other
indicator lamps of the air conditioning system
go off.
This action deactivates all of the functions of the
air conditioning system.
The temperature is no longer regulated. A slight
flow of air can still be felt, due to the forward
movement of the vehicle.
Interior air recirculation
The intake of exterior air prevents the formation
of mist on the windscreen and side windows.
Recirculating the interior air isolates the
passenger compartment from outside odours
and fumes and allows the desired passenger
compartment temperature to be achieved more
rapidly.
► Press this button to activate/deactivate
the function (confirmed by the
illumination/extinction of the indicator lamp).
This function is activated automatically when the front screenwash is used or
reverse gear is engaged.
Front demisting/defrosting
This mode allows the windscreen and side windows to be demisted or defrosted as quickly
as possible.
► Press this button to activate/deactivate
the mode (confirmed by the illumination/
extinction of the
indicator lamp).
The mode automatically manages the air
conditioning, air flow, air intake and distributes
ventilation optimally to the windscreen and side
windows.
The air flow can be changed manually without
deactivating this mode.
With Stop & Start, when demisting has
been activated, STOP mode is not
available.
In wintry conditions, before moving off, it
is essential to remove any snow or ice
from the windscreen around the camera.
Otherwise, the operation of the equipment
using the camera may be affected.
Rear screen demisting/
defrosting
This demisting/de-icing only works with the engine running.
Depending on version, it also demists/de-ices
the door mirrors.
► Press this button to activate/deactivate
the function (confirmed by the indicator
lamp coming on/switching off).
The function can be activated whatever the outside temperature may be. CarM an uals 2 .c o m
Page 58 of 244
56
Ease of use and comfort
Charging is managed by the smartphone.
With the Keyless Entry and Start system, the
charger’s operation may be briefly disrupted
when a door is opened or the ignition is switched
off.
Charging
► With the charging area clear, place a device
in its centre.
When the portable device is detected, the
charger’s indicator lamp lights up green. It
remains lit for the whole time that the battery is
being charged.
The system is not designed to charge multiple devices simultaneously.
Do not leave metal objects (e.g. coins,
keys, vehicle remote control) in the
charging area while a device is being charged
- Risk of overheating or interrupting the
charging!
When using applications for a long time
in combination with wireless charging,
some smartphones may switch to thermal
safety and cause some functions to stop.
Checking operation
The state of the indicator lamp allows the
operation of the charger to be monitored.
State of the
indicator lamp Meaning
Off Engine switched off.
No compatible devices
detected.
Charging complete.
Fixed green Compatible portable device detected.
Charging.
Flashing orange Foreign object detected in the charging zone.
Portable device not well
centred in the charging
zone.
Fixed orange Malfunction of the portable device's battery
meter.
Device battery
temperature too high.
Charger malfunction.
If the indicator lamp is fixed orange:
– remove the device, then place it back in the
centre of the charging zone.
or –
remove the device and try again in a quarter
of an hour
.
If the problem persists, have the system checked
by a PEUGEOT dealer or a qualified workshop.
Front armrest
It includes a storage space and is illuminated
when the cover is opened (depending on
version).
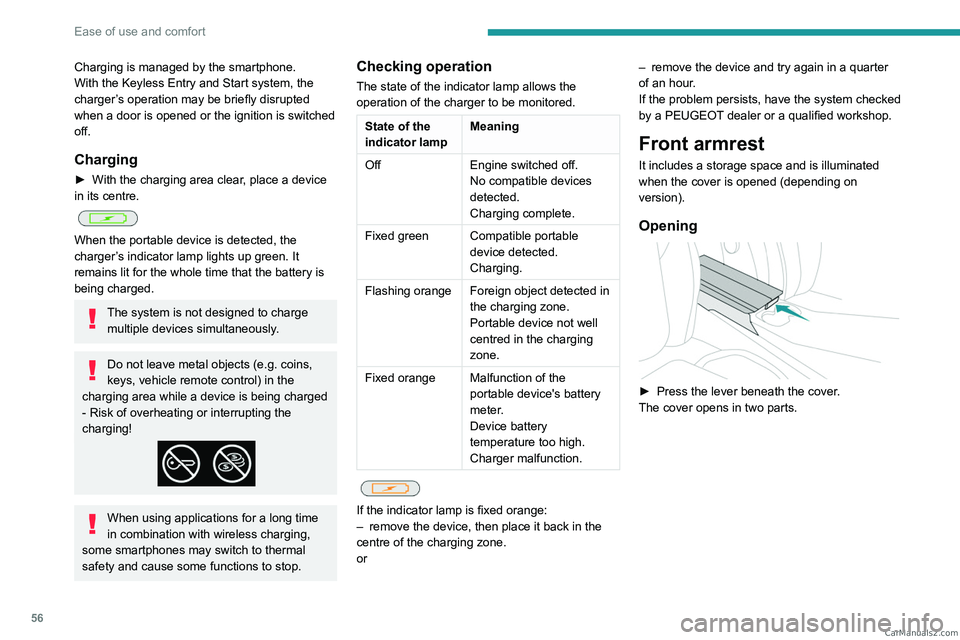
Opening
► Press the lever beneath the cover.
The cover opens in two parts. CarM an uals 2 .c o m
Page 65 of 244

63
Lighting and visibility
40 (Initial setting)Driver only or driver + front passenger
1 5 people
2 5 people + load in the boot
3 Driver only + load in the boot
4 5 6 Not used
Automatic Peugeot Matrix
LED Technology 2.0
headlamp adjustment
This system automatically adjusts the height of
the headlamp beams according to the load in the
vehicle.
In the event of a malfunction, this warning
lamp lights up on the instrument panel,
accompanied by the display of a message and
an audible signal.
The system places the headlamp beams in the
lowest position.
Have it checked by a PEUGEOT dealer or a
qualified workshop.
Do not touch the Peugeot Matrix LED
Technology 2.0 headlamps - risk of
electrocution!
Automatic illumination of lamps
With the lighting control stalk in the “ AUTO”
position and if a low level of exterior brightness
is detected by the rain/sunshine sensor, the
sidelamps and dipped beam headlamps are
switched on automatically, without any action on
the part of the driver. They may also come on if
rain is detected, at the same time as automatic
operation of the windscreen wipers.
As soon as the brightness returns to a sufficient
level or after the windscreen wipers are switched
off, the lamps are switched off automatically.
Malfunction
In the event of a malfunction of the rain/
sunshine sensor, the vehicle’s lamps
come on and this warning lamp is displayed on
the instrument panel, accompanied by an
audible signal and/or the display of a message.
Have it checked by a PEUGEOT dealer or a
qualified workshop.
Do not cover the rain/sunshine sensor
located at the top centre of the
windscreen behind the interior rear view
mirror; the associated functions would no
longer be controlled.
In fog or snow, the rain/sunshine sensor
may detect sufficient light. For this
reason, the lighting will not come on
automatically.
The inner surface of the windscreen may become misted up and affect the proper
operation of the rain/sunshine sensor.
In humid and cold weather, demist the
windscreen regularly.
Guide-me-home and
welcome lighting
Guide-me-home lighting
Automatic
With the ring of the lighting control stalk in the
"AUTO” position and when the light is poor, the
dipped beam headlamps come on automatically
when the ignition is switched off.
You can activate/deactivate and adjust the duration of the guide-me-home
lighting in the Settings
> Vehicle touch screen
application.
Manual
CarM an uals 2 .c o m
Page 67 of 244
65
Lighting and visibility
4
This system is a driving aid.The driver remains responsible for
the vehicle's lighting, its correct use in the
prevailing light, visibility and traffic conditions,
and for compliance with driving and vehicle
regulations.
The system becomes operational when the vehicle exceeds 16 mph (25 km/h).
When the speed falls below 9 mph (15 km/h),
the function is no longer operational.
Activation/Deactivation
It is configured in the Settings > Vehicle
touch screen application.
The state of the system is stored when the
ignition is switched off.
When the system detects thick fog, it
temporarily deactivates the function.
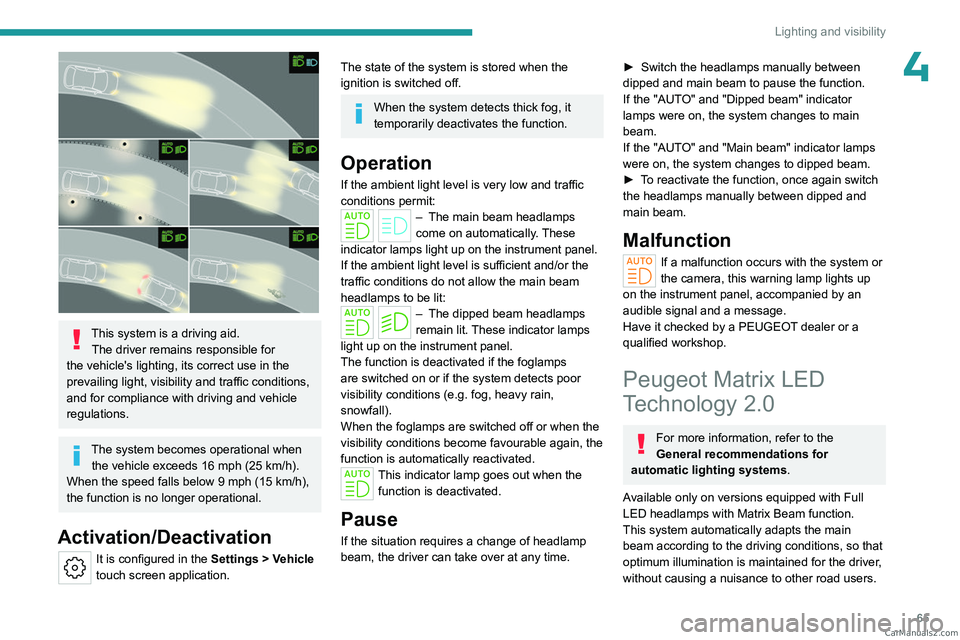
Operation
If the ambient light level is very low and traffic
conditions permit:
– The main beam headla mps
come on automatically. These
indicator lamps light up on the instrument panel.
If the ambient light level is sufficient and/or the
traffic conditions do not allow the main beam
headlamps to be lit:
– The dipped beam head lamps
remain lit. These indicator lamps
light up on the instrument panel.
The function is deactivated if the foglamps
are switched on or if the system detects poor
visibility conditions (e.g.
fog, heavy rain,
snowfall).
When the foglamps are switched off or when the
visibility conditions become favourable again, the
function is automatically reactivated.
This indicator lamp goes out when the function is deactivated.
Pause
If the situation requires a change of headlamp
beam, the driver can take over at any time.
► Switch the headlamps manually between
dipped and main beam to pause the function.
If the "AUT
O" and "Dipped beam" indicator
lamps were on, the system changes to main
beam.
If the "AUTO" and "Main beam" indicator
lamps
were on, the system changes to dipped beam.
►
T
o reactivate the function, once again switch
the headlamps manually between dipped and
main beam.
Malfunction
If a malfunction occurs with the system or
the camera, this warning lamp lights up
on the instrument panel, accompanied by an
audible signal and a message.
Have it checked by a PEUGEOT dealer or a
qualified workshop.
Peugeot Matrix LED
Technology 2.0
For more information, refer to the
General recommendations for
automatic lighting systems.
Available only on versions equipped with Full
LED headlamps with Matrix Beam function.
This system automatically adapts the main
beam according to the driving conditions, so that
optimum illumination is maintained for the driver,
without causing a nuisance to other road users. CarM an uals 2 .c o m
Page 68 of 244
66
Lighting and visibility
The driver remains responsible for the vehicle's lighting, its correct use in the
prevailing light, visibility and traffic conditions,
and for compliance with driving and vehicle
regulations.
The system is active from 25 mph
(40 km/h) and deactivates below 12 mph
(20
km/h).
Activation/Deactivation
► Place the ring of the lighting control stalk in
the “AUTO” position.
This indicator lamp comes on in the instrument panel.
It is configured in the Settings > Vehicle
touch screen application.
The state of the system is stored when the
ignition is switched off.
When deactivated, the lighting system changes
to "Automatic illumination of lamps" mode.
It is recommended that you deactivate
the function in foggy or snowy conditions
or in case of heavy mist.
The function temporarily is deactivated when
the system detects thick fog or when the
foglamps are switched on manually. This is
signalled by the indicator lamp going off on
the instrument panel.
Travelling abroad
Vehicles equipped with the Peugeot
Matrix LED Technology 2.0 function:
If planning to use your vehicle in a country
that drives on the other side of the road,
deactivate the function to avoid dazzling
oncoming drivers.
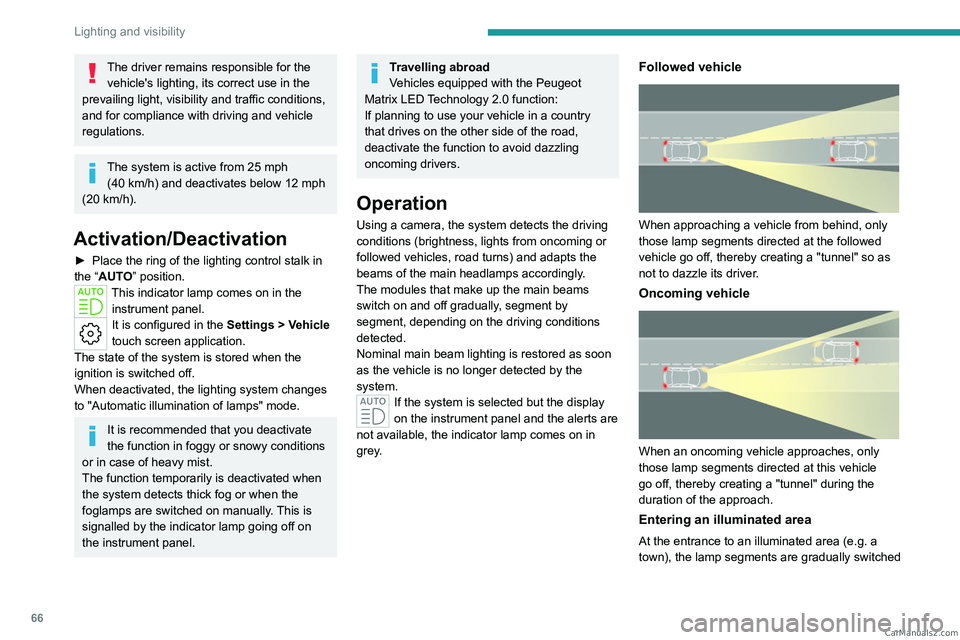
Operation
Using a camera, the system detects the driving
conditions (brightness, lights from oncoming or
followed vehicles, road turns) and adapts the
beams of the main headlamps accordingly.
The modules that make up the main beams
switch on and off gradually, segment by
segment, depending on the driving conditions
detected.
Nominal main beam lighting is restored as soon
as the vehicle is no longer detected by the
system.
If the system is selected but the display
on the instrument panel and the alerts are
not available, the indicator lamp comes on in
grey.
Followed vehicle
When approaching a vehicle from behind, only
those lamp segments directed at the followed
vehicle go off, thereby creating a "tunnel" so as
not to dazzle its driver.
Oncoming vehicle
When an oncoming vehicle approaches, only
those lamp segments directed at this vehicle
go off, thereby creating a "tunnel" during the
duration of the approach.
Entering an illuminated area
At the entrance to an illuminated area (e.g. a
town), the lamp segments are gradually switched CarM an uals 2 .c o m