2023 PEUGEOT 408 engine
[x] Cancel search: enginePage 144 of 244
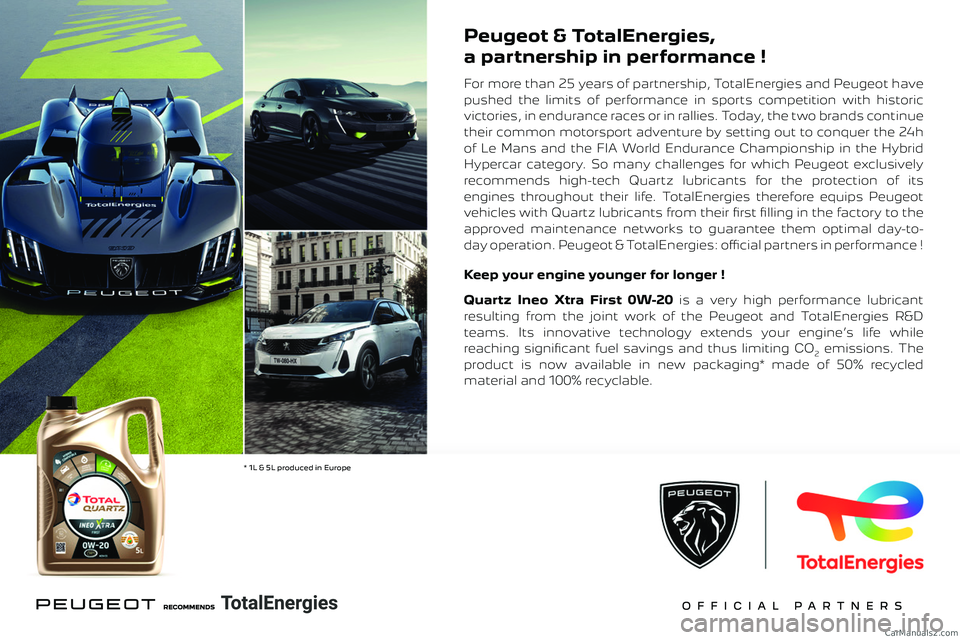
Peugeot & TotalEnergies,
a partnership in performance !
For more than 25 years of partnership, TotalEnergies and Peugeot have
pushed the limits of performance in sports competition with historic
victories, in endurance races or in rallies. Today, the two brands continue
their common motorsport adventure by setting out to conquer the 24h
of Le Mans and the FIA World Endurance Championship in the Hybrid
Hypercar category. So many challenges for which Peugeot exclusively
recommends high-tech Quartz lubricants for the protection of its
engines throughout their life. TotalEnergies therefore equips Peugeot
vehicles with Quartz lubricants from their fi rst fi lling in the factory to the
approved maintenance networks to guarantee them optimal day-to-
day operation. Peugeot & TotalEnergies: offi cial partners in performance !
Keep your engine younger for longer !
Quartz Ineo Xtra First 0W-20 is a very high performance lubricant
resulting from the joint work of the Peugeot and TotalEnergies R&D
teams. Its innovative technology extends your engine’s life while
reaching signifi cant fuel savings and thus limiting CO
2 emissions. The
product is now available in new packaging* made of 50% recycled
material and 100% recyclable.
* 1L & 5L produced in Europe
CarM an uals 2 .c o m
Page 145 of 244
143
Practical information
Peugeot & TotalEnergies,
a partnership in performance !
For more than 25 years of partnership, TotalEnergies and Peugeot have
pushed the limits of performance in sports competition with historic
victories, in endurance races or in rallies. Today, the two brands continue
their common motorsport adventure by setting out to conquer the 24h
of Le Mans and the FIA World Endurance Championship in the Hybrid
Hypercar category. So many challenges for which Peugeot exclusively
recommends high-tech Quartz lubricants for the protection of its
engines throughout their life. TotalEnergies therefore equips Peugeot
vehicles with Quartz lubricants from their fi rst fi lling in the factory to the
approved maintenance networks to guarantee them optimal day-to-
day operation. Peugeot & TotalEnergies: offi cial partners in performance !
Keep your engine younger for longer !
Quartz Ineo Xtra First 0W-20 is a very high performance lubricant
resulting from the joint work of the Peugeot and TotalEnergies R&D
teams. Its innovative technology extends your engine’s life while
reaching signifi cant fuel savings and thus limiting CO
2 emissions. The
product is now available in new packaging* made of 50% recycled
material and 100% recyclable.
* 1L & 5L produced in Europe
7Compatibility of fuels
Petrol fuels conforming to the EN228 standard
containing up to 5% and 10% ethanol
respectively.
The only petrol fuel additives authorised for use are those that meet the B715001
standard.
Travelling abroad
Certain fuels could damage your vehicle’s
engine.
In certain countries, the use of a particular
fuel may be required (specific octane rating,
specific trade name, etc.) to ensure correct
operation of the engine.
For all additional information, consult a dealer.
Refuelling
Fuel tank capacity: approximately 52 litres
(Petrol) or 40 litres (Rechargeable hybrid).
Reserve level: approximately 6 litres.
Low fuel level
When the low fuel level is reached, this
warning lamp lights up on the instrument
panel, accompanied by the display of a message
and an audible signal. When it first comes on,
about 6 litres of fuel remain.
Until sufficient fuel is added, this warning lamp
appears every time the ignition is switched on,
accompanied by the message and the audible
signal. When driving, this message and audible
signal are repeated with increasing frequency as
the fuel level drops towards 0.
You must refuel as soon as possible to avoid
running out of fuel.
A small arrow by the warning lamp indicates which side of the vehicle the
fuel filler flap is located on.
Stop & Start
Never refuel with the engine in STOP
mode; you must switch off the ignition.
Refuelling
Any addition of fuel must be in quantities of at
least 10 litres, in order to be registered by the
fuel gauge.
Opening the filler flap may create a noise caused
by an inrush of air. This vacuum is entirely
normal, resulting from the sealing of the fuel
system.
To refuel in complete safety:
►
Always switch off the engine.
► To open the filler flap, press the flap opening
button for more than 2 seconds or, with the
vehicle unlocked, press the rear of the filler flap
(depending on version).
Rechargeable hybrid vehicles
After pressing the button on the
dashboard, the filler flap may not open for
several minutes. A sound is emitted when the
filler flap opens.
If the flap becomes stuck, press and hold
the button on the dashboard for more than
3
seconds.
►
Select a pump that delivers the correct fuel
type for the vehicle's engine (see a reminder
label on the inside of the filler flap).
► Turn the filler cap to the left, remove it
and place it on its support on the filler flap
(depending on version). CarM an uals 2 .c o m
Page 146 of 244
144
Practical information
► Insert the filler nozzle and push it in as far as
possible before starting to refuel (to minimise the
risk of splashing).
►
Fill the tank.
Do not continue after the nozzle’
s third cut-
out. Doing so may cause malfunctions.
►
Put the filler cap back in place and turn it to
the right (depending on version).
►
Push the fuel filler flap to close it.
The vehicle is fitted with a catalytic converter
,
which helps to reduce the level of harmful
emissions in the exhaust gases.
For petrol engines, you must use unleaded
fuel.
The filler neck is narrower, allowing only
unleaded petrol nozzles to be inserted.
If you have put in the wrong fuel for
the vehicle, you must have the fuel
tank drained and filled with the correct fuel
before starting the engine.
Rechargeable hybrid
system
Electrical system
The electrical circuit of the rechargeable hybrid
system is identified by orange cables and its
components are marked with this symbol:
The rechargeable hybrid powertrain uses a voltage of between 240 V and 400 V.
This system may be hot both when the
ignition is on and after switching it off.
Comply with the warning messages shown
on the labels, particularly inside the charging
flap.
High voltage system voltage is
dangerous and can cause burns or other
injuries or even fatal electric shock.
Since damage to high voltage components is
not visible, PEUGEOT recommends that you:
–
Never touch the components, damaged
or not, and never let your jewelry or other
metallic objects come into contact with these
components.
–
Never work on the orange high voltage
cables or on any other high voltage
component marked with the Electric risk label.
Any intervention on the high voltage system
must be carried out by qualified persons in
workshops qualified and approved to carry
out this type of work.
–
Never damage, modify or remove the
orange high voltage cables or disconnect
them from the high voltage network.
– Never open, modify or remove the cover of
the traction battery .
–
Never work with cutting and forming
tools or heat sources near high voltage
components and cables.
In case of low level of fluid in the cooling
tank, the refilling shall only be performed in a
qualified and trained workshop to verify that
the leakage is not in the traction battery
.
Any intervention on the high voltage system
must be carried out by qualified persons in
workshops qualified and approved to carry
out this type of work.
Damage to the vehicle or the traction battery
could result in the leakage of toxic gases or
fluids either immediately or later. PEUGEOT
recommends that you:
–
Always inform the fire and emergency
services in the event of an incident, warning
that the vehicle is equipped with a traction
battery
.
–
Never touch the liquids leaking from the
traction battery
.
–
Do not inhale the gases emitted by the
traction battery which are toxic.
–
Move away from the vehicle in the event of
incident or accident, the gases emitted being
flammable and could cause a fire.
CarM an uals 2 .c o m
Page 147 of 244
145
Practical information
7
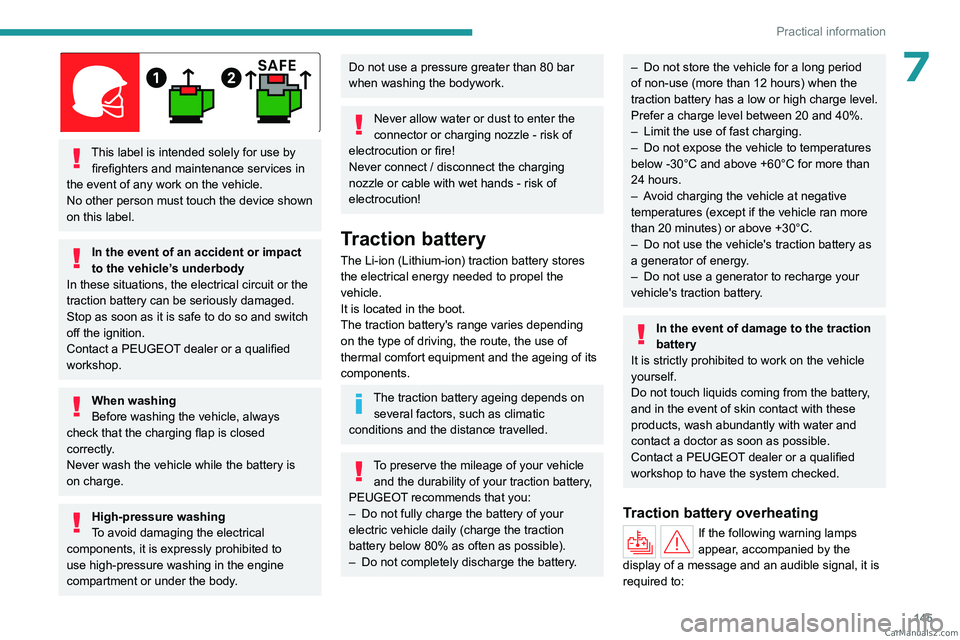
This label is intended solely for use by firefighters and maintenance services in
the event of any work on the vehicle.
No other person must touch the device shown
on this label.
In the event of an accident or impact
to the vehicle’s underbody
In these situations, the electrical
circuit or the
traction battery can be seriously damaged.
Stop as soon as it is safe to do so and switch
off the ignition.
Contact a PEUGEOT dealer or a qualified
workshop.
When washing
Before washing the vehicle, always
check that the charging flap is closed
correctly.
Never wash the vehicle while the battery is
on charge.
High-pressure washing
To avoid damaging the electrical
components, it is expressly prohibited to
use high-pressure washing in the engine
compartment or under the body.
Do not use a pressure greater than 80 bar
when washing the bodywork.
Never allow water or dust to enter the
connector or charging nozzle - risk of
electrocution or fire!
Never connect / disconnect the charging
nozzle or cable with wet hands - risk of
electrocution!
Traction battery
The Li-ion (Lithium-ion) traction battery stores
the electrical energy needed to propel the
vehicle.
It is located in the boot.
The traction battery's range varies depending
on the type of driving, the route, the use of
thermal comfort equipment and the ageing of its
components.
The traction battery ageing depends on several factors, such as climatic
conditions and the distance travelled.
To preserve the mileage of your vehicle and the durability of your traction battery,
PEUGEOT recommends that you:
–
Do not fully charge the battery of your
electric vehicle daily (charge the traction
battery below 80% as often as possible).
–
Do not completely discharge the battery
.
– Do not store the vehicle for a long period
of non-use (more than 12 hours) when the
traction battery has a low or high charge level.
Prefer a charge level between 20 and 40%.
–
Limit the use of fast charging.
–
Do not expose the vehicle to temperatures
below -30°C and above +60°C for more than
24
hours.
–
A
void charging the vehicle at negative
temperatures (except if the vehicle ran more
than 20
minutes) or above +30°C.
–
Do not use the vehicle's traction battery as
a generator of energy
.
–
Do not use a generator to recharge your
vehicle's traction battery
.
In the event of damage to the traction
battery
It is strictly prohibited to work on the vehicle
yourself.
Do not touch liquids coming from the battery,
and in the event of skin contact with these
products, wash abundantly with water and
contact a doctor as soon as possible.
Contact a PEUGEOT dealer or a qualified
workshop to have the system checked.
Traction battery overheating
If the following warning lamps
appear, accompanied by the
display of a message and an audible signal, it is
required to: CarM an uals 2 .c o m
Page 154 of 244
152
Practical information
Wearers of pacemakers or equivalent
devices should consult a doctor to
enquire about any applicable precautionary
measures, or contact the manufacturer of their
implanted electronic medical device to check that
it is guaranteed to operate in an environment
compliant with the ICNIRP guidelines.
If in doubt , during charging, do not remain
inside or near the vehicle, near the charging
cable or the charging unit, even for a short time.
Before charging
Depending on the context:
►
Have a professional check that the
electrical system to be used complies with
applicable standards and is compatible with
the vehicle.
►
Have a professional electrician install
a dedicated domestic power socket or
accelerated charging unit (W
allbox)
compatible with the vehicle.
Use the charging cable supplied with the
vehicle.
For more information, contact a PEUGEOT
dealer or a qualified workshop.
During charging
As a safety measure, the engine will
not start if the charging cable is plugged into
the connector on the vehicle. A warning is
displayed on the instrument panel.
While charging is in progress, unlocking the
vehicle will cause the charging to stop.
If no action is taken on one of the openings
(door or boot) or on the charging nozzle, the
vehicle will lock again after 30 seconds and
charging will resume automatically.
Never work under the bonnet:
–
Some areas remain very hot, even an hour
after charging ends - risk of burns!
–
The fan may start at any time - risk of cuts
or strangulation!
After charging
Check that the charging flap is closed.
Do not leave the cable connected to the
domestic power socket - risk of short-circuit
or electrocution in the event of contact with or
immersion in water!
Charging procedure
Connection
► Before charging, check that the gear selector
is in mode P and the ignition is off, otherwise
charging is impossible.
►
Press on the rear of the charging flap to open
it and check that there are no foreign bodies on
the vehicle's charging connector
.
The light guides in the flap come on white.
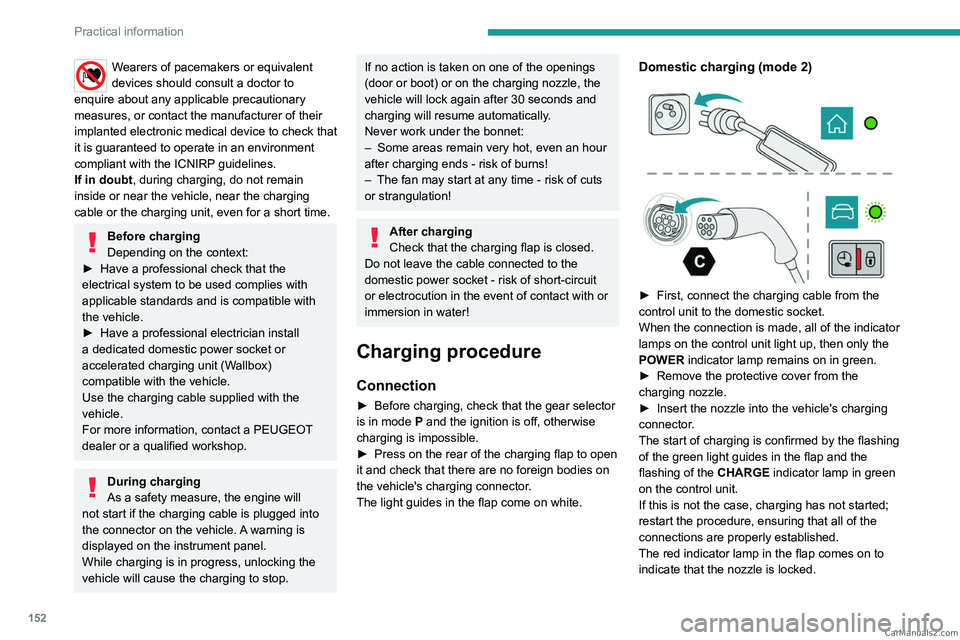
Domestic charging (mode 2)
► First, connect the charging cable from the
control unit to the domestic socket.
When the connection is made, all of the indicator
lamps on the control unit light up, then only the
POWER
indicator lamp remains on in green.
►
Remove the protective cover from the
charging nozzle.
►
Insert the nozzle into the vehicle's charging
connector
.
The start of charging is confirmed by the flashing
of the green light guides in the flap and the
flashing of the
CHARGE indicator lamp in green
on the control unit.
If this is not the case, charging has not started;
restart the procedure, ensuring that all of the
connections are properly established.
The red indicator lamp in the flap comes on to
indicate that the nozzle is locked. CarM an uals 2 .c o m
Page 155 of 244
153
Practical information
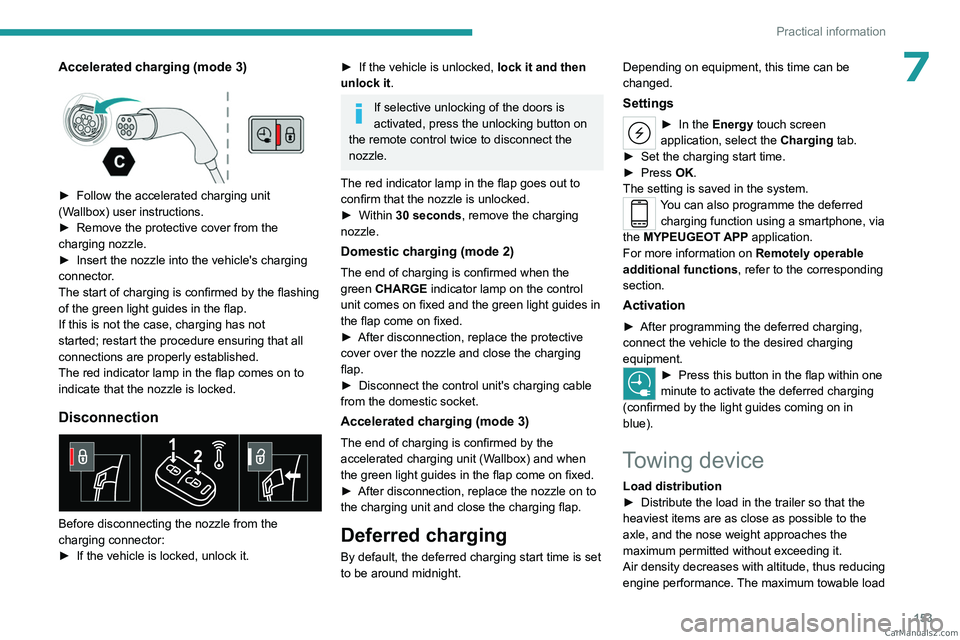
7Accelerated charging (mode 3)
► Follow the accelerated charging unit
(W allbox) user instructions.
►
Remove the protective cover from the
charging nozzle.
►
Insert the nozzle into the vehicle's charging
connector
.
The start of charging is confirmed by the flashing
of the green light guides in the flap.
If this is not the case, charging has not
started; restart the procedure ensuring that all
connections are properly established.
The red indicator lamp in the flap comes on to
indicate that the nozzle is locked.
Disconnection
Before disconnecting the nozzle from the
charging connector:
►
If the vehicle is locked, unlock it.
► If the vehicle is unlocked, lock it and then
unlock it .
If selective unlocking of the doors is
activated, press the unlocking button on
the remote control twice to disconnect the
nozzle.
The red indicator lamp in the flap goes out to
confirm that the nozzle is unlocked.
►
Within
30 seconds, remove the charging
nozzle.
Domestic charging (mode 2)
The end of charging is confirmed when the
green CHARGE indicator lamp on the control
unit comes on fixed and the green light guides in
the flap come on fixed.
►
After disconnection, replace the protective
cover over the nozzle and close the charging
flap.
►
Disconnect the control unit's charging cable
from the domestic socket.
Accelerated charging (mode 3)
The end of charging is confirmed by the
accelerated charging unit (Wallbox) and when
the green light guides in the flap come on fixed.
►
After disconnection, replace the nozzle on to
the charging unit and close the charging flap.
Deferred charging
By default, the deferred charging start time is set
to be around midnight. Depending on equipment, this time can be
changed.
Settings
► In the
Energy touch screen
application, select the Charging tab.
►
Set the charging start time.
►
Press
OK.
The setting is saved in the system.
You can also programme the deferred charging function using a smartphone, via
the MYPEUGEOT APP application.
For more information on Remotely operable
additional functions , refer to the corresponding
section.
Activation
► After programming the deferred charging,
connect the vehicle to the desired charging
equipment.
► Press this button in the flap within one
minute to activate the deferred charging
(confirmed by the light guides coming on in
blue).
Towing device
Load distribution
► Distribute the load in the trailer so that the
heaviest items are as close as possible to the
axle, and the nose weight approaches the
maximum permitted without exceeding it.
Air density decreases with altitude, thus reducing
engine performance.
The maximum towable load CarM an uals 2 .c o m
Page 160 of 244
158
Practical information
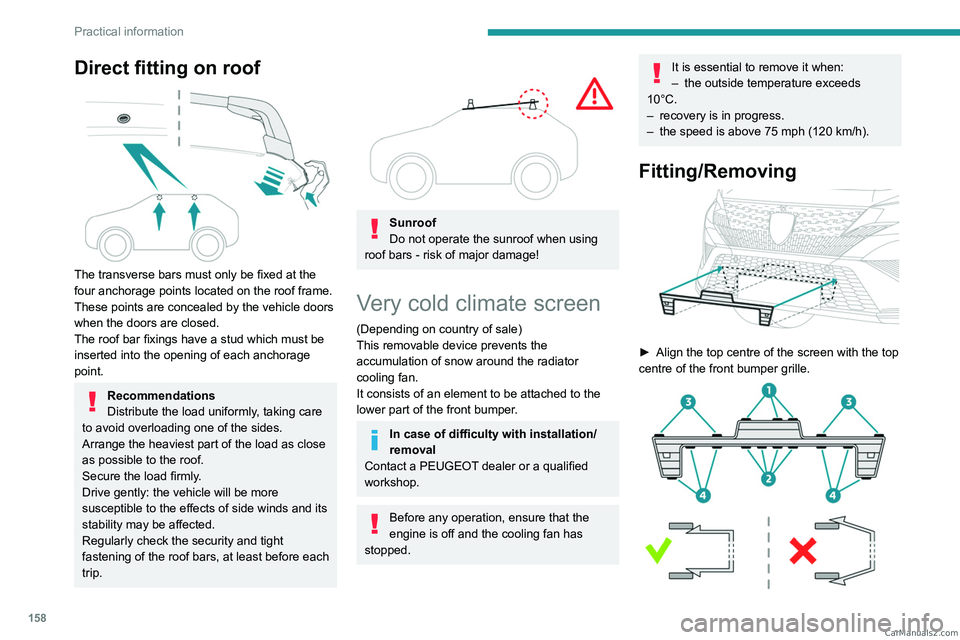
Direct fitting on roof
The transverse bars must only be fixed at the
four anchorage points located on the roof frame.
These points are concealed by the vehicle doors
when the doors are closed.
The roof bar fixings have a stud which must be
inserted into the opening of each anchorage
point.
Recommendations
Distribute the load uniformly, taking care
to avoid overloading one of the sides.
Arrange the heaviest part of the load as close
as possible to the roof.
Secure the load firmly.
Drive gently: the vehicle will be more
susceptible to the effects of side winds and its
stability may be affected.
Regularly check the security and tight
fastening of the roof bars, at least before each
trip.
Sunroof
Do not operate the sunroof when using
roof bars - risk of major damage!
Very cold climate screen
(Depending on country of sale)
This removable device prevents the
accumulation of snow around the radiator
cooling fan.
It consists of an element to be attached to the
lower part of the front bumper.
In case of difficulty with installation/
removal
Contact a PEUGEOT dealer or a qualified
workshop.
Before any operation, ensure that the
engine is off and the cooling fan has
stopped.
It is essential to remove it when:
– the outside temperature exceeds
10°C.
–
recovery is in progress.
–
the speed is above 75 mph (120
km/h).
Fitting/Removing
► Align the top centre of the screen with the top
centre of the front bumper grille.
CarM an uals 2 .c o m
Page 161 of 244
159
Practical information
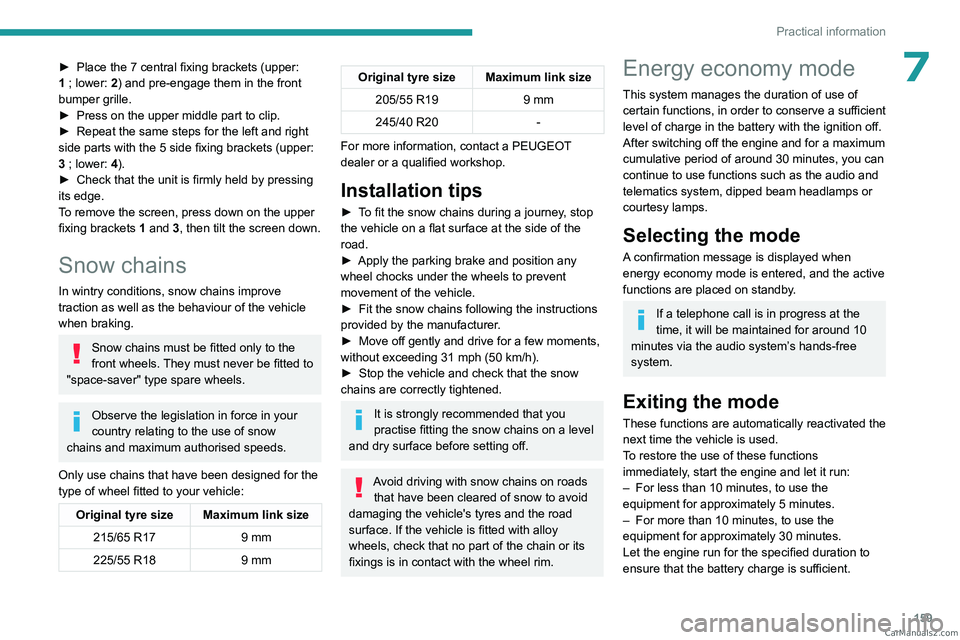
7► Place the 7 central fixing brackets (upper:
1 ; lower: 2) and pre-engage them in the front
bumper grille.
►
Press on the upper middle part to clip.
►
Repeat the same steps for the left and right
side parts with the 5 side fixing brackets (upper:
3
; lower: 4).
►
Check that the unit is firmly held by pressing
its edge.
T
o remove the screen, press down on the upper
fixing brackets 1 and 3, then tilt the screen down.
Snow chains
In wintry conditions, snow chains improve
traction as well as the behaviour of the vehicle
when braking.
Snow chains must be fitted only to the
front wheels. They must never be fitted to
"space-saver" type spare wheels.
Observe the legislation in force in your
country relating to the use of snow
chains and maximum authorised speeds.
Only use chains that have been designed for the
type of wheel fitted to your vehicle:
Original tyre size Maximum link size 215/65 R17 9 mm
225/55 R18 9 mm
Original tyre size Maximum link size
205/55 R19 9 mm
245/40 R20 -
For more information, contact a PEUGEOT
dealer or a qualified workshop.
Installation tips
► To fit the snow chains during a journey, stop
the vehicle on a flat surface at the side of the
road.
►
Apply the parking brake and position any
wheel chocks under the wheels to prevent
movement of the vehicle.
►
Fit the snow chains following the instructions
provided by the manufacturer
.
►
Move off gently and drive for a few moments,
without exceeding 31
mph (50 km/h).
►
Stop the vehicle and check that the snow
chains are correctly tightened.
It is strongly recommended that you
practise fitting the snow chains on a level
and dry surface before setting off.
Avoid driving with snow chains on roads that have been cleared of snow to avoid
damaging the vehicle's tyres and the road
surface. If the vehicle is fitted with alloy
wheels, check that no part of the chain or its
fixings is in contact with the wheel rim.
Energy economy mode
This system manages the duration of use of
certain functions, in order to conserve a sufficient
level of charge in the battery with the ignition off.
After switching off the engine and for a maximum
cumulative period of around 30 minutes, you can
continue to use functions such as the audio and
telematics system, dipped beam headlamps or
courtesy lamps.
Selecting the mode
A confirmation message is displayed when
energy economy mode is entered, and the active
functions are placed on standby.
If a telephone call is in progress at the
time, it will be maintained for around 10
minutes via the audio system’s hands-free
system.
Exiting the mode
These functions are automatically reactivated the
next time the vehicle is used.
To restore the use of these functions
immediately, start the engine and let it run:
–
For less than 10 minutes, to use the
equipment for approximately 5 minutes.
–
For more than 10 minutes, to use the
equipment for approximately 30 minutes.
Let the engine run for the specified duration to
ensure that the battery charge is sufficient. CarM an uals 2 .c o m