2023 PEUGEOT 408 height
[x] Cancel search: heightPage 64 of 244
62
Lighting and visibility
Never look too closely at the light beam
of LED technology lamps - risk of serious
eye injury!
Travelling abroad
Vehicles equipped with manual
headlamp beam height adjustment:
If planning to use your vehicle in a country
that drives on the other side of the road, the
dipped beam headlamps must be adjusted to
avoid dazzling oncoming drivers. Consult a
PEUGEOT dealer or a qualified workshop.
Daytime running lamps/
Sidelamps
These LED lamps at the front of the vehicle light
up automatically when the engine starts.
They perform the following functions:
–
Daytime running lamps (lighting control stalk
at position
"AUTO" with adequate ambient light).
–
Sidelamps (lighting control stalk at position
"
AUTO" with low ambient light or "Sidelamps
only" or "Dipped/main beam headlamps").
In daytime running lamps mode, the
diodes are brighter.
Direction indicators
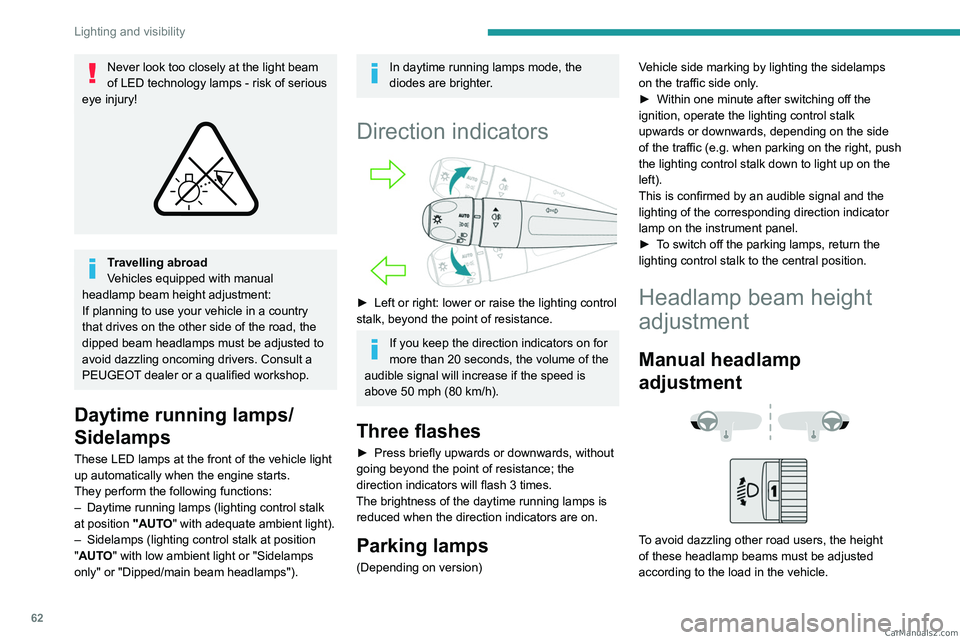
► Left or right: lower or raise the lighting control
stalk, beyond the point of resistance.
If you keep the direction indicators on for
more than 20 seconds, the volume of the
audible signal will increase if the speed is
above 50 mph (80 km/h).
Three flashes
► Press briefly upwards or downwards, without
going beyond the point of resistance; the
direction indicators will flash 3 times.
The brightness of the daytime running lamps is reduced when the direction indicators are on.
Parking lamps
(Depending on version) Vehicle side marking by lighting the sidelamps
on the traffic side only.
►
Within one minute after switching off the
ignition, operate the lighting control stalk
upwards or downwards, depending on the side
of the traffic (e.g.
when parking on the right, push
the lighting control stalk down to light up on the
left).
This is confirmed by an audible signal and the
lighting of the corresponding direction indicator
lamp on the instrument panel.
►
T
o switch off the parking lamps, return the
lighting control stalk to the central position.
Headlamp beam height
adjustment
Manual headlamp
adjustment
To avoid dazzling other road users, the height
of these headlamp beams must be adjusted
according to the load in the vehicle. CarM an uals 2 .c o m
Page 65 of 244

63
Lighting and visibility
40 (Initial setting)Driver only or driver + front passenger
1 5 people
2 5 people + load in the boot
3 Driver only + load in the boot
4 5 6 Not used
Automatic Peugeot Matrix
LED Technology 2.0
headlamp adjustment
This system automatically adjusts the height of
the headlamp beams according to the load in the
vehicle.
In the event of a malfunction, this warning
lamp lights up on the instrument panel,
accompanied by the display of a message and
an audible signal.
The system places the headlamp beams in the
lowest position.
Have it checked by a PEUGEOT dealer or a
qualified workshop.
Do not touch the Peugeot Matrix LED
Technology 2.0 headlamps - risk of
electrocution!
Automatic illumination of lamps
With the lighting control stalk in the “ AUTO”
position and if a low level of exterior brightness
is detected by the rain/sunshine sensor, the
sidelamps and dipped beam headlamps are
switched on automatically, without any action on
the part of the driver. They may also come on if
rain is detected, at the same time as automatic
operation of the windscreen wipers.
As soon as the brightness returns to a sufficient
level or after the windscreen wipers are switched
off, the lamps are switched off automatically.
Malfunction
In the event of a malfunction of the rain/
sunshine sensor, the vehicle’s lamps
come on and this warning lamp is displayed on
the instrument panel, accompanied by an
audible signal and/or the display of a message.
Have it checked by a PEUGEOT dealer or a
qualified workshop.
Do not cover the rain/sunshine sensor
located at the top centre of the
windscreen behind the interior rear view
mirror; the associated functions would no
longer be controlled.
In fog or snow, the rain/sunshine sensor
may detect sufficient light. For this
reason, the lighting will not come on
automatically.
The inner surface of the windscreen may become misted up and affect the proper
operation of the rain/sunshine sensor.
In humid and cold weather, demist the
windscreen regularly.
Guide-me-home and
welcome lighting
Guide-me-home lighting
Automatic
With the ring of the lighting control stalk in the
"AUTO” position and when the light is poor, the
dipped beam headlamps come on automatically
when the ignition is switched off.
You can activate/deactivate and adjust the duration of the guide-me-home
lighting in the Settings
> Vehicle touch screen
application.
Manual
CarM an uals 2 .c o m
Page 81 of 244
79
Safety
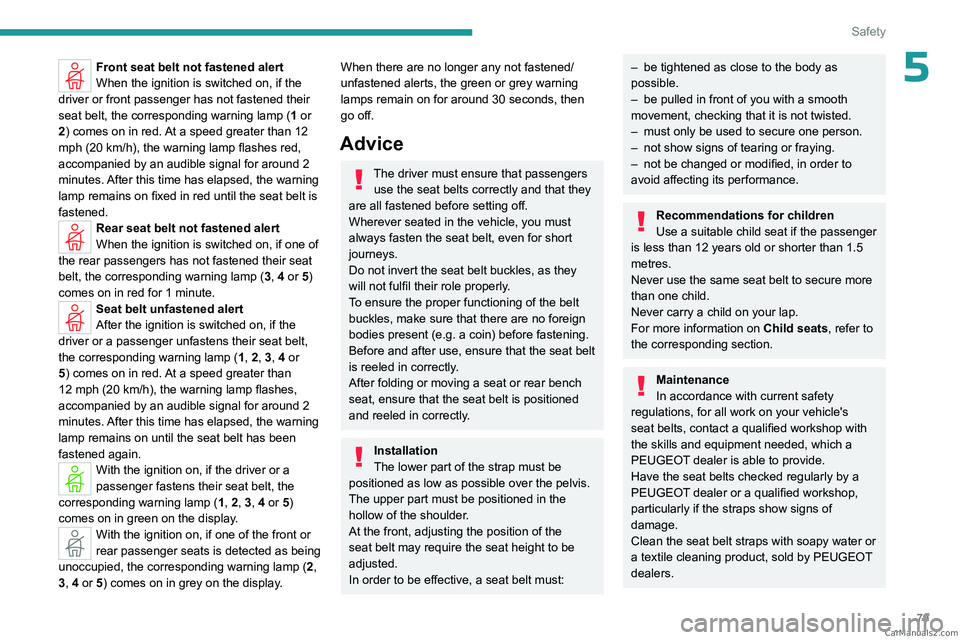
5Front seat belt not fastened alert
When the ignition is switched on, if the
driver or front passenger has not fastened their
seat belt, the corresponding warning lamp ( 1 or
2) comes on in red. At a speed greater than 12
mph (20
km/h), the warning lamp flashes red,
accompanied by an audible signal for around 2
minutes. After this time has elapsed, the warning
lamp remains on fixed in red until the seat belt is
fastened.
Rear seat belt not fastened alert
When the ignition is switched on, if one of
the rear passengers has not fastened their seat
belt, the corresponding warning lamp ( 3, 4 or 5)
comes on in red for 1 minute.
Seat belt unfastened alert
After the ignition is switched on, if the
driver or a passenger unfastens their seat belt,
the corresponding warning lamp ( 1, 2, 3, 4 or
5) comes on in red. At a speed greater than
12 mph (20
km/h), the warning lamp flashes,
accompanied by an audible signal for around 2
minutes. After this time has elapsed, the warning
lamp remains on until the seat belt has been
fastened again.
With the ignition on, if the driver or a
passenger fastens their seat belt, the
corresponding warning lamp ( 1, 2, 3, 4 or 5)
comes on in green on the display.
With the ignition on, if one of the front or
rear passenger seats is detected as being
unoccupied, the corresponding warning lamp ( 2,
3, 4 or 5) comes on in grey on the display.
When there are no longer any not fastened/
unfastened alerts, the green or grey warning
lamps remain on for around 30 seconds, then
go off.
Advice
The driver must ensure that passengers use the seat belts correctly and that they
are all fastened before setting off.
Wherever seated in the vehicle, you must
always fasten the seat belt, even for short
journeys.
Do not invert the seat belt buckles, as they
will not fulfil their role properly.
To ensure the proper functioning of the belt
buckles, make sure that there are no foreign
bodies present (e.g.
a coin) before fastening.
Before and after use, ensure that the seat belt
is reeled in correctly.
After folding or moving a seat or rear bench
seat, ensure that the seat belt is positioned
and reeled in correctly.
Installation
The lower part of the strap must be
positioned as low as possible over the pelvis.
The upper part must be positioned in the
hollow of the shoulder.
At the front, adjusting the position of the
seat belt may require the seat height to be
adjusted.
In order to be effective, a seat belt must:
– be tightened as close to the body as
possible.
–
be pulled in front of you with a smooth
movement, checking that it is not twisted.
–
must only be used to secure one person.
–
not show signs of tearing or fraying.
–
not be changed or modified, in order to
avoid affecting its performance.
Recommendations for children
Use a suitable child seat if the passenger
is less than 12 years old or shorter than 1.5
metres.
Never use the same seat belt to secure more
than one child.
Never carry a child on your lap.
For more information on Child seats, refer to
the corresponding section.
Maintenance
In accordance with current safety
regulations, for all work on your vehicle's
seat belts, contact a qualified workshop with
the skills and equipment needed, which a
PEUGEOT dealer is able to provide.
Have the seat belts checked regularly by a
PEUGEOT dealer or a qualified workshop,
particularly if the straps show signs of
damage.
Clean the seat belt straps with soapy water or
a textile cleaning product, sold by PEUGEOT
dealers. CarM an uals 2 .c o m
Page 84 of 244

82
Safety
Passengers must not place their feet on the
dashboard.
Do not smoke as deployment of the airbags
can cause burns or the risk of injury from a
cigarette or pipe.
Never remove or pierce the steering wheel or
hit it violently.
Do not fix or attach anything to the steering
wheel or dashboard, as this could cause
injuries when the airbags are deployed.
Lateral airbags
Use only approved seat covers
compatible with the deployment of these
airbags. For information on the range of seat
covers suitable for your vehicle, contact a
PEUGEOT dealer.
Do not fix or attach anything to the seat
backrests (e.g.
clothing) as this could cause
injuries to the chest or arm when the airbag is
deployed.
Do not sit with the upper part of the body any
nearer to the door than necessary.
The vehicle's front door panels include side
impact sensors.
A damaged door or any unauthorised or
incorrectly executed work (modification or
repair) on the front doors or their interior trim
could compromise the operation of these
sensors - risk of malfunction of the lateral
airbags!
All work must be carried out only by a
PEUGEOT dealer or a qualified workshop
Curtain airbags
Do not fix or attach anything to the roof,
as this could cause head injuries when the
curtain airbag is deployed.
Do not remove the grab handles installed on
the roof.
Active bonnet
The active bonnet has been designed to
optimise the safety of pedestrians in the event of
collision with the front of the vehicle.
The pyrotechnic system is triggered at the
hinges of the bonnet to lift it, when the sensors
located at the front of the vehicle detect a
collision.
Deployment of the active bonnet is
accompanied by a slight discharge of
harmless smoke and a noise, due to the
activation of the pyrotechnic cartridge
incorporated in the system. The airbag
warning lamp comes on.
After triggering, do not try to open or close
the bonnet. Call a towing company or go to
the nearest PEUGEOT dealer or qualified
workshop, driving at a speed below 19 mph
(30
km/h).
Make sure that you adjust the height of the
driver's seat - risk of hindrance to visibility!
This equipment will only trigger once. If a second impact occurs (during the same
or a subsequent accident), the active bonnet
will not trigger.
After an accident or if the vehicle has been
stolen, have the system checked.
Do not tamper with the pyrotechnic systems
under the bonnet, close to the struts - risk of
explosion!
All work must be carried out only by a
PEUGEOT dealer or a qualified workshop
Malfunction
In the event of a malfunction, this warning
lamp lights up on the instrument panel,
accompanied by the display of a message and
an audible signal. You must contact a PEUGEOT
dealer or a qualified workshop to have the
system checked.
The active bonnet may not deploy in the event of
an impact. CarM an uals 2 .c o m
Page 88 of 244
86
Safety
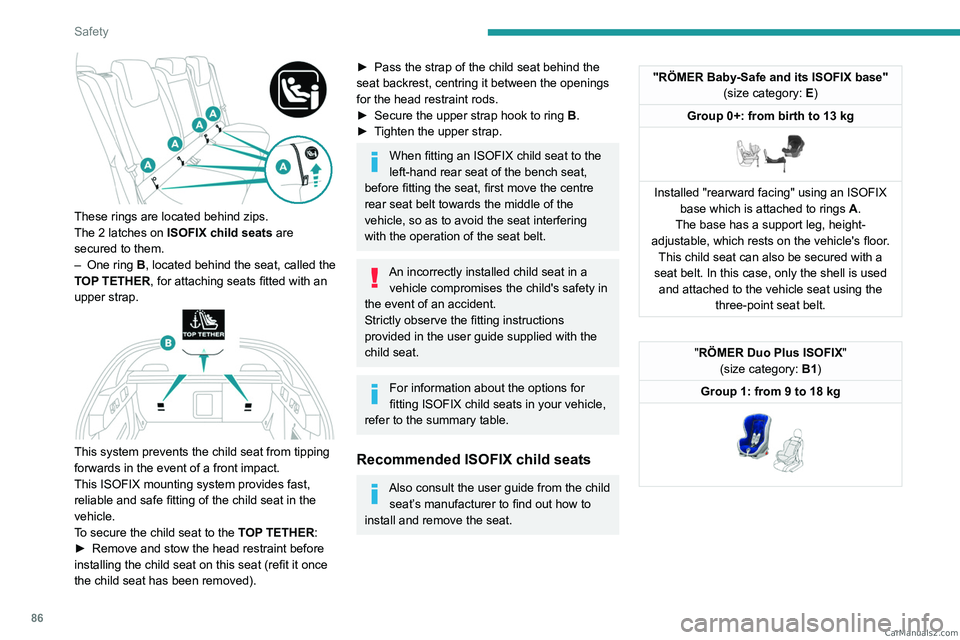
These rings are located behind zips.
The 2 latches on ISOFIX child seats are
secured to them.
–
One ring
B, located behind the seat, called the
TOP TETHER, for attaching seats fitted with an
upper strap.
This system prevents the child seat from tipping
forwards in the event of a front impact.
This ISOFIX mounting system provides fast,
reliable and safe fitting of the child seat in the
vehicle.
To secure the child seat to the TOP TETHER:
►
Remove and stow the head restraint before
installing the child seat on this seat (refit it once
the child seat has been removed).
► Pass the strap of the child seat behind the
seat backrest, centring it between the openings
for the head restraint rods.
►
Secure the upper strap hook to ring
B
.
►
T
ighten the upper strap.
When fitting an ISOFIX child seat to the
left-hand rear seat of the bench seat,
before fitting the seat, first move the centre
rear seat belt towards the middle of the
vehicle, so as to avoid the seat interfering
with the operation of the seat belt.
An incorrectly installed child seat in a vehicle compromises the child's safety in
the event of an accident.
Strictly observe the fitting instructions
provided in the user guide supplied with the
child seat.
For information about the options for
fitting ISOFIX child seats in your vehicle,
refer to the summary table.
Recommended ISOFIX child seats
Also consult the user guide from the child seat’s manufacturer to find out how to
install and remove the seat.
"RÖMER Baby-Safe and its ISOFIX base" (size category: E)
Group 0+: from birth to 13 kg
Installed "rearward facing" using an ISOFIX base which is attached to rings A .
The base has a support leg, height-
adjustable, which rests on the vehicle's floor. This child seat can also be secured with a
seat belt. In this case, only the shell is used and attached to the vehicle seat using the three-point seat belt.
"RÖMER Duo Plus ISOFIX "
(size category: B1)
Group 1: from 9 to 18 kg
CarM an uals 2 .c o m
Page 91 of 244
89
Safety
5– A position that is F3 compatible is also
compatible with F2X and F2.
–
A
position that is B3 compatible is also
compatible with B2.
(a) Universal child seat: child seat that can be
installed in all vehicles using the seat belt.
(b) To install a "rearward facing" child seat at
this seat position, the front passenger airbag
must be deactivated ("OFF").
(c) Only a "forward facing" child seat is
authorised at this seat position with the front
passenger airbag activated (" ON").
(d) Depending on version, refer to the
legislation in force in your country before
installing a child in this seat position.
(e) Never install a child seat with a support leg
on the centre rear seat.
(f) For a seat with height adjustment, adjust
the seat to the highest position and move it
fully back.
(g) Adjust the driver's seat to the highest
position.
(h) Adjust the passenger seat to the
intermediate forward longitudinal position.
(i) For a universal " rearward facing" and/or
"forward facing" (U) child seat in groups 0,
0+, 1, 2 or 3. (j)
For a universal " forward facing" (UF) child
seat in groups 1, 2 or 3.
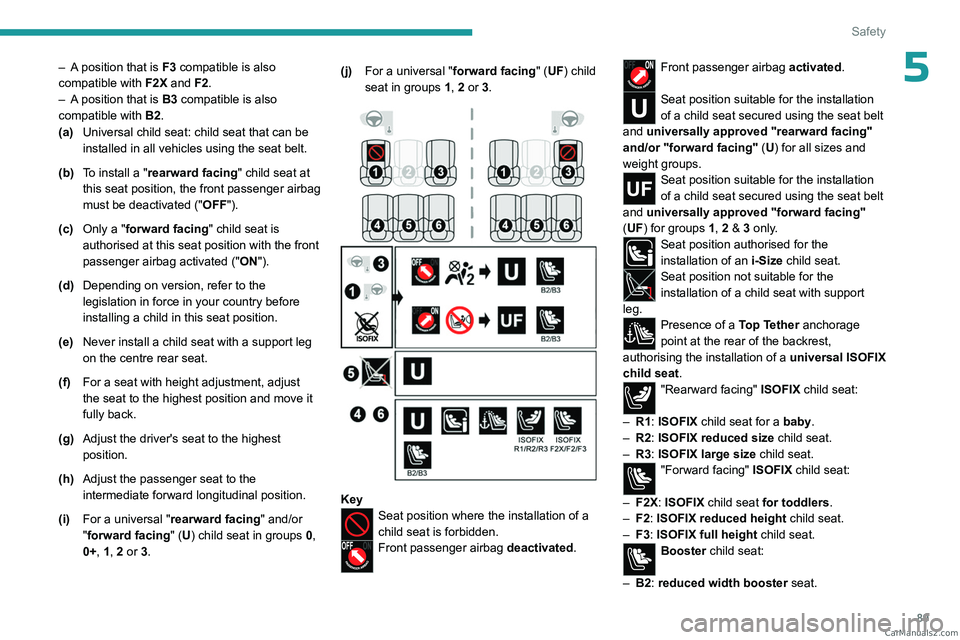
KeySeat position where the installation of a
child seat is forbidden.
Front passenger airbag deactivated.
Front passenger airbag activated.
Seat position suitable for the installation
of a child seat secured using the seat belt
and universally approved "rearward facing"
and/or "forward facing" (U) for all sizes and
weight groups.
Seat position suitable for the installation
of a child seat secured using the seat belt
and universally approved "forward facing"
(UF) for groups 1, 2 & 3 only.
Seat position authorised for the
installation of an i-Size child seat.
Seat position not suitable for the
installation of a child seat with support
leg.
Presence of a Top Tether anchorage
point at the rear of the backrest,
authorising the installation of a universal ISOFIX
child seat.
"Rearward facing" ISOFIX child seat:
–
R1
: ISOFIX child seat for a baby.
–
R2
: ISOFIX reduced size child seat.
–
R3
: ISOFIX large size child seat.
"Forward facing" ISOFIX child seat:
–
F2X
: ISOFIX child seat for toddlers.
–
F2
: ISOFIX reduced height child seat.
–
F3
: ISOFIX full height child seat.
Booster child seat:
–
B2
: reduced width booster seat. CarM an uals 2 .c o m
Page 94 of 244

92
Driving
Towing
Driving with a trailer places greater
demands on the towing vehicle and
particular care must be taken.
Do not exceed the maximum towable
weights.
At altitude: reduce the maximum load by
10% per 1,000 metres of altitude; the lower
air density at high altitudes decreases engine
performance.
New vehicle: do not tow a trailer until the
vehicle has driven at least 620 miles
(1,000 kilometres).
If the outside temperature is high, let the
engine idle for 1 to 2 minutes after the
vehicle comes to a stop, to help it to cool.
Before setting off
Nose weight
► Distribute the load in the trailer so that the
heaviest items are as close as possible to the
axle and the nose weight (at the point where it
joins your vehicle) approaches the maximum
permitted without exceeding it.
Tyres
► Check the tyre pressures of the towing
vehicle and of the trailer , observing the
recommended pressures.
Lighting
► Check the electrical signalling on the trailer
and the headlamp beam height of your vehicle.
If a genuine PEUGEOT towing device is
used, the rear parking sensors will be
deactivated automatically to avoid the audible
signal.
When driving
Cooling
Towing a trailer uphill causes the coolant
temperature to increase. The maximum towable
load depends on the gradient and the exterior
temperature. The fan’s cooling capacity does not
increase with engine speed.
►
Reduce speed and lower the engine speed to
limit the amount of heating produced.
►
Pay constant attention to the coolant
temperature.
If this warning lamp and the STOP
warning lamp come on, stop the
vehicle and switch off the engine as soon as
possible.
Brakes
Using the engine brake is recommended to limit
the overheating of the brakes. Braking distances
are increased when towing a trailer.
Side wind
Bear in mind that the vehicle will be more
susceptible to wind when towing.
Anti-theft protection
Electronic immobiliser
The keys contain a code, which must be
recognised by the vehicle before starting is
possible.
If the system malfunctions, indicated by the
display of a message, the engine will not start.
Contact a PEUGEOT dealer.
Starting/switching off the
engine
The electronic key must be present in the passenger compartment.
The electronic key is also detected in the
boot.
If the electronic key is not detected, a
message is displayed.
Move the electronic key so that the engine
can be started or switched off. CarM an uals 2 .c o m
Page 130 of 244
128
Driving
In case the detection is degraded or
temporarily unavailable by environment
conditions, then a driver indication is not
displayed (because a driver action is not
requested).
It can be dangerous to drive if the brake
lamps are not in perfect working order.
The driver must not overload the vehicle (keep within the GVW and GTW limits
and load height limits for roof bars).
Collision Risk Alert
This function warns the driver if there is a risk
of collision with the preceding vehicle, or with a
pedestrian or cyclist.
Modifying the alert trigger threshold
The trigger threshold determines the sensitivity
with which the function warns of the risk of
collision.
► In the ADAS touch screen application,
select Functions>Automatic Braking
System .
►
Select one of the 3 preset
thresholds:
"Far", "Medium" or "Near".
The selected threshold is memorised when the
ignition is switched off.
Operation
Depending on the collision risk detected by the
system and the alert trigger threshold chosen
by the driver, different levels of alert may be
triggered and displayed on the instrument panel.
The system takes into account the vehicle
dynamics, the difference speed of the own
vehicle and the object identified for the
collision risk, and the operation of the vehicle
(e.g.
actions on the pedals, steering wheel) to
trigger the alert at the most relevant moment.
(orange)
Level 1: visual alert only, warning that the
preceding vehicle is very close.
The message "Vehicle close" is displayed.
(red)
Level 2: visual and audible alert, warning
that a collision is imminent.
The message "Brake! " is displayed.
Level 3: a micro-braking may be given,
confirming the risk of collision (optional).
While approaching a vehicle too quickly,
the level 2 alert may be displayed
directly.
Important: the level 1 alert depends on the
trigger threshold selected. It reacts only on
moving vehicles. It is disabled automatically
at lower speed.
It is possible that collision warnings are
not given, are given too late or seem
unjustified.
The driver must always stay in control of the
vehicle and be prepared to react at any time
to avoid an accident.
If you select "Far" in the touch screen,
then the system warns sooner. This
increases the safety but increases also the
amount of alerts, if the legal safety distance is
not kept.
To reduce the alert occurrence, you can
change the setting to either of the other two.
Intelligent emergency
braking assistance (iEBA)
This function increases vehicle deceleration
if the driver does not brake enough to avoid a
collision.
This assistance is only provided if the driver
presses the brake pedal. CarM an uals 2 .c o m