2023 NISSAN SENTRA heater
[x] Cancel search: heaterPage 231 of 556
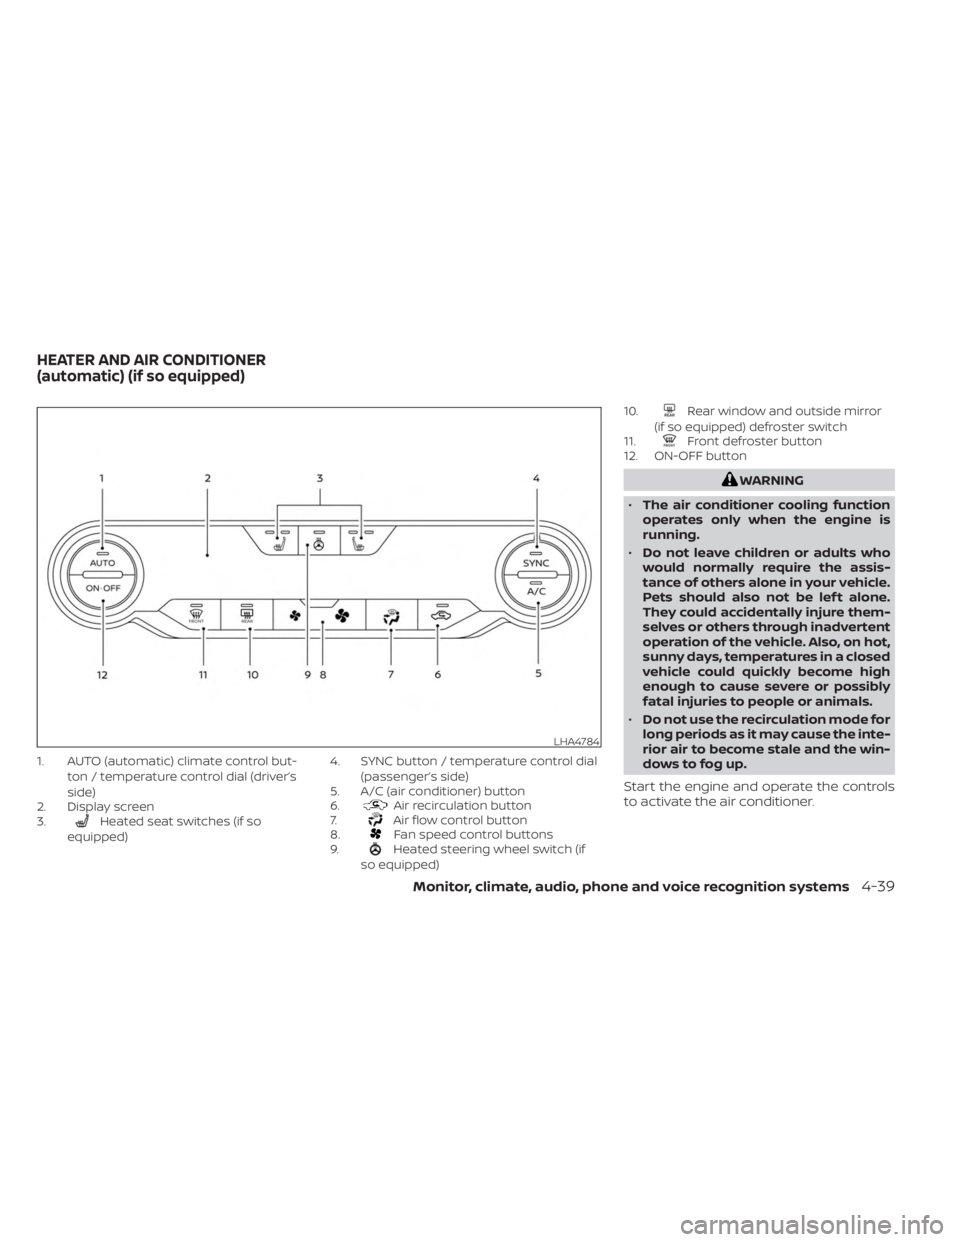
1. AUTO (automatic) climate control but-ton / temperature control dial (driver’s
side)
2. Display screen
3.
Heated seat switches (if so
equipped) 4. SYNC button / temperature control dial
(passenger’s side)
5. A/C (air conditioner) button
6.Air recirculation button
7.Air flow control button
8.Fan speed control buttons
9.Heated steering wheel switch (if
so equipped) 10.
Rear window and outside mirror
(if so equipped) defroster switch
11.
Front defroster button
12. ON-OFF button
WARNING
• The air conditioner cooling function
operates only when the engine is
running.
• Do not leave children or adults who
would normally require the assis-
tance of others alone in your vehicle.
Pets should also not be lef t alone.
They could accidentally injure them-
selves or others through inadvertent
operation of the vehicle. Also, on hot,
sunny days, temperatures in a closed
vehicle could quickly become high
enough to cause severe or possibly
fatal injuries to people or animals.
• Do not use the recirculation mode for
long periods as it may cause the inte-
rior air to become stale and the win-
dows to fog up.
Start the engine and operate the controls
to activate the air conditioner.
LHA4784
HEATER AND AIR CONDITIONER
(automatic) (if so equipped)
Monitor, climate, audio, phone and voice recognition systems4-39
Page 232 of 556
NOTE:
• Odors from inside and outside the ve-hicle can build up in the air conditioner
unit. Odor can enter the passenger
compartment through the vents.
• When parking, set the heater and air conditioner controls to turn off air re-
circulation to allow fresh air into the
passenger compartment. This should
help reduce odors inside the vehicle.
AUTOMATIC OPERATION
Cooling and/or dehumidified
heating (AUTO)
This mode may be used all year round as
the system automatically works to keep a
constant temperature. Air flow distribution,
air intake control, and fan speed are also
controlled automatically.
1. Press the AUTO button on.
2. Turn the temperature control dial to the lef t or right to set the desired
temperature.
• Adjust the temperature display to about 75°F (24°C) for normal operation. • The temperature of the passenger com-
partment will be maintained automati-
cally. Air flow distribution, air intake con-
trol and fan speed are also controlled
automatically.
• A visible mist may be seen coming from the vents in hot, humid conditions as the
air is cooled rapidly. This does not indicate
a malfunction.
3. You can individually set driver's and front passenger's side temperature using
each temperature control dial. To syn-
chronize the driver’s and front passen-
ger’s temperature settings, press the
SYNC button.Heating (A/C OFF)
The air conditioner does not activate. When
you need to heat only, use this mode.
1. Press the AUTO button.
2. Turn the temperature control dial to set the desired temperature.
• The temperature of the passenger com- partment will be maintained automati-
cally. Air flow distribution and fan speed
are also controlled automatically. • Do not set the temperature lower than
the outside air temperature. Otherwise,
the system may not work properly.
• Not recommended if windows fog up.
Dehumidified defrosting or
defogging
1. Press thefront defroster button on.
2. Turn the temperature control dial to set the desired temperature.
• To quickly remove ice from the outside of the windows, use the
fan speed con-
trol buttons to set the fan speed to
maximum.
• As soon as possible af ter the windshield is clean, press the AUTO button to return
to the automatic mode.
• When the
front defroster button is
pressed, the air conditioner will automati-
cally be turned on at outside tempera-
tures above 36°F (2°C). The air recirculate
mode automatically turns off, allowing
outside air to be drawn into the passen-
ger compartment to further improve the
defogging performance.
4-40Monitor, climate, audio, phone and voice recognition systems
Page 244 of 556
Auxiliary (AUX) devices operation
Connecting auxiliary devices
Connect an AUX device into the AUX input
jack located on the center console below
the heater and air conditioner controls.
The AUX input jack accepts any standard
analog audio input such as from a portable
cassette player, CD player, MP3 player or
phone.
Insert a 1/8 in (3.5 mm) stereo mini plug in
the audio input jack. If a cable with a mono
plug is used, the audio output may not
function normally.
Activation and playing
Turn on the AUX device. Connect an AUX
cable to the AUX device and the AUX input
jack. Select AUX mode from the audio
source menu screen or by pressing the
Source button on the steering wheel.
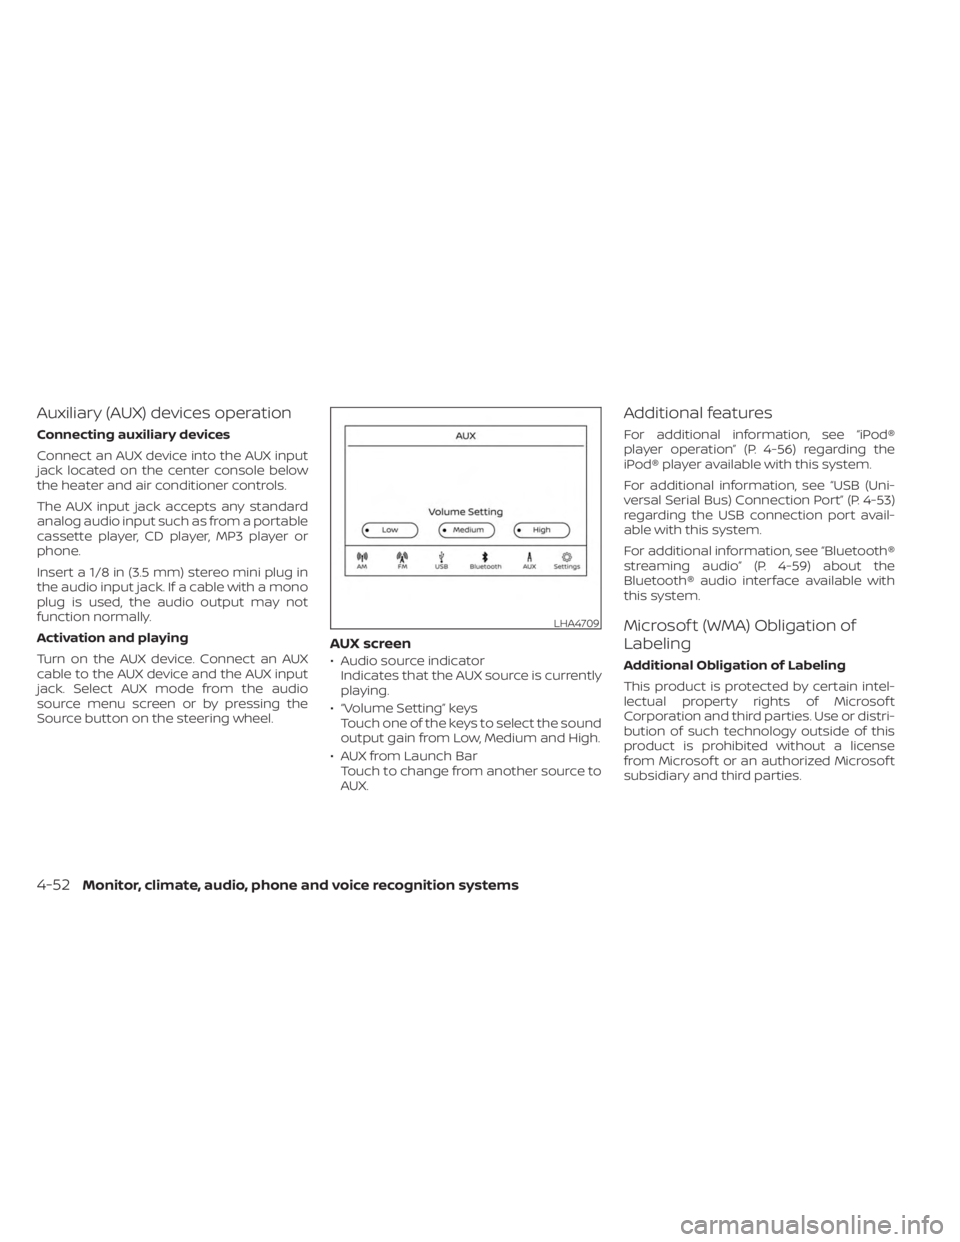
AUX screen
• Audio source indicatorIndicates that the AUX source is currently
playing.
• “Volume Setting” keys Touch one of the keys to select the sound
output gain from Low, Medium and High.
• AUX from Launch Bar Touch to change from another source to
AUX.
Additional features
For additional information, see “iPod®
player operation” (P. 4-56) regarding the
iPod® player available with this system.
For additional information, see “USB (Uni-
versal Serial Bus) Connection Port” (P. 4-53)
regarding the USB connection port avail-
able with this system.
For additional information, see “Bluetooth®
streaming audio” (P. 4-59) about the
Bluetooth® audio interface available with
this system.
Microsof t (WMA) Obligation of
Labeling
Additional Obligation of Labeling
This product is protected by certain intel-
lectual property rights of Microsof t
Corporation and third parties. Use or distri-
bution of such technology outside of this
product is prohibited without a license
from Microsof t or an authorized Microsof t
subsidiary and third parties.
LHA4709
4-52Monitor, climate, audio, phone and voice recognition systems
Page 245 of 556
USB (Universal Serial Bus)
CONNECTION PORT
Connecting a device to the USB
Connection Port
WARNING
Do not connect, disconnect, or operate
the USB device while driving. Doing so
can be a distraction. If distracted you
could lose control of your vehicle and
cause an accident or serious injury.
CAUTION
• To avoid damage and loss of function
when using a USB device, note the
following precautions.
• Do not force the USB device into the
USB port. Inserting the USB device
tilted or up-side-down into the port
may damage the port. Make sure
that the USB device is connected cor-
rectly into the USB port.
• Do not grab the USB port cover (if so
equipped) when pulling the USB de-
vice out of the port. This could dam-
age the port and the cover.
• Do not leave the USB cable in a place
where it can be pulled unintention-
ally. Pulling the cable may damage
the port.
For additional information, refer to your de-
vice manufacturer's owner information re-
garding the proper use and care of the
device.
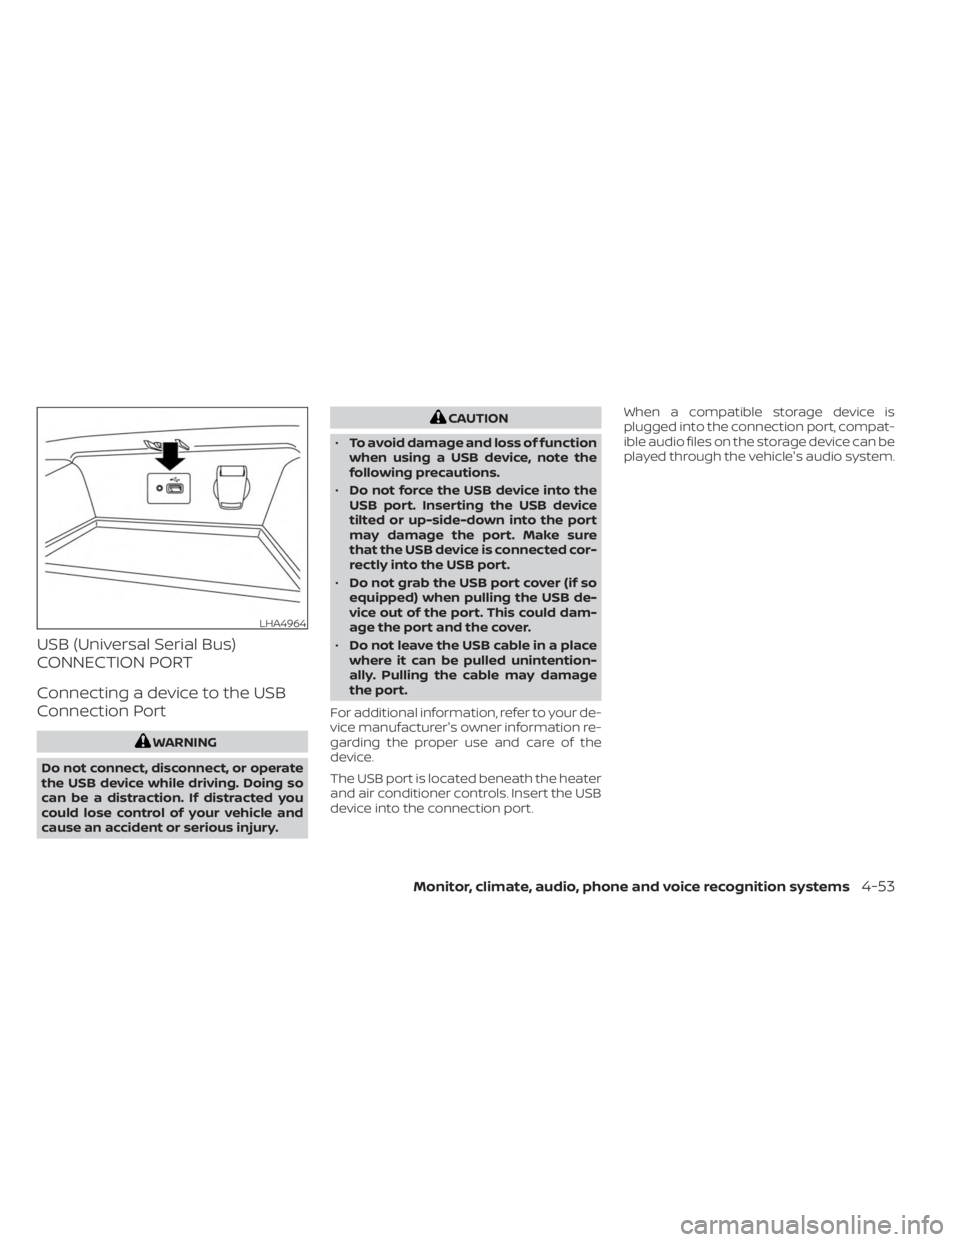
The USB port is located beneath the heater
and air conditioner controls. Insert the USB
device into the connection port. When a compatible storage device is
plugged into the connection port, compat-
ible audio files on the storage device can be
played through the vehicle's audio system.
LHA4964
Monitor, climate, audio, phone and voice recognition systems4-53
Page 248 of 556
iPod®* PLAYER OPERATION
Connecting iPod®
WARNING
Do not connect, disconnect, or operate
the USB device while driving. Doing so
can be a distraction. If distracted you
could lose control of your vehicle and
cause an accident or serious injury.
CAUTION
• Do not force the USB device into the
USB port. Inserting the USB device
tilted or up-side-down into the port
may damage the port. Make sure
that the USB device is connected cor-
rectly into the USB port.
• Do not grab the USB port cover (if so
equipped) when pulling the USB de-
vice out of the port. This could dam-
age the port and the cover.
• Do not leave the USB cable in a place
where it can be pulled unintention-
ally. Pulling the cable may damage
the port.
For additional information, refer to your de-
vice manufacturer’s owner information re-
garding the proper use and care of the
device.
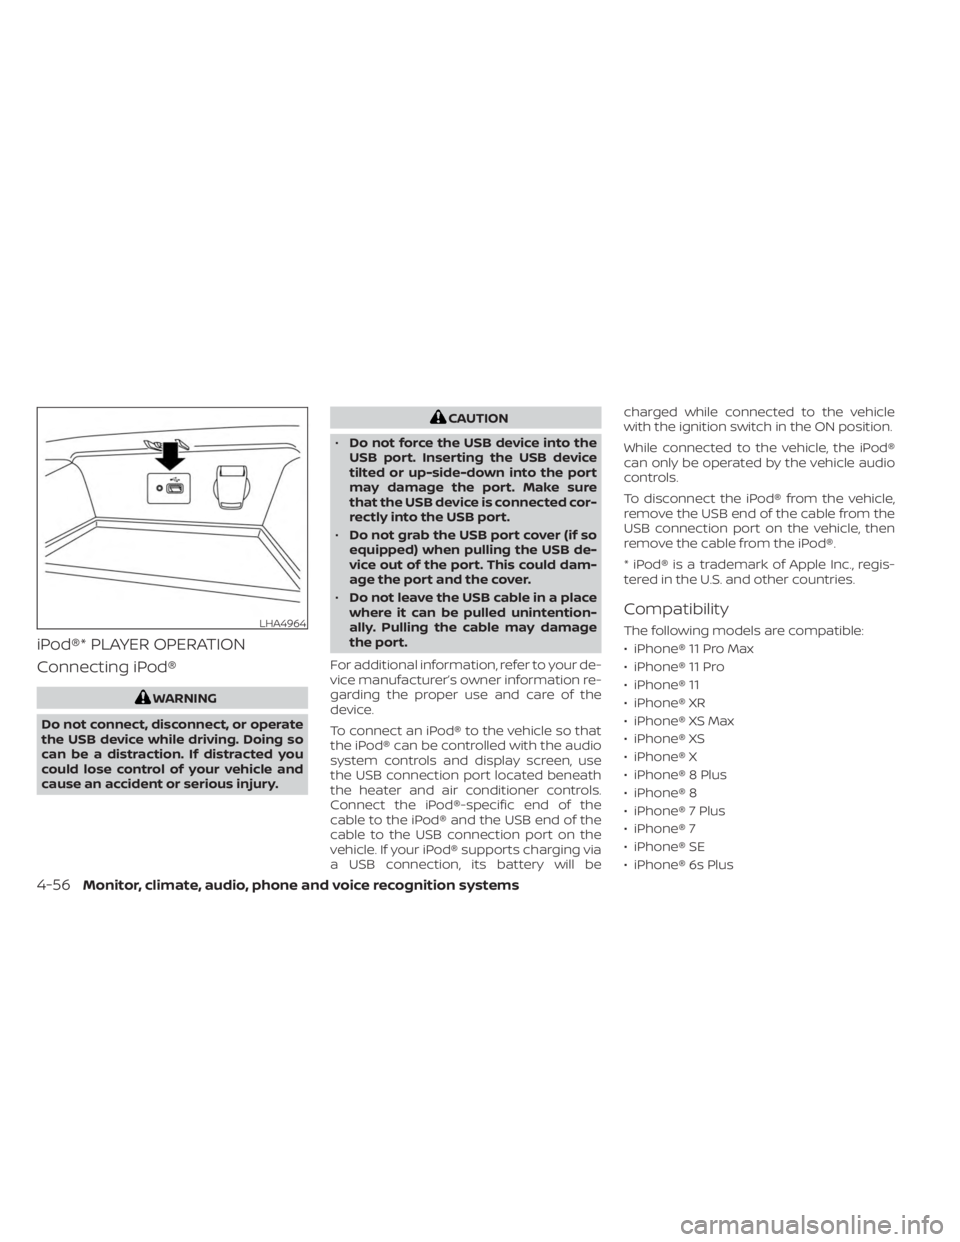
To connect an iPod® to the vehicle so that
the iPod® can be controlled with the audio
system controls and display screen, use
the USB connection port located beneath
the heater and air conditioner controls.
Connect the iPod®-specific end of the
cable to the iPod® and the USB end of the
cable to the USB connection port on the
vehicle. If your iPod® supports charging via
a USB connection, its battery will be charged while connected to the vehicle
with the ignition switch in the ON position.
While connected to the vehicle, the iPod®
can only be operated by the vehicle audio
controls.
To disconnect the iPod® from the vehicle,
remove the USB end of the cable from the
USB connection port on the vehicle, then
remove the cable from the iPod®.
* iPod® is a trademark of Apple Inc., regis-
tered in the U.S. and other countries.
Compatibility
The following models are compatible:
• iPhone® 11 Pro Max
• iPhone® 11 Pro
• iPhone® 11
• iPhone® XR
• iPhone® XS Max
• iPhone® XS
• iPhone® X
• iPhone® 8 Plus
• iPhone® 8
• iPhone® 7 Plus
• iPhone® 7
• iPhone® SE
• iPhone® 6s PlusLHA4964
4-56Monitor, climate, audio, phone and voice recognition systems
Page 279 of 556
Intelligent Driver Alertness (I-DA)...............5-121
Intelligent Driver Alertness system
operation .................................. 5-121
How to enable/disable the Intelligent
Driver Alertness (I-DA) system ..............5-122
Intelligent Driver Alertness (I-DA)
system limitations ......................... 5-123
Break-in schedule ............................. 5-125
Fuel efficient driving tips .......................5-125
Increasing fuel economy ......................5-126
Parking/parking on hills .......................5-127
Power steering ................................ 5-128
Brake system ................................. 5-129
Brake precautions .......................... 5-129
Anti-lock Braking System (ABS) .............5-129
Brake Assist ................................ 5-131
Vehicle Dynamic Control (VDC) system ........5-131
Rise-up and build-up ....................... 5-132
Brake force distribution ....................5-132
Chassis Control ............................... 5-133Intelligent Trace Control
....................5-133
Active Ride Control ......................... 5-134
Intelligent Engine Brake ....................5-134
Hill start assist system ........................5-135
Rear Sonar System (RSS) ......................5-135
System operation .......................... 5-136
How to enable/disable the sonar
system ..................................... 5-138
Sonar limitations ........................... 5-140
System temporarily unavailable ............5-140
System maintenance ......................5-140
Cold weather driving .......................... 5-141
Freeing a frozen door lock ..................5-141
Antifreeze .................................. 5-141
Battery..................................... 5-141
Draining of coolant water ..................5-141
Tire equipment ............................. 5-141
Special winter equipment ..................5-142
Driving on snow or ice ......................5-142
Engine
block heater (if so equipped) ........5-142
Page 418 of 556
SPECIAL WINTER EQUIPMENT
It is recommended that the following items
be carried in the vehicle during winter:
• A scraper and stiff-bristled brush to re-move ice and snow from the windows
and wiper blades.
• A sturdy, flat board to be placed under the jack to give it firm support.
• A shovel to dig the vehicle out of snowdrif ts.
• Extra washer fluid to refill the windshield- washer fluid reservoir.
DRIVING ON SNOW OR ICE
WARNING
• Wet ice (32°F, 0°C and freezing rain),
very cold snow or ice can be slick and
very hard to drive on. The vehicle will
have much less traction or “grip” un-
der these conditions. Try to avoid
driving on wet ice until the road is
salted or sanded.
• Whatever the condition, drive with
caution. Accelerate and slow down
with care. If accelerating or down-
shif ting too fast, the drive wheels will
lose even more traction. •
Allow more stopping distance under
these conditions. Braking should be
started sooner than on dry
pavement.
• Allow greater following distances on
slippery roads.
• Watch for slippery spots (glare ice).
These may appear on an otherwise
clear road in shaded areas. If a patch
of ice is seen ahead, brake before
reaching it. Try not to brake while on
the ice, and avoid any sudden steer-
ing maneuvers.
• Do not use the cruise control (if so
equipped) on slippery roads.
• Snow can trap dangerous exhaust
gases under your vehicle. Keep snow
clear of the exhaust pipe and from
around your vehicle.
ENGINE BLOCK HEATER (if so
equipped)
Engine block heaters are used to assist
with cold temperature starting.
The engine block heater should be used
when the outside temperature is 20°F (-7°C)
or lower.
WARNING
• Do not use your engine block heater
with an ungrounded electrical sys-
tem or a 2-pronged adapter. You can
be seriously injured by an electrical
shock if you use an ungrounded
connection.
• Disconnect and properly store the
engine block heater cord before
starting the engine. Damage to the
cord could result in an electrical
shock and can cause serious injury.
• Use a heavy-duty 3-wire, 3-pronged
extension cord rated for at least 10 A.
Plug the extension cord into a
Ground Fault Interrupt (GFI) pro-
tected, grounded 110-VAC outlet.
Failure to use the proper extension
cord or a grounded outlet can result
in a fire or electrical shock and cause
serious personal injury.
5-142Starting and driving
Page 419 of 556
To use the engine block heater:
1. Turn the engine off.
2. Open the hood and unwrap the engineblock heater cord.
3. Plug the engine block heater cord into a grounded 3-wire, 3-pronged extension
cord.
4. Plug the extension cord into a Ground Fault Interrupt (GFI) protected, grounded
110-volt AC (VAC) outlet.
5. The engine block heater must be plugged in for at least2-4hours, de-
pending on outside temperatures, to
properly warm the engine coolant. Use
an appropriate timer to turn the engine
block heater on.
6. Before starting the engine, unplug and properly store the cord to keep it away
from moving parts.
Starting and driving5-143