2023 NISSAN SENTRA USB
[x] Cancel search: USBPage 86 of 556
2 Instruments and controls
Instrument panel................................2-2
Meters and gauges .............................2-4
Speedometer and odometer .................2-4
Tachometer ..................................2-6
Engine coolant temperature gauge ..........2-6
Fuel gauge ................................... 2-7
Distance To Empty (DTE) .....................2-8
Warning lights, indicator lights and audible
reminders .......................................2-9
Checking lights .............................. 2-10
Warning/Indicator lights (red) ...............2-10
Warning/Indicator lights (yellow) ............2-12
Warning/Indicator lights (other) .............2-16
Audible reminders ........................... 2-17
Vehicle information display 4.2 inch (11 cm)
TYPE A (if so equipped) ......................... 2-18
How to use the vehicle information
display ...................................... 2-18
Startup display .............................. 2-18
Settings ..................................... 2-19
Vehicle information display warnings
and indicators ............................... 2-26
Vehicle information display– 7 inch (18 cm)
Type B (if so equipped) ......................... 2-32
How to use the vehicle information
display ...................................... 2-33
Startup display .............................. 2-33Resetting the drive computer
...............2-34
Settings ..................................... 2-34
Vehicle information display warnings
and indicators ............................... 2-41
Security systems ............................... 2-48
Vehicle security system (if so equipped) .....2-48
NISSAN Vehicle Immobilizer System .........2-49
Wiper and washer switch .......................2-50
Switch operation ............................ 2-50
Rear window and outside mirror
(if so equipped) defroster switch ...............2-51
Headlight and turn signal switch ...............2-52
Headlight control switch ....................2-52
LED Daytime Running Lights (DRL)
system (if so equipped) ......................2-57
Instrument brightness control ..............2-58
Turn signal switch ........................... 2-58
Fog light switch (if so equipped) .............2-59
Horn ........................................... 2-59
He
ated seat switches (if so equipped) ..........2-60
Heated steering wheel switch (if so equipped) . . . 2-61
Emergency call (SOS) button (if so equipped) . . . 2-62
Rear Door Alert ................................. 2-62
Power outlet ................................... 2-64
USB/iPod® charging port (if so equipped) .......2-64
Extended storage switch .......................2-65
Page 150 of 556
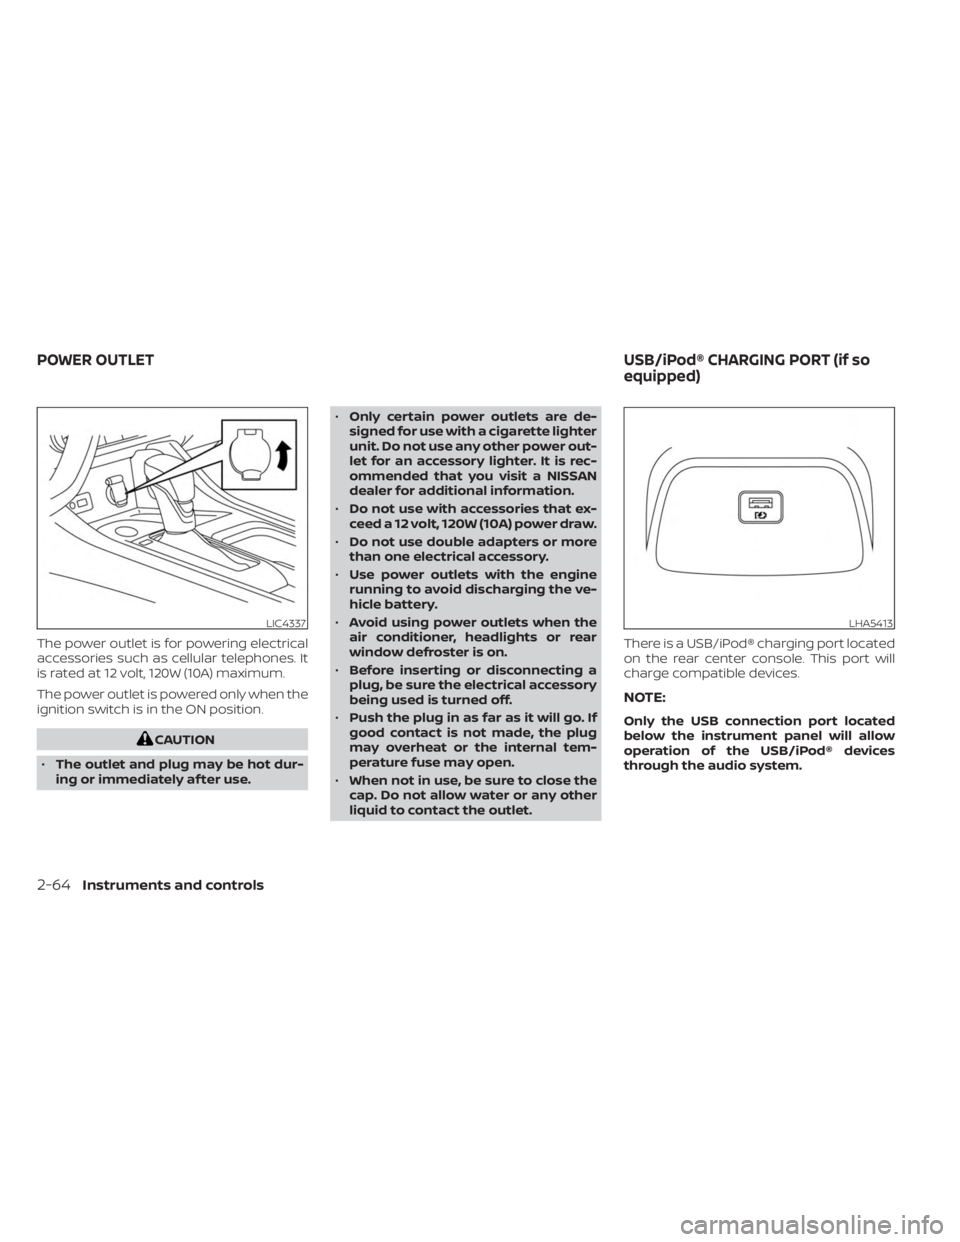
The power outlet is for powering electrical
accessories such as cellular telephones. It
is rated at 12 volt, 120W (10A) maximum.
The power outlet is powered only when the
ignition switch is in the ON position.
CAUTION
• The outlet and plug may be hot dur-
ing or immediately af ter use. •
Only certain power outlets are de-
signed for use with a cigarette lighter
unit. Do not use any other power out-
let for an accessory lighter. It is rec-
ommended that you visit a NISSAN
dealer for additional information.
• Do not use with accessories that ex-
ceed a 12 volt, 120W (10A) power draw.
• Do not use double adapters or more
than one electrical accessory.
• Use power outlets with the engine
running to avoid discharging the ve-
hicle battery.
• Avoid using power outlets when the
air conditioner, headlights or rear
window defroster is on.
• Before inserting or disconnecting a
plug, be sure the electrical accessory
being used is turned off.
• Push the plug in as far as it will go. If
good contact is not made, the plug
may overheat or the internal tem-
perature fuse may open.
• When not in use, be sure to close the
cap. Do not allow water or any other
liquid to contact the outlet. There is a USB/iPod® charging port located
on the rear center console. This port will
charge compatible devices.
NOTE:
Only the USB connection port located
below the instrument panel will allow
operation of the USB/iPod® devices
through the audio system.
LIC4337LHA5413
POWER OUTLET
USB/iPod® CHARGING PORT (if so
equipped)
2-64Instruments and controls
Page 193 of 556
Servicing air conditioner........................4-43
Audio system .................................. 4-44
Radio ....................................... 4-44
FM radio reception .......................... 4-44
AM radio reception .......................... 4-44
Audio operation precautions ................4-45
FM/AM radio ................................ 4-48
USB (Universal Serial Bus) Connection
Port......................................... 4-53
iPod®* player operation .....................4-56
Bluetooth® streaming audio .................4-59
Steering wheel switch for audio control .....4-62
Antenna ..................................... 4-63
Siri® Eyes Free .................................. 4-63
Requirements ............................... 4-63
Operating Siri® Eyes Free ....................4-64
Troubleshooting guide ......................4-65Car phone or CB radio
.......................... 4-66
Bluetooth® Hands-Free Phone System .........4-66
Regulatory information ......................4-68
Using the system ........................... 4-68
Indicators ................................... 4-70
Control buttons ............................. 4-71
Bluetooth® connecting procedure ...........4-71
Voice commands ........................... 4-73
Phone display screen .......................4-75
Making a call ................................ 4-76
Receiving/Ending a call ......................4-76
During a call ................................. 4-77
Text messaging (if so equipped) .............4-77
Bluetooth® connections screen .............4-81
Phone and text message settings ...........4-82
Volume & beeps ............................. 4-84
iPod®/iPhone® ................................. 4-84
Page 198 of 556

Menu itemResult
Settings Touch to change the following settings.
Connections Touch this key to select either Bluetooth® phone, Bluetooth® audio or USB audio options. For additional
information, see “USB connections screen” (P. 4-54) and “Bluetooth® connections screen” (P. 4-81).
Phone For additional information, see “Bluetooth® Hands-Free Phone System” (P. 4-66).
Sound For additional information, see “Audio system” (P. 4-44).
Volume & Beeps For additional information, see “Volume & beeps” (P. 4-84).
Clock Touch this key to adjust clock settings.
On-screen Clock Touch to toggle ON or OFF the clock display on the upper right corner of the display screen.
Clock Format Touch to set the clock to 12 hour or 24 hour formats.
Daylight Savings Time Touch to adjusts the daylight saving time to on or off.
Set Clock Manually Touch to adjust the clock manually; then touch to change between AM and PM, the hour and the minutes.
System Voice For additional information, see “Settings” (P. 4-75).
Camera Touch this key to change the camera settings.
Others Touch this key to select and/or adjust various functions of this system. A screen with additional options will
appear.
Display Touch this key to adjust the appearance of the display. For additional information, see “Adjusting the
screen” (P. 4-13).
Language Touch this key to change the language on the display.
OSS Licenses Touch this key to display sof tware licensing information.
Return All Settings to Default Touch this key to return all settings to default and to clear the memory.
4-6Monitor, climate, audio, phone and voice recognition systems
Page 199 of 556
(brightness control) BUTTON
To change the display brightness, press thebutton. Pressing the button again will
change the display to the day or the night
display.
Press and hold the
button for more
than 2 seconds to turn the display off. Press
and hold the button again to turn the dis-
play on.
HOW TO USE THE VOL (volume)
KNOB / PUSH
(power)
BUTTON
Press the PUSH(power) button to turn
audio function on and off. Turn the VOL
(volume) knob to adjust audio volume.
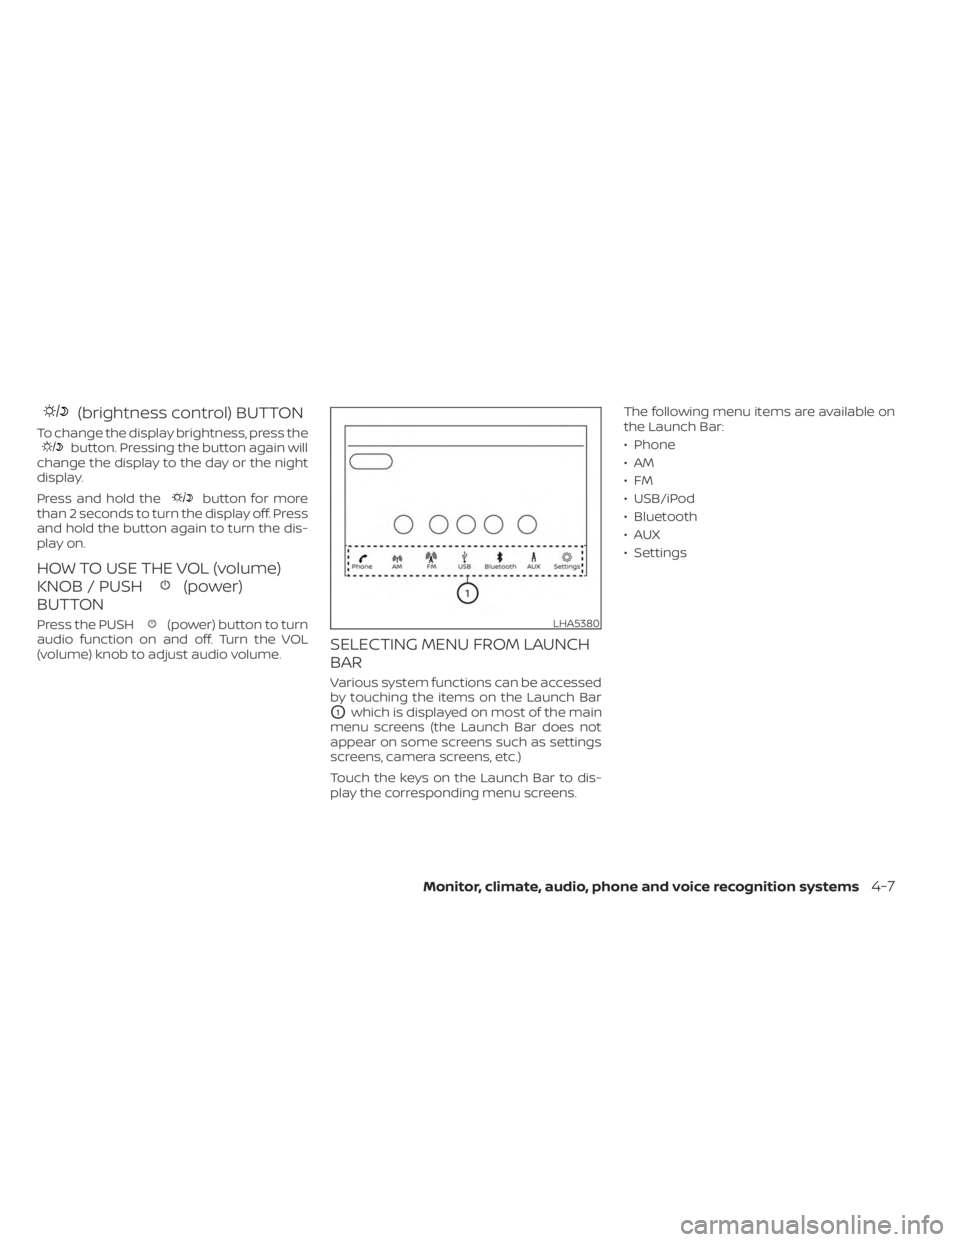
SELECTING MENU FROM LAUNCH
BAR
Various system functions can be accessed
by touching the items on the Launch Bar
O1which is displayed on most of the main
menu screens (the Launch Bar does not
appear on some screens such as settings
screens, camera screens, etc.)
Touch the keys on the Launch Bar to dis-
play the corresponding menu screens. The following menu items are available on
the Launch Bar:
• Phone
•AM
•FM
• USB/iPod
• Bluetooth
•AUX
• Settings
LHA5380
Monitor, climate, audio, phone and voice recognition systems4-7
Page 237 of 556

Fading: Occurs while the vehicle is passing
through freeway underpasses or in areas
with many tall buildings. It can also occur
for several seconds during ionospheric tur-
bulence even in areas where no obstacles
exist.
Static: Caused by thunderstorms, electrical
power lines, electric signs and even traffic
lights.
AUDIO OPERATION PRECAUTIONS
MP3 or WMA terms
• MP3 — MP3 is short for Moving PicturesExperts Group Audio Layer 3. MP3 is the
most well-known compressed digital au-
dio file format. This format allows for near
“CD quality” sound, but at a fraction of the
size of normal audio files. MP3 conversion
of an audio track from CD-ROM can re-
duce the file size by approximately a 10:1
ratio with virtually no perceptible loss in
quality. MP3 compression removes the
redundant and irrelevant parts of a
sound signal that the human ear doesn’t
hear. • WMA — Windows Media Audio (WMA)* is a
compressed audio format created by Mi-
crosof t as an alternative to MP3. The WMA
codec offers greater file compression
than the MP3 codec, enabling storage of
more digital audio tracks in the same
amount of space when compared to
MP3s at the same level of quality.
• Bit rate — Bit rate denotes the number of bits per second used by a digital music
file. The size and quality of a compressed
digital audio file is determined by the bit
rate used when encoding the file.
• Sampling frequency — Sampling fre- quency is the rate at which the samples
of a signal are converted from analog to
digital (A/D conversion) per second.
• Multisession — Multisession is one of the methods for writing data to media. Writ-
ing data once to the media is called a
single session, and writing more than
once is called a multisession.
• ID3/WMA Tag — The ID3/WMA tag is the part of the encoded MP3 or WMA file that
contains information about the digital
music file such as song title, artist, encod-
ing bit rate, track time duration, etc. ID3
tag information is displayed on the Artist/
song title line on the display. * Windows® and Windows Media® are reg-
istered trademarks and trademarks in the
United States of America and other coun-
tries of Microsof t Corporation of the USA.
USB (Universal Serial Bus)
Connection Port
WARNING
• Do not connect, disconnect or oper-
ate the USB device while driving. Do-
ing so can be a distraction. If dis-
tracted you could lose control of your
vehicle and cause an accident or se-
rious injury.
CAUTION
• Do not force the USB device into the
USB port. Inserting the USB device
tilted or up-side-down into the port
may damage the port. Make sure
that the USB device is connected cor-
rectly into the USB port.
• Do not grab the USB port cover (if so
equipped) when pulling the USB de-
vice out of the port. This could dam-
age the port and the cover.
Monitor, climate, audio, phone and voice recognition systems4-45
Page 238 of 556
•Do not leave the USB cable in a place
where it can be pulled unintention-
ally. Pulling the cable may damage
the port.
The vehicle is not equipped with a USB de-
vice. USB devices should be purchased
separately as necessary.
This system cannot be used to format USB
devices. To format a USB device, use a per-
sonal computer.
In some jurisdictions, the USB device for the
front seats plays only sound without im-
ages for regulatory reasons, even when the
vehicle is parked.
This system supports various USB
memory devices, USB hard drives and
iPod® players. Some USB devices may not
be supported by this system.
• Partitioned USB devices may not play correctly.
• Some characters used in other lan- guages (Chinese, Japanese, etc.) may not
appear properly in the display. Using Eng-
lish language characters with a USB de-
vice is recommended. General notes for USB use:
• For additional information, refer to your
device manufacturer’s owner informa-
tion regarding the proper use and care of
the device.
Notes for iPod® use:
iPod® is a trademark of Apple Inc., regis-
tered in the U.S. and other countries.
• Improperly plugging in the iPod® may cause a checkmark to be displayed on
and off (flickering). Always make sure that
the iPod® is connected properly.
• Audiobooks may not play in the same order as they appear on an iPod®.
• Large video files cause slow responses in an iPod®. The vehicle center display may
momentarily black out, but will soon
recover.
• If an iPod® automatically selects large video files while in the shuffle mode, the
vehicle center display may momentarily
black out, but will soon recover.iPod®* player
• Some characters used in other lan-guages (Chinese, Japanese, etc.) are not
displayed properly on the vehicle center
screen. We recommend using English or
Spanish language characters with an
iPod®.
• Large video podcast files cause slow re- sponses in the iPod®. The vehicle center
display may momentarily black out, but it
will soon recover.
• If the iPod® automatically selects large video podcast files while in the shuffle
mode, the vehicle center display may
momentarily black out, but it will soon
recover.
• Improperly plugging in the iPod® may cause a checkmark to be displayed on
and off (flickering). Always make sure that
the iPod® is connected properly.
• Audiobooks may not play in the same order as they appear on the iPod®.
• Be careful not to do the following, or the cable could be damaged and a loss of
function may occur:– Bend the cable excessively (1.6 in (40 mm) radius maximum).
– Twist the cable excessively (more than 180 degrees).
– Pull or drop the cable.
4-46Monitor, climate, audio, phone and voice recognition systems
Page 240 of 556
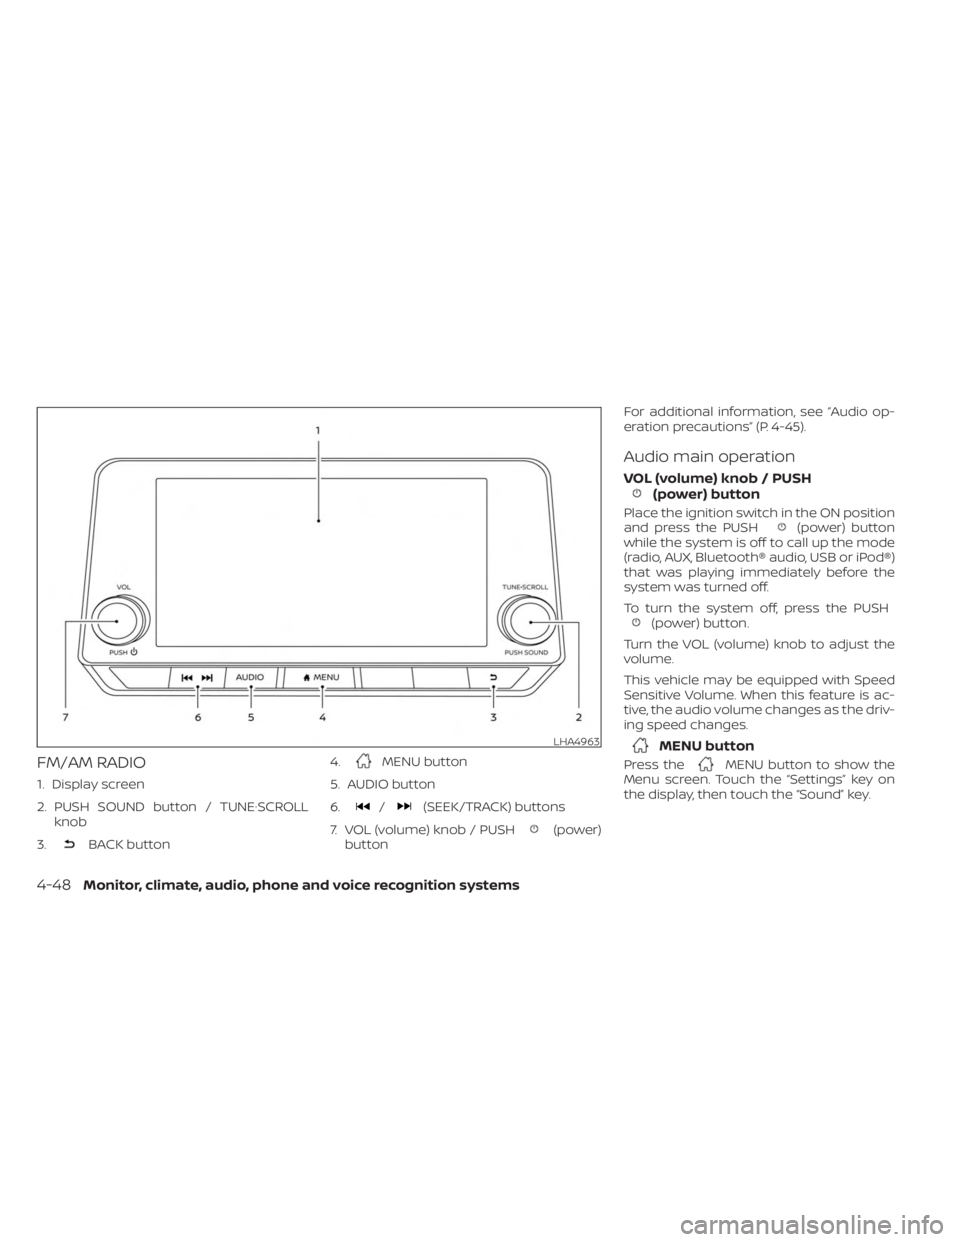
FM/AM RADIO
1. Display screen
2. PUSH SOUND button / TUNE·SCROLLknob
3.
BACK button 4.
MENU button
5. AUDIO button
6.
/(SEEK/TRACK) buttons
7. VOL (volume) knob / PUSH
(power)
button For additional information, see “Audio op-
eration precautions” (P. 4-45).
Audio main operation
VOL (volume) knob / PUSH(power) button
Place the ignition switch in the ON position
and press the PUSH(power) button
while the system is off to call up the mode
(radio, AUX, Bluetooth® audio, USB or iPod®)
that was playing immediately before the
system was turned off.
To turn the system off, press the PUSH
(power) button.
Turn the VOL (volume) knob to adjust the
volume.
This vehicle may be equipped with Speed
Sensitive Volume. When this feature is ac-
tive, the audio volume changes as the driv-
ing speed changes.
MENU button
Press theMENU button to show the
Menu screen. Touch the “Settings” key on
the display, then touch the “Sound” key.
LHA4963
4-48Monitor, climate, audio, phone and voice recognition systems