2023 NISSAN QASHQAI ECO mode
[x] Cancel search: ECO modePage 168 of 508
2-86Instruments and controls
PROGRAMMING TROUBLESHOOT-
ING
If the HomeLink® does not quickly learn
the hand-held transmitter information:
.replace the hand-held transmitter
batteries with new batteries.
. position the hand-held transmitter
with its battery area facing away from
the HomeLink® surface.
. press and hold both the HomeLink®
and hand-held transmitter buttons
without interruption.
. position the hand-held transmitter 1-3
in (26-76 mm) away from the
HomeLink® surface. Hold the transmit-
ter in that position for up to 15
seconds. If HomeLink® is not pro-
grammed within that time, try holding
the transmitter in another position -
keeping the indicator light in view at
all times.
If you have any questions or are having
difficulty programming your HomeLink®
buttons, refer to the HomeLink® web site
at: www.homelink.com/nissan or 1-800-
355-3515.
CLEARING THE PROGRAMMED IN-
FORMATION
The following procedure clears the pro-
grammed information from both buttons.
Individual buttons cannot be cleared.
However, individual buttons can be re-
programmed, see “Reprogramming a sin-
gle HomeLink® button” (P.2-86).
To clear all programming
1. Press and hold the two outer HomeLink® buttons until the indicator
light begins to flash in approximately
10 seconds. Do not hold for longer
than 20 seconds.
2. Release both buttons.
HomeLink® is now in the programming
mode and can be programmed at any
time beginning with “Programming
HomeLink®” - Step 1.
REPROGRAMMING A SINGLE
HomeLink® BUTTON
To reprogram a HomeLink® Universal
Transceiver button, complete the follow-
ing.
1. Press and hold the desired HomeLink® button. Do notrelease the button.
2. The indicator light will begin to flash after 20 seconds. Without releasing
the HomeLink® button, proceed with “Programming HomeLink®” - Step 1.
For questions or comments, contact
HomeLink® at: www.homelink.com/
nissan or 1-800-355-3515.
The HomeLink® Universal Transceiver
button has now been reprogrammed.
The new device can be activated by
pushing the HomeLink® button that was
just programmed. This procedure will not
affect any other programmed HomeLink®
buttons.
IF YOUR VEHICLE IS STOLEN
If your vehicle is stolen, you should
change the codes of any non-rolling code
device that has been programmed into
HomeLink®. Consult the Owner’s Manual
of each device or call the manufacturer or
dealer of those devices for additional
information.
When your vehicle is recovered, you will
need to reprogram the HomeLink® Uni-
versal Transceiver with your new trans-
mitter information.
FCC Notice:
For USA:
This device complies with Part 15 of the
FCC Rules. Operation is subject to the
following two conditions: (1) This device
may not cause harmful interference,
and (2) this device must accept any
Page 179 of 508

the welcome light and farewell light
function, see “Vehicle Settings” (P.2-23).
Locking doors
1. Remove the key from the ignitionswitch.
2. Close all the doors.
3. Push the LOCK
buttonon the
key fob.
4. All the doors will lock. All of the doors will lock when the
LOCK
button is pushed even
though a door remains open.
5. The hazard indicator flashes twice and the horn chirps once.
. When the LOCK
button is pushed
with all doors locked, the hazard
indicator flashes twice and the horn
chirps once as a reminder that the
doors are already locked.
. Operate the door handles to confirm
that the doors have been securely
locked.
Unlocking doors
1. Push the UNLOCKbuttonon
the key fob.
.The driver’s door unlocks..The hazard indicator flashes once if
all doors are completely closed. 2. Push the UNLOCK
button again
within 5 seconds.
.All the doors and the liftgate unlock..The hazard indicator flashes once if all doors are completely closed.
All doors will be locked automatically
unless one of the following operations is
performed within 1 minute of pushing the
UNLOCK
button.
. Any door or liftgate is opened.
. The ignition switch is placed in the ON
position.
NOTE:
The unlocking operation can be chan-
ged in selective unlock in the Vehicle
Settings of the vehicle information dis-
play. For additional information, refer to
“Vehicle Settings” (P.2-23).
Using panic alarm
If you are near your vehicle and feel
threatened, you may activate the alarm
to call attention as follows:
1. Push the PANIC
buttonon the
key fob for more than 0.5 seconds.
2. The theft warning alarm and head- lights will stay on for 25 seconds.
3. The panic alarm stops when:
.It has run for 25 seconds, or
.Any of the buttons on the key fob is pushed. (Note: the PANIC button
must be pushed for more than 1
second.)
Battery indicator light
The battery indicator lightilluminates
when you push any button. If the light
does not illuminate, the battery is weak or
needs replacement. For information re-
garding replacement of a battery, see
“Key fob battery replacement” (P.8-21).
Setting hazard indicator and horn
mode
This vehicle is set in hazard indicator and
horn mode when you first receive the
vehicle.
In hazard indicator and horn mode, when
the LOCK
buttonis pushed, the
hazard indicator flashes twice and the
horn chirps once. When the UNLOCK
buttonis pushed, the hazard indicator
flashes once.
If the horn chirp is not necessary, you can
switch to hazard indicator only mode by
following the switching procedure.
In hazard indicator only mode, when the
LOCK
button is pushed, the hazard
indicator flashes twice. When the UNLOCK
button is pushed, neither the hazard
indicator nor the horn operates.
Pre-driving checks and adjustments3-9
Page 180 of 508
3-10Pre-driving checks and adjustments
Mode (Pushing theorbutton)DOOR LOCK
DOOR UNLOCK
Hazard indicator and horn mode HAZARD -
twice
HORN - once HAZARD -
once
HORN - none
Hazard indicator mode HAZARD - twiceHAZARD - noneSwitching procedure:
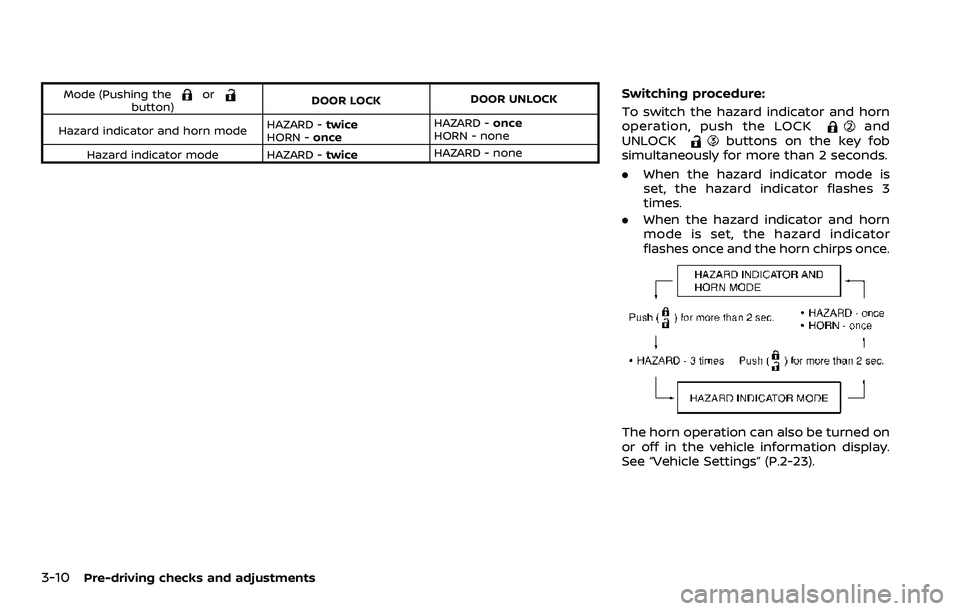
To switch the hazard indicator and horn
operation, push the LOCK
and
UNLOCKbuttons on the key fob
simultaneously for more than 2 seconds.
. When the hazard indicator mode is
set, the hazard indicator flashes 3
times.
. When the hazard indicator and horn
mode is set, the hazard indicator
flashes once and the horn chirps once.
The horn operation can also be turned on
or off in the vehicle information display.
See “Vehicle Settings” (P.2-23).
Page 187 of 508
TROUBLESHOOTING GUIDE
Verify the location of all Intelligent Keys that are programmed for the vehicle. If another Intelligent Key is in range or inside the vehicle,
the vehicle system may respond differently than expected.
SymptomPossible causeAction to take
When stopping the engine
(CVT model) The Shift to Park warning appears on
the display and the inside warning chime
sounds continuously. The shift lever is not in the P (Park)
position.
Move the shift lever to the P (Park)
position.
When opening the driver’s
door to get out of the vehicle The Door/liftgate open warning appears
on the display. The ignition switch is in the ON
position.Place the ignition switch in the OFF
position.
When closing the door after
getting out of the vehicle The No Key Detected warning appears
on the display, the outside chime sounds
three times and the inside warning
chime sounds for approximately three
seconds.
The ignition switch is in the ON
position.
Place the ignition switch in the OFF
position.
The red Shift to Park warning appears
on the display and the inside side chime
sounds continuously. (CVT model) The ignition switch is in the ON
position and the shift lever is not in
the P (Park) position.Move the shift lever to the P (Park)
position and place the ignition switch
in the OFF position.
The Rear Door Alert is activated mes-
sage appears on the display, the horn
sounds three times twice, or a Check
Back Seat for all articles warning ap-
pears on the display. The Rear Door Alert is activated.
Check the back seat for all articles,
clear the Rear Door Alert warning
message by using the steering
switches.
When closing the door with
the inside lock knob turned
to LOCK The outside chime sounds for approxi-
mately three seconds and all the doors
unlock.
The Intelligent Key is inside the
vehicle.
Carry the Intelligent Key with you.
When pushing the door han-
dle request switch or the
LOCK button on the Intelli-
gent Key to lock the door The outside chime sounds for approxi-
mately three seconds.
The Intelligent Key is inside the
vehicle.
Carry the Intelligent Key with you.
Pre-driving checks and adjustments3-17
Page 190 of 508
3-20Pre-driving checks and adjustments
JVP0541X
Type A
JVP0542XType B
LOCK buttonUNLOCK buttonPANIC buttonRemote engine start button
When you lock or unlock the doors or the
liftgate, the hazard indicator will flash and
the horn (or the outside chime) will sound
as a confirmation. For details, see “Setting
hazard indicator and horn mode” (P.3-21).
Locking doors
1. Place the ignition switch in the OFFposition.
2. Carry the Intelligent Key with you.*
3. Close all the doors.
4. Push the LOCK
buttonon the
Intelligent Key.
5. All the doors and the liftgate will lock.
6. The hazard indicator flashes twice and the horn chirps once.
*: Doors will lock with the Intelligent Key
while the ignition switch is in the ON
position.
Operate the door handles to confirm that
the doors have been securely locked.
Unlocking doors
1. Push the UNLOCKbuttonon
the Intelligent Key once.
2. The hazard indicator flashes once. The driver’s door will unlock.
3. Push the UNLOCK
button again
within 5 seconds.
4. The hazard indicator flashes once. All the doors and the liftgate will unlock.
All doors will be locked automatically
unless one of the following operations is
performed within 1 minute after pushing
the UNLOCK
button while the doors
are locked.
. Opening any door (including the lift-
gate).
. Pushing the ignition switch.
During this 1-minute time period, if the
UNLOCK
button is pushed, all doors
will be locked automatically after another
1 minute.
NOTE:
The unlocking operation can be chan-
ged in selective unlock in the Vehicle
Settings of the vehicle information dis-
play. For additional information, see
“Vehicle Settings” (P.2-23).
Page 191 of 508

Using panic alarm
If you are near your vehicle and feel
threatened, you may activate the alarm
to call attention as follows:
1. Push the PANIC
buttonon the
Intelligent Key for more than 0.5
seconds.
2. The theft warning alarm and head- lights will stay on for 25 seconds.
3. The panic alarm stops when:
.It has run for 25 seconds, or.Any of the buttons on the Intelligent Key is pushed. (Note: the PANIC
button must be pushed for more
than 0.5 seconds.)
Remote engine start (if so
equipped)
The remote engine startbuttonis
on the Intelligent Key if the vehicle has
remote engine start function. This func-
tion allows the engine to start from
outside the vehicle. See “Remote engine
start” (P.3-23).
Setting hazard indicator and horn
mode
This vehicle is set in hazard indicator and
horn mode when you first receive the
vehicle.
In hazard indicator and horn mode, when
the LOCK
buttonis pushed, the
hazard indicator flashes twice and the
horn chirps once. When the UNLOCK
buttonis pushed, the hazard indicator
flashes once.
If horns are not necessary, the system
can be switched to the hazard indicator
mode.
In hazard indicator mode, when the LOCK
button is pushed, the hazard indica-
tor flashes twice. When the UNLOCK
button is pushed, neither the hazard
indicator nor the horn operates.
Pre-driving checks and adjustments3-21
Page 192 of 508
3-22Pre-driving checks and adjustments
Hazard indicator and horn mode:
OperationDOOR LOCKDOOR UNLOCK
Pushing door handle request switch or liftgate request switch HAZARD -
twice
OUTSIDE CHIME - twiceHAZARD -
once
OUTSIDE CHIME - once
Pushing
orbutton HAZARD -
twice
HORN - once HAZARD -
once
HORN - none
Hazard indicator mode:
Operation DOOR LOCKDOOR UNLOCK
Pushing door handle request switch or liftgate request switch HAZARD -
twice
OUTSIDE CHIME - none HAZARD - none
OUTSIDE CHIME - none
Pushing
orbutton HAZARD -
twice
HORN - none HAZARD - none
HORN - none
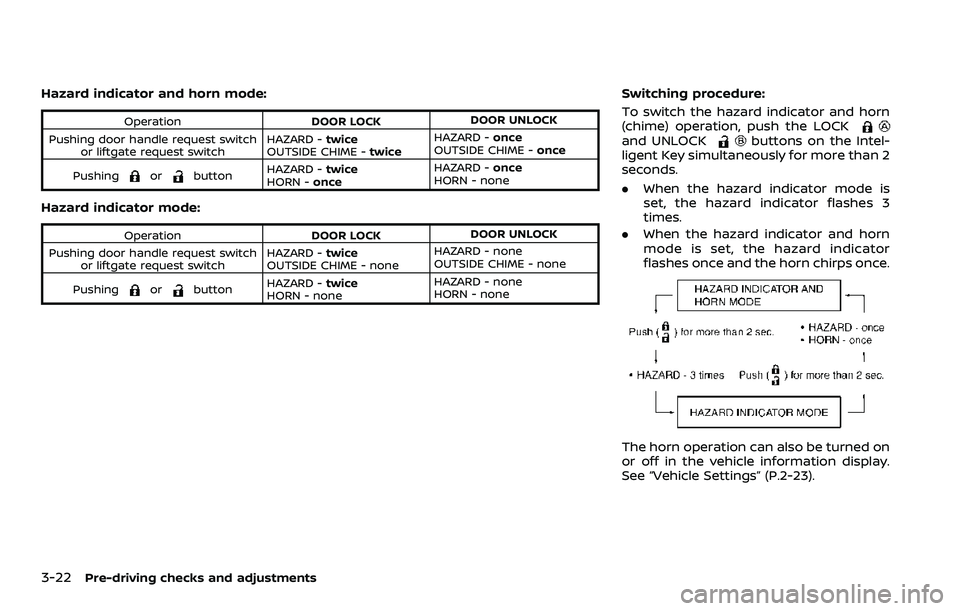
Switching procedure:
To switch the hazard indicator and horn
(chime) operation, push the LOCK
and UNLOCKbuttons on the Intel-
ligent Key simultaneously for more than 2
seconds.
. When the hazard indicator mode is
set, the hazard indicator flashes 3
times.
. When the hazard indicator and horn
mode is set, the hazard indicator
flashes once and the horn chirps once.
The horn operation can also be turned on
or off in the vehicle information display.
See “Vehicle Settings” (P.2-23).
Page 208 of 508
4-2Monitor, heater, air conditioner, audio and phone systems
WAE0859X
For models with NissanConnect® system,
refer to the digital NissanConnect® Own-
er’s Manual using the QR code on this
page (US only), or your printed Nissan-
Connect® Owner’s Manual (if so
equipped). This manual includes the fol-
lowing information.
Available functions may vary depending
on the models and specifications.
.Audio
. Hands-Free Phone
. Apple CarPlay®
. Android Auto
TM
.NissanConnect® Services powered by
SiriusXM® .
Navigation system
. Voice recognition
. Information and settings viewable on
NissanConnect®
NISSANCONNECT® OWNER’S MANUAL