2023 NISSAN QASHQAI Malfunction warning
[x] Cancel search: Malfunction warningPage 246 of 508

5-6Starting and driving
or wheels on your vehicle to ensure that
the replacement or alternate tires and
wheels allow the TPMS to continue to
function properly.
Additional information
.Since the spare tire (if so equipped) is
not equipped with the TPMS, the TPMS
does not monitor the tire pressure of
the spare tire.
. The TPMS will activate only when the
vehicle is driven at speeds above 16
MPH (25 km/h). Also, this system may
not detect a sudden drop in tire
pressure (for example a flat tire while
driving).
. The low tire pressure warning light
does not automatically turn off when
the tire pressure is adjusted. After the
tire is inflated to the recommended
pressure, the vehicle must be driven at
speeds above 16 MPH (25 km/h) to
activate the TPMS and turn off the low
tire pressure warning light. Use a tire
pressure gauge to check the tire
pressure.
. The “Tire Pressure Low - Add Air”
warning appears in the vehicle infor-
mation display when the low tire
pressure warning light is illuminated
and low tire pressure is detected. The
“Tire Pressure Low - Add Air” warning
turns off when the low tire pressure warning light turns off.
The “Tire Pressure Low - Add Air”
warning does not appear if the low
tire pressure warning light illuminates
to indicate a TPMS malfunction.
. Tire pressure rises and falls depending
on the heat caused by the vehicle’s
operation and the outside tempera-
ture. Do not reduce the tire pressure
after driving because the tire pressure
rises after driving. Low outside tem-
perature can lower the temperature
of the air inside the tire which can
cause a lower tire inflation pressure.
This may cause the low tire pressure
warning light to illuminate. If the
warning light illuminates in low ambi-
ent temperature, check the tire pres-
sure for all four tires.
For additional information, see “Low tire
pressure warning light” (P.2-14) and “Tire
Pressure Monitoring System (TPMS)” (P.6-
3).
WARNING
. If the low tire pressure warning
light illuminates while driving,
avoid sudden steering maneu-
vers or abrupt braking, reduce
vehicle speed, pull off the road
to a safe location and stop the vehicle as soon as possible. Driv-
ing with under-inflated tires may
permanently damage the tires
and increase the likelihood of tire
failure. Serious vehicle damage
could occur and may lead to an
accident and could result in ser-
ious personal injury. Check the
tire pressure for all four tires.
Adjust the tire pressure to the
recommended COLD tire pressure
shown on the Tire and Loading
Information label to turn the low
tire pressure warning light OFF. If
you have a flat tire, replace it with
a spare tire (if so equipped) or
repair it using the emergency tire
puncture repair kit (if so
equipped) as soon as possible.
(See “Flat tire” (P.6-3) for chan-
ging a flat tire.)
. Since the spare tire (if so
equipped) is not equipped with
the TPMS, when a spare tire is
mounted or a wheel is replaced,
the TPMS will not function and
the low tire pressure warning
light will flash for approximately
1 minute. The light will remain on
after 1 minute. Have your tires
replaced and/or TPMS system
reset as soon as possible. It is
Page 247 of 508
recommended you visit a NISSAN
dealer for these services.
. Replacing tires with those not
originally specified by NISSAN
could affect the proper operation
of the TPMS.
. Do not inject any tire liquid or
aerosol tire sealant into the tires,
as this may cause a malfunction
of the tire pressure sensors
(models without emergency tire
puncture repair kit).
. NISSAN recommends using only
Genuine NISSAN Emergency Tire
Sealant provided with your vehi-
cle. Other tire sealants may da-
mage the valve stem seal which
can cause the tire to lose air
pressure. Visit a NISSAN dealer
as soon as possible after using
tire repair sealant (models with
emergency tire puncture repair
kit).
CAUTION
.The TPMS may not function prop-
erly when the wheels are
equipped with tire chains or the
wheels are buried in snow. .
Do not place metalized film or
any metal parts (antenna, etc.) on
the windows. This may cause
poor reception of the signals
from the tire pressure sensors,
and the TPMS will not function
properly.
Some devices and transmitters may tem-
porarily interfere with the operation of
the TPMS and cause the low tire pressure
warning light to illuminate. Some exam-
ples are:
. Facilities or electric devices using
similar radio frequencies are near the
vehicle.
. If a transmitter set to similar frequen-
cies is being used in or near the
vehicle.
. If a computer (or similar equipment) or
a DC/AC converter is being used in or
near the vehicle.
Low tire pressure warning light may
illuminate in the following cases.
. If the vehicle is equipped with a wheel
and tire without TPMS.
. If the TPMS has been replaced and the
ID has not been registered.
. If the wheel is not originally specified
by NISSAN. FCC Notice:
For USA:
This device complies with Part 15 of the
FCC Rules. Operation is subject to the
following two conditions: (1) This device
may not cause harmful interference,
and (2) this device must accept any
interference received, including inter-
ference that may cause undesired op-
eration.
Note: Changes or modifications not
expressly approved by the party re-
sponsible for compliance could void
the user’s authority to operate the
equipment.
For Canada:
This device complies with Industry Ca-
nada licence-exempt RSS standard(s).
Operation is subject to the following
two conditions: (1) this device may not
cause interference, and (2) this device
must accept any interference, including
interference that may cause undesired
operation of the device.
Starting and driving5-7
Page 248 of 508

5-8Starting and driving
TPMS with Easy Fill Tire Alert
When adding air to an under-inflated tire,
the TPMS with Easy Fill Tire Alert provides
visual and audible signals outside the
vehicle to help you inflate the tires to
the recommended COLD tire pressure.
Vehicle set-up:
1. Park the vehicle in a safe and levelplace.
2. Apply the parking brake and place the shift lever in the P (Park) position (CVT
model) or N (Neutral) position (MT
model).
3. Place the ignition switch in the ON position. Do not start the engine.
Operation:
1. Add air to the tire.
2. After a few seconds, the hazard in- dicators will start flashing.
3. When the designated pressure is reached, the horn beeps once and
the hazard indicators stop flashing.
4. Perform the above steps for each tire.
. If the tire is over-inflated more than
approximately 4 psi (30 kPa), the horn
beeps and the hazard indicators flash
3 times. To correct the pressure, push
the core of the valve stem on the tire
briefly to release pressure. When the pressure reaches the designated
pressure, the horn beeps once.
. If the hazard indicator does not flash
within approximately 15 seconds after
starting to inflate the tire, it indicates
that the TPMS with Easy Fill Tire Alert
is not operating.
. The TPMS will not activate the Easy Fill
Tire Alert under the following condi-
tions:
— If there is interference from an
external device or transmitter
— The air pressure from the inflation device such as those using a power
socket is not sufficient to inflate the
tire
— If an electrical equipment is being used in or near the vehicle
— There is a malfunction in the TPMS system
— There is a malfunction in the horn or hazard indicators
. If the TPMS with Easy Fill Tire Alert
does not operate due to TPMS inter-
ference, move the vehicle about 3 ft
(1m) backward or forward and try
again.
If the TPMS with Easy Fill Tire Alert is not
working, use a tire pressure gauge.
AVOIDING COLLISION AND ROLL-
OVER
WARNING
Failure to operate this vehicle in a
safe and prudent manner may result
in loss of control or an accident.
Be alert and drive defensively at all times.
Obey all traffic regulations. Avoid exces-
sive speed, high speed cornering, or
sudden steering maneuvers, because
these driving practices could cause you
to lose control of your vehicle. As with
any vehicle, a loss of control could
result in a collision with other vehicles
or objects, or cause the vehicle to roll-
over, particularly if the loss of control
causes the vehicle to slide sideways. Be
attentive at all times, and avoid driving
when tired. Never drive when under the
influence of alcohol or drugs (including
prescription or over-the-counter drugs
which may cause drowsiness). Always
wear your seat belt as outlined in “Seat
belts” (P.1-12) of this manual, and also
instruct your passengers to do so.
Seat belts help reduce the risk of injury in
collisions and rollovers. In a rollover
crash, an unbelted or improperly belted
Page 257 of 508
JVS0404X
INTELLIGENT KEY BATTERY DIS-
CHARGE
If the battery of the Intelligent Key is
discharged, or environmental conditions
interfere with the Intelligent Key opera-
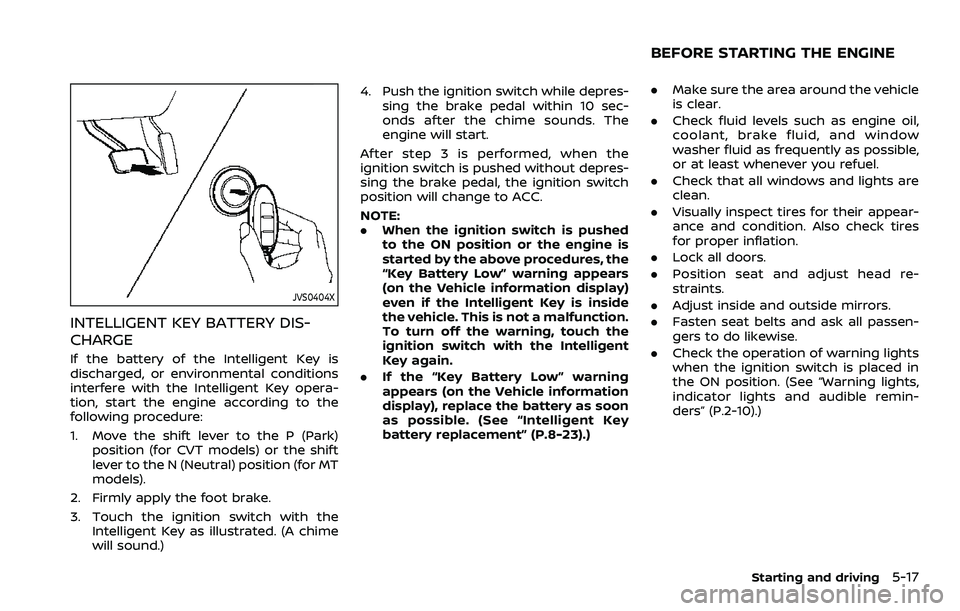
tion, start the engine according to the
following procedure:
1. Move the shift lever to the P (Park)position (for CVT models) or the shift
lever to the N (Neutral) position (for MT
models).
2. Firmly apply the foot brake.
3. Touch the ignition switch with the Intelligent Key as illustrated. (A chime
will sound.) 4. Push the ignition switch while depres-
sing the brake pedal within 10 sec-
onds after the chime sounds. The
engine will start.
After step 3 is performed, when the
ignition switch is pushed without depres-
sing the brake pedal, the ignition switch
position will change to ACC.
NOTE:
. When the ignition switch is pushed
to the ON position or the engine is
started by the above procedures, the
“Key Battery Low” warning appears
(on the Vehicle information display)
even if the Intelligent Key is inside
the vehicle. This is not a malfunction.
To turn off the warning, touch the
ignition switch with the Intelligent
Key again.
. If the “Key Battery Low” warning
appears (on the Vehicle information
display), replace the battery as soon
as possible. (See “Intelligent Key
battery replacement” (P.8-23).)
.Make sure the area around the vehicle
is clear.
. Check fluid levels such as engine oil,
coolant, brake fluid, and window
washer fluid as frequently as possible,
or at least whenever you refuel.
. Check that all windows and lights are
clean.
. Visually inspect tires for their appear-
ance and condition. Also check tires
for proper inflation.
. Lock all doors.
. Position seat and adjust head re-
straints.
. Adjust inside and outside mirrors.
. Fasten seat belts and ask all passen-
gers to do likewise.
. Check the operation of warning lights
when the ignition switch is placed in
the ON position. (See “Warning lights,
indicator lights and audible remin-
ders” (P.2-10).)
Starting and driving5-17
BEFORE STARTING THE ENGINE
Page 263 of 508
M1 (1st):
Use this position when climbing steep
hills slowly or driving slowly through deep
snow, sand or mud, or for maximum
engine braking on steep downhill grades.
.Remember not to drive at high speeds
for extended periods of time in lower
than M7 range. This reduces fuel
economy.
. In the manual shift mode, the trans-
mission may not shift to the se-
lected range. This helps maintain
driving performance and reduces
the chance of vehicle damage or
loss of control.
. In the manual shift mode, the trans-
mission automatically shifts down
to 1st gear before the vehicle comes
to a stop. When accelerating again, it
is necessary to shift up to the
desired range.
. When the CVT fluid temperature is
extremely low, the manual shift mode
may not work and automatically shift
as a drive mode. This is not a mal-
function. In this case, return the shift
lever to the D (Drive) position and drive
for a while and then shift to the
manual shift mode.
. When the CVT fluid temperature is
high, the shift range may upshift at a
lower engine speed than usual. This is not a malfunction.Accelerator downshift — In D posi-
tion —
For passing or hill climbing, fully depress
the accelerator pedal to the floor. This
shifts the transmission down into a lower
gear, depending on the vehicle speed.
High fluid temperature protection
mode
This transmission has a high fluid tem-
perature protection mode. If the fluid
temperature becomes too high (for ex-
ample, when climbing steep grades in
high temperature with heavy loads), en-
gine power and, under some conditions,
vehicle speed will be decreased automa-
tically to reduce the chance of transmis-
sion damage. Vehicle speed can be
controlled with the accelerator pedal,
but the engine and vehicle speed may
be limited.
Fail-safe
If the vehicle is driven under extreme
conditions, such as excessive wheel
spinning and subsequent hard braking,
the fail-safe system may be activated.
The MIL may illuminate to indicate the
fail-safe mode is activated. (See “Mal-
function Indicator Light (MIL)” (P.2-16).)
This will occur even if all electricalcircuits are functioning properly. In this
case, place the ignition switch in the
OFF position and wait for 10 seconds.
Then turn the switch back to the ON
position. The vehicle should return to its
normal operating condition. If it does
not return to its normal operating con-
dition, have the transmission checked
and repaired, if necessary. It is recom-
mended you visit a NISSAN dealer for
this service.
WARNING
When the high fluid temperature
protection mode or fail-safe opera-
tion occurs, vehicle speed may be
gradually reduced. The reduced
speed may be lower than other
traffic, which could increase the
chance of a collision. Be especially
careful when driving. If necessary,
pull to the side of the road at a safe
place and allow the transmission to
return to normal operation, or have it
repaired if necessary.
Starting and driving5-23
Page 265 of 508

4. Insert the mechanical key and pushdown the shift lock release.
5. Push the shift lever button and move the shift lever to the N (Neutral)
position while holding down the shift
lock release.
Place the ignition switch in the ON posi-
tion. The vehicle may be moved to the
desired location.
Replace the removed shift lock release
cover after the operation.
If the shift lever cannot be moved out of
the P (Park) position, have the CVT system
checked as soon as possible. It is recom-
mended you visit a NISSAN dealer for this
service.
WARNING
If the shift lever cannot be moved
from the P (Park) position while the
engine is running and the brake
pedal is depressed, the stop lights
may not work. Malfunctioning stop
lights could cause an accident injur-
ing yourself and others.
MANUAL TRANSMISSION (MT)
WARNING
. Do not downshift abruptly on
slippery roads. This may cause a
loss of control.
. Do not over-rev the engine when
shifting to a lower gear. This may
cause a loss of control or engine
damage.
. When the high fluid temperature
protection mode or fail-safe op-
eration occurs, vehicle speed may
be gradually reduced. The re-
duced speed may be lower than
other traffic, which could increase
the chance of a collision. Be
especially careful when driving. If
necessary, pull to the side of the
road at a safe place and allow the
transmission to return to normal
operation, or have it repaired if
necessary.
CAUTION
.Do not rest your foot on the
clutch pedal while driving. This may damage the clutch.
. Fully depress the clutch pedal
before shifting to help prevent
transmission damage.
. Stop your vehicle completely be-
fore shifting into R (Reverse).
. When the vehicle is stopped for a
period of time, for example at a
stop light, shift to N (Neutral) and
release the clutch pedal with the
foot brake applied.
Starting and driving5-25
Page 268 of 508
5-28Starting and driving
automatic brake hold function.
The electronic parking brake is automati-
cally released as soon as the vehicle
starts while the accelerator pedal is
depressed.
WARNING
.The electronic parking brake will
not be automatically applied
when the engine is stopped with-
out using the ignition switch (for
example, by engine stalling).
Without the vehicle stationary,
the electronic parking brake will
not be automatically applied
even if the engine is turned off
with the ignition switch.
. Before leaving the vehicle, move
the shift lever to the 1 (1st) or R
(Reverse) position and check that
the electronic parking brake in-
dicator light is illuminated to
confirm that the electronic park-
ing brake is applied. The electro-
nic parking brake indicator light
will remain on for a period of time
after the driver’s door is locked.
CAUTION
When parking in an area where the
outside temperature is below 32°F
(0°C), do not apply the parking brake
to prevent it from freezing.
For safe parking, place the shift lever
in the 1 (1st) or R (Reverse) position
and securely block the wheels.
NOTE:
. To keep the electronic parking brake
released after the engine is turned
off, place the ignition switch in the
OFF position, depress the brake
pedal and push down the parking
brake switch before opening the
driver’s door.
. If a malfunction occurs in the elec-
tronic parking brake system (for
example, due to battery discharge),
it is recommended to contact a
NISSAN dealer.
. If the shift lever is moved to the P
(Park) position when the brake force
is maintained by the automatic
brake hold function, the electronic
parking brake will apply automati-
cally. .
If the driver’s seat belt is unfastened
when the brake force is maintained
by the automatic brake hold func-
tion, the electronic parking brake
will apply automatically.
. If the ignition switch is placed in the
OFF position when the brake force is
maintained by the automatic brake
hold function, the electronic parking
brake will apply automatically.
Manual operation
The electronic parking brake will not be
automatically applied if the engine is
stopped without using the ignition switch
(for example, by engine stalling). In such a
case, you have to apply the parking brake
manually.
To apply: Pull the switch up
. The
indicator lightwill illuminate.
To release: With the ignition switch in the
ON position, depress the brake pedal and
push the switch down
. The indicator
lightwill turn off.
Before driving, check that the electronic
parking brake indicator light
goes
out. For additional information, see
“Warning lights, indicator lights and audi-
ble reminders” (P.2-10).
Page 269 of 508
NOTE:
.A buzzer will sound if the vehicle is
driven without releasing the parking
brake. See “Audible reminders” (P.2-
18).
. While the electronic parking brake is
applied or released, an operating
sound is heard from the lower side
of the rear seat. This is normal and
does not indicate a malfunction.
. When the electronic parking brake is
frequently applied and released in a
short period of time, the parking
brake may not operate in order to
prevent the parking brake system
from overheating. If this occurs,
operate the electronic parking brake
switch again after waiting approxi-
mately 1 minute.
. If the electronic parking brake must
be applied while driving in an emer-
gency, pull up and hold the parking
brake switch. When you release the
parking brake switch, the parking
brake will be released.
. While pulling up the electronic park-
ing brake switch during driving, the
parking brake is applied and a chime
sounds. The electronic parking
brake indicator light in the meter
and in the parking brake switch
illuminate. This does not indicate a
malfunction. The electronic parking brake indicator light in the meter
and in the parking brake switch turn
off when the parking brake is re-
leased.
. When pulling the electronic parking
brake switch up with the ignition
switch in the OFF or ACC position,
the parking brake switch indicator
light will continue to illuminate for a
short period of time.The automatic brake hold function main-
tains the braking force without the driver
having to depress the brake pedal when
the vehicle is stopped at a traffic light or
intersection. As soon as the driver de-
presses the accelerator pedal again, the
automatic brake hold function is deacti-
vated and the braking force is released.
The operating status of the automatic
brake hold can be displayed on the
vehicle information display.
WARNING
.The automatic brake hold func-
tion is not designed to hold the
vehicle on a steep hill or slippery
road. Never use the automatic
brake hold when the vehicle is
stopped on a steep hill or slippery
road. Failure to do so may cause
the vehicle to move.
. When the automatic brake hold
function is activated but fails to
maintain the vehicle at a stand-
still, depress the brake pedal to
stop the vehicle. If the vehicle
unexpectedly moves due to out-
side conditions, the chime may
sound and automatic brake hold
warning may illuminate in the
vehicle information display.
Starting and driving5-29
AUTOMATIC BRAKE HOLD (if so equipped)