Page 529 of 665

•Use the correct jack-up points. Never
use any other part of the vehicle for
jack support.
• If your vehicle is equipped with Run-
ning Boards use the Jack Point lo-
cated on the front or rear mounting
brackets.
• Never jack up the vehicle more than
necessary.
• Never use blocks on or under the
jack.
• Do not start or run the engine while
vehicle is on the jack. It may cause
the vehicle to move. This is especially
true for vehicles with limited slip
differentials.
• Do not allow passengers to stay in
the vehicle while it is on the jack.
• Never run the engine with a wheel(s)
off the ground. It may cause the ve-
hicle to move.
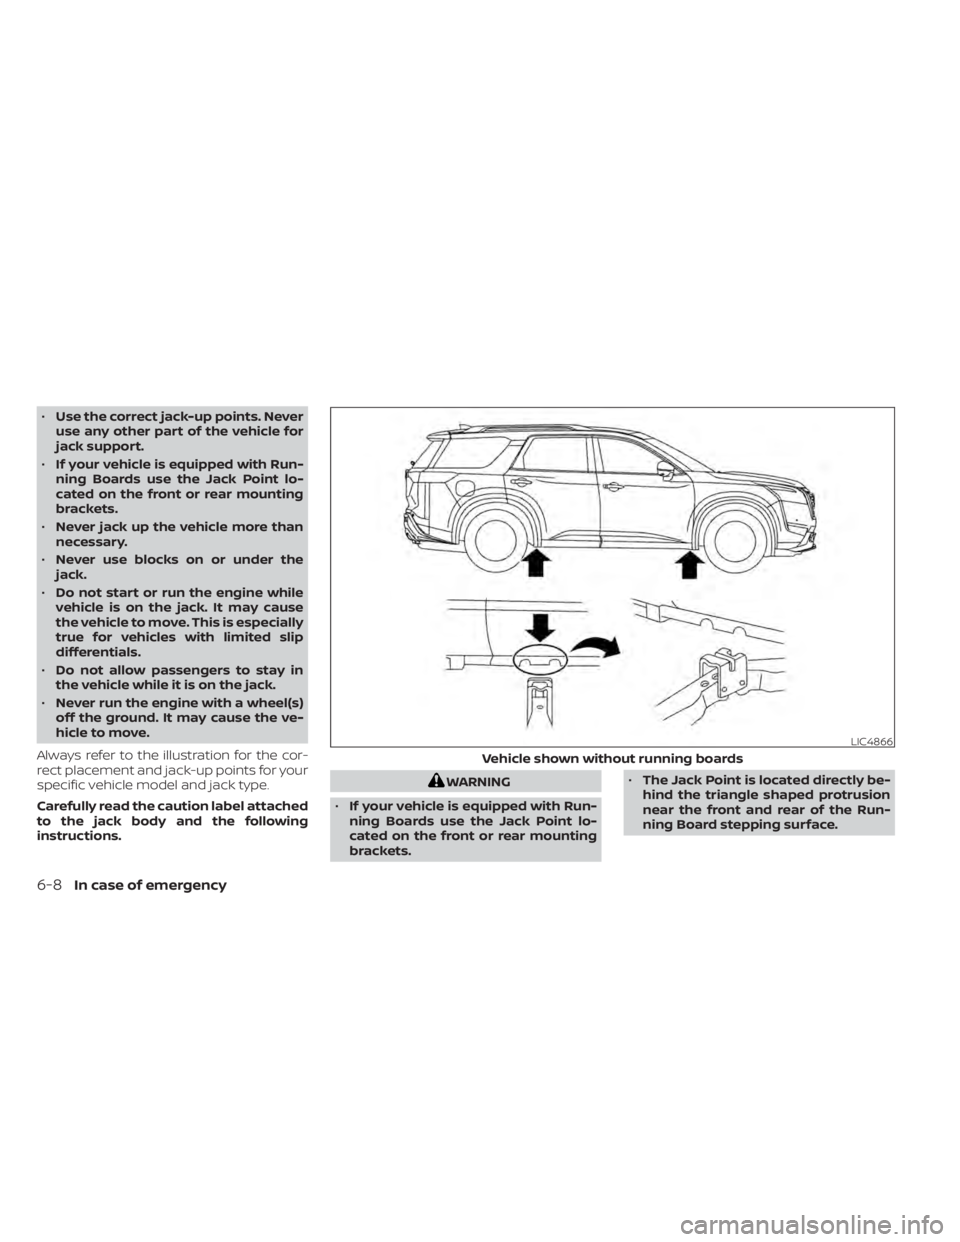
Always refer to the illustration for the cor-
rect placement and jack-up points for your
specific vehicle model and jack type.
Carefully read the caution label attached
to the jack body and the following
instructions.
WARNING
• If your vehicle is equipped with Run-
ning Boards use the Jack Point lo-
cated on the front or rear mounting
brackets. •
The Jack Point is located directly be-
hind the triangle shaped protrusion
near the front and rear of the Run-
ning Board stepping surface.
LIC4866
Vehicle shown without running boards
6-8In case of emergency
Page 530 of 665
1. Loosen each wheel nut one or two turnsby turning counterclockwise with the
wheel nut wrench. Do not remove the
wheel nuts until the tire is off the
ground. 2. Place the jack directly under the jack-up
point as illustrated so the top of the jack
contacts the vehicle at the jack-up point.
The jack-up points are indicated by the
notches under the frame. If the vehicle is equipped with NISSAN
Running Boards, the jack-up points are
indicated on the running board step-
ping surface and the running board
mounting brackets.
The jack should be used on firm and
level ground.
LCE2469
Vehicle shown with running boards
In case of emergency6-9
Page 553 of 665

CHECKING ENGINE OIL LEVEL
1. Park the vehicle on a level surface andapply the parking brake.
2. Start the engine and let it idle until it reaches operating temperature.
3. Turn off the engine. Wait more than 10
minutes for the oil to drain back into
the oil pan.
4. Remove the dipstick and wipe it clean. Reinsert it all the way. 5. Remove the dipstick again and check
the oil level. It should be between the H
(High) and L (Low) marksOB. This is the
normal operating oil level range. If the oil
level is below the L (Low) mark
OA,re-
move the oil filler cap and pour recom-
mended oil through the opening. Do not
fill oil level above H (High) mark
OC.
6. Recheck the oil level with the dipstick.
It is normal to add some oil between oil
maintenance intervals or during the
break-in period, depending on the sever-
ity of operating conditions.
CAUTION
Oil level should be checked regularly.
Operating the engine with an insuffi-
cient amount of oil can damage the en-
gine, and such damage is not covered
by warranty.
CHANGING ENGINE OIL AND OIL
FILTER
For additional information on engine oil
and oil filter change, refer to the instruc-
tions outlined in this section.
Vehicle set-up
1. Park the vehicle on a level surface and apply the parking brake.
2. Run the engine until it reaches operating temperature.
3. Turn the engine off and wait for 15 minutes.
4. Raise and support the vehicle using a suitable floor jack and safety jack
stands.
• Place the safety jack stands under the vehicle jack-up points.
• A suitable adapter should be attached to the jack stand saddle.
LDI3014WDI0214
ENGINE OIL
8-6Do-it-yourself