2023 NISSAN PATHFINDER climate settings
[x] Cancel search: climate settingsPage 280 of 665

Restarting the entry/exit function
If the battery cable is disconnected or if the
fuse opens, the stored memory positions
may be lost and some of the functions will
be restricted.
1. Drive the vehicle over 25 mph (40 km/h).
OR
2. Open and close the driver's door morethan two times with the ignition switch
in the OFF position.
The entry/exit function should now work
properly.
SETTING MEMORY FUNCTION
The position of the following settings can
be linked to the Intelligent Key and the
memorized settings can be available for
each Intelligent Key.
• Climate control system
• Audio system
To use the memory function, set the cli-
mate and audio systems to the driver's
preferred settings. Lock the doors with the
Intelligent Key. Each Intelligent Key may be
set with the driver's individual preferences.
When a new Intelligent Key is used, “Con-
nection with the key has been done” will be displayed on the vehicle information dis-
play and the memorized settings are
available.
To engage the memorized settings, per-
form the following:
1. Carry the Intelligent Key that is linked to
the memorized settings.
2. Unlock the doors by wrapping hand around the capacitive door handle or
the
button on the Intelligent Key.
3. Place the ignition switch in the ON posi- tion. The settings linked to the Intelligent
Key will start.
For additional information on using the cli-
mate control system, see “Heater and air
conditioner (automatic)” (P. 4-32).
SYSTEM OPERATION
The memory seat system will not work or
will stop operating under the following
conditions:
• When the vehicle speed is above 4 mph (7 km/h).
• When any of the memory switches are pushed while the memory seat is
operating. • When the switch for the driver’s seat and
steering wheel is pushed while the
memory seat is operating.
• When the seat has already been moved to the memorized position.
• When no seat position is stored in the memory switch.
• When the shif t position is moved from P (Park) position to any other position.
Pre-driving checks and adjustments3-43
Page 283 of 665
Refer to the digital NissanConnect® Own-
er’s manual using the QR code on this
page, or your printed NissanConnect®
Owner’s manual (if so equipped). This
manual includes the following information:
• NissanConnect® Services (if so equipped)
• Navigation system (if so equipped)
• Audio system
• Apple CarPlay®
• Android Auto™
• Bluetooth® Hands-Free Phone system
• Viewing information
• Other settings• Voice recognition
• General system information
LHA5681
NISSANCONNECT® OWNER’S
MANUAL
4-2Monitor, climate, audio, phone and voice recognition systems
Page 289 of 665
4. Maneuver the steering wheel to makethe vehicle width guide lines
ODparallel
to the parking space
OCwhile referring
to the predicted course lines.
5. When the vehicle is parked in the space completely, move the shif t lever to the P
(Park) position and apply the parking
brake.
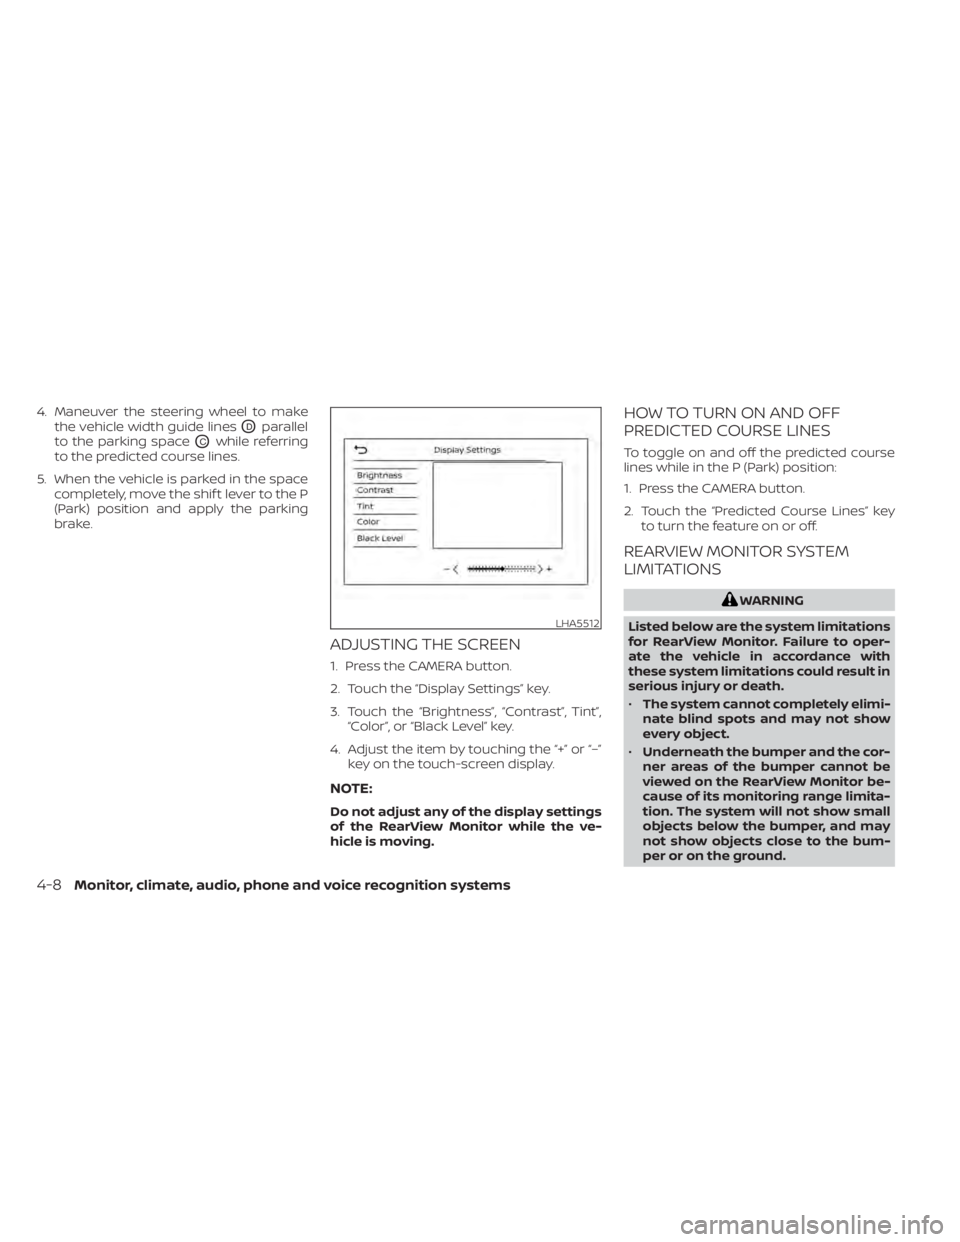
ADJUSTING THE SCREEN
1. Press the CAMERA button.
2. Touch the “Display Settings” key.
3. Touch the “Brightness”, “Contrast”, Tint”,“Color”, or “Black Level” key.
4. Adjust the item by touching the “+” or “–” key on the touch-screen display.
NOTE:
Do not adjust any of the display settings
of the RearView Monitor while the ve-
hicle is moving.
HOW TO TURN ON AND OFF
PREDICTED COURSE LINES
To toggle on and off the predicted course
lines while in the P (Park) position:
1. Press the CAMERA button.
2. Touch the “Predicted Course Lines” keyto turn the feature on or off.
REARVIEW MONITOR SYSTEM
LIMITATIONS
WARNING
Listed below are the system limitations
for RearView Monitor. Failure to oper-
ate the vehicle in accordance with
these system limitations could result in
serious injury or death.
• The system cannot completely elimi-
nate blind spots and may not show
every object.
• Underneath the bumper and the cor-
ner areas of the bumper cannot be
viewed on the RearView Monitor be-
cause of its monitoring range limita-
tion. The system will not show small
objects below the bumper, and may
not show objects close to the bum-
per or on the ground.
LHA5512
4-8Monitor, climate, audio, phone and voice recognition systems
Page 300 of 665
If the shif t lever is in the P (Park) or D (drive)
position, the available views are:
• Front view/bird’s-eye view split screen
• Front view/front-side view split screen
• Front-wide view
The display will switch from the Intelligent
Around View® Monitor screen when:
• The shif t lever is in the D (Drive) positionand the vehicle speed increases above
approximately 6 mph (10 km/h)
• A different screen is selected.
OFF-ROAD MODE (for 4WD model)
(if so equipped)
When the shif t lever is out of the R (Reverse)
position, selecting the 4LO position using
the 4WD shif t switch affects the Intelligent
Around View® Monitor display as follows:
– Selecting the 4LO position will activate the Intelligent Around View® Monitor. The
front view/front-side view split screen
will be displayed.
– When the ignition switch is placed in the ON position with the 4LO position se-
lected, the front view/front-side view
split screen will be displayed. – When the vehicle is shif ted to the 4LO
position with the bird's-eye view dis-
played, the passenger side of the display
will change to the front-side view.
When in the off-road mode, the Intelligent
Around View® Monitor will not return to the
previous screen. The screen displayed on
the Intelligent Around View® Monitor will
automatically return to the previous screen
3 minutes af ter the vehicle was shif ted out
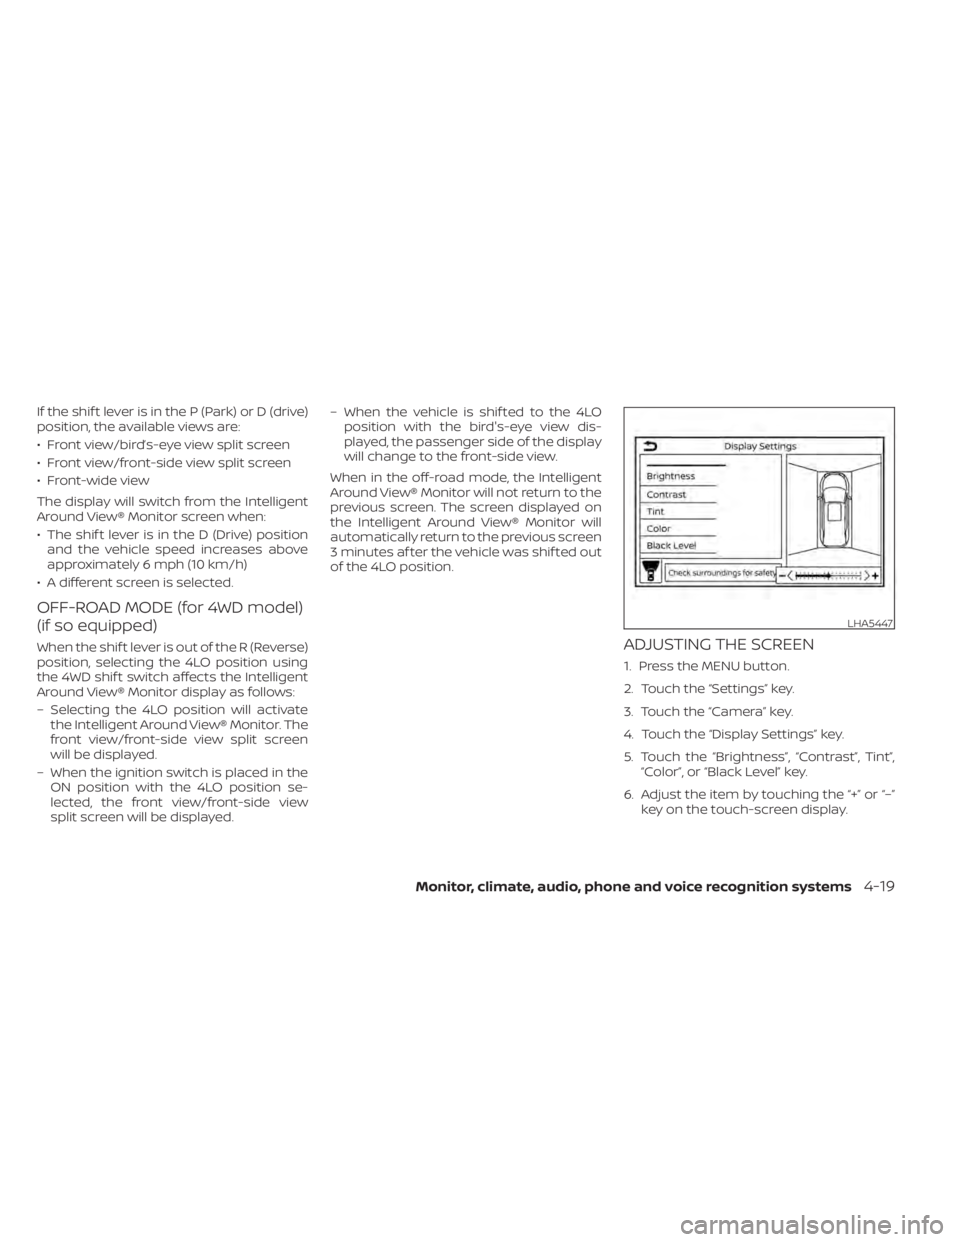
of the 4LO position.ADJUSTING THE SCREEN
1. Press the MENU button.
2. Touch the “Settings” key.
3. Touch the “Camera” key.
4. Touch the “Display Settings” key.
5. Touch the “Brightness”, “Contrast”, Tint”, “Color”, or “Black Level” key.
6. Adjust the item by touching the “+” or “–” key on the touch-screen display.
LHA5447
Monitor, climate, audio, phone and voice recognition systems4-19
Page 301 of 665
NOTE:
Do not adjust any of the display settings
of the Intelligent Around View® Monitor
while the vehicle is moving. Make sure
the parking brake is firmly applied.
INTELLIGENT AROUND VIEW®
MONITOR SYSTEM LIMITATIONS
WARNING
Listed below are the system limitations
for Intelligent Around View® Monitor.
Failure to operate the vehicle in accor-
dance with these system limitations
could result in serious injury or death.
• Do not use the Intelligent Around
View® Monitor with the outside mir-
rors in the stored position, and make
sure that the lif tgate is securely
closed when operating the vehicle
using the Intelligent Around View®
Monitor.
• The apparent distance between ob-
jects viewed on the Intelligent
Around View® Monitor differs from
the actual distance.
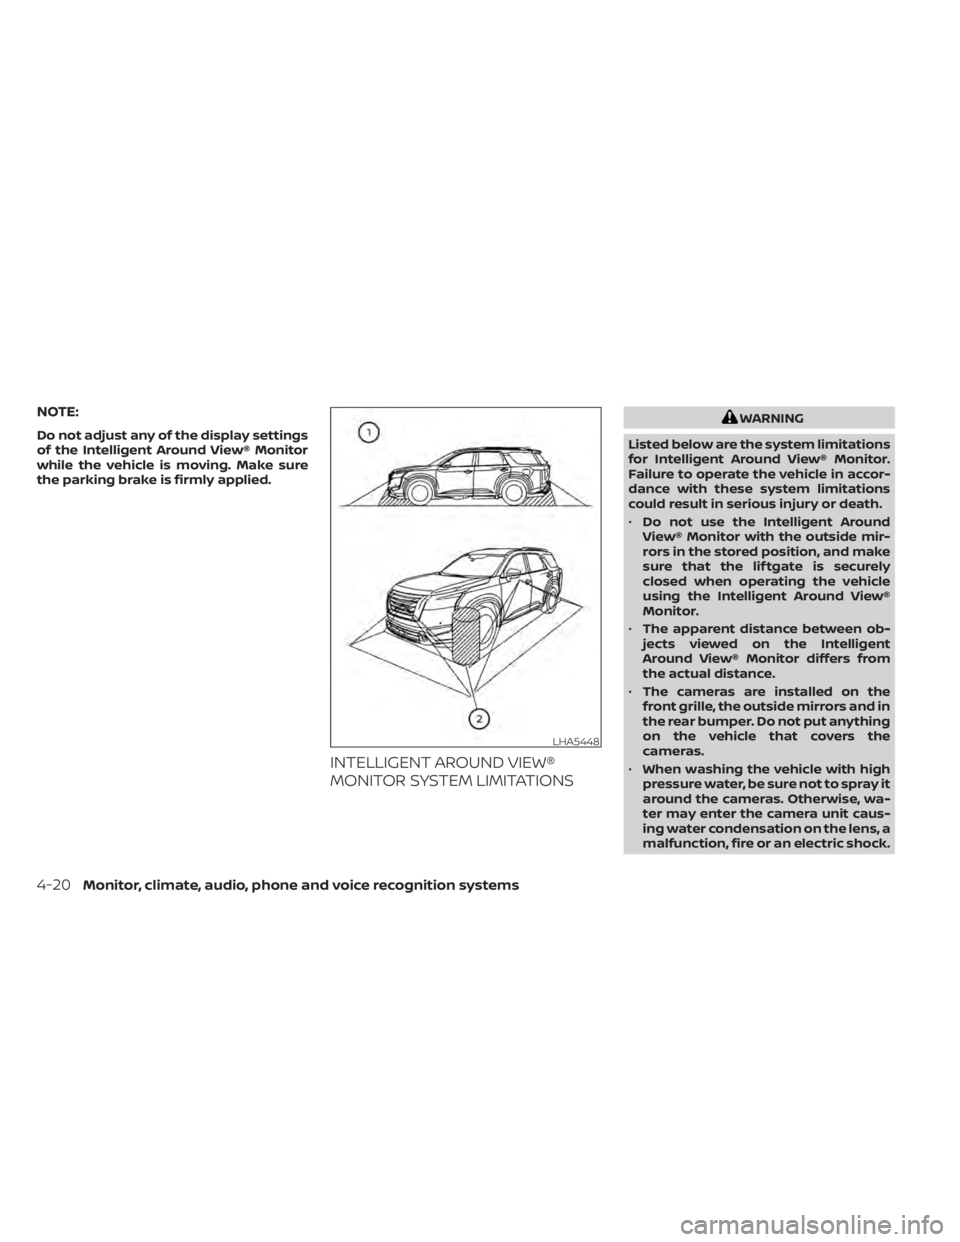
• The cameras are installed on the
front grille, the outside mirrors and in
the rear bumper. Do not put anything
on the vehicle that covers the
cameras.
• When washing the vehicle with high
pressure water, be sure not to spray it
around the cameras. Otherwise, wa-
ter may enter the camera unit caus-
ing water condensation on the lens, a
malfunction, fire or an electric shock.
LHA5448
4-20Monitor, climate, audio, phone and voice recognition systems
Page 305 of 665
The system is deactivated at speeds above
6 mph (10 km/h). It is reactivated at lower
speeds.
The colors of the sonar indicators and the
distance guide lines in the front and rear
views indicate different distances to the
object.
When the objects are detected, the indica-
tor (green) appears and blinks and the tone
sounds intermittently. When the vehicle
moves closer to the object, the color of the
indicator turns yellow and the rate of the
blinking and the rate of the tone increase.
When the vehicle is very close to the object,
the indicator stops blinking and turns red,
and the tone sounds continuously.
The intermittent tone will stop af ter 3 sec-
onds when an object is detected by only
the corner sonar and the distance does
not change.
The tone will stop when the object is no
longer near the vehicle.
TURNING ON AND OFF THE SONAR
FUNCTION
When the “Sonar” key is selected, the indi-
cator will turn off and the sonar will be
turned off temporarily. The Moving Object
Detection (MOD) system will also be turnedoff at the same time. For additional infor-
mation, see “Moving Object Detection
(MOD)” (P. 4-26). When the “Sonar” key is se-
lected again, the indicator will turn on and
the sonar will turn back on.
In the below cases, the sonar will be turned
back on automatically:
• When the shif t lever is placed in the “R”
(Reverse) position.
• When the CAMERA button is pressed and a screen other than the camera view is
shown on the display.
• When vehicle speed decreases below ap- proximately 6 mph (10 km/h).
• When the ignition switch is placed in the “OFF” position and turned back to the “ON”
position again. To prevent the sonar sys-
tem from activating altogether, use the
“Camera” menu. For additional informa-
tion, see “Sonar function settings” (P. 4-24).
Sonar function settings
To set up the sonar function to your pre-
ferred settings, press the MENU button, se-
lect the “Settings” key, select the “Camera/
Sonar” key and then select the “Sonar” key
on the center display. Designs and items displayed on the
screen may vary depending on the
models.
Sonar:
When this item is turned on, the rear
sonar is activated. When this item is turned
off (indicator turns off ), the rear sonar is
deactivated. The amber markers are dis-
played at the corners of the vehicle icon.
The next time the ignition switch is placed
in the ON position, “sonar is OFF” is dis-
played briefly.
Sonar Sensitivity: Adjust the sensitivity
level of the sonar higher (right) or lower
(lef t).
Sonar Volume: Adjust the volume of the
buzzer.
Towing mode (if so equipped): When this
item is turned on, only the rear sonar is off.
The amber markers are displayed at the
rear corners of the vehicle icon.
Show Camera when Sonar Activate (if so
equipped): When this item is turned on, the
camera view is automatically shown on the
display in the case that the distance to the
objects measured by the sonar is becom-
ing short.
4-24Monitor, climate, audio, phone and voice recognition systems
Page 310 of 665
TURNING MOD ON AND OFF
To turn the MOD system on or off:
1. Press the
orbutton on the
steering wheel and select “Settings” in
the vehicle information display.
2. Using the scroll dial, select “Driver Assis- tance” and press the OK button.
3. Select “Parking Aids”.
4. Toggle ON or OFF “Moving Object” using the OK button.
MOD SYSTEM LIMITATIONS
WARNING
Listed below are the system limitations
for MOD. Failure to operate the vehicle
in accordance with these system limi-
tations could result in serious injury or
death.
• Do not use the MOD system when
towing a trailer. The system may not
function properly.
• Excessive noise (for example, audio
system volume or open vehicle win-
dow) will interfere with the chime
sound, and it may not be heard. •
The MOD system performance will be
limited according to environmental
conditions and surrounding objects
such as:
– When there is low contrast be-
tween background and the mov-
ing objects.
– When there is a blinking source of
light.
– When strong light such as another
vehicle’s headlight or sunlight is
present.
– When camera orientation is not in
its usual position, such as when a
mirror is folded.
– When there is dirt, water drops or
snow on the camera lens.
– When the position of the moving
objects in the display is not
changed.
• The MOD system might detect flow-
ing water droplets on the camera
lens, white smoke from the muffler,
moving shadows, etc.
• The MOD system may not function
properly depending on the speed, di-
rection, distance or shape of the
moving objects. •
If your vehicle sustains damage to
the parts where the camera is in-
stalled, leaving it misaligned or bent,
the sensing zone may be altered and
the MOD system may not detect ob-
jects properly.
• When the temperature is extremely
high or low, the screen may not dis-
play objects clearly. This is not a
malfunction.
NOTE:
The green MOD icon will change to or-
ange if one of the following has oc-
curred:
• When the system is malfunctioning.
• When the component temperature
reaches a high level (icon will blink).
• When the rearview camera has de-
tected a blockage (icon will blink).
If the icon light continues to illuminate
orange, have the MOD system checked. It
is recommended that you visit a NISSAN
dealer for this service.
Monitor, climate, audio, phone and voice recognition systems4-29
Page 314 of 665

•Do not use the recirculation mode for
long periods as it may cause the inte-
rior air to become stale and the win-
dows to fog up.
Start the engine and operate the controls
to activate the air conditioner.
NOTE:
• Odors from inside and outside the ve- hicle can build up in the air conditioner
unit. Odor can enter the passenger
compartment through the vents.
• When parking, set the heater and air conditioner controls to turn off air re-
circulation to allow fresh air into the
passenger compartment. This should
help reduce odors inside the vehicle.
While the engine is stopped by the Idling
Stop System, activating the front defroster
will cause the engine to automatically re-
start. While the engine is running, activating
the front defroster will prevent the Idling
Stop System from automatically stopping
the engine.
When the engine is stopped by the Idling
Stop System, heater and air conditioner
performance may be reduced. To keep full
heater and air conditioner performance,
restart the engine by pushing the Idling Stop OFF switch. For additional informa-
tion, see “Idling Stop System” (P. 5-195).
AUTOMATIC OPERATION
Cooling and/or dehumidified
heating (AUTO)
This mode may be used all year round as
the system automatically works to keep a
constant temperature. Air flow distribution,
air intake control, and fan speed are also
controlled automatically.
1. Press the AUTO button.
2. Turn the temperature control dial to the
lef t or right to set the desired
temperature.
• Adjust the temperature display to about 75°F (24°C) for normal operation.
• The temperature of the passenger com- partment will be maintained automati-
cally. Air flow distribution, air intake con-
trol and fan speed are also controlled
automatically.
• A visible mist may be seen coming from the vents in hot, humid conditions as the
air is cooled rapidly. This does not indicate
a malfunction. 3. You can individually set driver's and front
passenger's side temperature using
each temperature control dial.
• To synchronize the driver’s and front pas- senger’s temperature settings, press the
SYNC button. The SYNC indicator will
illuminate.Heating (A/C off)
The air conditioner does not activate. When
you need to heat only, use this mode.
1. Press the AUTO button.
2. Turn the temperature control dial to set the desired temperature.
• The temperature of the passenger com- partment will be maintained automati-
cally. Air flow distribution, air intake con-
trol and fan speed are also controlled
automatically.
• Not recommended if windows fog up.
Dehumidified defrosting or
defogging
1. Press thefront defroster button.
(The indicator light on the button will
come on.)
2. Turn the temperature control dial to set the desired temperature.
Monitor, climate, audio, phone and voice recognition systems4-33