2023 NISSAN PATHFINDER ECO mode
[x] Cancel search: ECO modePage 82 of 665

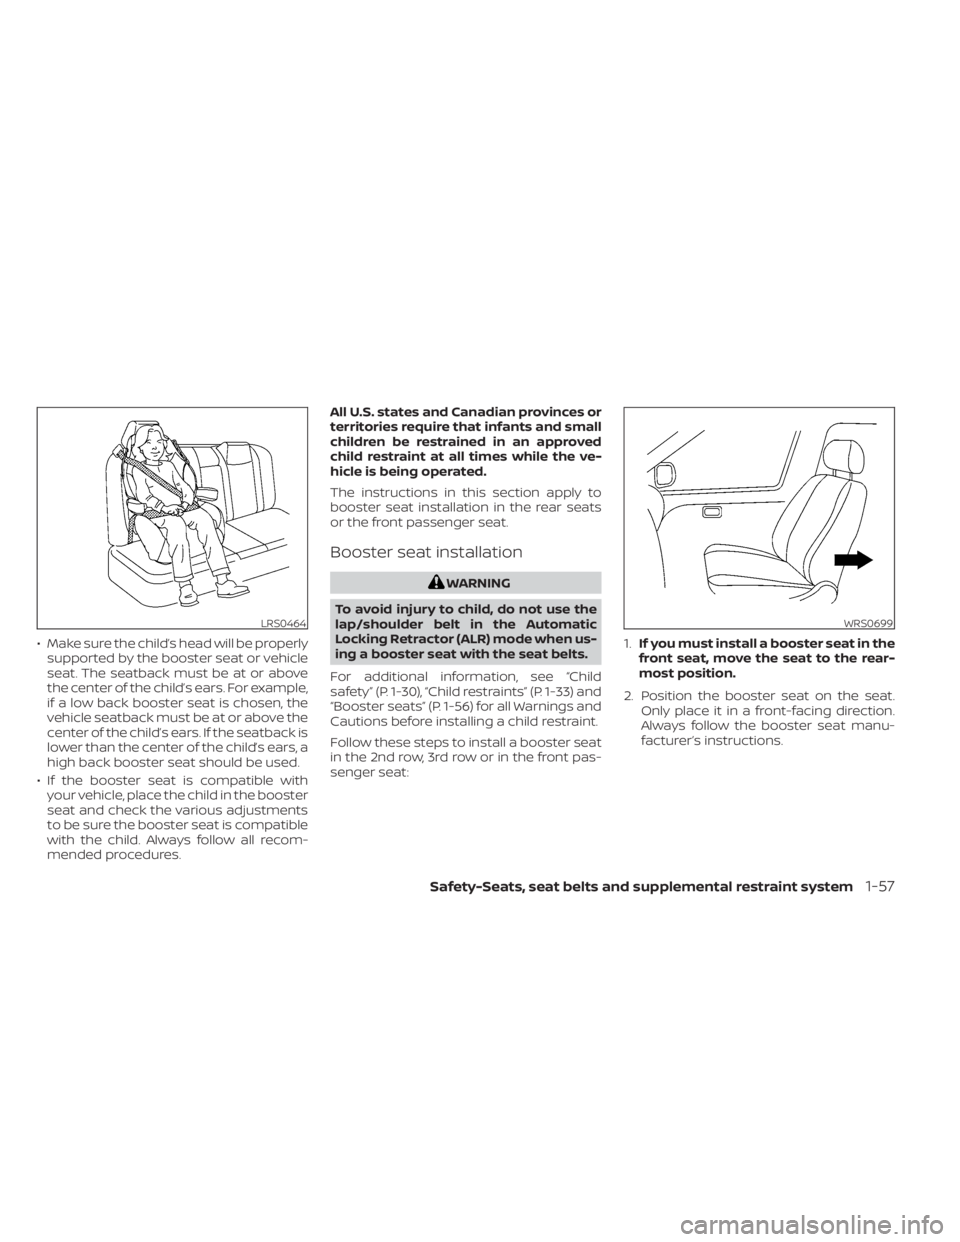
• Make sure the child’s head will be properlysupported by the booster seat or vehicle
seat. The seatback must be at or above
the center of the child’s ears. For example,
if a low back booster seat is chosen, the
vehicle seatback must be at or above the
center of the child’s ears. If the seatback is
lower than the center of the child’s ears, a
high back booster seat should be used.
• If the booster seat is compatible with your vehicle, place the child in the booster
seat and check the various adjustments
to be sure the booster seat is compatible
with the child. Always follow all recom-
mended procedures. All U.S. states and Canadian provinces or
territories require that infants and small
children be restrained in an approved
child restraint at all times while the ve-
hicle is being operated.
The instructions in this section apply to
booster seat installation in the rear seats
or the front passenger seat.
Booster seat installation
WARNING
To avoid injury to child, do not use the
lap/shoulder belt in the Automatic
Locking Retractor (ALR) mode when us-
ing a booster seat with the seat belts.
For additional information, see “Child
safety” (P. 1-30), “Child restraints” (P. 1-33) and
“Booster seats” (P. 1-56) for all Warnings and
Cautions before installing a child restraint.
Follow these steps to install a booster seat
in the 2nd row, 3rd row or in the front pas-
senger seat: 1.
If you must install a booster seat in the
front seat, move the seat to the rear-
most position.
2. Position the booster seat on the seat. Only place it in a front-facing direction.
Always follow the booster seat manu-
facturer’s instructions.
LRS0464WRS0699
Safety-Seats, seat belts and supplemental restraint system1-57
Page 96 of 665

Front passenger air bag
The front passenger air bag and front pas-
senger supplemental knee air bag are de-
signed to automatically turn OFF when the
vehicle is operated under some conditions
as described below in accordance with U.S.
regulations. If the front passenger air bag
and front passenger supplemental knee
air bag are OFF, it will not inflate in a crash.
The driver air bag and other air bags in your
vehicle are not part of this system.
The purpose of the regulation is to help
reduce the risk of injury or death from an
inflating air bag to certain front passenger
seat occupants, such as children, by requir-
ing the air bag to be automatically turned
OFF. Certain sensors are used to meet the
requirements.
The occupant classification sensor in this
vehicle is a weight sensor. It is designed to
detect an occupant and objects on the
seat by weight. For example, if a child is in
the front passenger seat, the NISSAN Ad-
vanced Air Bag System is designed to turn
the front passenger air bag and front pas-
senger supplemental knee air bag OFF in
accordance with the regulations. Also, if a
child restraint of the type specified in the
regulations is on the seat, its weight andthe child’s weight can be detected and
cause the air bags to turn OFF.
Front passenger seat adult occupants who
are properly seated and using the seat belt
as outlined in this manual should not
cause the front passenger air bag and
front passenger supplemental knee air
bag to be automatically turned OFF. For
small adults it may be turned OFF, however
if the occupant takes his/her weight off the
seat cushion (for example, by not sitting
upright, by sitting on an edge of the seat, or
by otherwise being out of position), this
could cause the sensor to turn the front
passenger air bag and front passenger
supplemental knee air bag OFF. Always be
sure to be seated and wearing the seat belt
properly for the most effective protection
by the seat belt and supplemental air bag.
NISSAN recommends that pre-teens and
children be properly restrained in a rear
seat. NISSAN also recommends that ap-
propriate child restraints and booster
seats be properly installed in a rear seat. If
this is not possible, the occupant classifica-
tion sensor is designed to operate as de-
scribed above to turn the front passenger
air bag and front passenger supplemental
knee air bag OFF for specified child re-
straints as required by the regulations. Fail-ing to properly secure child restraints and
to use the ALR mode may allow the re-
straint to tip or move in a collision or sud-
den stop. This can also result in the front
passenger air bag and front passenger
supplemental knee air bag inflating in a
crash instead of being OFF. For additional
information, see “Child restraints” (P. 1-33).
If the front passenger seat is not occupied,
the front passenger air bag and front pas-
senger supplemental knee air bag are de-
signed not to inflate in a crash. However,
heavy objects placed on the seat could re-
sult in air bag inflation, because of the ob-
ject’s weight detected by the occupant
classification sensor. Other conditions
could also result in air bag inflation, such as
if a child is standing on the seat, or if two
children are on the seat, contrary to the
instructions in this manual. Always be sure
that you and all vehicle occupants are
seated and restrained properly.
Using the front passenger air bag status
light, you can monitor when the front pas-
senger air bag and front passenger
supplemental knee air bag are automati-
cally turned OFF.
Safety-Seats, seat belts and supplemental restraint system1-71
Page 133 of 665

2. Speed and Average speed (if so
equipped)
The Speed and Average speed mode
shows the current vehicle speed and the
average vehicle speed since the last reset.
The Speed and Average speed mode has
three modes of operation. You can switch
between Manual Reset1, Manual Reset2 or
Auto Refuel by pushing the scroll dial.
Manual Reset1 can be reset manually by
using the scroll dial.
Manual Reset2 can be reset manually by
using the scroll dial or will be reset auto-
matically each time the ignition switch is
placed in the OFF position (if so equipped).
Auto Refuel will be reset automatically each
time when refueling.
3. Drive Computer
Average fuel consumption:
The average fuel consumption shows the
average fuel consumption since the last
reset.
Average speed:
The average speed shows the average ve-
hicle speed since the last reset.Trip odometer:
The trip odometer shows the total dis-
tance the vehicle has been driven since the
last reset.
Elapsed time:
The elapsed time shows the time since the
last reset.
The Drive computer mode has three
modes of operation. You can switch be-
tween Manual Reset1, Manual Reset2 or
Auto Refuel by pushing the scroll dial.
Manual Reset1 can be reset manually by
using the scroll dial.
Manual Reset2 can be reset manually by
using the scroll dial or will be reset auto-
matically each time the ignition switch is
placed in the OFF position (if so equipped).
Auto Refuel will be reset automatically each
time when refueling.
4. Fuel economy display
Current fuel consumption:
The Fuel economy display mode shows the
current fuel consumption.
Average fuel consumption:
The Fuel economy display mode shows the
average fuel consumption since the last
reset.
The Fuel economy display mode has three
modes of operation. You can switch be-
tween Manual Reset1, Manual Reset2 or
Auto Refuel by pushing the scroll dial.
Manual Reset1 can be reset manually by
using the scroll dial.
Manual Reset2 can be reset manually by
using the scroll dial or will be reset auto-
matically each time the ignition switch is
placed in the OFF position (if so equipped).
Auto Refuel will be reset automatically each
time when refueling.
5. Eco Pedal Guide
When the ECO mode is selected, you can
view ECO Pedal Guide function for improv-
ing fuel economy.
The ECO Pedal Guide mode has three
modes of operation. You can switch be-
tween Manual Reset1, Manual Reset2 or
Auto Refuel by pushing the scroll dial.
Manual Reset1 can be reset manually by
using the scroll dial.
2-26Instruments and controls
Page 134 of 665

Manual Reset2 can be reset manually by
using the scroll dial or will be reset auto-
matically each time the ignition switch is
placed in the OFF position (if so equipped).
Auto Refuel will be reset automatically each
time when refueling.
For additional information, see “ECO Mode”
(P. 5-34).
6. Tire Pressures
The tire pressure mode shows the pres-
sure of all four tires while the vehicle is
driven.
With the “Tire Pres ECO advice” function ON,
when the tire pressure is getting low,
“Check Tire Pressures for Best Fuel
Economy” or “Add air for Best Fuel
Economy” appears. For additional informa-
tion, see “ECO Mode Setting” (P. 5-34) or “Tire
Pres ECO advice” (P. 5-34).
When the “Tire Pressure Low — Add Air”
warning appears, the display can be
switched to the tire pressure mode by
pushing the scroll dial to reveal additional
details on the displayed warning.
7. Intelligent 4x4 torque
distribution display (if so
equipped)
When the Intelligent 4x4 torque distribution
display is selected, you can view the distri-
bution ratio of the transmission torque to
the front and rear wheels during driving.
8. Compass (if so equipped)
This display indicates the direction the ve-
hicle is heading.
9. Navigation (if so equipped)
When the route guidance is set in the navi-
gation system, this item shows the naviga-
tion route information.
10. Audio
The audio mode shows the status of audio
information.
11. Driver Assistance
The Driver Assistance mode shows the op-
erating condition for the following systems:
•Forward–– Automatic Emergency Braking (AEB)with Pedestrian Detection system –
– Intelligent Forward Collision Warning
(I-FCW)
• Lane: –– Lane Departure Warning (LDW)
–– Intelligent Lane Intervention (I-LI)
• Blind Spot: –– Blind Spot Warning (BSW)
–– Intelligent Blind Spot Intervention
(I-BSI) (if so equipped)
For additional information, see “Intelligent
Blind Spot Intervention (I-BSI)” (P. 5-65),
“Blind Spot Warning (BSW)” (P. 5-52), “Lane
Departure Warning (LDW)” (P. 5-38), “Auto-
matic Emergency Braking (AEB) with Pe-
destrian Detection” (P. 5-137), “Intelligent
Forward Collision Warning (I-FCW)” (P. 5-149)
or “Intelligent Lane Intervention (I-LI)”
(P. 5-45).
12. ProPILOT Assist (if so equipped)
The ProPILOT Assist mode shows operat-
ing conditions for the following systems:
• Intelligent Cruise Control (ICC)
• Steering Assist
The display will also be shown when the
ProPILOT Assist is turned on. For additional
information, see “ProPILOT Assist” (P. 5-88).
Instruments and controls2-27
Page 135 of 665

13. Traffic Sign Recognition (if so
equipped)
The Traffic Sign Recognition (TSR) system
provides the driver with information about
the most recently detected speed limit.
For additional information, see “Traffic Sign
Recognition (TSR) (P. 5-35).
14. Idling Stop System (if so
equipped)
The Idling Stop System provides the driver
with information about the amount of fuel
saved while using the system.
For additional information, see “Idling Stop
System” (P. 5-189).
OIL CONTROL SYSTEM (if so
equipped)
The oil control system can be accessed in
the Maintenance portion of the vehicle in-
formation display settings.
Engine oil information informs the distance
to oil change. Never exceed one year or
10,000 miles (16,000 km) between oil
change intervals for the 3.5L 6 cylinder
(VQ35DD engine model).
Display when
ignition is ONDisplay timing Action Re-
quired
Engine Oil Ser-
vice due in xxx
miles Remaining oil
life is less than
940 miles (1500
km). Plan to have
your vehicle
serviced.
Engine Oil Ser-
vice due Remaining oil
lifeis0miles(0
km). Have your ve-
hicle serviced
within two
weeks or less
than 500 miles
(800 km).
The oil change interval cannot be adjusted
manually.
The distance to oil change interval is calcu-
lated depending on the driving conditions
and set automatically by the oil control sys-
tem. A reminder will be displayed when ap-
proaching the end of the service interval.
When the Factory Reset option is selected
in the vehicle information display, the oil
control system will also be reset to initial
value. Please change the engine oil when
Factory Reset is selected.
CAUTION
If the oil replacement indicator is dis-
played, change the engine oil within
two weeks or less than 500 miles (800
km).
Operating the vehicle with deteriorated
oil can damage the engine.
To reset oil control system:
1. Place the ignition switch in the ON position.
2. Push the
andbuttons located
on the steering wheel until “Settings” dis-
plays in the vehicle information display.
Use the scroll dial to select “Mainte-
nance”. Then, press the scroll dial.
3. Select the “Service” and press the scroll dial.
4. Press the scroll dial according to the re- set instructions displayed at the bottom
of the “Service” maintenance screen.
For additional information, see “Mainte-
nance” (P. 2-62).
2-28Instruments and controls
Page 136 of 665

SETTINGS
The setting mode allows you to change the
information displayed in the vehicle infor-
mation display:
• VDC Setting• Driver Assistance
• ECO Mode Setting
• TPMS Setting
• Clock
• Vehicle Settings• Maintenance
• Customize Display
• Unit/Language
• Key-Linked Settings (if so equipped)
• Factory Reset
VDC Setting
The VDC Setting menu allows the user to enable or disable the Vehicle Dynamic Control (VDC) system.
Some menu items shown below may not be equipped on your vehicle.
Menu item
Explanation
System Allows the user to turn the VDC system on or off. For additional information, see “Vehicle Dynamic Control
(VDC) system” (P. 5-177).
Instruments and controls2-29
Page 138 of 665

Menu itemExplanation
Front Sonar Allows user to turn the front sonar on or off.
Rear Sonar Allows user to turn the rear sonar on or off.
Sonar Distance Allows user to set the distance sensor range to Long/Medium/Short.
Sonar Volume Allows the user to set the parking sensor volume to High/Medium/Low.
Rear Cross Traffic Alert Allows user to turn the Rear Cross Traffic Alert (RCTA) system on or off. For additional information, see “Rear Cross Traffic A lert
(RCTA)” (P. 5-77).
Driver Alertness Allows user to turn the Intelligent Driver Alertness on or off. For additional information, see “Intelligent Driver Alertness (I-D A)”
(P. 5-165).
Timer Alert Allows user to set the timer alert.
Low Temp. Alert Allows user to turn the low temperature alert on or off.
ECO Mode Setting
The ECO mode setting menu allows the user to change the settings for the ECO mode.
Some menu items shown below may not be equipped on your vehicle.
Menu item Explanation
ECO Customize Displays available ECO mode settings.
Cruise Control Allows user to turn the cruise control ECO option on or off. For additional information, see “Cruise Control” (P. 5-87).
Idling stop Allows user to turn the Idling Stop System (ISS) ECO option on or off. For additional information, see “Idling Stop
System” (P. 5-189).
Air Conditioning Allows user to turn the Air Conditioning ECO option on or off. For additional information, see “ECO Customize”
(P. 5-34).
ECO Drive Assist Displays available ECO information settings.
ECO Indicator Allows user to turn the ECO indicator on or off.
ECO Drive Report Allows user to turn the ECO Drive Report on or off.
View History Displays the history report for the vehicle.
Tire Pres ECO advice Allows user to turn the tire pressure ECO advice on or off.
Instruments and controls2-31
Page 147 of 665

Check Rear Seat For All Articles
When the system is enabled, this message
appears when the vehicle comes to a com-
plete stop, the vehicle is transitioned from
the D (Drive) position to P (Park) position,
and the driver exits the vehicle. This mes-
sage alerts the driver, af ter a period of time,
to check for items in the rear seat af ter the
audible alert has been provided.
NOTE:
This system is disabled until a driver en-
ables it using the vehicle information
display. For additional information, see
“How to use the vehicle information dis-
play ” (P. 2-24).
For additional information, see “Rear Door
Alert” (P. 2-100).
Rear Door Alert is activated
When the system is enabled, this message
appears when the Rear Door Alert system
is active and can remind the driver to check
the back seat.
• Using the steering wheel switch, a drivercan select “Dismiss Message” to clear the
display for a period of time. If no selection
is made, this message automatically
turns off af ter a period of time. • Using the steering wheel switch, a driver
can select “Disable Alert” to disable the
horn alert for the remainder of the cur-
rent trip.
WARNING
Selecting “Dismiss Message” during a
stop within a trip temporarily dis-
misses the message for that stop with-
out turning the system off. Alerts can
be provided for other stops during the
trip. Selecting “Disable Alert” turns off
the Rear Door Alert system for the re-
mainder of a trip and no audible alert
will be provided.
NOTE:
This system is disabled until a driver en-
ables it using the vehicle information
display. For additional information, see
“How to use the vehicle information dis-
play ” (P. 2-24).
For additional information, see “Rear Door
Alert” (P. 2-100).
Door/Lif tgate Open
This warning appears when a door or the
lif tgate has been opened.
Drive Mode Selector indicator
When a driving mode is selected using the
Drive Mode Selector, the selected mode in-
dicator is displayed.
• SAND (4WD models)
• MUD/RUT (4WD models)
• SNOW
• STANDARD (2WD models)
• AUTO (4WD models)
•ECO
• SPORT
•TOW
For additional information, see “Drive Mode
Selector” (P. 5-31).
Headlight System Error: See Owner’s
Manual
This warning appears when there is an er-
ror with the system. For additional informa-
tion, see “Headlight and turn signal switch”
(P. 2-82).
2-40Instruments and controls