2023 NISSAN MURANO ECO mode
[x] Cancel search: ECO modePage 6 of 518
For descriptions specified for all-wheel drive
models, anAWDmark is placed at the begin-
ning of the applicable sections/items.
As with other vehicles with features for
off- road use, failure to operate all-wheel
drive models correctly may result in loss
of control or an accident. For additional
information, see “Driving safety precau-
tions” (P. 5-11).
ON-PAVEMENT AND OFF-ROAD DRIVING
This vehicle will handle and maneuver
differently from an ordinary passenger
car because it has a higher center of
gravity for off-road use. As with other
vehicles with features of this type, fail-
ure to operate this vehicle correctly may
result in loss of control or an accident.
For additional information, see “On-
pavement and off-road driving precau-
tions” (P. 5-9), “Avoiding collision and
roll-over” (P. 5-9) and “Driving safety
precautions” (P. 5-11).
MODIFICATION OF YOUR VEHICLE
This vehicle should not be modified.
Modification could affect its perfor-
mance, safety, emissions or durability
and may even violate governmental
regulations. In addition, damage or
performance problems resulting from
modifications may not be covered un-
der NISSAN warranties.
WARNING
Installing an af termarket On-Board Di-
agnostic (OBD) plug-in device that uses
the port during normal driving, for ex-
ample remote insurance company
monitoring, remote vehicle diagnos-
tics, telematics or engine reprogram-
ming, may cause interference or dam-
age to vehicle systems. We do not
recommend or endorse the use of any
af termarket OBD plug-in devices, un-
less specifically approved by NISSAN.
The vehicle warranty may not cover
damage caused by any af termarket
plug-in device. This manual includes information for all
features and equipment available on this
model. Features and equipment in your ve-
hicle may vary depending on model, trim
level, options selected, order, date of pro-
duction, region or availability. Therefore,
you may find information about features or
equipment that are not included or in-
stalled on your vehicle.
All information, specifications and illustrations
in this manual are those in effect at the time of
printing. NISSAN reserves the right to change
specifications, performance, design or com-
ponent suppliers without notice and without
obligation. From time to time, NISSAN may up-
date or revise this manual to provide Owners
with the most accurate information currently
available. Please carefully read and retain with
this manual all revision updates sent to you by
NISSAN to ensure you have access to accurate
and up-to-date information regarding your
vehicle. Current versions of vehicle Owner's
Manuals and any updates can also be found in
the Owner section of the NISSAN website at
https://owners.nissanusa.com/nowners/
navigation/manualsGuide. If you have ques-
tions concerning any information in your
Owner's Manual, contact NISSAN Consumer
Affairs. For contact information, refer to the
NISSAN CUSTOMER CARE PROGRAM page in
this Owner’s Manual.
WHEN READING THE MANUAL
Page 37 of 518
THREE-POINT TYPE SEAT BELT
WITH RETRACTOR
WARNING
• Every person who drives or rides in
this vehicle should use a seat belt at
all times. Children should be in the
rear seats and in an appropriate
restraint.
• Do not ride in a moving vehicle when
the seatback is reclined. This can be
dangerous. The shoulder belt will not
be against your body. In an accident,
you could be thrown into it and re-
ceive neck or other serious injuries.
You could also slide under the lap belt
and receive serious internal injuries.
• For the most effective protection
when the vehicle is in motion, the
seat should be upright. Always sit
well back and upright in the seat with
both feet on the floor and adjust the
seat belt properly. •
Do not allow children to play with the
seat belts. Most seating positions are
equipped with Automatic Locking
Retractor (ALR) mode seat belts. If
the seat belt becomes wrapped
around a child’s neck with the ALR
mode activated, the child can be se-
riously injured or killed if the seat belt
retracts and becomes tight. This can
occur even if the vehicle is parked.
Unbuckle the seat belt to release the
child. If the seat belt cannot be un-
buckled or is already unbuckled, re-
lease the child by cutting the seat
belt with a suitable tool (such as a
knife or scissors) to release the seat
belt.
Fastening the seat belts
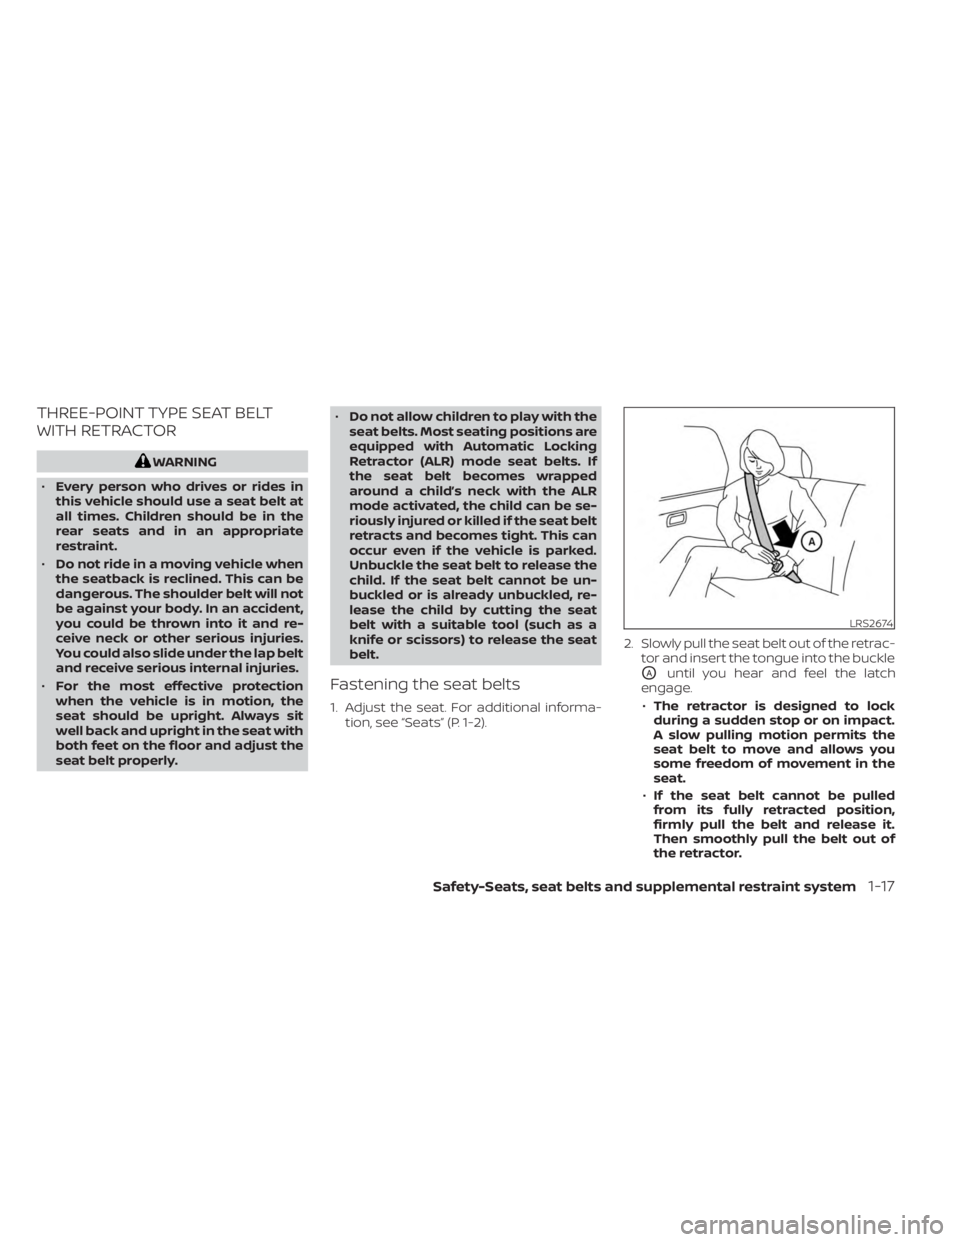
1. Adjust the seat. For additional informa- tion, see “Seats” (P. 1-2). 2. Slowly pull the seat belt out of the retrac-
tor and insert the tongue into the buckle
OAuntil you hear and feel the latch
engage.
• The retractor is designed to lock
during a sudden stop or on impact.
A slow pulling motion permits the
seat belt to move and allows you
some freedom of movement in the
seat.
• If the seat belt cannot be pulled
from its fully retracted position,
firmly pull the belt and release it.
Then smoothly pull the belt out of
the retractor.
LRS2674
Safety-Seats, seat belts and supplemental restraint system1-17
Page 44 of 518
WARNING
Do not allow children to play with the
seat belts. Most seating positions are
equipped with Automatic Locking Re-
tractor (ALR) mode seat belts. If the seat
belt becomes wrapped around a child’s
neck with the ALR mode activated, the
child can be seriously injured or killed if
the seat belt retracts and becomes
tight. This can occur even if the vehicle
is parked. Unbuckle the seat belt to re-
lease the child. If the seat belt cannot
be unbuckled or is already unbuckled,
release the child by cutting the seat
belt with a suitable tool (such as a knife
or scissors) to release the seat belt.
Children need adults to help protect them.
They need to be properly restrained.
In addition to the general information in
this manual, child safety information is
available from many other sources, includ-
ing doctors, teachers, government traffic
safety offices, and community organiza-
tions. Every child is different, so be sure to
learn the best way to transport your child. There are three basic types of child re-
straint systems:
• Rear-facing child restraints
• Forward-facing child restraints
• Booster seats
The proper restraint depends on the child's
size. Generally, infants up to about 1 year
and less than 20 lbs. (9 kg) should be placed
in rear-facing child restraints. Forward-
facing child restraints are available for chil-
dren who outgrow rear-facing child re-
straints and are at least 1 year old. Booster
seats are used to help position a vehicle
lap/shoulder belt on a child who can no
longer use a forward-facing child restraint.
WARNING
Infants and children need special pro-
tection. The vehicle's seat belts may
not fit them properly. The shoulder belt
may come too close to the face or neck.
The lap belt may not fit over their small
hip bones. In an accident, an improp-
erly fitting seat belt could cause serious
or fatal injury. Always use appropriate
child restraints.
All U.S. states and Canadian provinces or
territories require the use of approved child
restraints for infants and small children. For additional information, see “Child re-
straints” (P. 1-26).
A child restraint may be secured in the ve-
hicle by using either the LATCH (Lower An-
chors and Tethers for CHildren) system or
with the vehicle seat belt. For additional
information, see “Child restraints” (P. 1-26).
NISSAN recommends that all pre-teens
and children be restrained in the rear
seat. Studies show that children are
safer when properly restrained in the
rear seat than in the front seat.
This is especially important because
your vehicle has a supplemental re-
straint system (air bag system) for the
front passenger. For additional informa-
tion, see “Supplemental Restraint Sys-
tem (SRS)” (P. 1-48).
INFANTS
Infants up to at least 1 year old should be
placed in a rear-facing child restraint.
NISSAN recommends that infants be
placed in child restraints that comply with
Federal Motor Vehicle Safety Standards or
Canadian Motor Vehicle Safety Standards.
You should choose a child restraint that fits
your vehicle and always follow the manu-
facturer's instructions for installation and
use.
CHILD SAFETY
1-24Safety-Seats, seat belts and supplemental restraint system
Page 63 of 518
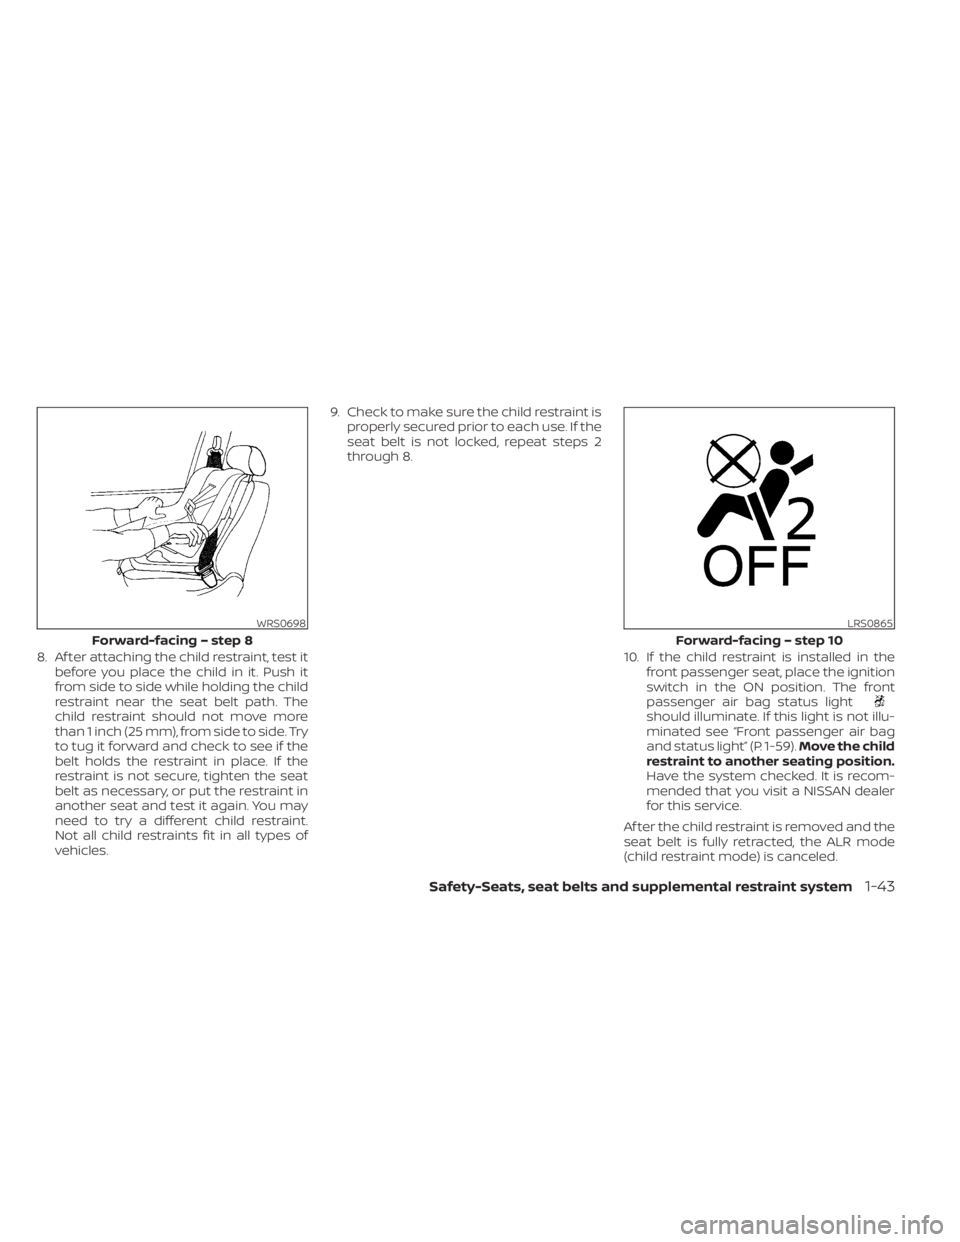
8. Af ter attaching the child restraint, test itbefore you place the child in it. Push it
from side to side while holding the child
restraint near the seat belt path. The
child restraint should not move more
than 1 inch (25 mm), from side to side. Try
to tug it forward and check to see if the
belt holds the restraint in place. If the
restraint is not secure, tighten the seat
belt as necessary, or put the restraint in
another seat and test it again. You may
need to try a different child restraint.
Not all child restraints fit in all types of
vehicles. 9. Check to make sure the child restraint is
properly secured prior to each use. If the
seat belt is not locked, repeat steps 2
through 8.
10. If the child restraint is installed in thefront passenger seat, place the ignition
switch in the ON position. The front
passenger air bag status light
should illuminate. If this light is not illu-
minated see “Front passenger air bag
and status light” (P. 1-59). Move the child
restraint to another seating position.
Have the system checked. It is recom-
mended that you visit a NISSAN dealer
for this service.
Af ter the child restraint is removed and the
seat belt is fully retracted, the ALR mode
(child restraint mode) is canceled.
WRS0698
Forward-facing – step 8
LRS0865
Forward-facing – step 10
Safety-Seats, seat belts and supplemental restraint system1-43
Page 80 of 518
Front passenger air bag
The front passenger air bag is designed to
automatically turn OFF when the vehicle is
operated under some conditions as de-
scribed below in accordance with U.S. regu-
lations. If the front passenger air bag is OFF,
it will not inflate in a crash. The driver air bag
and other air bags in your vehicle are not
part of this system.
The purpose of the regulation is to help
reduce the risk of injury or death from an
inflating air bag to certain front passenger
seat occupants, such as children, by requir-
ing the air bag to be automatically turned
OFF. Certain sensors are used to meet the
requirements.
The occupant classification sensor in this
vehicle is a weight sensor. It is designed to
detect an occupant and objects on the
seat by weight. For example, if a child is in
the front passenger seat, the NISSAN Ad-
vanced Air Bag System is designed to turn
the front passenger air bag OFF in accor-
dance with the regulations. Also, if a child
restraint of the type specified in the regula-
tions is on the seat, its weight and the
child’s weight can be detected and cause
the air bag to turn OFF.Front passenger seat adult occupants who
are properly seated and using the seat belt
as outlined in this manual should not
cause the front passenger air bag and
front passenger supplemental knee air
bag to be automatically turned OFF. For
small adults it may be turned OFF, however
if the occupant takes his/her weight off the
seat cushion (for example, by not sitting
upright, by sitting on an edge of the seat, or
by otherwise being out of position), this
could cause the sensor to turn the front
passenger air bag and front passenger
supplemental knee air bag OFF. Always be
sure to be seated and wearing the seat belt
properly for the most effective protection
by the seat belt and supplemental air bag.
NISSAN recommends that pre-teens and
children be properly restrained in a rear
seat. NISSAN also recommends that ap-
propriate child restraints and booster
seats be properly installed in a rear seat. If
this is not possible, the occupant classifica-
tion sensor is designed to operate as de-
scribed above to turn the front passenger
air bag and front passenger supplemental
knee air bag OFF for specified child re-
straints as required by the regulations.
Failing to properly secure child restraints
and to use the ALR mode may allow the
restraint to tip or move in a collision orsudden stop. This can also result in the
passenger air bag and front passenger
supplemental knee air bag inflating in a
crash instead of being OFF. For additional
information about proper use and installa-
tion, see “Child restraints” (P. 1-26).
If the front passenger seat is not occupied,
the front passenger air bag and front pas-
senger supplemental knee air bag are de-
signed not to inflate in a crash. However,
heavy objects placed on the seat could re-
sult in air bag inflation, because of the ob-
ject’s weight detected by the occupant
classification sensor. Other conditions
could also result in air bag inflation, such as
if a child is standing on the seat, or if two
children are on the seat, contrary to the
instructions in this manual. Always be sure
that you and all vehicle occupants are
seated and restrained properly.
Using the front passenger air bag status
light, you can monitor when the front pas-
senger air bag and front passenger
supplemental knee air bag are automati-
cally turned OFF.
If an adult occupant is in the seat but the
front passenger air bag status light is illu-
minated (indicating that the front passen-
ger air bag and front passenger supple-
mental knee air bag are OFF), it could be
1-60Safety-Seats, seat belts and supplemental restraint system
Page 111 of 518
2.— go back or forward
through the vehicle information menu
items or to change from one display
screen to the next (i.e. trip, TPMS, fuel
economy).
The OK and
buttons also
control audio and control panel functions
in some conditions. Most screens and
menus offer instruction prompts of the
steering switch buttons to indicate how to
control the vehicle information display. An
orange cursor is shown to indicate where
you are in the available menu items. A scroll
bar with up and down arrows will appear if
there is more than one page of menu
items. For additional information, refer to
the separate NissanConnect® Owner’s
Manual.
STARTUP DISPLAY
When the vehicle in placed in the ON or ACC
position the screens that display in the ve-
hicle information display include:
• Home
• Audio
• Navigation (if so equipped)
• Drive computer
• Fuel economy
• Driving aids (if so equipped)
• Speed Limit Sign (if so equipped)
• Tire pressure information
• Warning review
• Settings
The warnings review title screen will show
how many active warnings exist, or “No
items to review” in the event that no warn-
ings are active. For additional information
on warnings and indicators, see “Vehicle
information display warnings and indica-
tors” (P. 2-26).
To control what items display in the vehicle
information display, see “Customize Dis-
play” (P. 2-21).
SETTINGS
The setting mode allows you to change the
information displayed in the vehicle infor-
mation display:
• Driver Assistance
• Customize Display
• Vehicle Settings
• Maintenance
• Clock
• TPMS Settings
• Unit / Language
• Key-Linked Settings
• Factory Reset
Instruments and controls2-19
Page 113 of 518
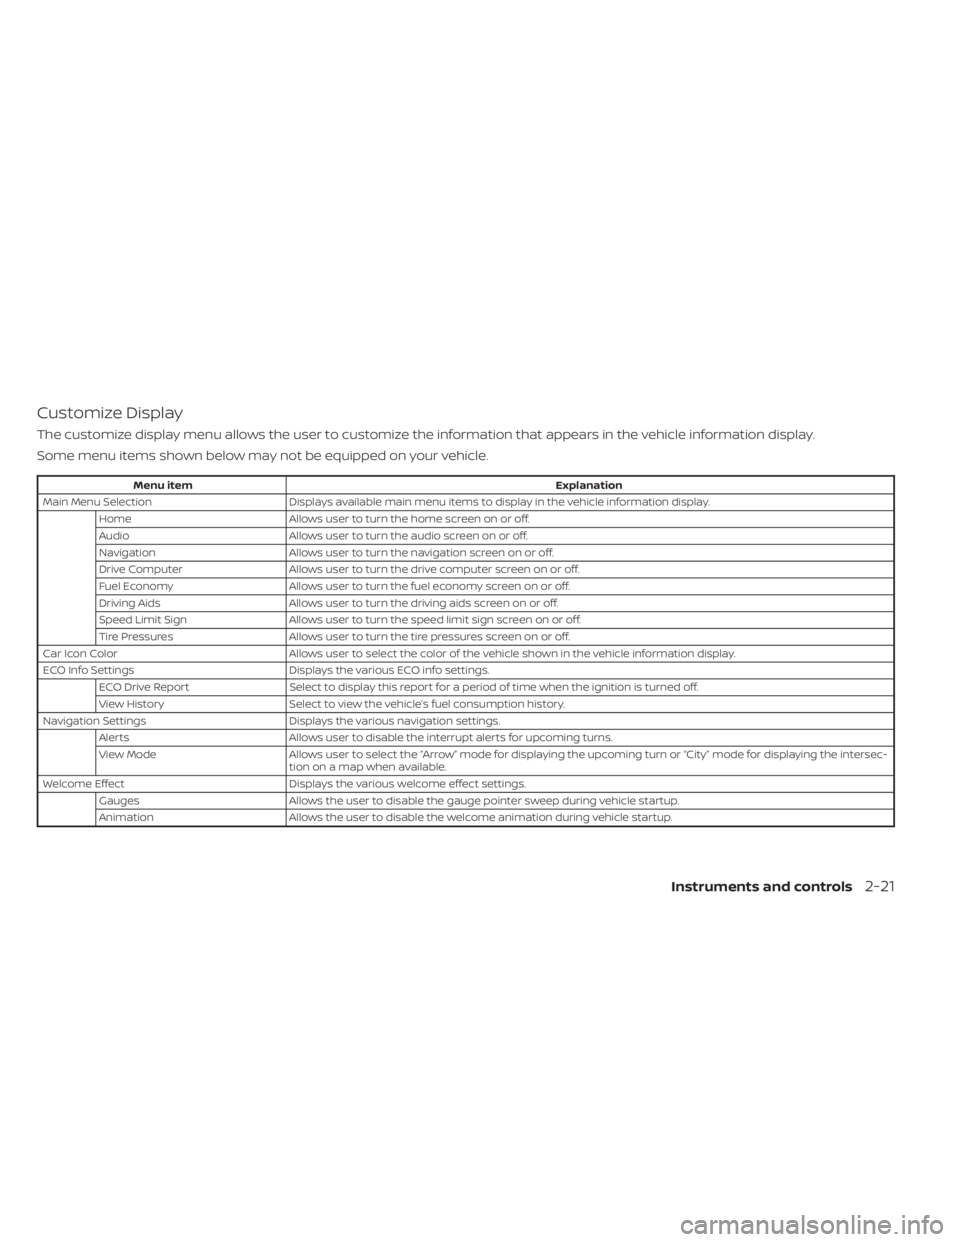
Customize Display
The customize display menu allows the user to customize the information that appears in the vehicle information display.
Some menu items shown below may not be equipped on your vehicle.
Menu itemExplanation
Main Menu Selection Displays available main menu items to display in the vehicle information display.
Home Allows user to turn the home screen on or off.
Audio Allows user to turn the audio screen on or off.
Navigation Allows user to turn the navigation screen on or off.
Drive Computer Allows user to turn the drive computer screen on or off.
Fuel Economy Allows user to turn the fuel economy screen on or off.
Driving Aids Allows user to turn the driving aids screen on or off.
Speed Limit Sign Allows user to turn the speed limit sign screen on or off.
Tire Pressures Allows user to turn the tire pressures screen on or off.
Car Icon Color Allows user to select the color of the vehicle shown in the vehicle information display.
ECO Info Settings Displays the various ECO info settings.
ECO Drive Report Select to display this report for a period of time when the ignition is turned off.
View History Select to view the vehicle’s fuel consumption history.
Navigation Settings Displays the various navigation settings.
Alerts Allows user to disable the interrupt alerts for upcoming turns.
View Mode Allows user to select the “Arrow” mode for displaying the upcoming turn or “City” mode for displaying the intersec-
tion on a map when available.
Welcome Effect Displays the various welcome effect settings.
Gauges Allows the user to disable the gauge pointer sweep during vehicle startup.
Animation Allows the user to disable the welcome animation during vehicle startup.
Instruments and controls2-21
Page 121 of 518
Shif t to Park
This warning appears when the ignition
switch is in the ACC or OFF position and the
shif t lever is not in the P (Park) position. Also,
a chime sounds when the ignition switch is
in the ACC or OFF position.
If this warning appears, move the shif t lever
to the P (Park) position or start the engine.
Shipping Mode On Push Storage Fuse
This warning may appear if the extended
storage switch is not pushed in. When this
warning appears, push in the extended
storage switch to turn off the warning. For
additional information, see “Extended stor-
age switch” (P. 2-55).
Tire Pressure Low - Add Air
This warning appears when the low tire
pressure warning light in the meter illumi-
nates and low tire pressure is detected. The
warning appears each time the ignition
switch is placed in the ON position as long
as the low tire pressure warning light re-
mains illuminated. If this warning appears,
stop the vehicle and adjust the tire pres-
sures of all four tires to the recommended
COLD tire pressure shown on the Tire and
Loading Information label. For additionalinformation, see “Low tire pressure warning
light” (P. 2-13) and “Tire Pressure Monitoring
System (TPMS)” (P. 5-5).
Transmission Shif t Position
indicator
This indicator shows the transmission shif t
position.
AWD Error: See Owner’s
Manual
This warning appears when the all-wheel
drive system is not functioning properly
while the engine is running.
AWD High Temp. Stop
Vehicle
This warning may appear while trying to
free a stuck vehicle due to increased oil
temperature. The driving mode may
change to 2-Wheel Drive (2WD). If this
warning is displayed, stop the vehicle with
the engine idling, as soon as it is safe to do
so. Then if the warning turns off, you can
continue driving.
Tire Size Incorrect: See
Owner’s Manual
This warning may appear if there is a large
difference between the diameters of the
front and rear wheels. Pull off the road in a
safe area, with the engine idling. Check that
all the tire sizes are the same, that the tire
pressure is correct and that the tires are
not excessively worn.
CVT Error: See Owner's
Manual
This warning appears when the there is a
problem with the CVT system. If this
warning appears, have the system
checked. It is recommended that you visit a
NISSAN dealer for this service.
Alarm - Time for a break?
This indicator appears when the driver en-
ables the timer alert function within the
driver assistance settings and the selected
set time is expired. The time is based on
ignition on time and can be set up to six
hours.
Automatic Emergency
Braking (AEB) with
Pedestrian Detection
emergency warning
indicator
This indicator appears along with an au-
dible warning, when the system detects
the possibility of a forward collision.
Instruments and controls2-29