2023 NISSAN MURANO ECO mode
[x] Cancel search: ECO modePage 166 of 518
2. Using both hands, simultaneously pressand hold the desired HomeLink® button
and the hand-held transmitter button.
During training, your hand-held trans-
mitter may automatically stop transmit-
ting. Continue to press and hold the de-
sired HomeLink® button while you press
and re-press (“cycle”) your hand-held
transmitter every 2 seconds until the
frequency signal has been learned. The
HomeLink® indicator light will flash
slowly and then rapidly af ter several
seconds upon successful training. DO
NOT release until the HomeLink® indica-
tor light flashes slowly and then rapidly.
When the indicator light flashes rapidly,
both buttons may be released. The rapid
flashing indicates successful training.
Proceed with “Programming HomeLink®”
step 3 to complete.
If the device was unplugged during the
programming procedure, remember to
plug it back in when programming is
completed.
OPERATING THE HOMELINK®
UNIVERSAL TRANSCEIVER
The HomeLink® Universal Transceiver, af ter
it is programmed, can be used to activate
the programmed device. To operate, sim- ply press and release the appropriate pro-
grammed HomeLink® Universal Trans-
ceiver button. The amber indicator light
will illuminate while the signal is being
transmitted.
For convenience, the hand-held transmit-
ter of the device may also be used at any
time.
PROGRAMMING TROUBLE-
DIAGNOSIS
If the HomeLink® does not quickly learn the
hand-held transmitter information:
• replace the hand-held transmitter bat-
teries with new batteries.
• position the hand-held transmitter with its battery area facing away from the
HomeLink® surface.
• press and hold both the HomeLink® and hand-held transmitter buttons without
interruption.
• position the hand-held transmitter1-3in (26 - 76 mm) away from the HomeLink®
surface. Hold the transmitter in that posi-
tion for up to 15 seconds. If HomeLink® is
not programmed within that time, try
holding the transmitter in another posi-
tion – keeping the indicator light in view at
all times. If you have any questions or are having
difficulty programming your HomeLink®
buttons, refer to the HomeLink® web site at:
www.homelink.com or call 1-800-355-3515.
CLEARING THE PROGRAMMED
INFORMATION
The following procedure clears the pro-
grammed information from both buttons.
Individual buttons cannot be cleared. How-
ever, individual buttons can be repro-
grammed. For additional information, see
“Reprogramming a single HomeLink® but-
ton” (P. 2-75).
To clear all programming:
1. Press and hold the two outer HomeLink®
buttons until the indicator light begins to
flash in approximately 10 seconds. Do
not hold for longer than 20 seconds.
2. Release both buttons.
HomeLink® is now in the programming
mode and can be programmed at any
time beginning with “Programming
HomeLink®” - Step 1 (P. 2-72).
2-74Instruments and controls
Page 183 of 518
Closing windows (if so equipped)
WARNING
When the closing feature is operating,
parts of the body could become
trapped in the closing area of the side
window. There is a risk of injury. Ob-
serve the complete closing procedure
when the closing feature is operating.
When closing, make sure that no parts
of the body are in the closing area. No
one/no pets should be lef t in the car
when locking doors, raising windows
and leaving.
The Intelligent Key allows you to simultane-
ously close windows equipped with auto-
matic operation.
All doors must be closed and the key must
be outside the vehicle.
To close the windows, press and hold the
button on the Intelligent Key for lon-
ger than 3 seconds af ter all doors are
locked.
The door windows will close while pressing
the
button on the Intelligent Key.
To interrupt closing of the windows, release
the
button.
Releasing the rear lif tgate (if so
equipped)
The rear lif tgate can be opened and closed
by performing the following:
• Press the
button for longer than 1
second to open the rear lif tgate.
• Press the
button again for longer
than 1 second to close the rear lif tgate.
When the
button is pressed during
the open or close process, the lif tgate
motors will stop. When the
button is
pressed again for longer than 1 second the
lif tgate will reverse direction.
Using the panic alarm
If you are near your vehicle and feel threat-
ened, you may activate the panic alarm to
call attention by pressing and holding the
button on the Intelligent Key for lon-
ger than 0.5 seconds.
The panic alarm and headlights will stay on
for a period of time.
The panic alarm stops when:
• It has run for a period of time.
• Any button is pressed on the Intelligent Key. • The request switch on the driver or pas-
senger door is pushed and the Intelligent
Key is in range of the door handle.
Answer back horn feature
If desired, the answer back horn feature
can be deactivated using the Intelligent
Key. When it is deactivated and the
button is pressed, the hazard indicator
lights flash twice. When thebutton is
pressed, neither the hazard indicator lights
nor the horn operates.
NOTE:
If you change the Answer Back Horn
feature with the Intelligent Key, the ve-
hicle information display screen will
show the current mode af ter the igni-
tion switch has been cycled from the
OFF to the ON position. The vehicle in-
formation display screen can also be
used to change the answer back horn
mode.
For additional information, see “Ve-
hicle settings” (P. 2-18).
Pre-driving checks and adjustments
3-15
Page 186 of 518
Thebutton will be on the NISSAN
Intelligent Key® if the vehicle has Remote
Engine Start. This feature allows the engine
to start from outside the vehicle.
Vehicles with an automatic climate control
system may default to either a heating or
cooling mode depending on outside and
cabin temperatures. For additional infor-
mation, see “Remote Engine Start with In-
telligent Climate Control” (P. 4-30).
Laws in some local communities may re-
strict or prohibit the use of Remote Engine
Start, or the amount of time a parked ve-
hicle engine may idle. For example, some
laws require a person using Remote Engine Start to have the vehicle in view or may
restrict idling time except in freezing tem-
peratures. Check local regulations for any
requirements.
Other conditions may affect the function of
the Remote Engine Start feature. For addi-
tional information, see “Conditions the Re-
mote Engine Start will not work” (P. 3-20).
Other conditions can affect the perfor-
mance of the Intelligent Key transmitter.
For additional information, see “NISSAN In-
telligent Key® system” (P. 3-7).
REMOTE ENGINE START
OPERATING RANGE
WARNING
• To help avoid risk of injury or death
through unintended operation of the
vehicle and/or its systems, including
entrapment in windows or inadver-
tent door lock activation, do not
leave children, people who require
the assistance of others or pets unat-
tended in your vehicle. Additionally,
the temperature inside a closed ve-
hicle on a warm day can quickly be-
come high enough to cause a signifi-
cant risk of injury or death to people
and pets. •
Do not use Remote Engine Start in
closed spaces such as a garage. Do
not breathe exhaust gases; they con-
tain colorless and odorless carbon
monoxide. Carbon monoxide is dan-
gerous. It can cause unconscious-
ness or death.
CAUTION
When the Intelligent Key battery is dis-
charged or other strong radio wave
sources are present near the operating
location, the Intelligent Key operating
range becomes narrower, and the Intel-
ligent Key may not function properly.
The Remote Engine Start function can only
be used when the Intelligent Key is within
the specified operating range from the
vehicle.
The Remote Engine Start operating range
is approximately 197 f t (60 m) from the
vehicle.
LPD2995
REMOTE ENGINE START (if so
equipped)
3-18Pre-driving checks and adjustments
Page 192 of 518
• If the lif tgate close switchOBis activated
while the cinching motor is engaged, the
cinching motor will disengage and re-
lease the latch.
• The Intelligent Key button must be held for 1 second before the lif tgate closes.
Reverse:
The power lif tgate will stop immediately
during power open or power close if the
Intelligent Key switch, instrument panel
switch, lif tgate opener switch
OAor lif tgate
close switch
OBis pushed. The power lif t-
gate will reverse direction if the Intelligent
Key switch, instrument panel switch, lif t-
gate opener switch
OAor lif tgate close
switch
OBis pushed a second time. A
chime will sound to announce the reversal.
Auto Reverse:
If an obstacle is detected during power
open or power close, a warning chime will
sound and the lif tgate will reverse direction
and return to the full open or full close po-
sition. If a second obstacle is detected, the
lif tgate motion will stop and the lif tgate will
enter manual mode.
A pinch strip is mounted on each side of
the lif tgate. If an obstacle is detected by a
pinch strip during power close, the lif tgate
will reverse direction and return to the full
open position.
NOTE:
If the pinch strip is damaged or removed,
the power close function will not operate.
WARNING
There are some small distances imme-
diately before the closed position
which cannot be detected. Make sure
that all passengers have their hands,
etc., inside the vehicle before closing
the lif tgate.
Manual Mode:
If power operation is not available, the lif t-
gate may be operated manually. Power op-
eration may not be available if multiple ob-
stacles have been detected in a single
power cycle or if battery voltage is low.
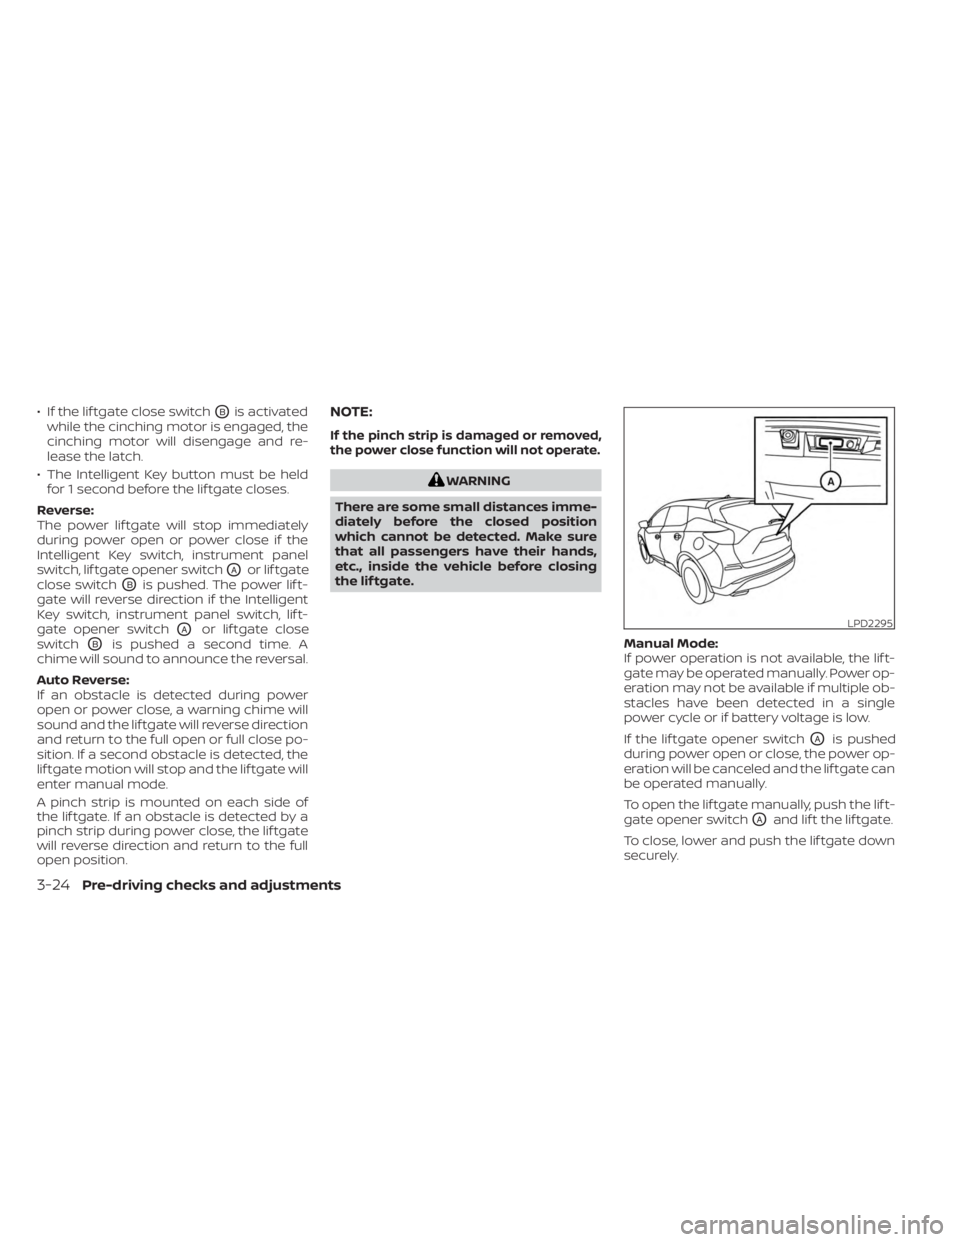
If the lif tgate opener switch
OAis pushed
during power open or close, the power op-
eration will be canceled and the lif tgate can
be operated manually.
To open the lif tgate manually, push the lif t-
gate opener switch
OAand lif t the lif tgate.
To close, lower and push the lif tgate down
securely.
LPD2295
3-24Pre-driving checks and adjustments
Page 193 of 518
Auto Power Lif tgate System Battery
Power Saving Mode:
The vehicle goes into power saving mode
when the lif tgate is open for a long time
(approximately 12 hours). This is to prevent
deterioration of the battery. The power
saving mode automatically cuts the power
supply of the power lif tgate door.
When the power to the lif tgate is cut off, the
manual mode must be performed. Af ter
the manual mode is performed, the power
lif tgate function is restored.
NOTE:
When a battery voltage is lower than ap-
proximately 11V, the power lif tgate may
not operate af ter automatic return.
MOTION-ACTIVATED LIFTGATE
(if so equipped)
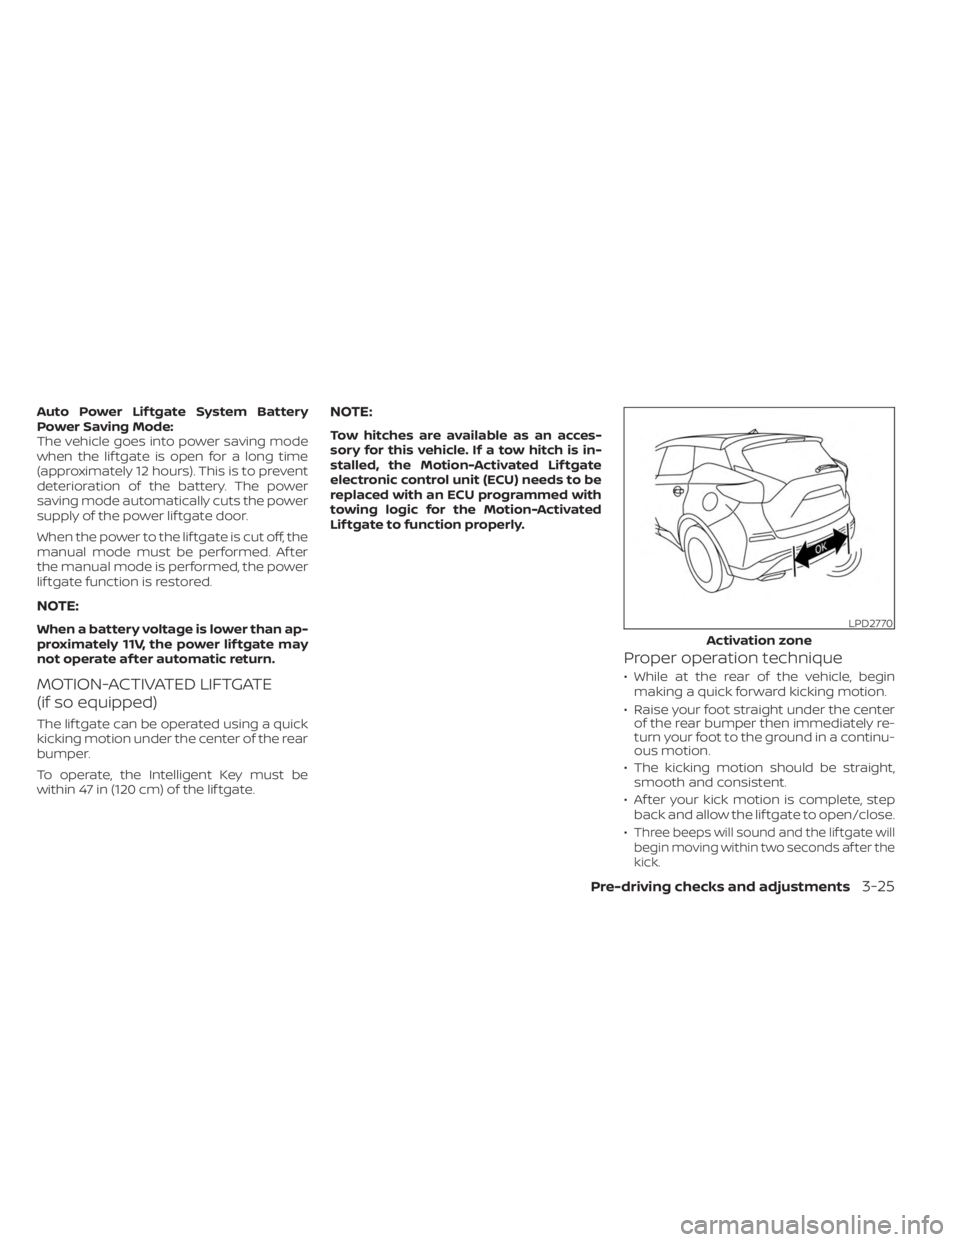
The lif tgate can be operated using a quick
kicking motion under the center of the rear
bumper.
To operate, the Intelligent Key must be
within 47 in (120 cm) of the lif tgate.
NOTE:
Tow hitches are available as an acces-
sory for this vehicle. If a tow hitch is in-
stalled, the Motion-Activated Lif tgate
electronic control unit (ECU) needs to be
replaced with an ECU programmed with
towing logic for the Motion-Activated
Lif tgate to function properly.
Proper operation technique
• While at the rear of the vehicle, beginmaking a quick forward kicking motion.
• Raise your foot straight under the center of the rear bumper then immediately re-
turn your foot to the ground in a continu-
ous motion.
• The kicking motion should be straight, smooth and consistent.
• Af ter your kick motion is complete, step back and allow the lif tgate to open/close.
•
Three beeps will sound and the lif tgate will
begin moving within two seconds af ter the
kick.
LPD2770
Activation zone
Pre-driving checks and adjustments3-25
Page 196 of 518
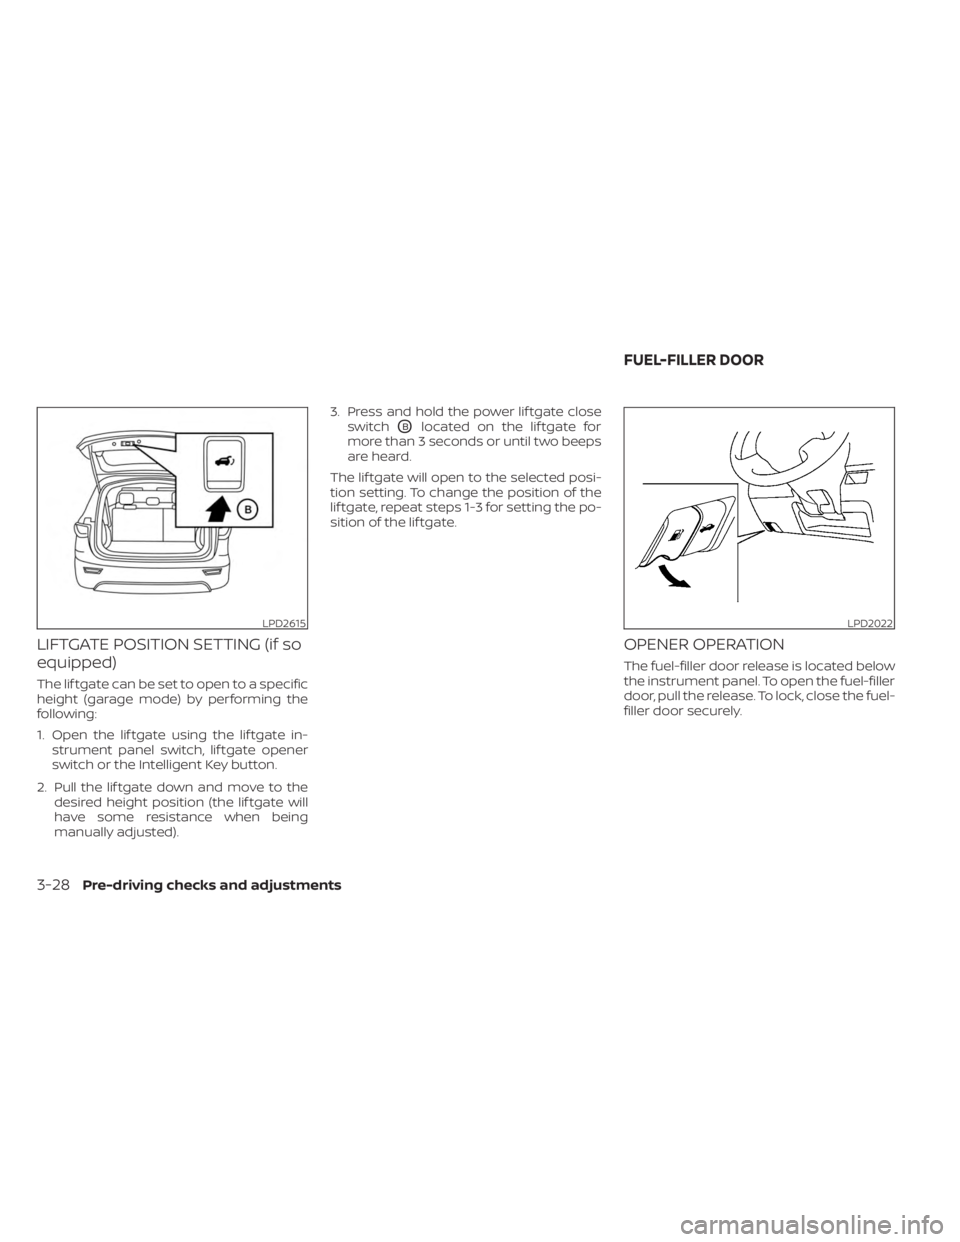
LIFTGATE POSITION SETTING (if so
equipped)
The lif tgate can be set to open to a specific
height (garage mode) by performing the
following:
1. Open the lif tgate using the lif tgate in-strument panel switch, lif tgate opener
switch or the Intelligent Key button.
2. Pull the lif tgate down and move to the desired height position (the lif tgate will
have some resistance when being
manually adjusted). 3. Press and hold the power lif tgate close
switch
OBlocated on the lif tgate for
more than 3 seconds or until two beeps
are heard.
The lif tgate will open to the selected posi-
tion setting. To change the position of the
lif tgate, repeat steps 1-3 for setting the po-
sition of the lif tgate.
OPENER OPERATION
The fuel-filler door release is located below
the instrument panel. To open the fuel-filler
door, pull the release. To lock, close the fuel-
filler door securely.
LPD2615LPD2022
FUEL-FILLER DOOR
3-28Pre-driving checks and adjustments
Page 231 of 518
• When the shif t lever is in the D (Drive)position and the vehicle speed is below
approximately 6 mph (10 km/h), the MOD
system detects moving objects in the
front view.
• When the shif t lever is in the R (Reverse) position and the vehicle speed is below
approximately 6 mph (10 km/h), the MOD
system detects moving objects in the
rear view. The MOD system will not oper-
ate if the lif tgate is open. The MOD system does not detect moving
objects in the front-side view. The MOD
icon is not displayed on the screen when in
this view.
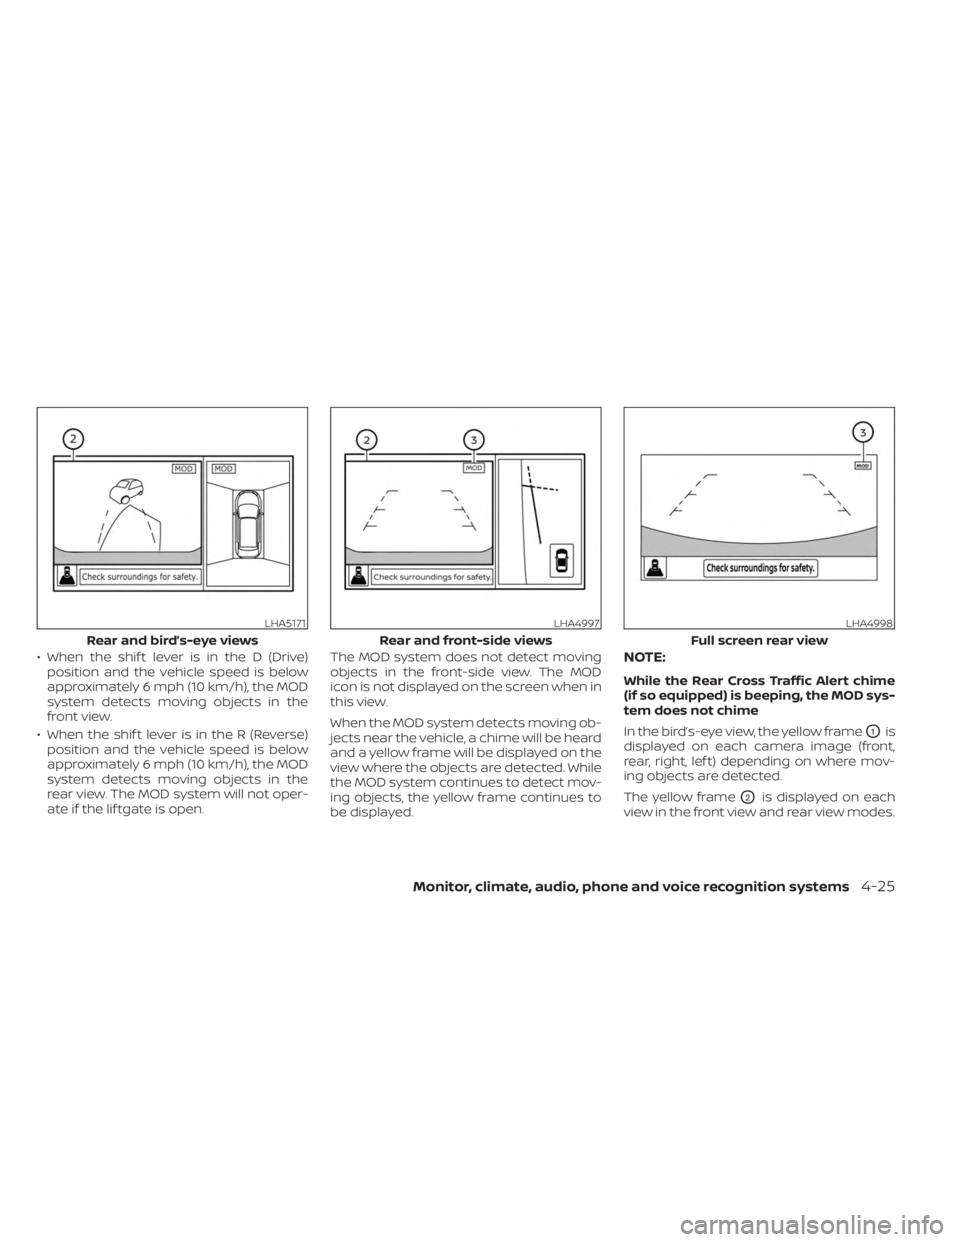
When the MOD system detects moving ob-
jects near the vehicle, a chime will be heard
and a yellow frame will be displayed on the
view where the objects are detected. While
the MOD system continues to detect mov-
ing objects, the yellow frame continues to
be displayed.NOTE:
While the Rear Cross Traffic Alert chime
(if so equipped) is beeping, the MOD sys-
tem does not chime
In the bird’s-eye view, the yellow frame
O1is
displayed on each camera image (front,
rear, right, lef t) depending on where mov-
ing objects are detected.
The yellow frame
O2is displayed on each
view in the front view and rear view modes.
LHA5171
Rear and bird’s-eye views
LHA4997
Rear and front-side views
LHA4998
Full screen rear view
Monitor, climate, audio, phone and voice recognition systems4-25
Page 235 of 518
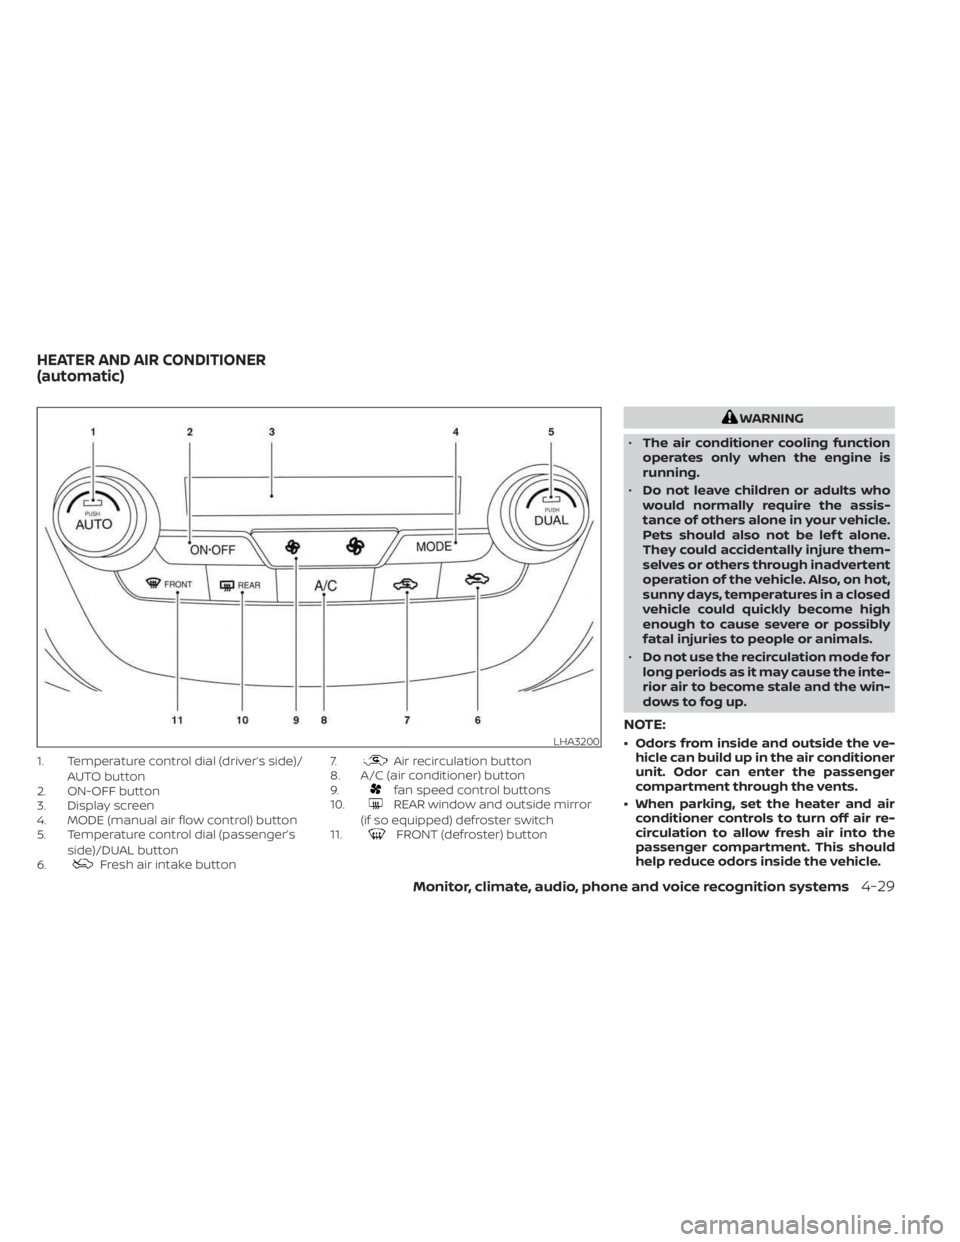
1. Temperature control dial (driver’s side)/AUTO button
2. ON-OFF button
3. Display screen
4. MODE (manual air flow control) button
5. Temperature control dial (passenger’s
side)/DUAL button
6.
Fresh air intake button 7.
Air recirculation button
8. A/C (air conditioner) button
9.
fan speed control buttons
10.REAR window and outside mirror
(if so equipped) defroster switch
11.
FRONT (defroster) button
WARNING
• The air conditioner cooling function
operates only when the engine is
running.
• Do not leave children or adults who
would normally require the assis-
tance of others alone in your vehicle.
Pets should also not be lef t alone.
They could accidentally injure them-
selves or others through inadvertent
operation of the vehicle. Also, on hot,
sunny days, temperatures in a closed
vehicle could quickly become high
enough to cause severe or possibly
fatal injuries to people or animals.
• Do not use the recirculation mode for
long periods as it may cause the inte-
rior air to become stale and the win-
dows to fog up.
NOTE:
• Odors from inside and outside the ve- hicle can build up in the air conditioner
unit. Odor can enter the passenger
compartment through the vents.
• When parking, set the heater and air conditioner controls to turn off air re-
circulation to allow fresh air into the
passenger compartment. This should
help reduce odors inside the vehicle.LHA3200
HEATER AND AIR CONDITIONER
(automatic)
Monitor, climate, audio, phone and voice recognition systems4-29