Page 92 of 558
1. TachometerVehicle information display
Odometer
Twin trip odometer
Fuel gauge 2. Warning and indicator lights
3. Speedometer
4. Trip reset switch
Instrument brightness control knob
LIC5078
Type A (if so equipped)
METERS AND GAUGES
2-4Instruments and controls
Page 93 of 558
1. Tachometer
2. Trip computerOdometer
Twin trip odometer 3. Speedometer
4. Trip reset switch
Instrument brightness control knob
5. Warning and indicator lights
SPEEDOMETER AND ODOMETER
This vehicle is equipped with a speedom-
eter and odometer. The speedometer is
located on the right side the meter cluster.
The odometer is located within the vehicle
information display (TypeA—ifso
equipped) or the trip computer (Type B —
if so equipped) to the lef t of the
speedometer.
LIC4284
Type B (if so equipped)
Instruments and controls2-5
Page 94 of 558
Speedometer
The speedometer indicates vehicle speed.Odometer/Twin trip odometer
The odometer and the twin trip odometer
O1are displayed in the vehicle information
display (Type A) (if so equipped) or the trip
computer (Type B) (if so equipped) when
the ignition switch is placed in the ON
position.
The odometer records the total distance
the vehicle has been driven.
The twin trip odometer records the dis-
tance of individual trips.
Changing the display
Push the TRIP RESET switchO2on the right
side of the instrument panel to change the
display as follows:
Trip
→ Trip→ Odometer Mile-
age →Trip
Resetting the trip odometer
Pushing the TRIP RESET switchO2for more
than 1 second resets the currently dis-
played trip odometer to zero.
Average fuel economy information is also
available. For additional information, see
“Trip computer” (P. 2-9).
LIC2255LIC5079
Type A (if so equipped)
LIC3595
Type B (if so equipped)
2-6Instruments and controls
Page 97 of 558

When the ignition switch is placed in the ON
position, modes of the trip computer can
be selected by pushing the TRIP RESET
switch
OA.
Each time the TRIP RESET switch is")
TRIP COMPUTER (if so equipped)
When the ignition switch is placed in the ON
position, modes of the trip computer can
be selected by pushing the TRIP RESET
switch
OA.
Each time the TRIP RESET switch is pushed,
the display changes as follows:
Trip A →Trip B →Odometer
The
switch for the trip computer is
located on the lower lef t side of the instru-
ment panel. Each time the
switch is pushed, the
display will change as follows:
Average fuel economy →Average speed →
Trip time →Trip Distance
Average fuel economy (mpg or
km/l)
The average fuel economy mode shows
the average fuel economy since the last
reset. Resetting is done by pressing the
change/reset switch for more than ap-
proximately 1 second. The display is up-
dated every 30 seconds. At about the first
1/3 mi (500 m) af ter a reset, the display
shows (----).
Average speed (mph or km/h)
The average speed mode shows the aver-
age vehicle speed since last reset. Reset-
ting is done by pressing the change/reset
switch for more than approximately 1 sec-
ond. The display is updated every 30 sec-
onds. The first 30 seconds af ter a reset, the
display shows (----).
Trip time
The trip time mode shows the time since
the last reset. The displayed time can be
reset by pressing the change/trip switch
for more than approximately 1 second.
Trip distance
The trip distance mode shows the distance
traveled since the last reset. The trip dis-
tance can be reset by pressing the
change/trip switch for more than approxi-
mately 1 second.
Shipping mode
This message may appear if the extended
storage switch is not pushed in. When this
message appears, push in the extended
storage switch to turn off the warning. For
additional information, see “Extended stor-
age switch” (P. 2-60).
LIC3594
Instruments and controls2-9
Page 98 of 558
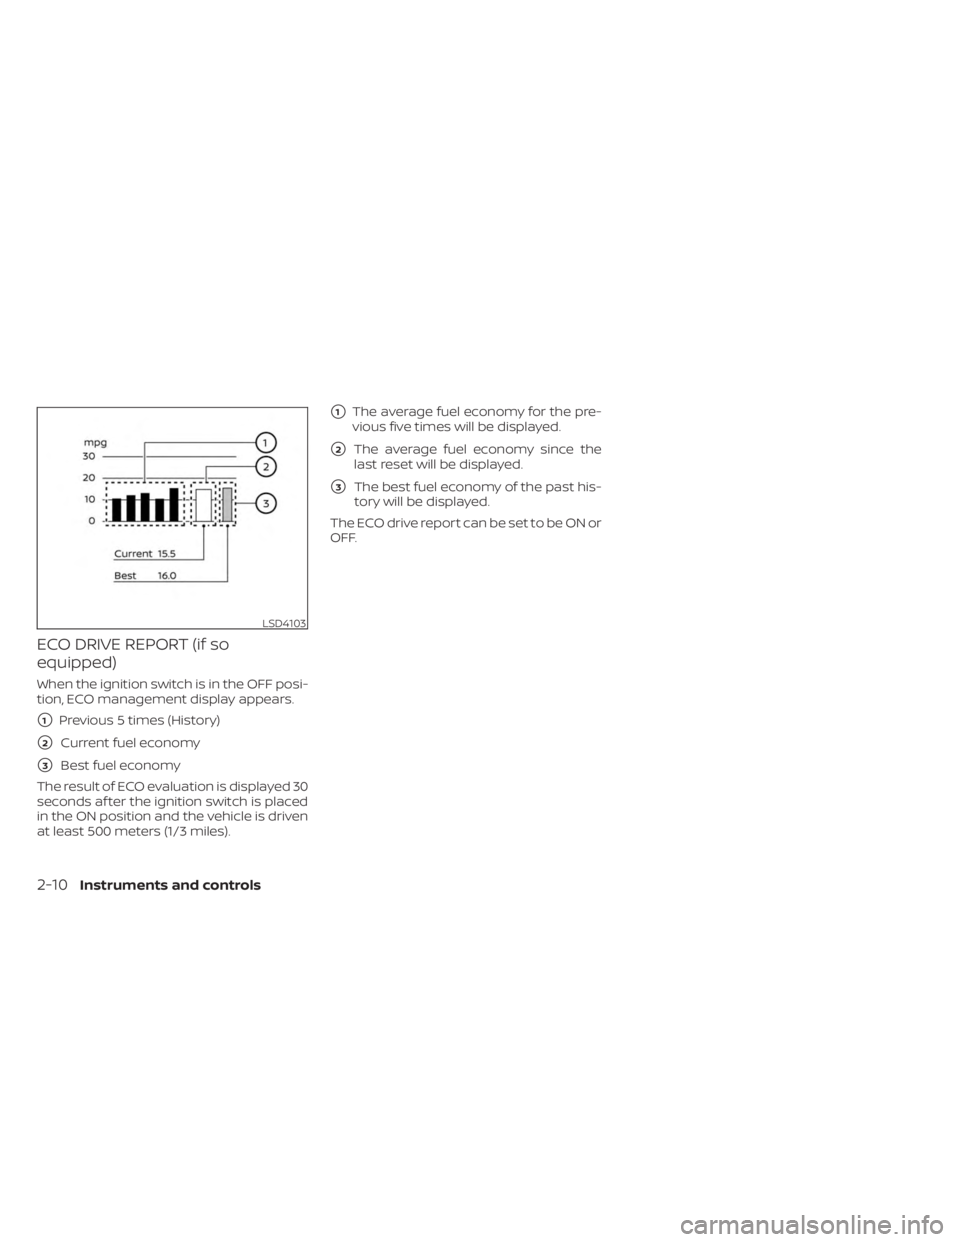
ECO DRIVE REPORT (if so
equipped)
When the ignition switch is in the OFF posi-
tion, ECO management display appears.
�1Previous 5 times (History)
�2Current fuel economy
�3Best fuel economy
The result of ECO evaluation is displayed 30
seconds af ter the ignition switch is placed
in the ON position and the vehicle is driven
at least 500 meters (1/3 miles).
�1The average fuel economy for the pre-
vious five times will be displayed.
�2The average fuel economy since the
last reset will be displayed.
�3The best fuel economy of the past his-
tory will be displayed.
The ECO drive report can be set to be ON or
OFF.
LSD4103
2-10Instruments and controls
Page 107 of 558

•If the light does not illuminate with
the ignition switch placed in the ON
position, have the vehicle checked as
soon as possible. It is recommended
that you visit a NISSAN dealer for this
service.
• If the light illuminates while driving,
avoid sudden steering maneuvers or
abrupt braking, reduce vehicle
speed, pull off the road to a safe loca-
tion and stop the vehicle as soon as
possible. Driving with under-inflated
tires may permanently damage the
tires and increase the likelihood of
tire failure. Serious vehicle damage
could occur and may lead to an acci-
dent and could result in serious per-
sonal injury or death. Check the tire
pressure for all four tires. Adjust the
tire pressure to the recommended
COLD tire pressure shown on the Tire
and Loading Information label lo-
cated in the driver’s door opening to
turn the low tire pressure warning
light off. If the light still illuminates
while driving af ter adjusting the tire
pressure, a tire may be flat or the
TPMS may be malfunctioning. If you
have a flat tire, replace it with a spare
tire as soon as possible. If no tire is flat and all tires are properly inflated,
have the vehicle checked. It is recom-
mended that you visit a NISSAN
dealer for this service.
• When using a wheel without the
TPMS such as the spare tire, the TPMS
will not function and the low tire
pressure warning light will flash for
approximately 1 minute. The light will
remain on af ter 1 minute. Have your
tires replaced and/or TPMS system
reset as soon as possible. It is recom-
mended that you visit a NISSAN
dealer for these services.
• Replacing tires with those not origi-
nally specified by NISSAN could af-
fect the proper operation of the
TPMS.
CAUTION
• The TPMS is not a substitute for the
regular tire pressure check. Be sure
to check the tire pressure regularly.
• If the vehicle is being driven at
speeds of less than 16 mph (25 km/h),
the TPMS may not operate correctly.
• Be sure to install the specified size of
tires to the four wheels correctly.
Low windshield-washer
fluid warning light (if so
equipped)
This light comes on when the windshield-
washer fluid is at a low level. Add
windshield-washer fluid as necessary. For
additional information, see “Windshield-
washer fluid” (P. 8-10).
Malfunction Indicator Light
(MIL)
If this indicator light comes on steady or
blinks while the engine is running, it may
indicate a potential emission control
malfunction.
The MIL may also come on steady if the
fuel-filler cap is loose or missing, or if the
vehicle runs out of fuel. Check to make sure
the fuel-filler cap is installed and closed
tightly, and that the vehicle has at least 3
gallons (11.4 liters) of fuel in the fuel tank.
Af ter a few driving trips, the
light
should turn off if no other potential emis-
sion control system malfunction exists.
If this indicator light comes on steady for 20
seconds and then blinks for 10 seconds
when the engine is not running, it indicates
that the vehicle is not ready for an emission
Instruments and controls2-19
Page 113 of 558
To control what items display in the vehicle
information display, see to “Customize dis-
play” (P. 2-27).SETTINGS
The setting mode allows you to change the
information displayed in the vehicle infor-
mation display as well as the model for
several vehicle functions:
• VDC Setting
• Driver Assistance
• Customize Display• Vehicle Settings
• TPMS Settings
• Maintenance
• Clock
• Unit/Language
• Factory Reset
VDC Setting
The VDC Setting menu allows the user to enable or disable the Vehicle Dynamic Control (VDC) system.
Some menu items shown below may not be equipped on your vehicle.
Menu item
Explanation
System Allows the user to turn the VDC system on or off. For additional information, see “Vehicle Dynamic Control
(VDC) system” (P. 5-134).
Instruments and controls2-25
Page 115 of 558

Menu itemExplanation
Timer Alert Allows user to set or reset an alert at a specific time interval.
Low Temperature Alert Allows user to turn the low temperature alert on or off.
Chassis Control Displays the available chassis control options.
Active Trace Control Allows the user to turn the Intelligent Trace Control (I-TC) feature on or off. For additional information, see
“Chassis Control” (P. 5-137).
Active Engine Brake Allows the user to turn the Intelligent Engine Brake (I-EB) feature on or off. For additional information, see
“Chassis Control” (P. 5-137).
Customize Display
The customize display menu allows the user to customize the information that appears in the vehicle information display.
Some menu items shown below may not be equipped on your vehicle.
Menu item Explanation
Main Menu Selection Displays available screens that can be shown in the vehicle information display.
Status Allows user to turn the status screen on or off in the vehicle information display.
Drive Computer Allows user to turn the drive computer screen on or off in the vehicle information display.
Driving Aids Allows user to turn the driving aids screen on or off in the vehicle information display.
Tire Pressures Allows user to turn the tire pressures screen on or off in the vehicle information display.
Coolant Temp. Allows user to turn the coolant temp. screen on or off in the vehicle information display.
Chassis Control Allows user to turn the chassis control screen on or off in the vehicle information display.
ECO Info Settings Displays the available ECO info settings.
ECO Drive Report Select to display this report when the ignition in switch is placed in the ON position.
View History Select to view the vehicle’s history.
Welcome Effect Displays the available welcome effect settings.
Gauges Allows user to turn the gauges effect on or off.
Animation Allows user to turn the animation effect on or off.
Instruments and controls2-27


 (if so equipped) or")
.SETTINGS
The setting mode allows you to change the
information displayed in the vehicle inf")