2023 NISSAN KICKS USB
[x] Cancel search: USBPage 16 of 558
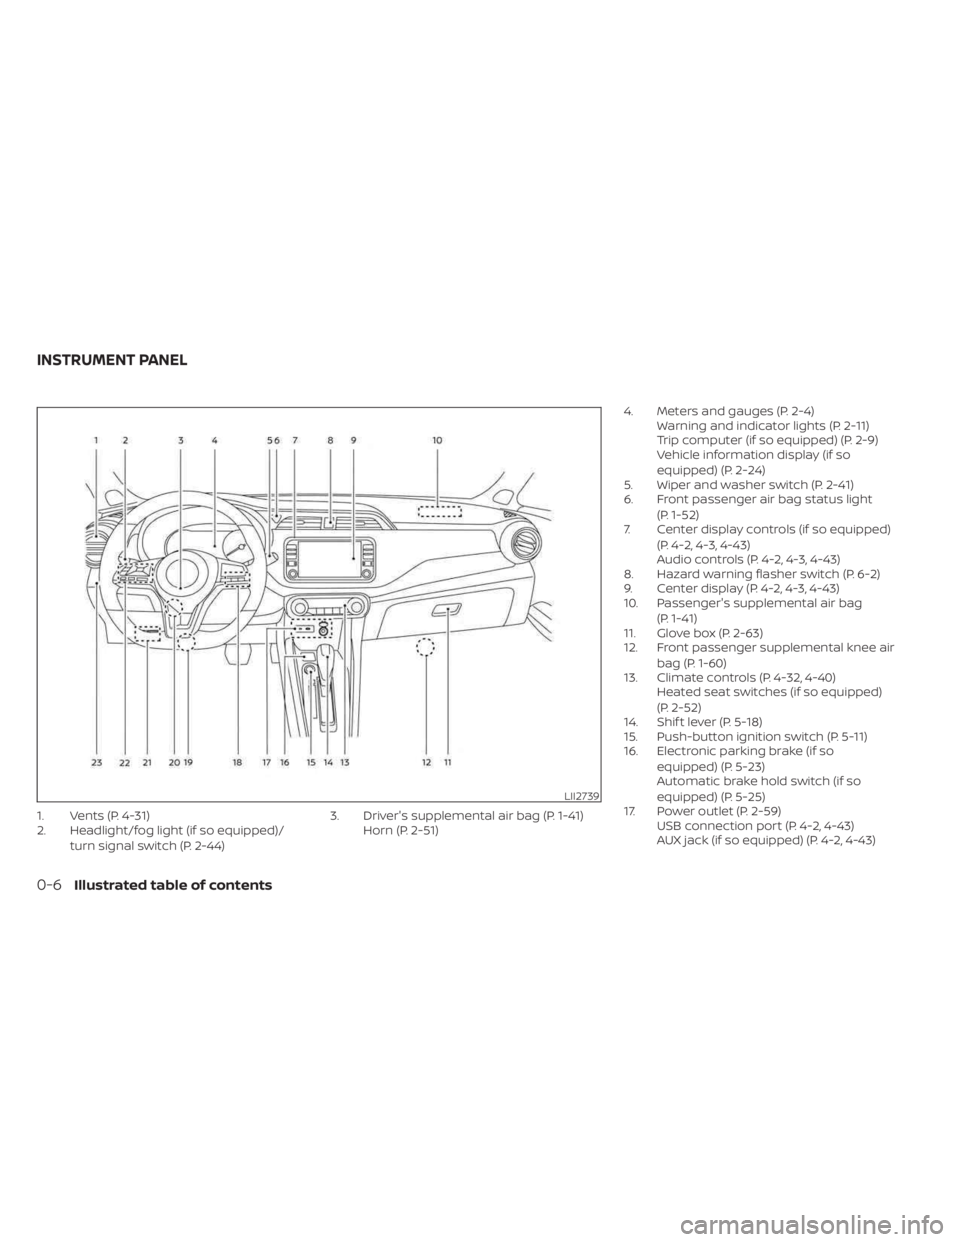
1. Vents (P. 4-31)
2. Headlight/fog light (if so equipped)/turn signal switch (P. 2-44) 3. Driver's supplemental air bag (P. 1-41)
Horn (P. 2-51) 4. Meters and gauges (P. 2-4)
Warning and indicator lights (P. 2-11)
Trip computer (if so equipped) (P. 2-9)
Vehicle information display (if so
equipped) (P. 2-24)
5. Wiper and washer switch (P. 2-41)
6. Front passenger air bag status light
(P. 1-52)
7. Center display controls (if so equipped)
(P. 4-2, 4-3, 4-43)
Audio controls (P. 4-2, 4-3, 4-43)
8. Hazard warning flasher switch (P. 6-2)
9. Center display (P. 4-2, 4-3, 4-43)
10. Passenger's supplemental air bag
(P. 1-41)
11. Glove box (P. 2-63)
12. Front passenger supplemental knee air
bag (P. 1-60)
13. Climate controls (P. 4-32, 4-40) Heated seat switches (if so equipped)
(P. 2-52)
14. Shif t lever (P. 5-18)
15. Push-button ignition switch (P. 5-11)
16. Electronic parking brake (if so
equipped) (P. 5-23)
Automatic brake hold switch (if so
equipped) (P. 5-25)
17. Power outlet (P. 2-59) USB connection port (P. 4-2, 4-43)
AUX jack (if so equipped) (P. 4-2, 4-43)
LII2739
INSTRUMENT PANEL
0-6Illustrated table of contents
Page 89 of 558
Vehicle Dynamic Control (VDC) OFF switch
(if so equipped)................................. 2-55
Rear Sonar System (RSS) OFF switch
(if so equipped) ................................. 2-56
Emergency call (SOS) button (if so equipped) . . . 2-57
USB/iPod® charging ports ......................2-57
Rear Door Alert (if so equipped) .................2-58
Power outlets .................................. 2-59
12v outlet .................................... 2-59
Extended storage switch .......................2-60
Storage ........................................ 2-61
Front-door pockets ......................... 2-61
Rear-door pockets .......................... 2-61
Seatback pockets (if so equipped) ...........2-62 Storagetrays................................
2-62
Glovebox ................................... 2-63
Console box (if so equipped) ................2-64
Cup holders ................................. 2-64
Luggage hooks ............................. 2-65
Grocery hooks .............................. 2-66
Cargo cover (if so equipped) .................2-66
Roof rack (if so equipped) ...................2-67
Windows ....................................... 2-71
Power windows ............................. 2-71
Interior lights ...................................2-74
Map lights ................................... 2-75
Personal Light ............................... 2-75
Luggage compartment light ................2-76
Page 90 of 558
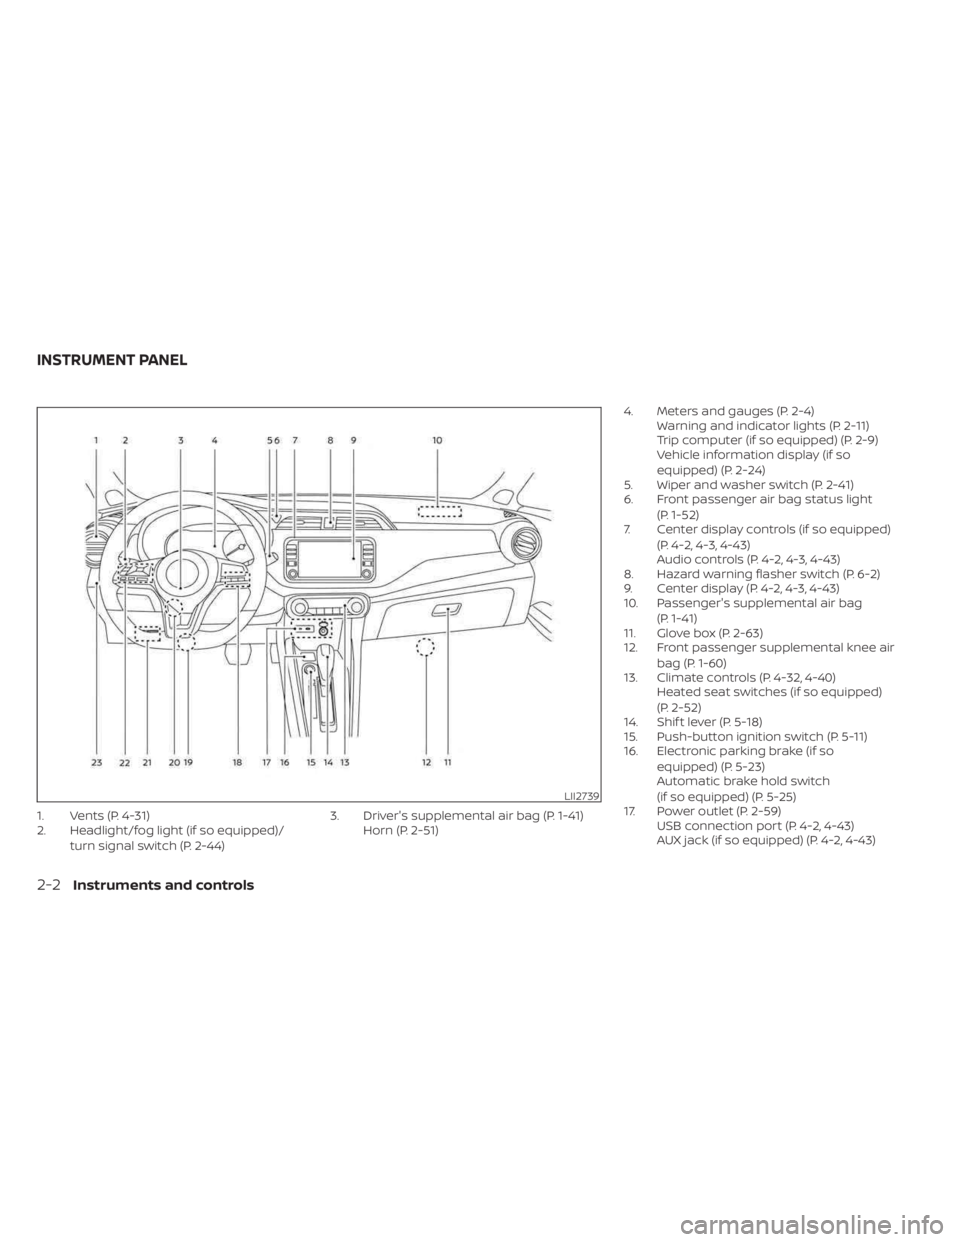
1. Vents (P. 4-31)
2. Headlight/fog light (if so equipped)/turn signal switch (P. 2-44) 3. Driver's supplemental air bag (P. 1-41)
Horn (P. 2-51) 4. Meters and gauges (P. 2-4)
Warning and indicator lights (P. 2-11)
Trip computer (if so equipped) (P. 2-9)
Vehicle information display (if so
equipped) (P. 2-24)
5. Wiper and washer switch (P. 2-41)
6. Front passenger air bag status light
(P. 1-52)
7. Center display controls (if so equipped)
(P. 4-2, 4-3, 4-43)
Audio controls (P. 4-2, 4-3, 4-43)
8. Hazard warning flasher switch (P. 6-2)
9. Center display (P. 4-2, 4-3, 4-43)
10. Passenger's supplemental air bag
(P. 1-41)
11. Glove box (P. 2-63)
12. Front passenger supplemental knee air
bag (P. 1-60)
13. Climate controls (P. 4-32, 4-40) Heated seat switches (if so equipped)
(P. 2-52)
14. Shif t lever (P. 5-18)
15. Push-button ignition switch (P. 5-11)
16. Electronic parking brake (if so
equipped) (P. 5-23)
Automatic brake hold switch
(if so equipped) (P. 5-25)
17. Power outlet (P. 2-59) USB connection port (P. 4-2, 4-43)
AUX jack (if so equipped) (P. 4-2, 4-43)
LII2739
INSTRUMENT PANEL
2-2Instruments and controls
Page 145 of 558
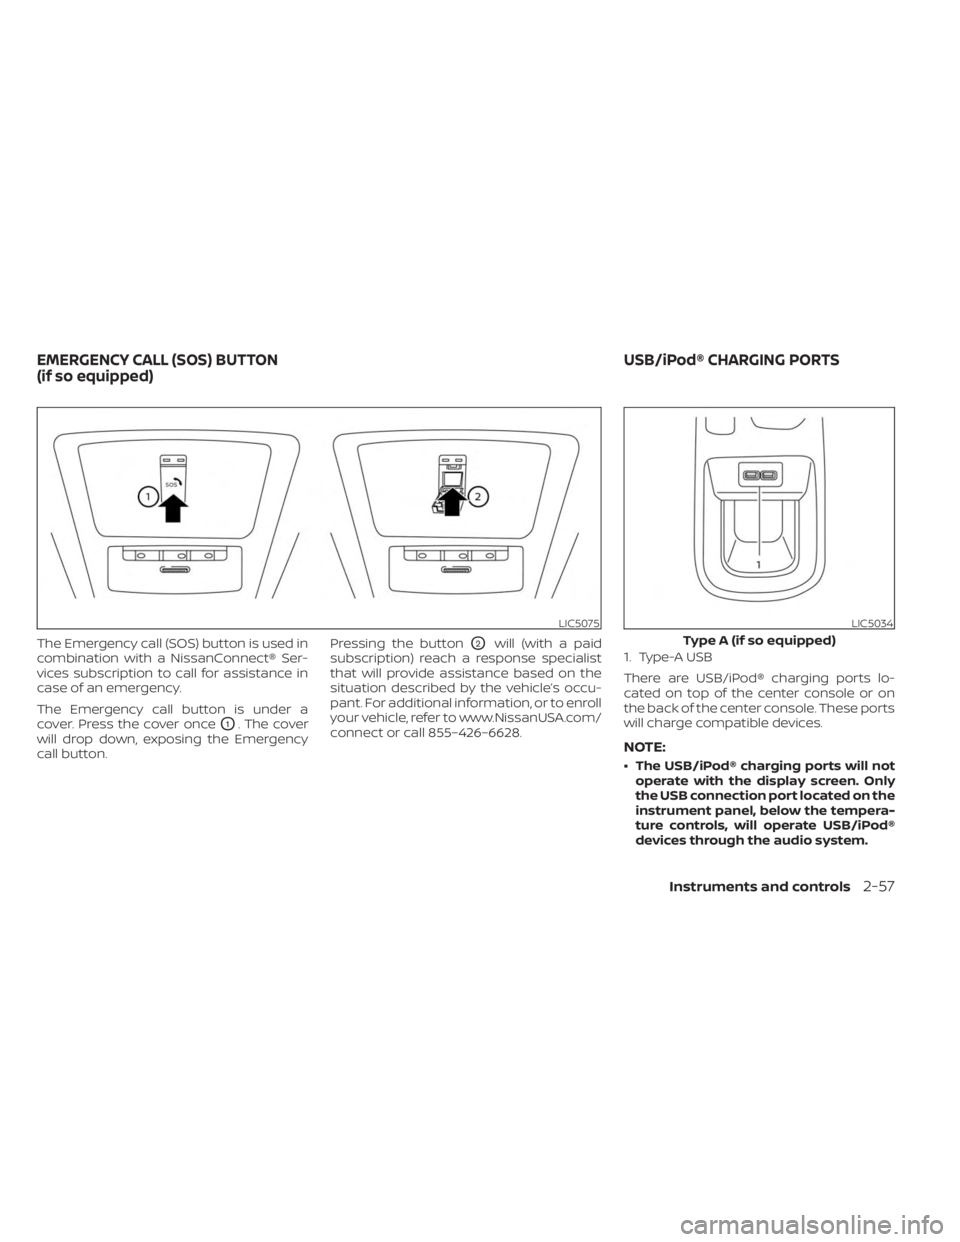
The Emergency call (SOS) button is used in
combination with a NissanConnect® Ser-
vices subscription to call for assistance in
case of an emergency.
The Emergency call button is under a
cover. Press the cover once
O1. The cover
will drop down, exposing the Emergency
call button. Pressing the button
O2will (with a paid
subscription) reach a response specialist
that will provide assistance based on the
situation described by the vehicle’s occu-
pant. For additional information, or to enroll
your vehicle, refer to www.NissanUSA.com/
connect or call 855–426–6628. 1. Type-A USB
There are USB/iPod® charging ports lo-
cated on top of the center console or on
the back of the center console. These ports
will charge compatible devices.
NOTE:
• The USB/iPod® charging ports will not
operate with the display screen. Only
the USB connection port located on the
instrument panel, below the tempera-
ture controls, will operate USB/iPod®
devices through the audio system.
LIC5075LIC5034
Type A (if so equipped)
EMERGENCY CALL (SOS) BUTTON
(if so equipped) USB/iPod® CHARGING PORTS
Instruments and controls2-57
Page 146 of 558
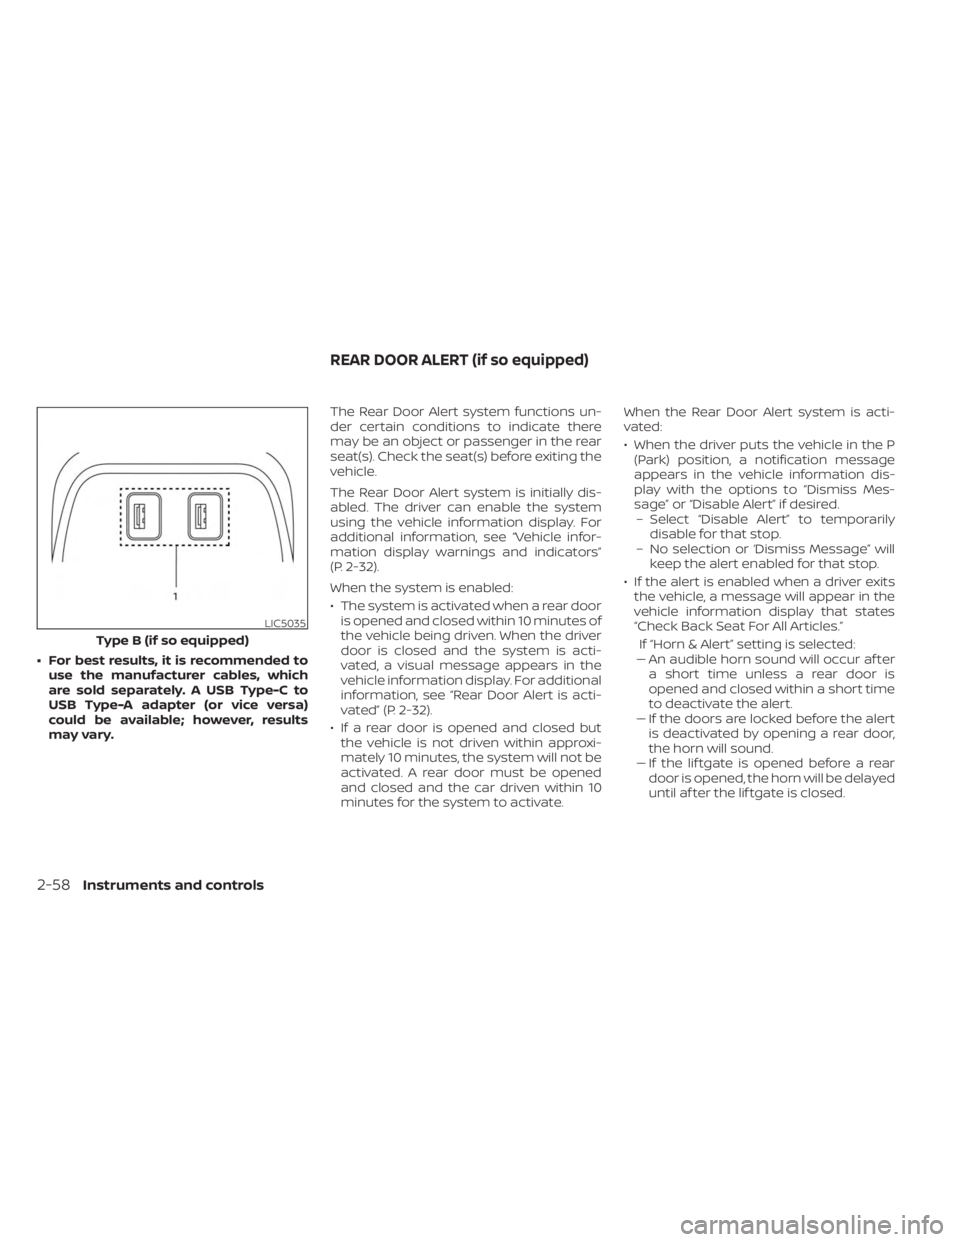
• For best results, it is recommended touse the manufacturer cables, which
are sold separately. A USB Type-C to
USB Type-A adapter (or vice versa)
could be available; however, results
may vary. The Rear Door Alert system functions un-
der certain conditions to indicate there
may be an object or passenger in the rear
seat(s). Check the seat(s) before exiting the
vehicle.
The Rear Door Alert system is initially dis-
abled. The driver can enable the system
using the vehicle information display. For
additional information, see “Vehicle infor-
mation display warnings and indicators”
(P. 2-32).
When the system is enabled:
• The system is activated when a rear door
is opened and closed within 10 minutes of
the vehicle being driven. When the driver
door is closed and the system is acti-
vated, a visual message appears in the
vehicle information display. For additional
information, see “Rear Door Alert is acti-
vated” (P. 2-32).
• If a rear door is opened and closed but the vehicle is not driven within approxi-
mately 10 minutes, the system will not be
activated. A rear door must be opened
and closed and the car driven within 10
minutes for the system to activate. When the Rear Door Alert system is acti-
vated:
• When the driver puts the vehicle in the P
(Park) position, a notification message
appears in the vehicle information dis-
play with the options to “Dismiss Mes-
sage” or “Disable Alert” if desired.– Select “Disable Alert” to temporarily disable for that stop.
– No selection or ‘Dismiss Message” will keep the alert enabled for that stop.
• If the alert is enabled when a driver exits the vehicle, a message will appear in the
vehicle information display that states
“Check Back Seat For All Articles.”
If “Horn & Alert” setting is selected:
– – An audible horn sound will occur af ter
a short time unless a rear door is
opened and closed within a short time
to deactivate the alert.
–– If the doors are locked before the alert is deactivated by opening a rear door,
the horn will sound.
–– If the lif tgate is opened before a rear door is opened, the horn will be delayed
until af ter the lif tgate is closed.
LIC5035
Type B (if so equipped)
REAR DOOR ALERT (if so equipped)
2-58Instruments and controls
Page 197 of 558
Audio system.................................. 4-43
Radio ....................................... 4-43
FM radio reception .......................... 4-44
AM radio reception .......................... 4-44
Audio operation precautions ................4-44
FM/AM radio ................................ 4-48
USB (Universal Serial Bus) connection
port......................................... 4-53
iPod®* player operation .....................4-56
Bluetooth® streaming audio .................4-59
Steering wheel switch for audio control .....4-62
Roof Mounted Antenna ......................4-62
Siri® Eyes Free (if so equipped) ..................4-63
Requirements ............................... 4-63
Operating Siri® Eyes Free ....................4-63
Troubleshooting guide ......................4-65
Car phone or CB radio .......................... 4-66Bluetooth® Hands-Free Phone System
.........4-66
Regulatory information ......................4-68
Using the system ........................... 4-68
Indicators ................................... 4-70
Control buttons ............................. 4-70
Connecting procedure ......................4-71
Voice commands ........................... 4-72
Phone display screen .......................4-74
Making a call ................................ 4-75
Receiving a call .............................. 4-75
During a call ................................. 4-75
Ending a call ................................ 4-76
Text messaging (if so equipped) .............4-76
Bluetooth® connections screen .............4-79
Phone and text message settings ...........4-80
iPod®/iPhone® ................................. 4-82
Page 202 of 558
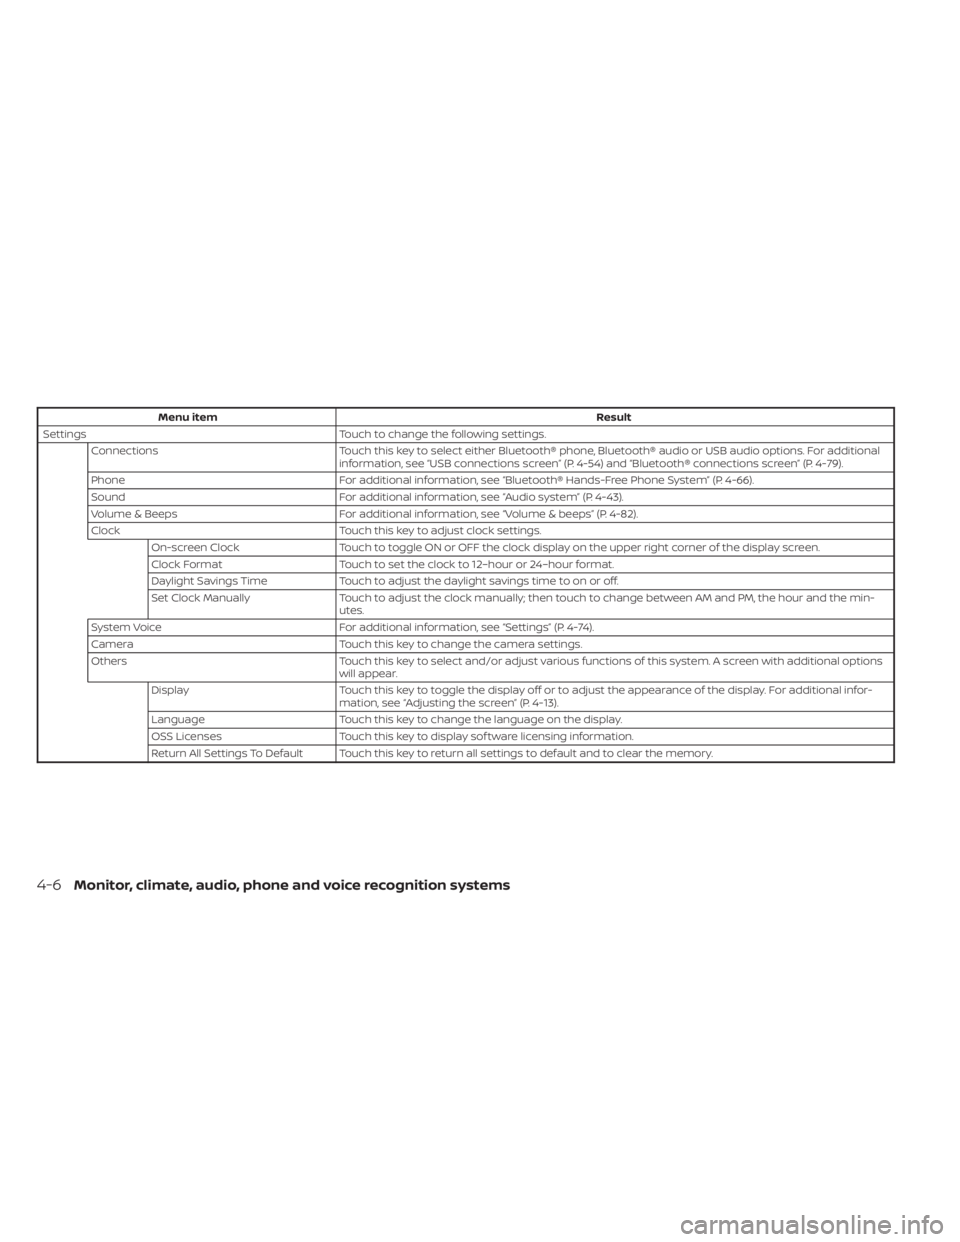
Menu itemResult
Settings Touch to change the following settings.
Connections Touch this key to select either Bluetooth® phone, Bluetooth® audio or USB audio options. For additional
information, see “USB connections screen” (P. 4-54) and “Bluetooth® connections screen” (P. 4-79).
Phone For additional information, see “Bluetooth® Hands-Free Phone System” (P. 4-66).
Sound For additional information, see “Audio system” (P. 4-43).
Volume & Beeps For additional information, see “Volume & beeps” (P. 4-82).
Clock Touch this key to adjust clock settings.
On-screen Clock Touch to toggle ON or OFF the clock display on the upper right corner of the display screen.
Clock Format Touch to set the clock to 12–hour or 24–hour format.
Daylight Savings Time Touch to adjust the daylight savings time to on or off.
Set Clock Manually Touch to adjust the clock manually; then touch to change between AM and PM, the hour and the min-
utes.
System Voice For additional information, see “Settings” (P. 4-74).
Camera Touch this key to change the camera settings.
Others Touch this key to select and/or adjust various functions of this system. A screen with additional options
will appear.
Display Touch this key to toggle the display off or to adjust the appearance of the display. For additional infor-
mation, see “Adjusting the screen” (P. 4-13).
Language Touch this key to change the language on the display.
OSS Licenses Touch this key to display sof tware licensing information.
Return All Settings To Default Touch this key to return all settings to default and to clear the memory.
4-6Monitor, climate, audio, phone and voice recognition systems
Page 203 of 558
(brightness control) BUTTON
To change the display brightness, press thebutton. Pressing the button again will
change the display to the day or the night
display.
Press and hold the
button for more
than 2 seconds to turn the display off. Press
and hold the button again to turn the dis-
play on.
HOW TO USE THE VOL (volume)
KNOB / PUSH
(power)
BUTTON
Press the PUSH(power) button to turn
audio function on and off. Turn the VOL
(volume) knob to adjust audio volume.
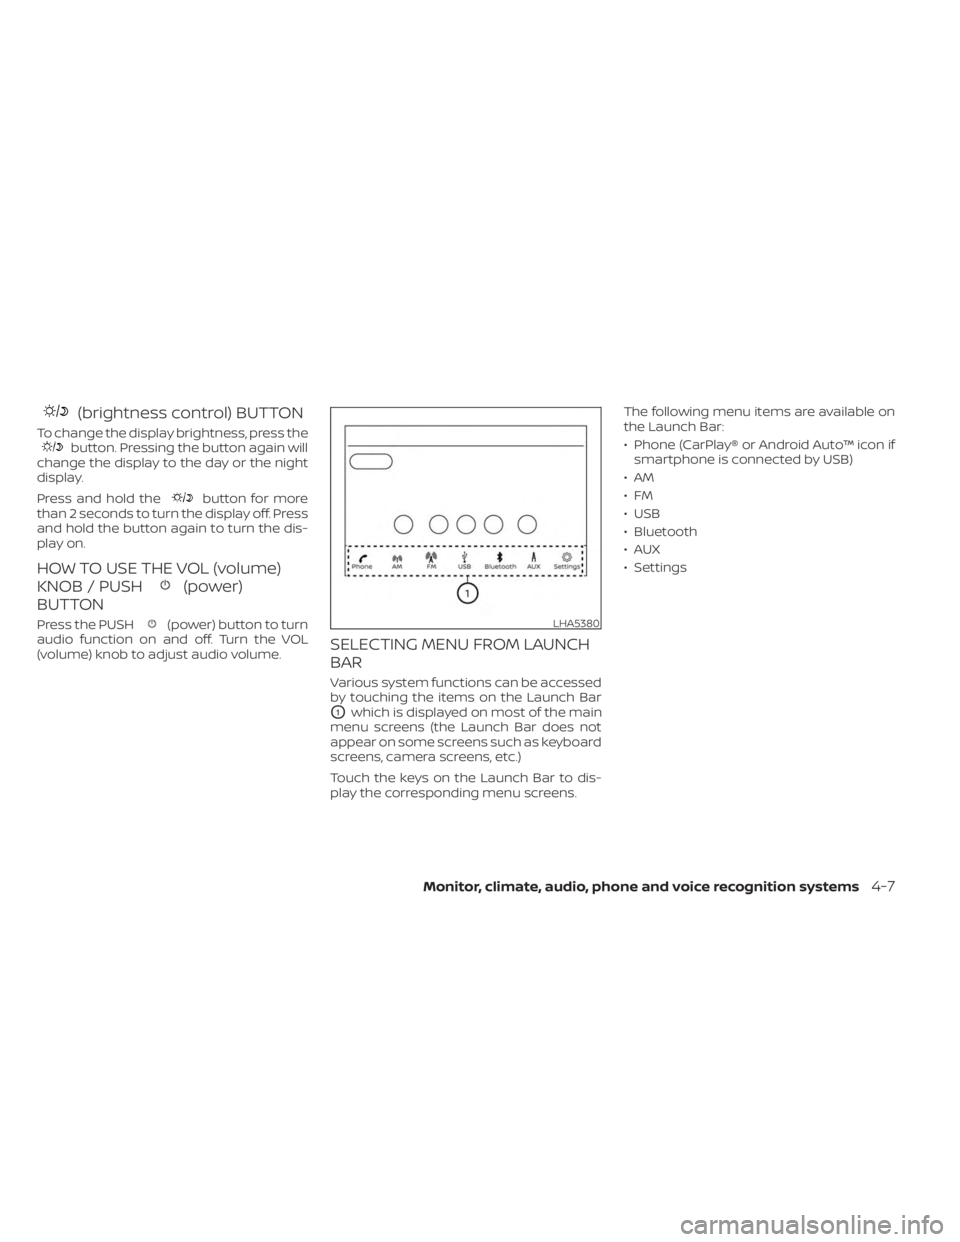
SELECTING MENU FROM LAUNCH
BAR
Various system functions can be accessed
by touching the items on the Launch Bar
O1which is displayed on most of the main
menu screens (the Launch Bar does not
appear on some screens such as keyboard
screens, camera screens, etc.)
Touch the keys on the Launch Bar to dis-
play the corresponding menu screens. The following menu items are available on
the Launch Bar:
• Phone (CarPlay® or Android Auto™ icon if
smartphone is connected by USB)
•AM
•FM
• USB
• Bluetooth
•AUX
• Settings
LHA5380
Monitor, climate, audio, phone and voice recognition systems4-7