2023 NISSAN KICKS manual radio set
[x] Cancel search: manual radio setPage 246 of 558
BACK button
Press theBACK button to return to the
previous menu screen.
AUDIO button
Press to display the audio screen. When
this button is pressed while the audio
screen is not displayed, the last audio
source played will play.
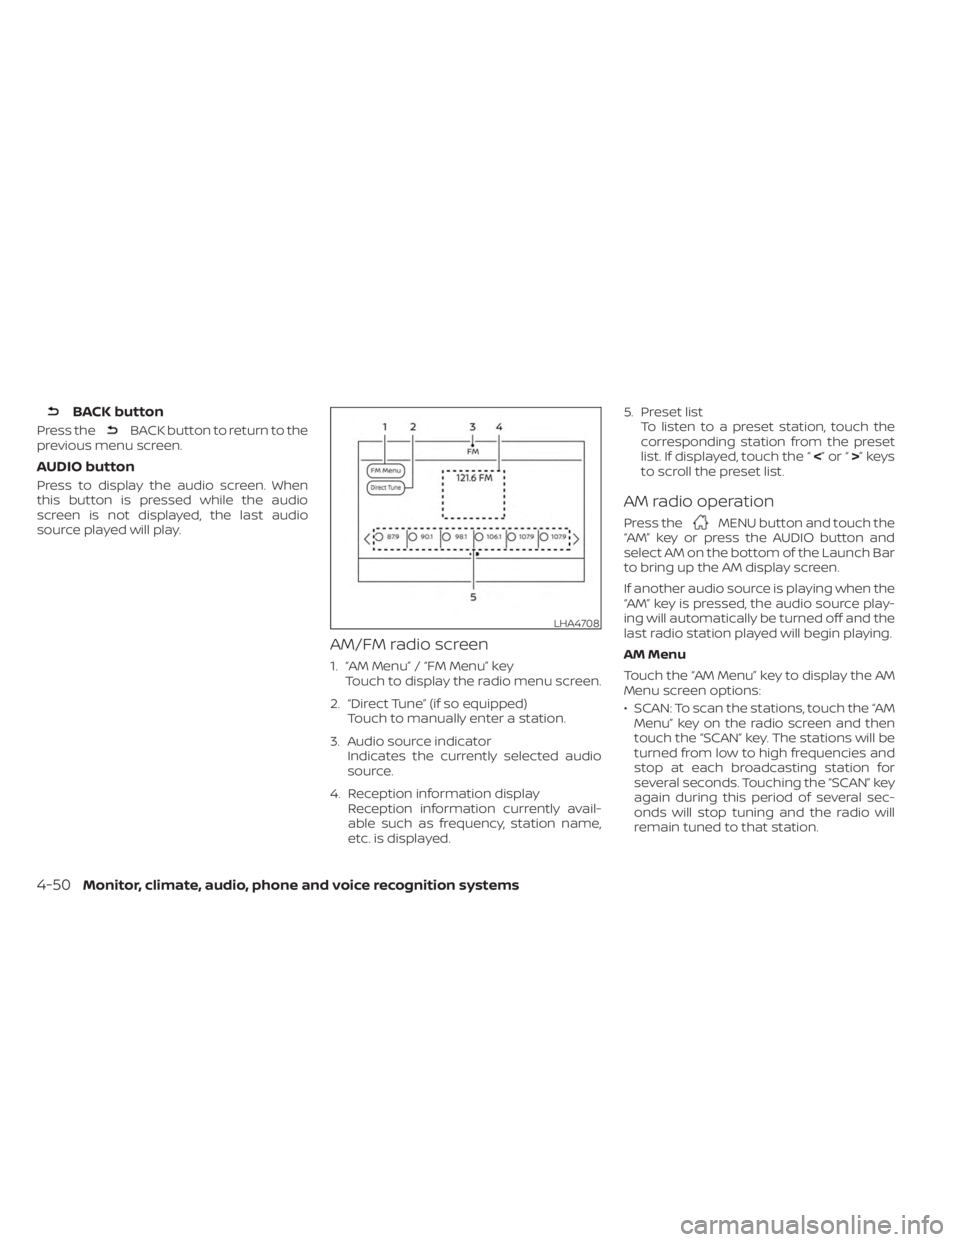
AM/FM radio screen
1. “AM Menu” / “FM Menu” key Touch to display the radio menu screen.
2. “Direct Tune” (if so equipped) Touch to manually enter a station.
3. Audio source indicator Indicates the currently selected audio
source.
4. Reception information display Reception information currently avail-
able such as frequency, station name,
etc. is displayed. 5. Preset list
To listen to a preset station, touch the
corresponding station from the preset
list. If displayed, touch the “ <”or“>”keys
to scroll the preset list.
AM radio operation
Press theMENU button and touch the
“AM” key or press the AUDIO button and
select AM on the bottom of the Launch Bar
to bring up the AM display screen.
If another audio source is playing when the
“AM” key is pressed, the audio source play-
ing will automatically be turned off and the
last radio station played will begin playing.
AM Menu
Touch the “AM Menu” key to display the AM
Menu screen options:
• SCAN: To scan the stations, touch the “AM Menu” key on the radio screen and then
touch the “SCAN” key. The stations will be
turned from low to high frequencies and
stop at each broadcasting station for
several seconds. Touching the “SCAN” key
again during this period of several sec-
onds will stop tuning and the radio will
remain tuned to that station.
LHA4708
4-50Monitor, climate, audio, phone and voice recognition systems
Page 247 of 558
• Refresh: Touch the “Refresh” key to up-date the station list displayed on the right
side of the AM Menu screen.
(SEEK/TRACK) buttons
Press the
orbuttons to tune
from low to high or high to low frequencies
and to stop at the next broadcasting
station.
Direct Tune (if so equipped)
Touch the “Direct Tune” key to display the
Direct Tune menu and manually enter a
station.
1 to 6 station memory operations
Up to six stations can be registered in the
preset list.
1. Select the AM radio band.
2. Tune to the station you wish to store.
3. Touch and hold one of the preset num- bers in the preset list.
The information such as frequency will be
displayed on the preset list.
To select and listen to the preset stations,
press
oron the steering wheel
briefly or touch a preferred station on the
preset list on the radio screen.
FM radio operation
Press theMENU button and touch the
“FM” key or press the AUDIO button and
select FM on the bottom of the Launch Bar
to bring up the FM display screen.
If another audio source is playing when the
“FM” key is pressed, the audio source play-
ing will automatically be turned off and the
last radio station played will begin playing.
The FM stereo indicator (STEREO) is shown
on the screen during FM stereo reception.
When the stereo broadcast signal is weak,
the radio automatically changes from ste-
reo to monaural reception.
FM Menu
Touch the “FM Menu” key to display the FM
Menu screen options:
• SCAN: To scan the stations, touch the “FM Menu” key on the radio screen and then
touch the “SCAN” key. The stations will be
tuned from low to high frequencies and
stop at each broadcasting stations for
several seconds. Touching the “SCAN” key
again during this period of several sec-
onds will stop tuning and the radio will
remain tuned to that station. • Refresh: Touch the “Refresh” key to up-
date the station list displayed on the right
side of the FM Menu screen.
• RDS Info: Radio station and song informa- tion can be displayed on the FM display
screen.
(SEEK/TRACK) buttons
Press the
orbuttons to tune
from low to high or high to low frequencies
and to stop at the next broadcasting
station.
1 to 12 station memory operations
Up to 12 stations can be registered in the
preset list.
1. Select the FM radio band.
2. Tune to the station you wish to store.
3. Touch and hold one of the preset num- bers in the preset list.
The information such as frequency will be
displayed on the preset list.
To select and listen to the preset stations,
press
oron the steering wheel
briefly or touch a preferred station on the
preset list on the radio screen.
Monitor, climate, audio, phone and voice recognition systems4-51
Page 255 of 558
BLUETOOTH® STREAMING AUDIO
If you have a compatible Bluetooth® device
with streaming audio (A2DP profile), you
can set up the wireless connection be-
tween your Bluetooth® device and your
vehicle’s audio system. This connection
allows you to listen to audio from the
Bluetooth® device using your vehicle’s
speakers. For additional information, see
“FM/AM radio” (P. 4-48).
NOTE:
For additional information regarding
Bluetooth® Streaming Audio, refer to the
cellular phone owner’s manual.
Connecting procedure
NOTE:
The connecting procedure must be per-
formed when the vehicle is stationary. If
the vehicle starts moving during the pro-
cedure, the procedure will be canceled.To connect a phone to the Bluetooth®
Hands-Free Phone System:
Manual Connecting Procedure
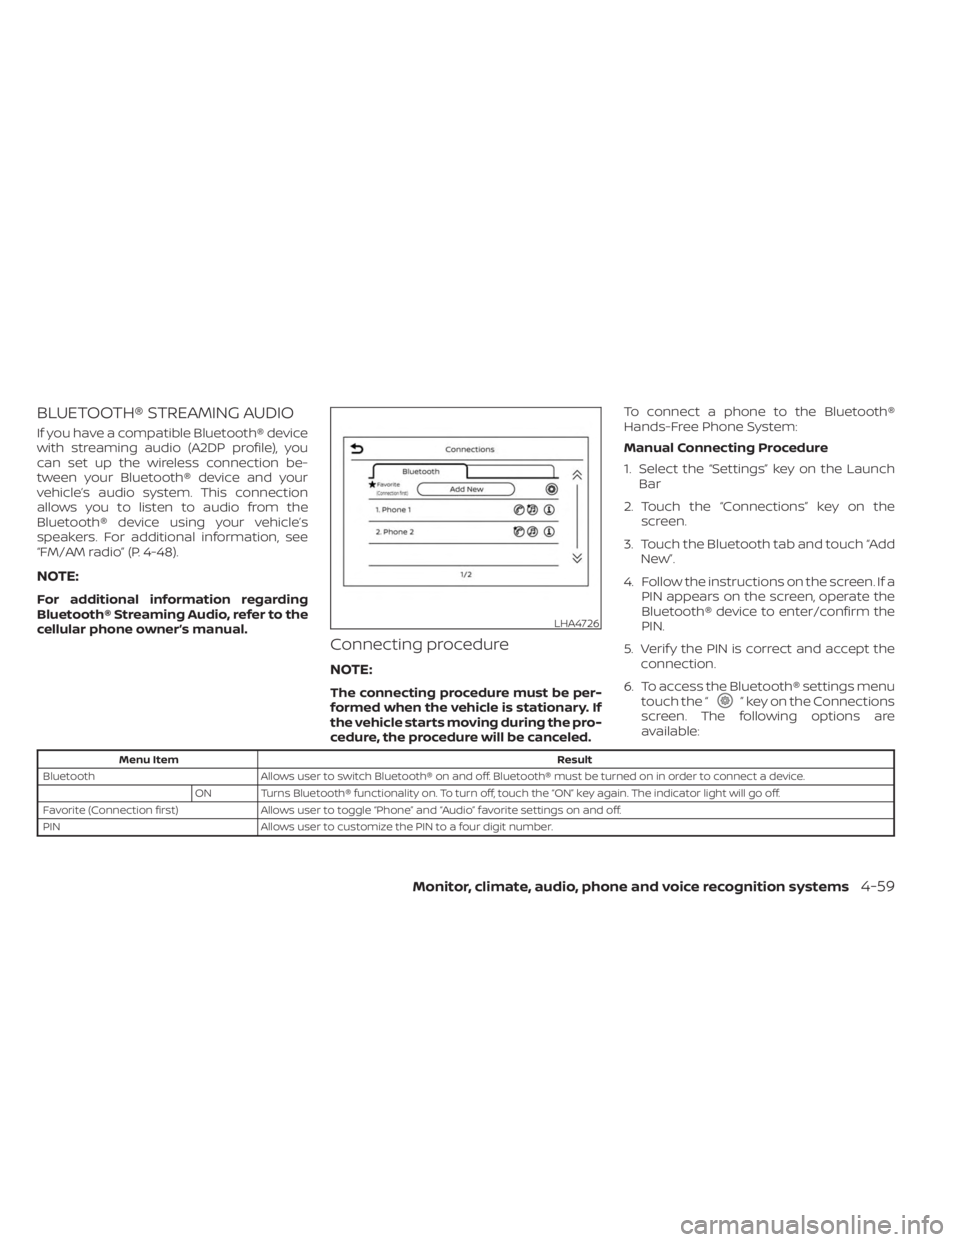
1. Select the “Settings” key on the Launch
Bar
2. Touch the “Connections” key on the screen.
3. Touch the Bluetooth tab and touch “Add New”.
4. Follow the instructions on the screen. If a PIN appears on the screen, operate the
Bluetooth® device to enter/confirm the
PIN.
5. Verif y the PIN is correct and accept the connection.
6. To access the Bluetooth® settings menu touch the “” key on the Connections
screen. The following options are
available:
Menu Item Result
Bluetooth Allows user to switch Bluetooth® on and off. Bluetooth® must be turned on in order to connect a device.
ON Turns Bluetooth® functionality on. To turn off, touch the “ON” key again. The indicator light will go off.
Favorite (Connection first) Allows user to toggle “Phone” and “Audio” favorite settings on and off.
PIN Allows user to customize the PIN to a four digit number.
LHA4726
Monitor, climate, audio, phone and voice recognition systems4-59
Page 375 of 558
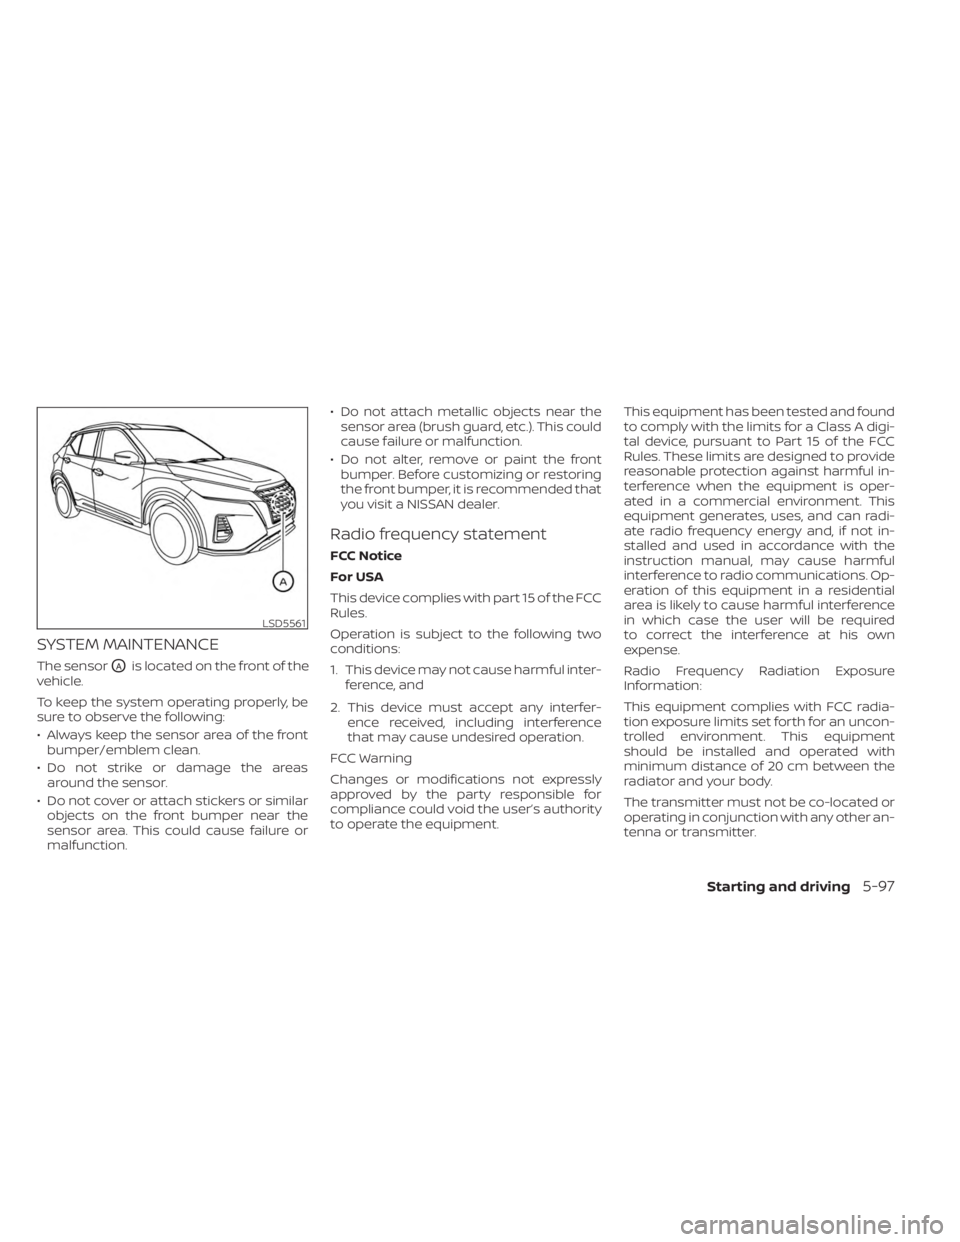
SYSTEM MAINTENANCE
The sensorOAis located on the front of the
vehicle.
To keep the system operating properly, be
sure to observe the following:
• Always keep the sensor area of the front bumper/emblem clean.
• Do not strike or damage the areas around the sensor.
• Do not cover or attach stickers or similar objects on the front bumper near the
sensor area. This could cause failure or
malfunction. • Do not attach metallic objects near the
sensor area (brush guard, etc.). This could
cause failure or malfunction.
• Do not alter, remove or paint the front bumper. Before customizing or restoring
the front bumper, it is recommended that
you visit a NISSAN dealer.
Radio frequency statement
FCC Notice
For USA
This device complies with part 15 of the FCC
Rules.
Operation is subject to the following two
conditions:
1. This device may not cause harmful inter- ference, and
2. This device must accept any interfer- ence received, including interference
that may cause undesired operation.
FCC Warning
Changes or modifications not expressly
approved by the party responsible for
compliance could void the user’s authority
to operate the equipment. This equipment has been tested and found
to comply with the limits for a Class A digi-
tal device, pursuant to Part 15 of the FCC
Rules. These limits are designed to provide
reasonable protection against harmful in-
terference when the equipment is oper-
ated in a commercial environment. This
equipment generates, uses, and can radi-
ate radio frequency energy and, if not in-
stalled and used in accordance with the
instruction manual, may cause harmful
interference to radio communications. Op-
eration of this equipment in a residential
area is likely to cause harmful interference
in which case the user will be required
to correct the interference at his own
expense.
Radio Frequency Radiation Exposure
Information:
This equipment complies with FCC radia-
tion exposure limits set forth for an uncon-
trolled environment. This equipment
should be installed and operated with
minimum distance of 20 cm between the
radiator and your body.
The transmitter must not be co-located or
operating in conjunction with any other an-
tenna or transmitter.
LSD5561
Starting and driving5-97
Page 402 of 558
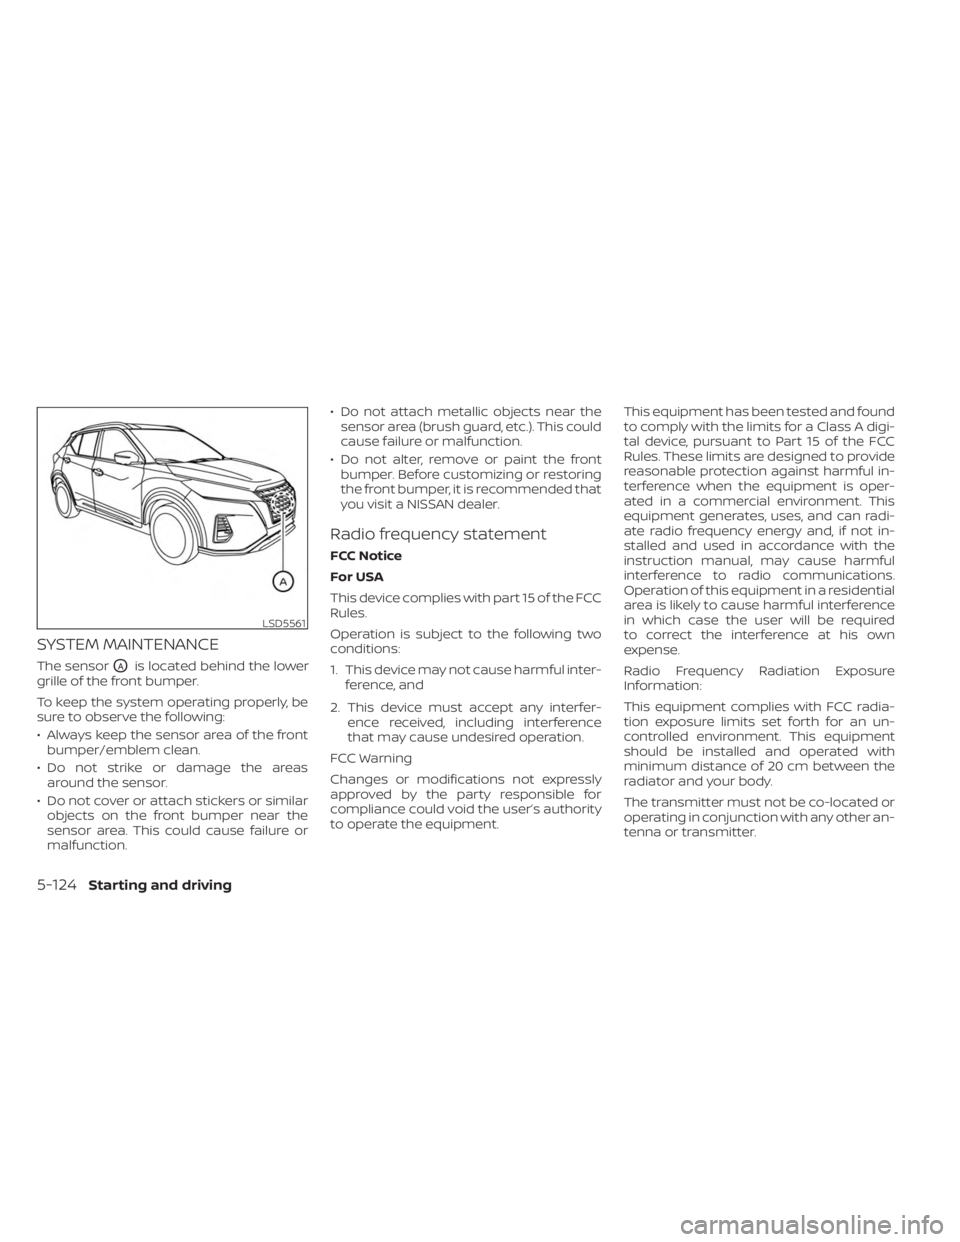
SYSTEM MAINTENANCE
The sensorOAis located behind the lower
grille of the front bumper.
To keep the system operating properly, be
sure to observe the following:
• Always keep the sensor area of the front bumper/emblem clean.
• Do not strike or damage the areas around the sensor.
• Do not cover or attach stickers or similar objects on the front bumper near the
sensor area. This could cause failure or
malfunction. • Do not attach metallic objects near the
sensor area (brush guard, etc.). This could
cause failure or malfunction.
• Do not alter, remove or paint the front bumper. Before customizing or restoring
the front bumper, it is recommended that
you visit a NISSAN dealer.
Radio frequency statement
FCC Notice
For USA
This device complies with part 15 of the FCC
Rules.
Operation is subject to the following two
conditions:
1. This device may not cause harmful inter- ference, and
2. This device must accept any interfer- ence received, including interference
that may cause undesired operation.
FCC Warning
Changes or modifications not expressly
approved by the party responsible for
compliance could void the user’s authority
to operate the equipment. This equipment has been tested and found
to comply with the limits for a Class A digi-
tal device, pursuant to Part 15 of the FCC
Rules. These limits are designed to provide
reasonable protection against harmful in-
terference when the equipment is oper-
ated in a commercial environment. This
equipment generates, uses, and can radi-
ate radio frequency energy and, if not in-
stalled and used in accordance with the
instruction manual, may cause harmful
interference to radio communications.
Operation of this equipment in a residential
area is likely to cause harmful interference
in which case the user will be required
to correct the interference at his own
expense.
Radio Frequency Radiation Exposure
Information:
This equipment complies with FCC radia-
tion exposure limits set forth for an un-
controlled environment. This equipment
should be installed and operated with
minimum distance of 20 cm between the
radiator and your body.
The transmitter must not be co-located or
operating in conjunction with any other an-
tenna or transmitter.
LSD5561
5-124Starting and driving
Page 548 of 558
Bulb check/instrument panel........2-13Bulb replacement...............8-26
C
Capacities and recommended
fuel/lubricants.................10-2Car phone or CB radio............4-66Cargo
(See vehicle loading information).....10-14Cargo cover................. .2-66Chassis control................5-137Check tire pressure..............2-36Child restraint with top tether strap. . . .1-24Child restraints........1-17,1-18,1-19,1-21LATCH (Lower Anchors and Tethers for
CHildren) System..............1-21Precautions on child
restraints.........1-19,1-26,1-33, 1-38Top tether strap anchor point
locations...................1-24Child safety rear door lock..........3-6Cleaning exterior and interior......7-2,7-4Clock set.................... .4-5Cold weather driving............5-145Console box..................2-64Continuously Variable Transmission
(CVT).......................5-17Continuously Variable Transmission (CVT)
fluid..................... .8-9Driving with Continuously Variable
Transmission (CVT).............5-17
Transmission shif t selector lock
release....................5-20Control panel buttons.............4-3Brightness/contrast button........4-7Controls
Audio controls (steering wheel).....4-62Heater and air conditioner controls. .4-41Heater and air conditioner controls
(automatic)................ .4-40Heater and air conditioner controls
(manual).................. .4-32Coolant
Capacities and recommended
fuel/lubricants
...............10-2Changing engine coolant.........8-5Checking engine coolant level......8-5Corrosion protection..............7-7Cruise control................ .5-56Cup holders................. .2-64
D
Daytime Running Light System......2-49Defroster switch
Rear window and outside mirror defroster
switch
.............2-43, 4-34, 4-42Rear window defroster switch.....2-43Dimensions and weights..........10-9Dimmer switch for instrument panel. . .2-50DisplayInformation display............2-24Display controls (see control panel
buttons).................... .4-3
Door locks....................3-4Door open warning light...........2-14Drive belt....................8-13Drive Systems OFF switch..........2-54Driving
Cold weather driving...........5-145Driving with Continuously Variable
Transmission (CVT).............5-17Precautions when starting and
driving.................... .5-4Driving the vehicle...............5-17
E
Eco Drive Report................2-10Economy - fuel................5-129Emergency call (SOS) button........2-57Emergency engine shutoff.......5-13,6-2Emission control information label. . . .10-11Emission control system warranty. . . .10-21Engine
Before starting the engine........5-15Capacities and recommended
fuel/lubricants...............10-2Changing engine coolant.........8-5Changing engine oil............8-6Changing engine oil filter.........8-6Checking engine coolant level......8-5Checking engine oil level.........8-5Engine compartment check
locations.................. .8-3Engine cooling system...........8-4Engine oil...................8-5
11-2