2023 NISSAN FRONTIER horn
[x] Cancel search: hornPage 16 of 572

1. Vents (P. 4-28)
2. Headlight/fog lights (if so equipped)/turn signal switch (P. 2-43)
3. Bluetooth® Hands-Free Phone System
(P. 4-2)
Audio system controls (P. 4-2)
4. Driver supplemental air bag (P. 1-70) Horn (P. 2-50)
5. Meters and gauges (P. 2-4) Warning and indicator lights (P. 2-11)
Vehicle information display (P. 2-22)
6. Cruise control switches (if so equipped)
(P. 5-50)
Intelligent cruise control (ICC) switches
(if so equipped) (P. 5-52)
7. Wiper and washer switch (P. 2-42)
8. Climate controls (P. 4-29, 4-38) Outside mirror defroster switch
(if so equipped) (P. 2-43)
9. Storage (P. 2-67)
10. Audio system (P. 4-2)
11. Front passenger air bag status light
(P. 1-80)
Hazard warning flasher switch (P. 6-2)
Idling stop OFF switch (P. 5-129)
12. Front passenger supplemental air bag
(P. 1-70)
13. Front passenger supplemental knee air
bag (P. 1-87)
14. Glove box (P. 2-71)
15. Power outlet (P. 2-60)
LII2716
INSTRUMENT PANEL
0-6Illustrated table of contents
Page 116 of 572

2 Instruments and controls
Instrument panel................................2-2
Meters and gauges .............................2-4
Speedometer and odometer .................2-4
Tachometer ..................................2-6
Engine coolant temperature gauge ..........2-6
Fuel gauge ................................... 2-7
Distance To Empty (DTE) ..................... 2-7
Auxiliary gauges (if so equipped) .............2-8
Off-road and 4–Wheel Drive (4WD)
monitor (if so equipped) ......................2-9
Eco Drive Report (if so equipped) .............2-9
Warning lights, indicator lights and audible
reminders ....................................... 2-11
Checking lights .............................. 2-13
Warning/Indicator lights (red) ...............2-13
Warning/Indicator lights (yellow) ............2-16
Warning/Indicator lights (other) .............2-20
Audible reminders ........................... 2-21
Vehicle information display .....................2-22
How to use the vehicle information
display ...................................... 2-22
Startup display .............................. 2-23
Trip computer ............................... 2-24
Settings ..................................... 2-26
Vehicle information display warnings
and indicators ............................... 2-33Security systems
............................... 2-39
Vehicle security system (if so equipped) .....2-39
NISSAN Vehicle Immobilizer System .........2-41
Wiper and washer switch .......................2-42
Switch operation ............................ 2-42
Outside mirror defroster switch
(if so equipped) ................................. 2-43
Headlight and turn signal switch ...............2-43
Headlight control switch ....................2-43
Daytime Running Lights (DRL) system
(Type A) (if so equipped) .....................2-48
LED Daytime Running Lights (DRL)
system (Type B) (if so equipped) .............2-48
Instrument brightness control ..............2-49
Turn signal switch ........................... 2-49
Fog light switch (if so equipped) .............2-49
Horn ........................................... 2-50
Cargo lamp switch ............................. 2-50
He
ated seat switches (if so equipped) ..........2-51
Heated steering wheel switch (if so equipped) . . . 2-52
Warning systems switch (if so equipped) .......2-52
Vehicle Dynamic Control (VDC) OFF switch .....2-53
Hill descent control switch (if so equipped) .....2-54
Electronic locking rear differential (E-Lock)
system switch (if so equipped) .................2-55
Page 118 of 572

1. Vents (P. 4-28)
2. Headlight/fog lights (if so equipped)/turn signal switch (P. 2-43) 3. Bluetooth® Hands-Free Phone System
(P. 4-2)
Audio system controls (P. 4-2) 4. Driver supplemental air bag (P. 1-70)
Horn (P. 2-50)
5. Meters and gauges (P. 2-4) Warning and indicator lights (P. 2-11)
Vehicle information display (P. 2-22)
6. Cruise control switches (if so equipped)
(P. 5-50)
Intelligent cruise control (ICC) switches
(if so equipped) (P. 5-52)
7. Wiper and washer switch (P. 2-42)
8. Climate controls (P. 4-29, 4-38) Outside mirror defroster switch
(if so equipped) (P. 2-43)
9. Storage (P. 2-67)
10. Audio system (P. 4-2)
11. Front passenger air bag status light
(P. 1-80)
Hazard warning flasher switch (P. 6-2)
Idling stop OFF switch (P. 5-129)
12. Front passenger supplemental air bag
(P. 1-70)
13. Front passenger supplemental knee air
bag (P. 1-87)
14. Glove box (P. 2-71)
15. Power outlet (P. 2-60)
16. Storage (P. 2-67)
17. Heated seats (if so equipped) (P. 2-51)
18. USB connection port (P. 4-2) AUX input (if so equipped) (P. 4-2)
19. Shif t lever (P. 5-20)
LII2716
INSTRUMENT PANEL
2-2Instruments and controls
Page 145 of 572

Vehicle Settings
The vehicle settings allow the user to change the settings for lights, wipers, locking, keys, and other vehicle settings.
Some menu items shown below may not be equipped on your vehicle.
Menu itemExplanation
Rear Door Alert Displays the available rear Door Alert options.
Alert and Horn When selected, the alert is displayed and the horn sounds.
Alert Only When selected, only the alert is displayed.
Off When selected, no alert or horn will be active.
Lighting Displays available lighting features of the vehicle.
Welcome Light Allows user to turn the welcome light on or off.
Auto Room Lamp Allows user to turn the auto room lamp feature on or off.
Light Sensitivity Allows user to change when the lights illuminate based on the brightness outside the vehicle.
Light Off Delay Allows user to change the duration of time that the automatic headlights stay on af ter the vehicle is shut off.
Turn indicator Displays available turn indicator options.
3 Flash Pass Allows user to turn the 3 flash pass on or off.
Locking Displays available locking options.
I-Key Door Lock Allows user to turn I-key door lock on or off. When turned on, the request switch on the door is activated.
Selective Unlock Allows user to turn selective unlock on or off. When turned on, only the driver’s door is unlocked af ter the
door unlock operation. When the door handle request switch on the driver’s or front passenger’s side door is
pushed to be unlocked, only the corresponding door is unlocked first. All the doors can be unlocked if the
door unlock operation is performed again within 1 minute. When this item is turned off, all the doors will be
unlocked af ter the door unlock operation is performed once.
Answer Back. Horn Allows user to turn answer back horn on or off.
Auto Unlock Displays available options for the auto door unlock.
Off Doors will have to be manually unlocked.
IGN Off Doors will unlock when the ignition is placed in the OFF position.
Shif t P Doors will unlock when the vehicle is shif ted into P (Park).
Instruments and controls2-29
Page 151 of 572

Rear Door Alert is activated
When the system is enabled, this message
appears when the Rear Door Alert system
is active and can remind the driver to check
the back seat.
• Using the steering wheel switch, a drivercan select “Dismiss Message” to clear the
display for a period of time. If no selection
is made, this message automatically
turns off af ter a period of time.
• Using the steering wheel switch, a driver can select “Disable Alert” to disable the
horn alert for the remainder of the cur-
rent trip.
WARNING
Selecting “Dismiss Message” during a
stop within a trip temporarily dis-
misses the message for that stop with-
out turning the system off. Alerts can
be provided for other stops during the
trip. Selecting “Disable Alert” turns off
the Rear Door Alert system for the re-
mainder of a trip and no audible alert
will be provided.
NOTE:
This system is disabled until a driver en-
ables it using the vehicle information
display. For additional information, “How
to use the vehicle information display ”
(P. 2-22).
For additional information, “Rear Door Alert”
(P. 2-59).
Release Parking Brake
This warning appears in the message area
of the vehicle information display when the
parking brake is set and the vehicle is
driven. Press the brake pedal to release the
parking brake.
Reminder: Turn OFF
Headlights
This warning appears when the headlights
are lef t in the ON position when exiting the
vehicle. Place the headlight switch in the
OFF or AUTO position. For additional infor-
mation, see “Headlight and turn signal
switch” (P. 2-43).
Remote Engine Start Mode
This warning appears in the vehicle infor-
mation display when the vehicle has been
started using the remote start function. To
start the vehicle, apply the brake and place
the ignition switch in the ON position.
Rear seat belt warning
• This warning includes display of the seat belts for rear positions only. Rear seat
belts that are unfastened will appear red.
• If any rear seat belts are unfastened when the ignition switch is pushed to the
ON position, this warning will display for
about one minute, or until dismissed.
• When a rear seat belt is changed from fastened to unfastened, this warning will
display for over one minute, or until
dismissed.
• If the vehicle is driven above 9 mph (15 km/h) during or af ter the status change,
this warning will display and the chime
will sound for over one minute. During
this time, the warning and chime cannot
be dismissed unless the rear seat belt is
fastened again.
Instruments and controls2-35
Page 156 of 572

The system helps deter vehicle thef t but
cannot prevent it, nor can it prevent the
thef t of interior or exterior vehicle compo-
nents in all situations. Always secure your
vehicle even if parking for a brief period.
Never leave your keys in the vehicle, and
always lock the vehicle when unattended.
Be aware of your surroundings, and park in
secure, well-lit areas whenever possible.
Many devices offering additional protec-
tion, such as component locks, identifica-
tion markers, and tracking systems, are
available at auto supply stores and spe-
cialty shops. A NISSAN dealer may also offer
such equipment. Check with your insur-
ance company to see if you may be eligible
for discounts for various thef t protection
features.
How to arm the vehicle security
system
1. Close all windows.(The system can be
armed even if the windows are open.)
2. Remove the Intelligent Key from the vehicle.
3. Close all doors. Lock all doors. The doors can be locked with the power door lock
switch (if the door is opened, locked and
then closed) or with the key fob. Key fob operation:
• Press the
button on the key fob. All
doors lock. The hazard lights flash twice
and the horn beeps once to indicate all
doors are locked.
• When the
button is pressed with all
doors locked, the hazard lights flash twice
and the horn beeps once as a reminder
that the doors are already locked.
The horn may or may not beep.
4. Confirm that the
indicator light
comes on. Theindicator light
stays on for about 30 seconds. The ve-
hicle security system is now pre-armed.
Af ter about 30 seconds the vehicle se-
curity system automatically shif ts into
the armed phase. The
indicator
light begins to flash once every 3 sec-
onds. If, during the 30-second pre-arm
time period, the driver's door is unlocked
by the key fob or the ignition switch is
placed in ACC or ON position, the system
will not arm.
• If the indicator light fails to glow for a
period of time, unlock the door once
and lock it again. •
Even when the driver and/or passen-
gers are in the vehicle, the system will
arm with all doors closed and locked
with the ignition switch placed in the
OFF position.
Vehicle security system activation
The vehicle security system will give the
following alarm:
• The headlights blink and the horn sounds intermittently.
• The alarm automatically turns off af ter a period of time. However, the alarm reacti-
vates if the vehicle is tampered with
again. The alarm can be shut off by un-
locking the driver's door by pressing the
button on the key fob.
The alarm is activated by:
• Opening a door without using the key fob (even if the door is unlocked by using the
inside lock knob or the power door lock
switch).
How to stop an activated alarm
The alarm stops only by pressing thebutton on the key fob.
2-40Instruments and controls
Page 166 of 572

The headlights must be on and the low
beams selected for the fog lights to oper-
ate. The fog lights automatically turn off
when the high beam headlights are
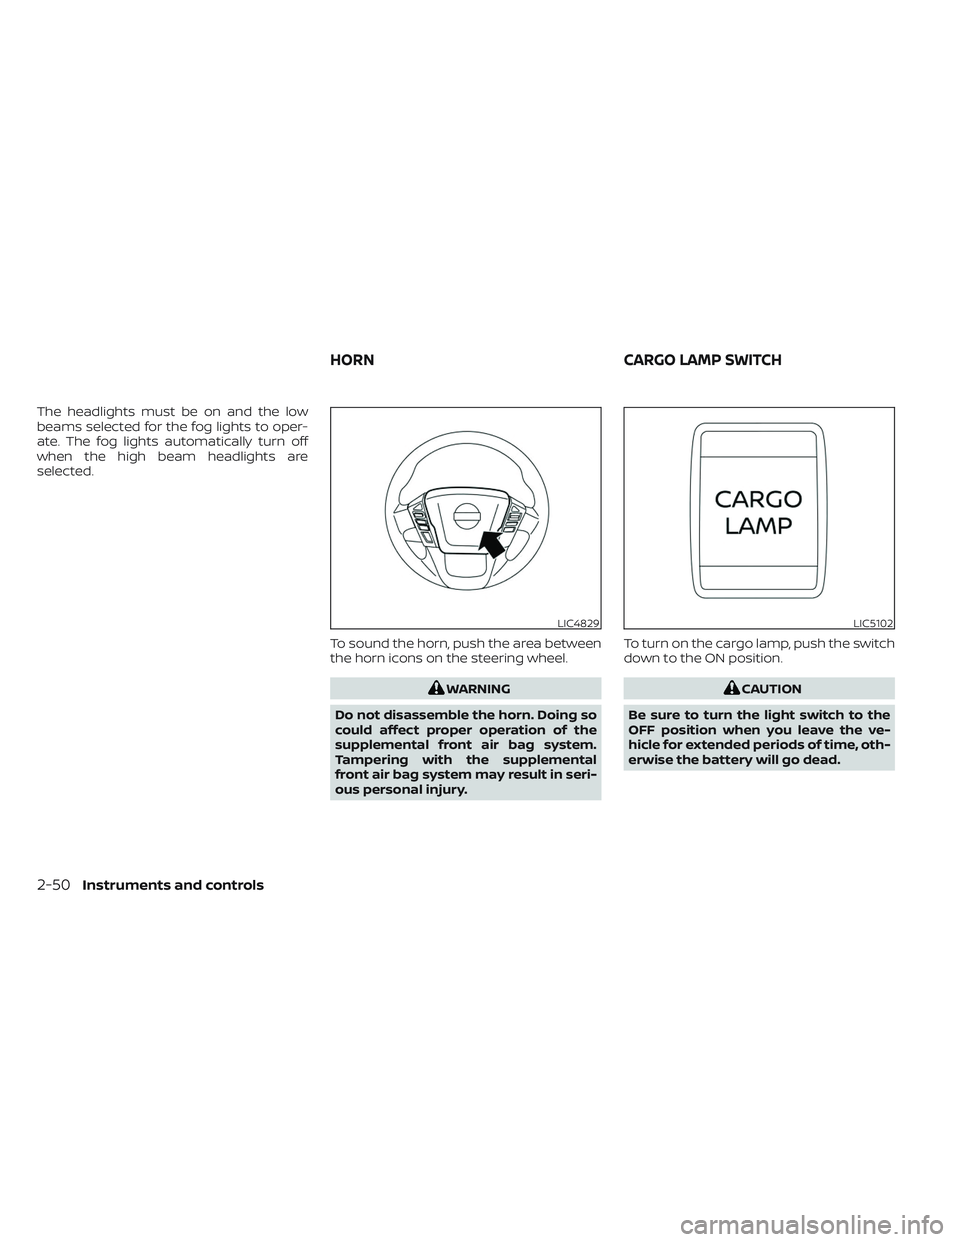
selected.To sound the horn, push the area between
the horn icons on the steering wheel.
WARNING
Do not disassemble the horn. Doing so
could affect proper operation of the
supplemental front air bag system.
Tampering with the supplemental
front air bag system may result in seri-
ous personal injury. To turn on the cargo lamp, push the switch
down to the ON position.CAUTION
Be sure to turn the light switch to the
OFF position when you leave the ve-
hicle for extended periods of time, oth-
erwise the battery will go dead.
LIC4829LIC5102
HORN CARGO LAMP SWITCH
2-50Instruments and controls
Page 176 of 572

When the Rear Door Alert system is acti-
vated and a driver exits the vehicle af ter
arriving at a destination:
• When the driver puts the vehicle in the P(Park) position, a message appears in the
vehicle information display for a driver
to “Dismiss Message” or “Disable Alert” if
desired.
• With the system enabled, when the driver exits the vehicle, an audible alert (horn
sound) will occur unless a rear door is
opened and closed within a short time to
deactivate the alert.
• If the doors are locked before the alert is deactivated by opening a rear door, the
horn will sound.
• If the audible horn alert occurs, a mes- sage will also appear in the vehicle infor-
mation display that states, “Check Rear
Seat for All Articles”.
WARNING
• If the driver selects “Disable Alert”, no
audible alert will be provided regard-
less of rear door open/close status. • There may be times when there is an
object or passenger in the rear seat(s)
but the audible alert does not sound.
For example, this may occur if rear seat
passengers enter or exit the vehicle
during a trip.
• The system does not directly detect
objects or passengers in the rear
seat(s). Instead, it can detect when a
rear door is opened and closed, indicat-
ing that there may be something in the
rear seat(s).
NOTE:
There may be times when the horn
sounds but there are no objects or pas-
sengers in the rear seat(s).
For additional information, see “Rear Door
Alert is activated” (P. 2-35).
12V OUTLETS
The power outlets are for powering electrical
accessories such as cellular telephones.
The power outlet located on the instru-
ment panel is powered only when the igni-
tion switch is placed in the ACC or ON
position.
Open the cap to use a power outlet.
CAUTION
• The outlet and plug may be hot dur-
ing or immediately af ter use.
LIC4831
Instrument panel
POWER OUTLETS
2-60Instruments and controls