2023 NISSAN ALTIMA tire pressure
[x] Cancel search: tire pressurePage 470 of 644
•Tire type and condition may also af-
fect braking effectiveness.
– When replacing tires, install the
specified size of tires on all four
wheels.
– When installing a spare tire, make
sure that it is the proper size and
type as specified on the Tire and
Loading Information label. For ad-
ditional information, see “Tire and
Loading Information label”
(P. 10-14).
– For additional information, see
“Wheels and tires” (P. 8-29).
The ABS controls the brakes so the wheels
do not lock during hard braking or when
braking on slippery surfaces. The system
detects the rotation speed at each wheel
and varies the brake fluid pressure to pre-
vent each wheel from locking and sliding.
By preventing each wheel from locking, the
system helps the driver maintain steering
control and helps to minimize swerving
and spinning on slippery surfaces.Using the system
Depress the brake pedal and hold it down.
Depress the brake pedal with firm steady
pressure, but do not pump the brakes. The
Anti-lock Braking System will operate to
prevent the wheels from locking up. Steer
the vehicle to avoid obstacles.
WARNING
Do not pump the brake pedal. Doing so
may result in increased stopping
distances.
Self-test feature
The Anti-lock Braking System (ABS) in-
cludes electronic sensors, electric pumps,
hydraulic solenoids and a computer. The
computer has a built-in diagnostic feature
that tests the system each time you start
the engine and move the vehicle at a low
speed in forward or reverse. When the self-
test occurs, you may hear a “clunk” noise
and/or feel a pulsation in the brake pedal.
This is normal and does not indicate a mal-
function. If the computer senses a mal-
function, it switches the ABS off and illumi-
nates the ABS warning light on the instrument panel. The brake system then
operates normally but without anti-lock
assistance.
If the ABS warning light illuminates during
the self-test or while driving, have the ve-
hicle checked. It is recommended that you
visit a NISSAN dealer for this service.
Normal operation
The Anti-lock Braking System (ABS) oper-
ates at speeds abov
e3-6mph(5-10
km/h). The speed varies according to road
conditions.
When the ABS senses that one or more
wheels are close to locking up, the actuator
rapidly applies and releases hydraulic pres-
sure. This action is similar to pumping the
brakes very quickly. You may feel a pulsa-
tion in the brake pedal and hear a noise
from under the hood or feel a vibration
from the actuator when it is operating. This
is normal and indicates that the ABS is op-
erating properly. However, the pulsation
may indicate that road conditions are haz-
ardous and extra care is required while
driving.
5-174Starting and driving
Page 485 of 644
6 In case of emergency
Hazard warning flasher switch..................6-2
Emergency engine shut off ......................6-2
Flat tire ..........................................6-3
Tire Pressure Monitoring System
(TPMS) .......................................6-3
Changing a flat tire
(for models with spare tire) ...................6-4
Repairing flat tire (for models with
emergency tire puncture repair kit) ...........6-11 Jump starting
.................................. 6-17
Push starting ................................... 6-19
If your vehicle overheats ........................6-19
Towing your vehicle ............................ 6-20
Towing recommended by NISSAN ...........6-20
Vehicle recovery
(freeing a stuck vehicle) .....................6-22
Page 487 of 644
TIRE PRESSURE MONITORING
SYSTEM (TPMS)
This vehicle is equipped with the Tire Pres-
sure Monitoring system (TPMS). It monitors
tire pressure of all tires except the spare.
When the low tire pressure warning light is
lit, and the “Tire Pressure Low - Add Air”
warning appears in the vehicle information
display, one or more of your tires is signifi-
cantly under-inflated. If equipped, the sys-
tem also displays pressure of all tires (ex-
cept the spare tire) on the display screen by
sending a signal from a sensor that is in-
stalled in each wheel. If the vehicle is being
driven with low tire pressure, the TPMS will
activate and warn you of it by the low tire
pressure warning light. This system will ac-
tivate only when the vehicle is driven at
speeds above 16 mph (25 km/h). For addi-
tional information, see “Warning lights, indi-
cator lights and audible reminders” (P. 2-9)
and “Tire Pressure Monitoring System
(TPMS)” (P. 5-5).
WARNING
• Radio waves could adversely affect
electric medical equipment. Those
who use a pacemaker should contact
the electric medical equipment
manufacturer for the possible influ-
ences before use.
• If the low tire pressure warning light
illuminates while driving, avoid sud-
den steering maneuvers or abrupt
braking, reduce vehicle speed, pull
off the road to a safe location and
stop the vehicle as soon as possible.
Driving with under-inflated tires may
permanently damage the tires and
increase the likelihood of tire failure.
Serious vehicle damage could occur
and may lead to an accident and
could result in serious personal in-
jury. Check the tire pressure for all
four tires. Adjust the tire pressure to
the recommended COLD tire pres-
sure shown on the Tire and Loading
Information label to turn the low tire
pressure warning light OFF. If the
light still illuminates while driving af-
ter adjusting the tire pressure, a tire
may be flat or the TPMS may be mal-
functioning. If you have a flat tire, re-
place it with a spare tire as soon as possible. If no tire is flat and all tires
are properly inflated, have the ve-
hicle checked. It is recommended
that you visit a NISSAN dealer for this
service.
• When using a wheel without the
TPMS such as the spare tire, the TPMS
will not function and the low tire
pressure warning light will flash for
approximately one minute. Have
your tires replaced and/or TPMS sys-
tem reset as soon as possible. It is
recommended that you visit a
NISSAN dealer for these services.
• Replacing tires with those not origi-
nally specified by NISSAN could af-
fect the proper operation of the
TPMS.
• The Genuine NISSAN Emergency Tire
Repair Sealant or equivalent can be
used for temporarily repairing a tire.
Do not inject any other tire liquid or
aerosol tire sealant into the tires, as
this may cause a malfunction of tire
pressure sensors.
FLAT TIRE
In case of emergency6-3
Page 494 of 644
Installing the spare tire
WARNING
For AWD vehicles - the TEMPORARY USE
ONLY spare tire must be installed to the
rear wheels only. If a front tire is punc-
tured, install the original rear tire onto
the front wheel, then install the TEMPO-
RARY USE ONLY spare tire on the rear.
Failure to do so could cause overheat-
ing to the AWD system
The spare tire is designed for emergency
use. For additional information, see
“Wheels and tires” (P. 8-29). 1. Clean any mud or dirt from the surface
between the wheel and hub.
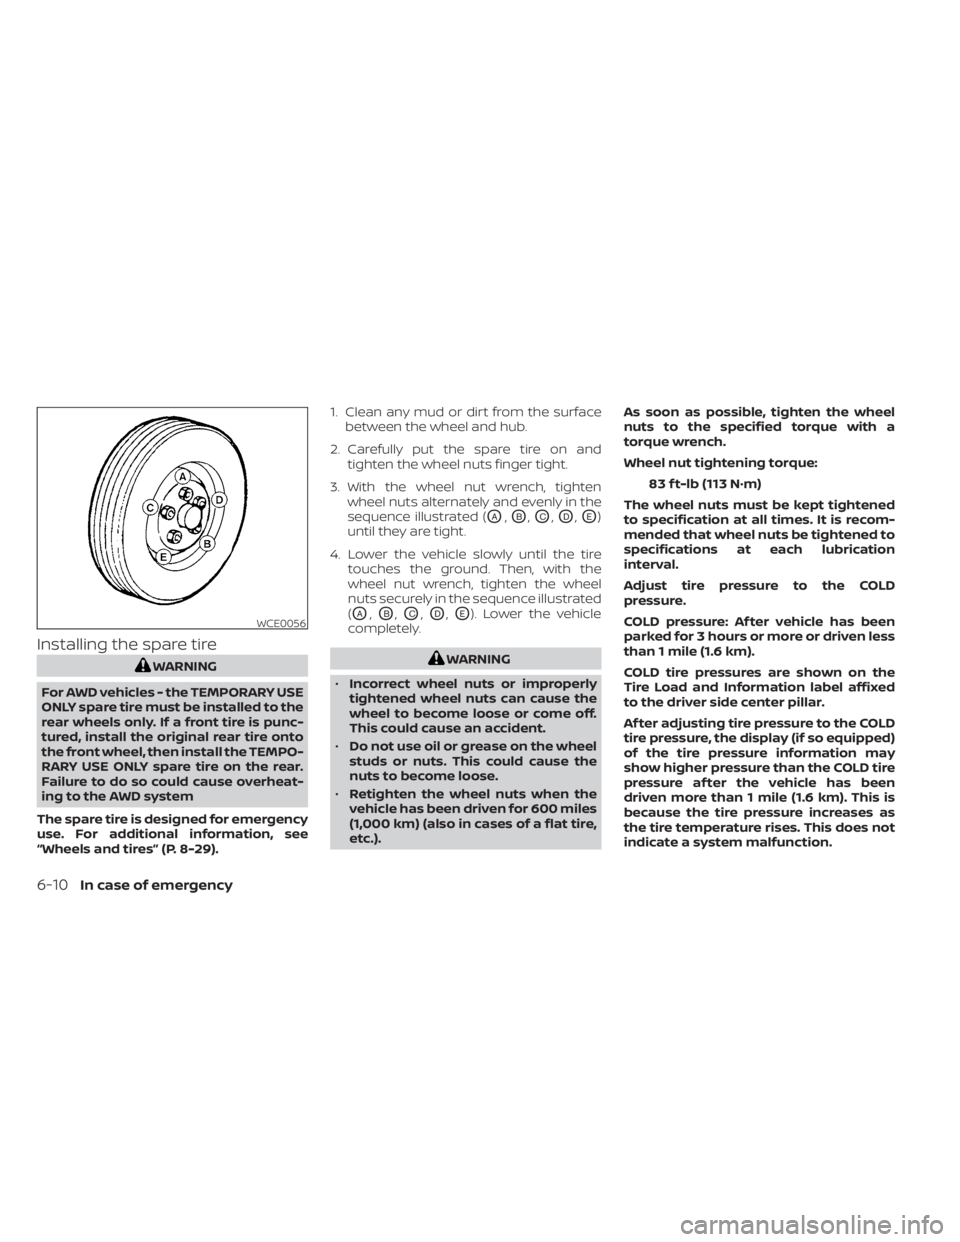
2. Carefully put the spare tire on and tighten the wheel nuts finger tight.
3. With the wheel nut wrench, tighten wheel nuts alternately and evenly in the
sequence illustrated (
OA,OB,OC,OD,OE)
until they are tight.
4. Lower the vehicle slowly until the tire touches the ground. Then, with the
wheel nut wrench, tighten the wheel
nuts securely in the sequence illustrated
(
OA,OB,OC,OD,OE). Lower the vehicle
completely.
WARNING
• Incorrect wheel nuts or improperly
tightened wheel nuts can cause the
wheel to become loose or come off.
This could cause an accident.
• Do not use oil or grease on the wheel
studs or nuts. This could cause the
nuts to become loose.
• Retighten the wheel nuts when the
vehicle has been driven for 600 miles
(1,000 km) (also in cases of a flat tire,
etc.). As soon as possible, tighten the wheel
nuts to the specified torque with a
torque wrench.
Wheel nut tightening torque:
83 f t-lb (113 N·m)
The wheel nuts must be kept tightened
to specification at all times. It is recom-
mended that wheel nuts be tightened to
specifications at each lubrication
interval.
Adjust tire pressure to the COLD
pressure.
COLD pressure: Af ter vehicle has been
parked for 3 hours or more or driven less
than 1 mile (1.6 km).
COLD tire pressures are shown on the
Tire Load and Information label affixed
to the driver side center pillar.
Af ter adjusting tire pressure to the COLD
tire pressure, the display (if so equipped)
of the tire pressure information may
show higher pressure than the COLD tire
pressure af ter the vehicle has been
driven more than 1 mile (1.6 km). This is
because the tire pressure increases as
the tire temperature rises. This does not
indicate a system malfunction.
WCE0056
6-10In case of emergency
Page 495 of 644
5. Securely store the flat tire in the tire welland jacking equipment in the vehicle.
NOTE:Remove the center wheel cap before
storing the flat tire.
6. Place the spare tire cover and the trunk floor carpeting over the damaged tire.
7. Close the trunk.
WARNING
• Always make sure that the spare tire
and jacking equipment are properly
secured af ter use. Such items can be-
come dangerous projectiles in an ac-
cident or sudden stop.
• The spare tire is designed for emer-
gency use. For additional informa-
tion, see “Wheels and tires” (P. 8-29).
REPAIRING FLAT TIRE (for models
with emergency tire puncture
repair kit)
WARNING
• Af ter using Genuine NISSAN Emer-
gency Tire Sealant to repair a minor
tire puncture, do not drive the vehicle
at speeds faster than 50 mph (80
km/h).
• Immediately af ter using the Genuine
NISSAN Emergency Tire Sealant to
repair a minor tire puncture, it is rec-
ommended that you visit a NISSAN
dealer. The Genuine NISSAN Emer-
gency Tire Sealant cannot perma-
nently seal a punctured tire. Continu-
ing operation of the vehicle without a
permanent tire repair can lead to a
crash.
• If you used the Genuine NISSAN
Emergency Tire Sealant to repair a
minor tire puncture, it is recom-
mended that you visit a NISSAN
dealer to replace the TPMS sensor in
addition to repairing or replacing the
tire. •
NISSAN recommends using only
Genuine NISSAN Emergency Tire
Sealant provided with your vehicle.
Other tire sealants may damage the
valve stem seal which can cause the
tire to lose air pressure.
This vehicle does not have a spare tire. The
emergency tire puncture repair kit
(Genuine NISSAN Emergency Tire Sealant)
is supplied with the vehicle instead of a
spare tire. It can be used to temporarily
repair minor tire punctures.
If possible, have the vehicle towed to a fa-
cility that can repair or replace the flat tire.
Using the emergency tire puncture repair
kit may cause a malfunction of the tire
pressure sensor and cause the low tire
pressure warning light to illuminate.
CAUTION
• To avoid the emergency tire puncture
kit being damaged during storage or
use:
– Only use the emergency tire punc-
ture repair kit on your vehicle. Do
not use it on other vehicles.
In case of emergency6-11
Page 496 of 644
–Only use the kit to inflate the tires
of your vehicle and to check the
vehicle’s tire pressure.
– Only plug the compressor into a
12-volt DC car power point.
– Keep the kit free of water and dirt.
– Do not disassemble or modif y the
kit.
– Do not drop the kit or allow hard
impacts to the kit.
• Do not use the emergency tire punc-
ture repair kit under the following
conditions. It is recommended that
you visit a NISSAN dealer or profes-
sional road assistance.
– when the sealant has passed its
expiration date (shown on the la-
bel attached to the bottle)
– when the cut or the puncture is
approximately 0.25 in (6 mm) or
longer
– when the tire sidewall is damaged
– when the vehicle has been driven
with extremely low tire pressure
– when the tire has come off the in-
side or the outside of the wheel
– when the tire wheel is damaged
– when two or more tires are flat If you have a flat tire, follow the instructions
below.
Stopping the vehicle
1. Safely move the vehicle off the road and
away from traffic.
2. Turn on the hazard warning flashers.
3. Park on a level surface and apply the parking brake.
4. Move the shif t lever to the P (Park) position.
5. Turn off the engine.
6. Raise the hood to warn other traffic and to signal professional road assistance
personnel that you need assistance.
7. Have all passengers get out of the ve- hicle and stand in a safe place, away
from traffic and clear of the vehicle.
WARNING
• Make sure the parking brake is se-
curely applied and the vehicle is
placed into the P (Park) position.
• Never repair tires when the vehicle is
on a slope, ice or slippery areas. This
is hazardous.
• Never repair tires if oncoming traffic
is close to your vehicle. Wait for pro-
fessional road assistance.
6-12In case of emergency
Page 497 of 644
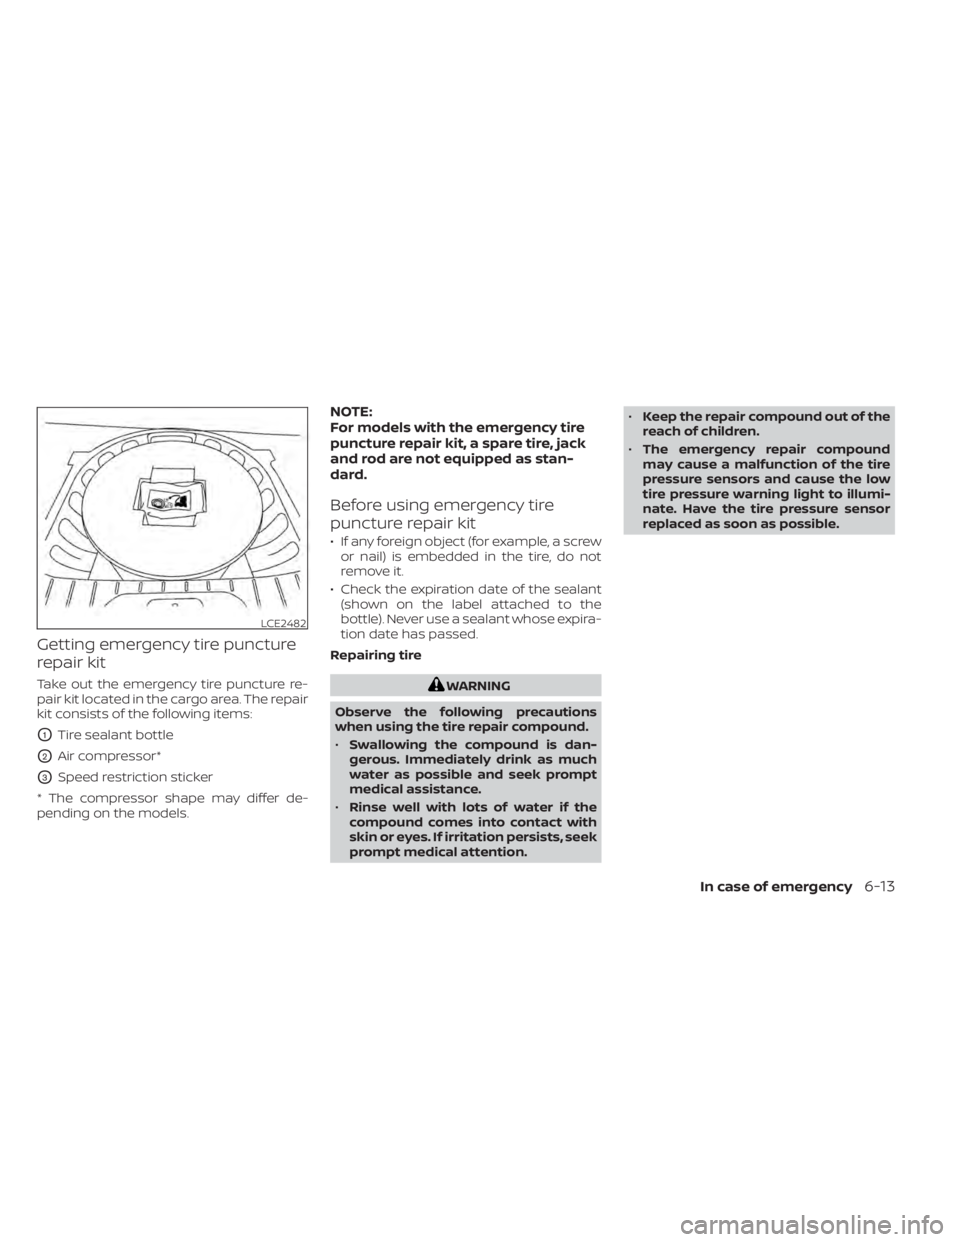
Getting emergency tire puncture
repair kit
Take out the emergency tire puncture re-
pair kit located in the cargo area. The repair
kit consists of the following items:
O1Tire sealant bottle
O2Air compressor*
O3Speed restriction sticker
* The compressor shape may differ de-
pending on the models.
NOTE:
For models with the emergency tire
puncture repair kit, a spare tire, jack
and rod are not equipped as stan-
dard.
Before using emergency tire
puncture repair kit
• If any foreign object (for example, a screw or nail) is embedded in the tire, do not
remove it.
• Check the expiration date of the sealant (shown on the label attached to the
bottle). Never use a sealant whose expira-
tion date has passed.
Repairing tire
WARNING
Observe the following precautions
when using the tire repair compound.
• Swallowing the compound is dan-
gerous. Immediately drink as much
water as possible and seek prompt
medical assistance.
• Rinse well with lots of water if the
compound comes into contact with
skin or eyes. If irritation persists, seek
prompt medical attention. •
Keep the repair compound out of the
reach of children.
• The emergency repair compound
may cause a malfunction of the tire
pressure sensors and cause the low
tire pressure warning light to illumi-
nate. Have the tire pressure sensor
replaced as soon as possible.
LCE2482
In case of emergency6-13
Page 499 of 644
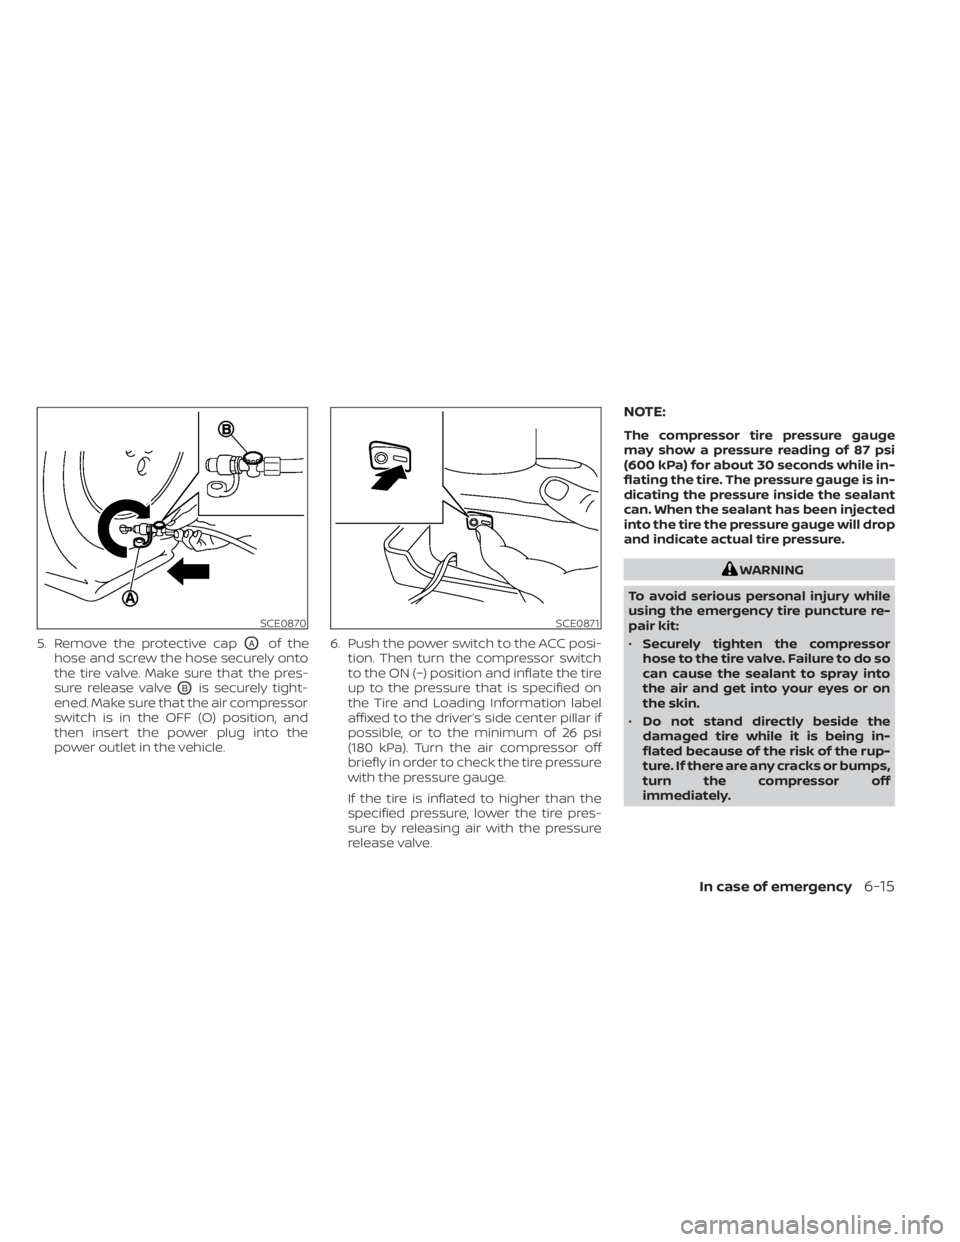
5. Remove the protective capOAof the
hose and screw the hose securely onto
the tire valve. Make sure that the pres-
sure release valve
OBis securely tight-
ened. Make sure that the air compressor
switch is in the OFF (O) position, and
then insert the power plug into the
power outlet in the vehicle. 6. Push the power switch to the ACC posi-
tion. Then turn the compressor switch
to the ON (−) position and inflate the tire
up to the pressure that is specified on
the Tire and Loading Information label
affixed to the driver’s side center pillar if
possible, or to the minimum of 26 psi
(180 kPa). Turn the air compressor off
briefly in order to check the tire pressure
with the pressure gauge.
If the tire is inflated to higher than the
specified pressure, lower the tire pres-
sure by releasing air with the pressure
release valve.
NOTE:
The compressor tire pressure gauge
may show a pressure reading of 87 psi
(600 kPa) for about 30 seconds while in-
flating the tire. The pressure gauge is in-
dicating the pressure inside the sealant
can. When the sealant has been injected
into the tire the pressure gauge will drop
and indicate actual tire pressure.
WARNING
To avoid serious personal injury while
using the emergency tire puncture re-
pair kit:
• Securely tighten the compressor
hose to the tire valve. Failure to do so
can cause the sealant to spray into
the air and get into your eyes or on
the skin.
• Do not stand directly beside the
damaged tire while it is being in-
flated because of the risk of the rup-
ture. If there are any cracks or bumps,
turn the compressor off
immediately.
SCE0870SCE0871
In case of emergency6-15