2023 NISSAN ALTIMA light
[x] Cancel search: lightPage 474 of 644
The chassis control is an electric control
module that includes the following
functions:
• Intelligent Trace Control
• Active Ride Control
INTELLIGENT TRACE CONTROL
(I-TC)
This system senses driving based on the
driver’s steering and acceleration/braking
patterns, and controls brake pressure at
individual wheels to aid tracing at corners
and help smooth vehicle response.
The I-TC can be set to on (enabled) or off
(disabled) through the vehicle information
display “Settings” page. For additional infor-
mation, see “Vehicle information display —
5 inch (13 cm) Type A (if so equipped)”
(P. 2-18) or “Vehicle information display — 7
inch (18 cm) Type B (if so equipped)” (P. 2-34).
When the VDC system is turned off, the I-TC
is also turned off.
WARNING
The I-TC may not be effective depend-
ing on the driving condition. Always
drive carefully and attentively. When the I-TC is operating, you may feel a
pulsation in the brake pedal and hear a
noise. This is normal and indicates that the
I-TC is operating properly.
Even if the I-TC is turned off, some functions
will remain on to assist the driver (for ex-
ample, avoidance scenes).
ACTIVE RIDE CONTROL (ARC)
This system senses upper body motion
(based on wheel speed information) and
controls engine torque and four wheel
brake pressure. This will enhance ride com-
fort in effort to restrain uncomfortable up-
per body movement when passing over
undulated road surfaces. This system
comes into effect above 25 mph (40 km/h).
When the VDC system is turned off, the ARC
is also turned off.
When the ARC is operating, you may hear
noise and sense slight deceleration. This is
normal and indicates that the ARC is oper-
ating properly.
WARNING
• Never rely solely on the hill start as-
sist system to prevent the vehicle
from moving backward on a hill. Al-
ways drive carefully and attentively.
Depress the brake pedal when the
vehicle is stopped on a steep hill. Be
especially careful when stopped on a
hill on frozen or muddy roads. Failure
to prevent the vehicle from rolling
backwards may result in a loss of
control of the vehicle and possible
serious injury or death.
• The hill start assist system is not de-
signed to hold the vehicle at a stand-
still on a hill. Depress the brake pedal
when the vehicle is stopped on a
steep hill. Failure to do so may cause
the vehicle to roll backwards and
may result in a collision or serious
personal injury.
• The hill start assist system may not
prevent the vehicle from rolling
backwards on a hill under all load or
road conditions. Always be prepared
to depress the brake pedal to prevent
the vehicle from rolling backwards.
Failure to do so may result in a colli-
sion or serious personal injury.
CHASSIS CONTROL (if so equipped) HILL START ASSIST SYSTEM
5-178Starting and driving
Page 486 of 644
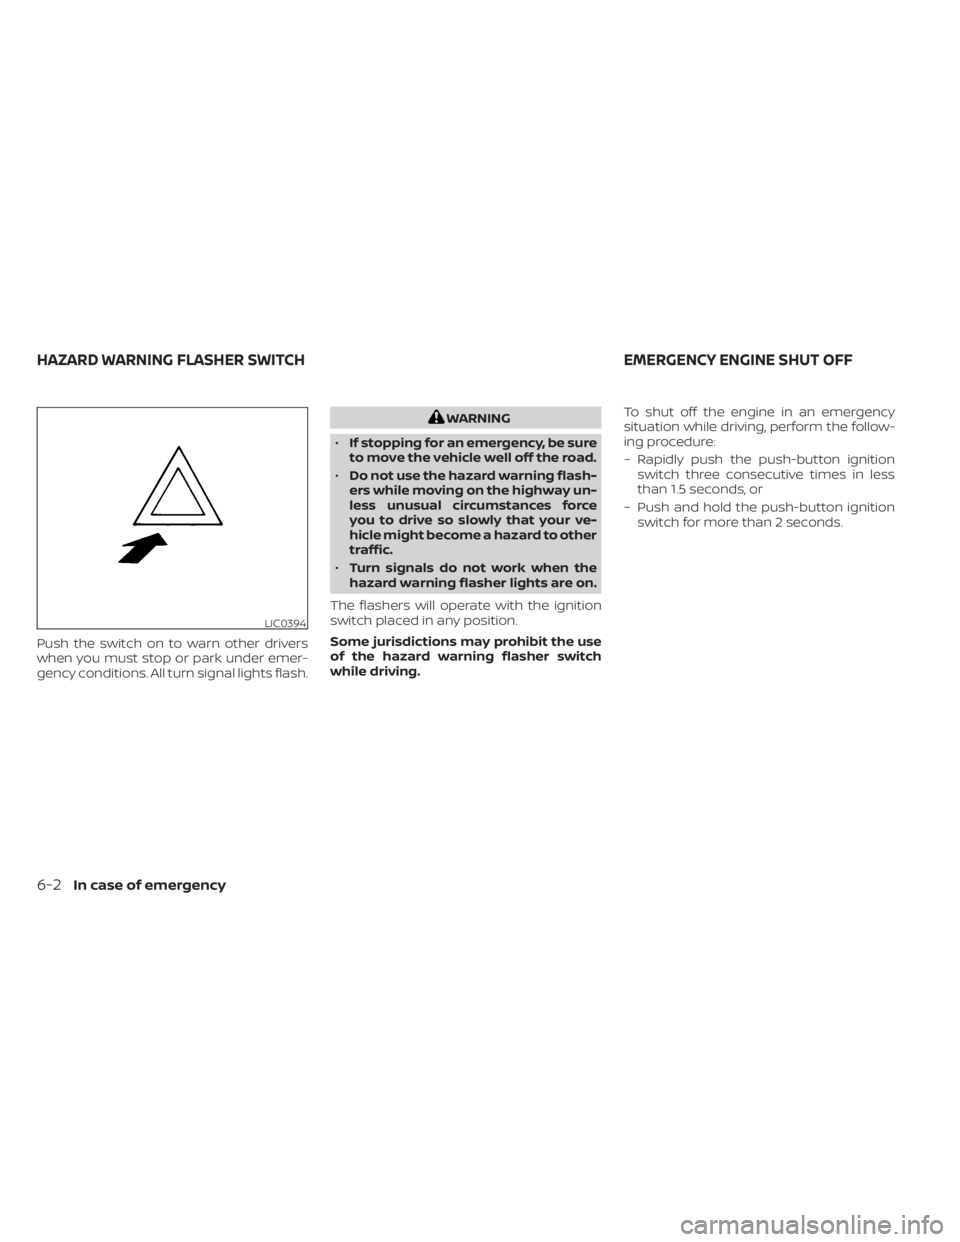
Push the switch on to warn other drivers
when you must stop or park under emer-
gency conditions. All turn signal lights flash.
WARNING
• If stopping for an emergency, be sure
to move the vehicle well off the road.
• Do not use the hazard warning flash-
ers while moving on the highway un-
less unusual circumstances force
you to drive so slowly that your ve-
hicle might become a hazard to other
traffic.
• Turn signals do not work when the
hazard warning flasher lights are on.
The flashers will operate with the ignition
switch placed in any position.
Some jurisdictions may prohibit the use
of the hazard warning flasher switch
while driving. To shut off the engine in an emergency
situation while driving, perform the follow-
ing procedure:
– Rapidly push the push-button ignition
switch three consecutive times in less
than 1.5 seconds, or
– Push and hold the push-button ignition switch for more than 2 seconds.
LIC0394
HAZARD WARNING FLASHER SWITCH EMERGENCY ENGINE SHUT OFF
6-2In case of emergency
Page 487 of 644
TIRE PRESSURE MONITORING
SYSTEM (TPMS)
This vehicle is equipped with the Tire Pres-
sure Monitoring system (TPMS). It monitors
tire pressure of all tires except the spare.
When the low tire pressure warning light is
lit, and the “Tire Pressure Low - Add Air”
warning appears in the vehicle information
display, one or more of your tires is signifi-
cantly under-inflated. If equipped, the sys-
tem also displays pressure of all tires (ex-
cept the spare tire) on the display screen by
sending a signal from a sensor that is in-
stalled in each wheel. If the vehicle is being
driven with low tire pressure, the TPMS will
activate and warn you of it by the low tire
pressure warning light. This system will ac-
tivate only when the vehicle is driven at
speeds above 16 mph (25 km/h). For addi-
tional information, see “Warning lights, indi-
cator lights and audible reminders” (P. 2-9)
and “Tire Pressure Monitoring System
(TPMS)” (P. 5-5).
WARNING
• Radio waves could adversely affect
electric medical equipment. Those
who use a pacemaker should contact
the electric medical equipment
manufacturer for the possible influ-
ences before use.
• If the low tire pressure warning light
illuminates while driving, avoid sud-
den steering maneuvers or abrupt
braking, reduce vehicle speed, pull
off the road to a safe location and
stop the vehicle as soon as possible.
Driving with under-inflated tires may
permanently damage the tires and
increase the likelihood of tire failure.
Serious vehicle damage could occur
and may lead to an accident and
could result in serious personal in-
jury. Check the tire pressure for all
four tires. Adjust the tire pressure to
the recommended COLD tire pres-
sure shown on the Tire and Loading
Information label to turn the low tire
pressure warning light OFF. If the
light still illuminates while driving af-
ter adjusting the tire pressure, a tire
may be flat or the TPMS may be mal-
functioning. If you have a flat tire, re-
place it with a spare tire as soon as possible. If no tire is flat and all tires
are properly inflated, have the ve-
hicle checked. It is recommended
that you visit a NISSAN dealer for this
service.
• When using a wheel without the
TPMS such as the spare tire, the TPMS
will not function and the low tire
pressure warning light will flash for
approximately one minute. Have
your tires replaced and/or TPMS sys-
tem reset as soon as possible. It is
recommended that you visit a
NISSAN dealer for these services.
• Replacing tires with those not origi-
nally specified by NISSAN could af-
fect the proper operation of the
TPMS.
• The Genuine NISSAN Emergency Tire
Repair Sealant or equivalent can be
used for temporarily repairing a tire.
Do not inject any other tire liquid or
aerosol tire sealant into the tires, as
this may cause a malfunction of tire
pressure sensors.
FLAT TIRE
In case of emergency6-3
Page 495 of 644
5. Securely store the flat tire in the tire welland jacking equipment in the vehicle.
NOTE:Remove the center wheel cap before
storing the flat tire.
6. Place the spare tire cover and the trunk floor carpeting over the damaged tire.
7. Close the trunk.
WARNING
• Always make sure that the spare tire
and jacking equipment are properly
secured af ter use. Such items can be-
come dangerous projectiles in an ac-
cident or sudden stop.
• The spare tire is designed for emer-
gency use. For additional informa-
tion, see “Wheels and tires” (P. 8-29).
REPAIRING FLAT TIRE (for models
with emergency tire puncture
repair kit)
WARNING
• Af ter using Genuine NISSAN Emer-
gency Tire Sealant to repair a minor
tire puncture, do not drive the vehicle
at speeds faster than 50 mph (80
km/h).
• Immediately af ter using the Genuine
NISSAN Emergency Tire Sealant to
repair a minor tire puncture, it is rec-
ommended that you visit a NISSAN
dealer. The Genuine NISSAN Emer-
gency Tire Sealant cannot perma-
nently seal a punctured tire. Continu-
ing operation of the vehicle without a
permanent tire repair can lead to a
crash.
• If you used the Genuine NISSAN
Emergency Tire Sealant to repair a
minor tire puncture, it is recom-
mended that you visit a NISSAN
dealer to replace the TPMS sensor in
addition to repairing or replacing the
tire. •
NISSAN recommends using only
Genuine NISSAN Emergency Tire
Sealant provided with your vehicle.
Other tire sealants may damage the
valve stem seal which can cause the
tire to lose air pressure.
This vehicle does not have a spare tire. The
emergency tire puncture repair kit
(Genuine NISSAN Emergency Tire Sealant)
is supplied with the vehicle instead of a
spare tire. It can be used to temporarily
repair minor tire punctures.
If possible, have the vehicle towed to a fa-
cility that can repair or replace the flat tire.
Using the emergency tire puncture repair
kit may cause a malfunction of the tire
pressure sensor and cause the low tire
pressure warning light to illuminate.
CAUTION
• To avoid the emergency tire puncture
kit being damaged during storage or
use:
– Only use the emergency tire punc-
ture repair kit on your vehicle. Do
not use it on other vehicles.
In case of emergency6-11
Page 497 of 644
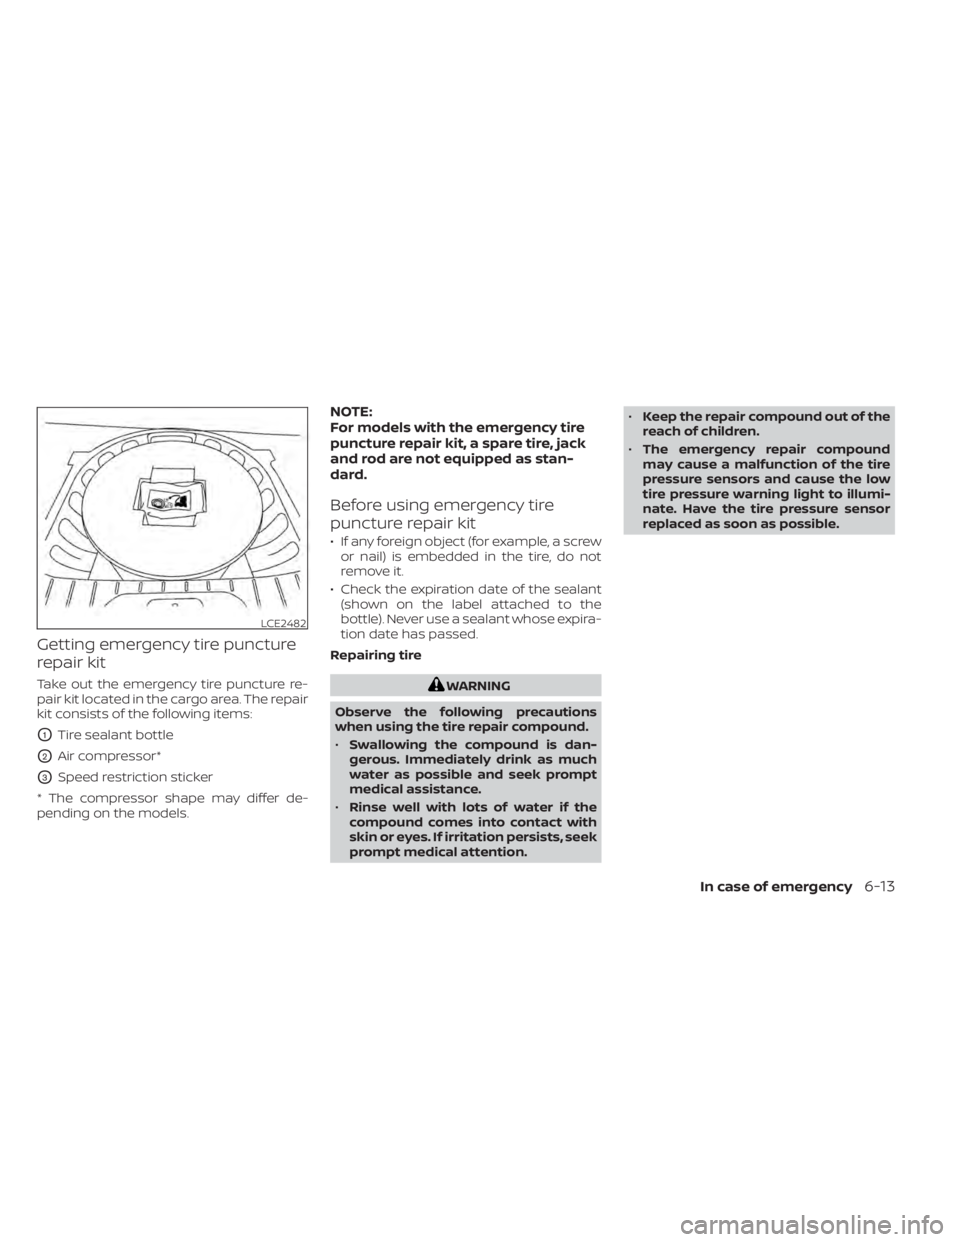
Getting emergency tire puncture
repair kit
Take out the emergency tire puncture re-
pair kit located in the cargo area. The repair
kit consists of the following items:
O1Tire sealant bottle
O2Air compressor*
O3Speed restriction sticker
* The compressor shape may differ de-
pending on the models.
NOTE:
For models with the emergency tire
puncture repair kit, a spare tire, jack
and rod are not equipped as stan-
dard.
Before using emergency tire
puncture repair kit
• If any foreign object (for example, a screw or nail) is embedded in the tire, do not
remove it.
• Check the expiration date of the sealant (shown on the label attached to the
bottle). Never use a sealant whose expira-
tion date has passed.
Repairing tire
WARNING
Observe the following precautions
when using the tire repair compound.
• Swallowing the compound is dan-
gerous. Immediately drink as much
water as possible and seek prompt
medical assistance.
• Rinse well with lots of water if the
compound comes into contact with
skin or eyes. If irritation persists, seek
prompt medical attention. •
Keep the repair compound out of the
reach of children.
• The emergency repair compound
may cause a malfunction of the tire
pressure sensors and cause the low
tire pressure warning light to illumi-
nate. Have the tire pressure sensor
replaced as soon as possible.
LCE2482
In case of emergency6-13
Page 498 of 644
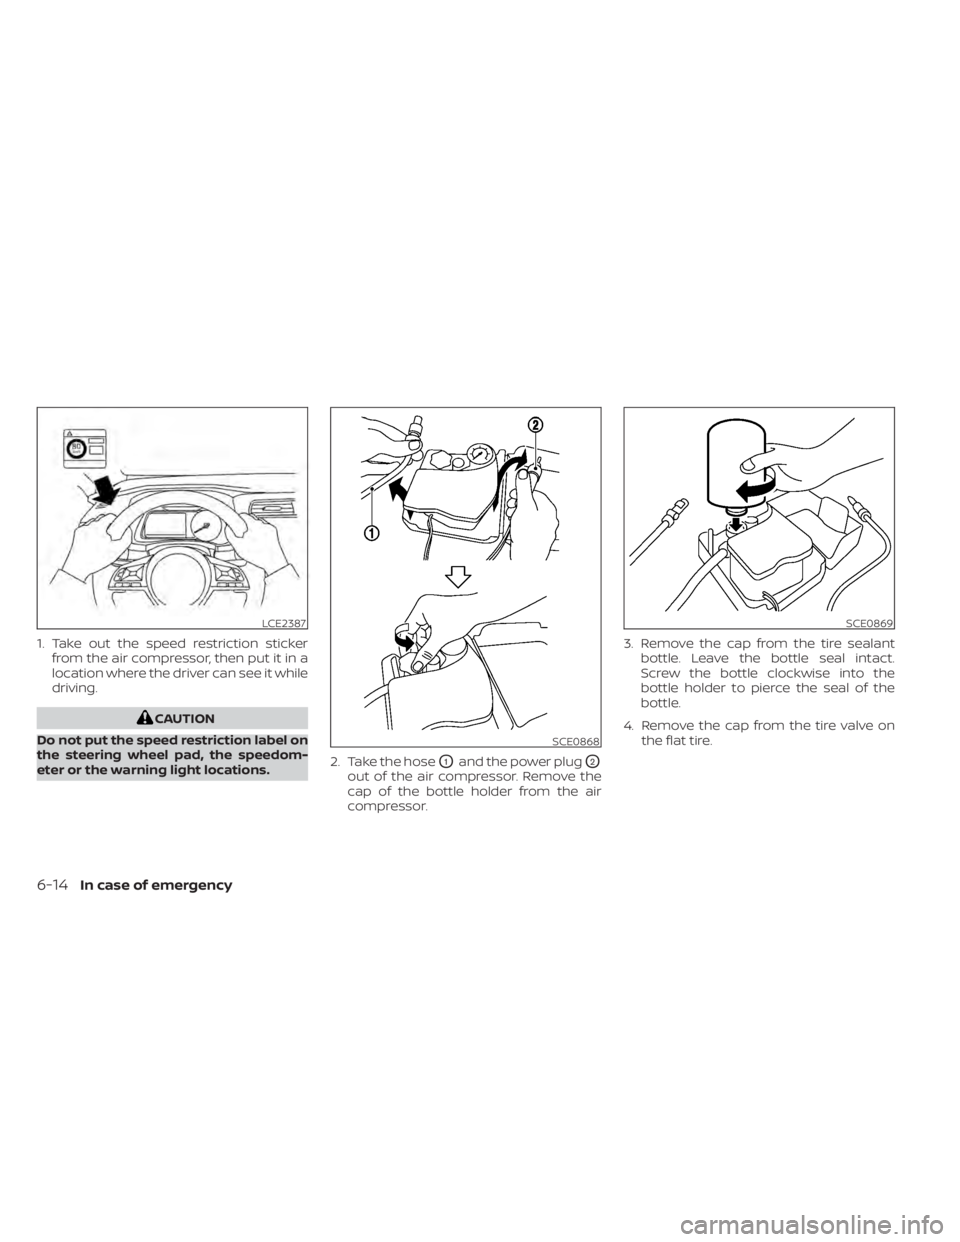
1. Take out the speed restriction stickerfrom the air compressor, then put it in a
location where the driver can see it while
driving.
CAUTION
Do not put the speed restriction label on
the steering wheel pad, the speedom-
eter or the warning light locations. 2. Take the hose
O1and the power plugO2
out of the air compressor. Remove the
cap of the bottle holder from the air
compressor.3. Remove the cap from the tire sealant
bottle. Leave the bottle seal intact.
Screw the bottle clockwise into the
bottle holder to pierce the seal of the
bottle.
4. Remove the cap from the tire valve on the flat tire.
LCE2387
SCE0868
SCE0869
6-14In case of emergency
Page 502 of 644
WARNING
Always follow the instructions below.
Failure to do so could result in damage
to the charging system and cause per-
sonal injury.
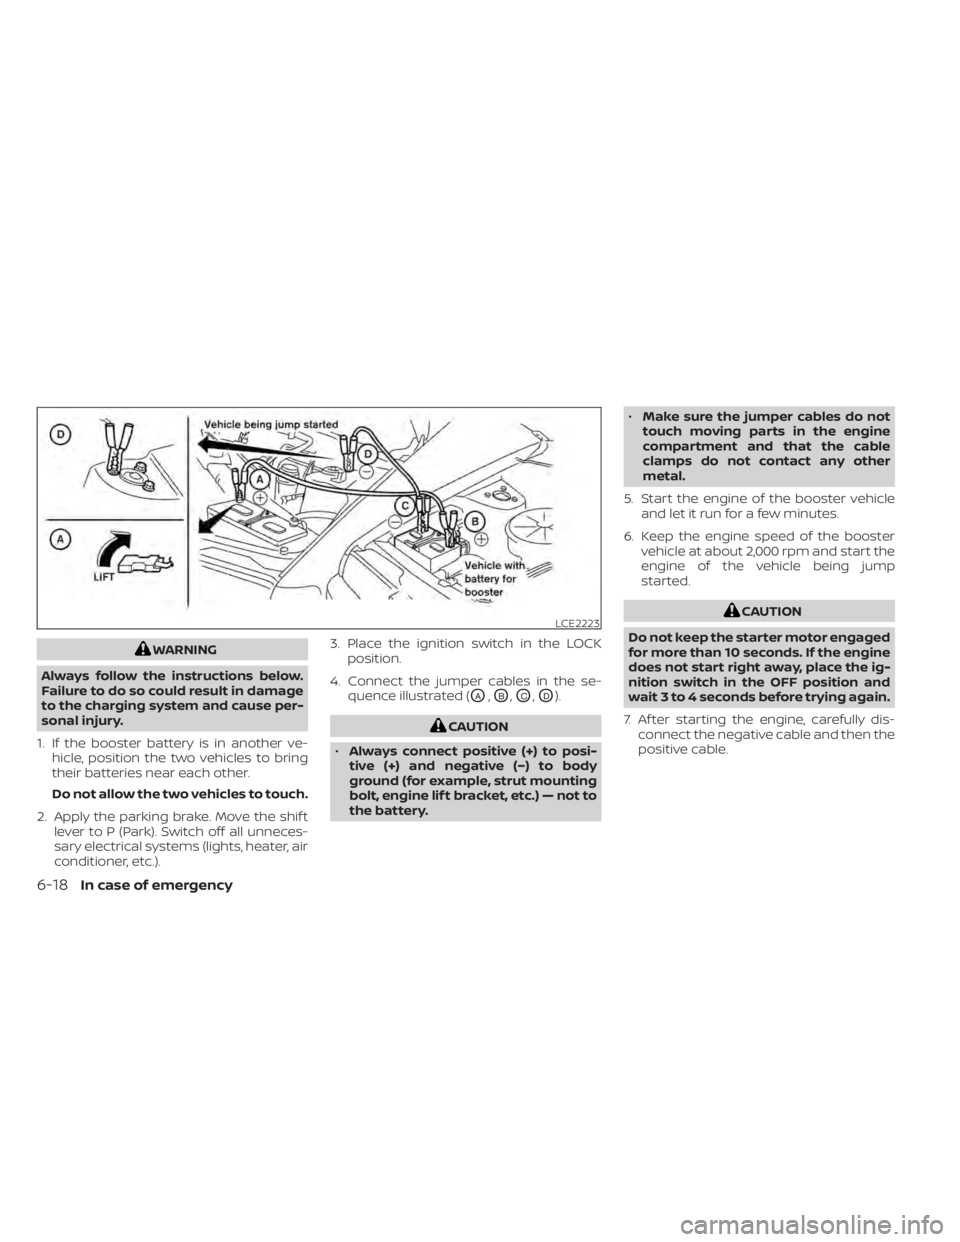
1. If the booster battery is in another ve- hicle, position the two vehicles to bring
their batteries near each other.
Do not allow the two vehicles to touch.
2. Apply the parking brake. Move the shif t lever to P (Park). Switch off all unneces-
sary electrical systems (lights, heater, air
conditioner, etc.). 3. Place the ignition switch in the LOCK
position.
4. Connect the jumper cables in the se- quence illustrated (
OA,OB,OC,OD).
CAUTION
• Always connect positive (+) to posi-
tive (+) and negative (−) to body
ground (for example, strut mounting
bolt, engine lif t bracket, etc.) — not to
the battery. •
Make sure the jumper cables do not
touch moving parts in the engine
compartment and that the cable
clamps do not contact any other
metal.
5. Start the engine of the booster vehicle and let it run for a few minutes.
6. Keep the engine speed of the booster vehicle at about 2,000 rpm and start the
engine of the vehicle being jump
started.
CAUTION
Do not keep the starter motor engaged
for more than 10 seconds. If the engine
does not start right away, place the ig-
nition switch in the OFF position and
wait 3 to 4 seconds before trying again.
7. Af ter starting the engine, carefully dis- connect the negative cable and then the
positive cable.LCE2223
6-18In case of emergency
Page 510 of 644
In order to maintain the appearance of
your vehicle, it is important to take proper
care of it.
To protect the paint surfaces, wash your
vehicle as soon as you can:
• Af ter a rainfall to prevent possible dam-age from acid rain.
• Af ter driving on coastal roads.
• When contaminants such as soot, bird droppings, tree sap, metal particles or
bugs get on the paint surface.
• When dust or mud builds up on the surface.
Whenever possible, store or park your ve-
hicle inside a garage or in a covered area.
When it is necessary to park outside, park in
a shady area or protect the vehicle with a
body cover.
Be careful not to scratch the paint sur-
face when putting on or removing the
body cover.
WASHING
Wash dirt off with a wet sponge and plenty
of water. Clean the vehicle thoroughly us-
ing a mild soap, a special vehicle soap or
general purpose dishwashing liquid mixed
with clean, lukewarm (never hot) water.
CAUTION
• Do not concentrate water spray di-
rectly on the sonar sensors (if so
equipped) on the bumper as this will
result in damage to the sensors. Do
not use pressure washers capable of
spraying water over 1,200 psi (8,274
kPa) to wash your vehicle. Use of
high-pressure washers over 1,200 psi
(8,274 kPa) can result in damage to or
removal of paint or graphics. Avoid
using a high-pressure washer closer
than 12 inches (30 cm) to the vehicle.
Always use a wide-angle nozzle only,
keep the nozzle moving and do not
concentrate the water spray on any
one area.
• Do not use car washes that use acid
in the detergent. Some car washes,
especially brushless ones, use some
acid for cleaning. The acid may react
with some plastic vehicle compo-
nents, causing them to crack. This
could affect their appearance, and
also could cause them not to func-
tion properly. Always check with your
car wash to confirm that acid is not
used. •
Do not wash the vehicle with strong
household soap, strong chemical de-
tergents, gasoline or solvents.
• Do not wash the vehicle in direct sun-
light or while the vehicle body is hot,
as the surface may become
water-spotted.
• Avoid using tight-napped or rough
cloths, such as washing mitts. Care
must be taken when removing
caked-on dirt or other foreign sub-
stances so the paint surface is not
scratched or damaged.
Rinse the vehicle thoroughly with plenty of
clean water.
Inside edges, seams and folds on the
doors, hatches and hood are particularly
vulnerable to the effects of road salt. There-
fore, these areas must be cleaned regularly.
Take care that the drain holes in the lower
edge of the door are open. Spray water
under the body and in the wheel wells to
loosen the dirt and wash away road salt.
A damp chamois can be used to dry the
vehicle to avoid water spots.
CLEANING EXTERIOR
7-2Appearance and care