2023 NISSAN ALTIMA ad blue
[x] Cancel search: ad bluePage 216 of 644
Menu itemResult
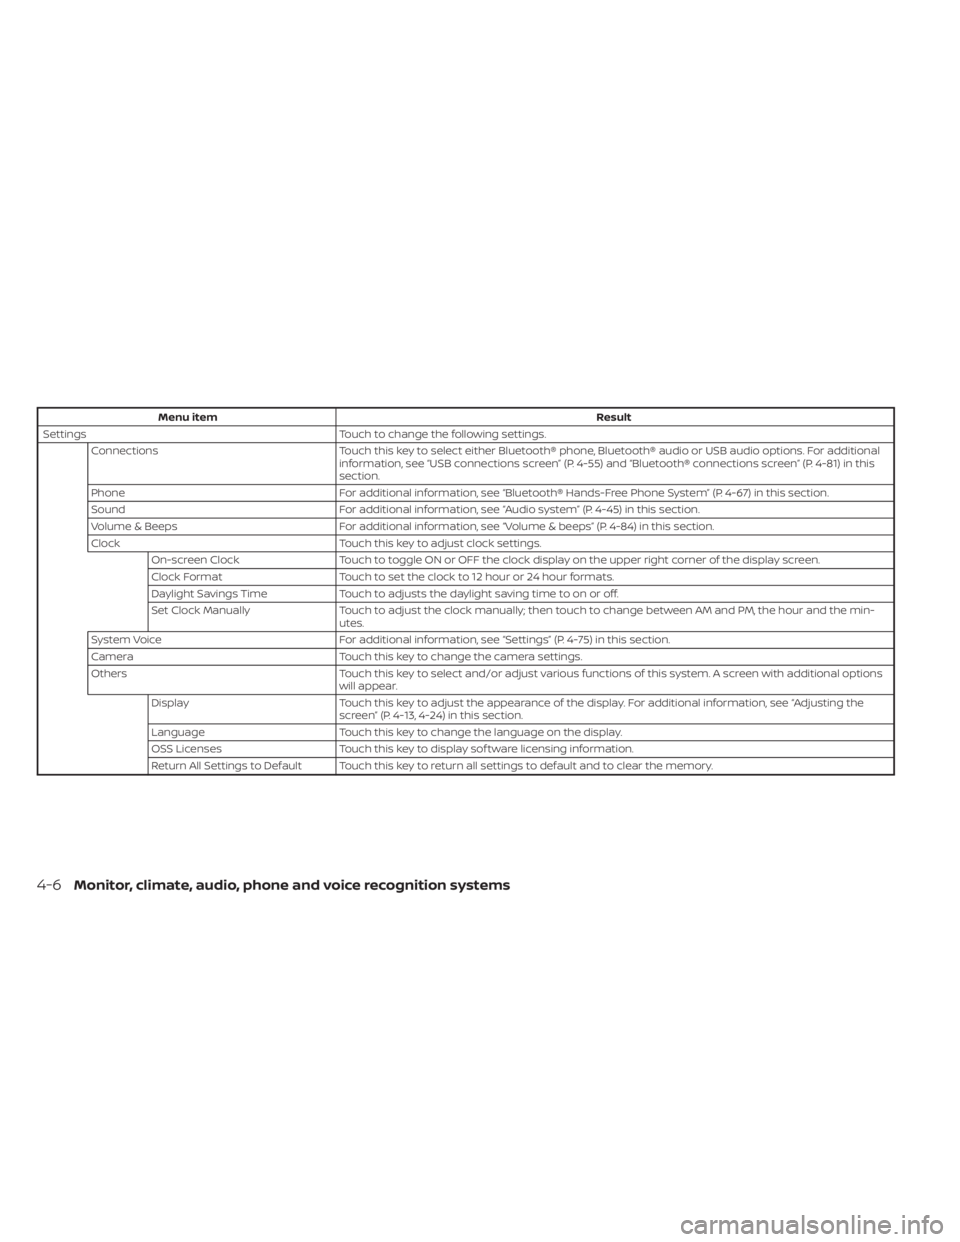
Settings Touch to change the following settings.
Connections Touch this key to select either Bluetooth® phone, Bluetooth® audio or USB audio options. For additional
information, see “USB connections screen” (P. 4-55) and “Bluetooth® connections screen” (P. 4-81) in this
section.
Phone For additional information, see “Bluetooth® Hands-Free Phone System” (P. 4-67) in this section.
Sound For additional information, see “Audio system” (P. 4-45) in this section.
Volume & Beeps For additional information, see “Volume & beeps” (P. 4-84) in this section.
Clock Touch this key to adjust clock settings.
On-screen Clock Touch to toggle ON or OFF the clock display on the upper right corner of the display screen.
Clock Format Touch to set the clock to 12 hour or 24 hour formats.
Daylight Savings Time Touch to adjusts the daylight saving time to on or off.
Set Clock Manually Touch to adjust the clock manually; then touch to change between AM and PM, the hour and the min-
utes.
System Voice For additional information, see “Settings” (P. 4-75) in this section.
Camera Touch this key to change the camera settings.
Others Touch this key to select and/or adjust various functions of this system. A screen with additional options
will appear.
Display Touch this key to adjust the appearance of the display. For additional information, see “Adjusting the
screen” (P. 4-13, 4-24) in this section.
Language Touch this key to change the language on the display.
OSS Licenses Touch this key to display sof tware licensing information.
Return All Settings to Default Touch this key to return all settings to default and to clear the memory.
4-6Monitor, climate, audio, phone and voice recognition systems
Page 217 of 644
(brightness control) BUTTON
To change the display brightness, press thebutton. Pressing the button again will
change the display to the day or the night
display.
Press and hold the
button for more
than 2 seconds to turn the display off. Press
and hold the button again to turn the dis-
play on.
HOW TO USE THE VOL (volume)
KNOB / PUSH
(power)
BUTTON
Press the PUSH(power) button to turn
audio function on and off. Turn the VOL
(volume) knob to adjust audio volume.
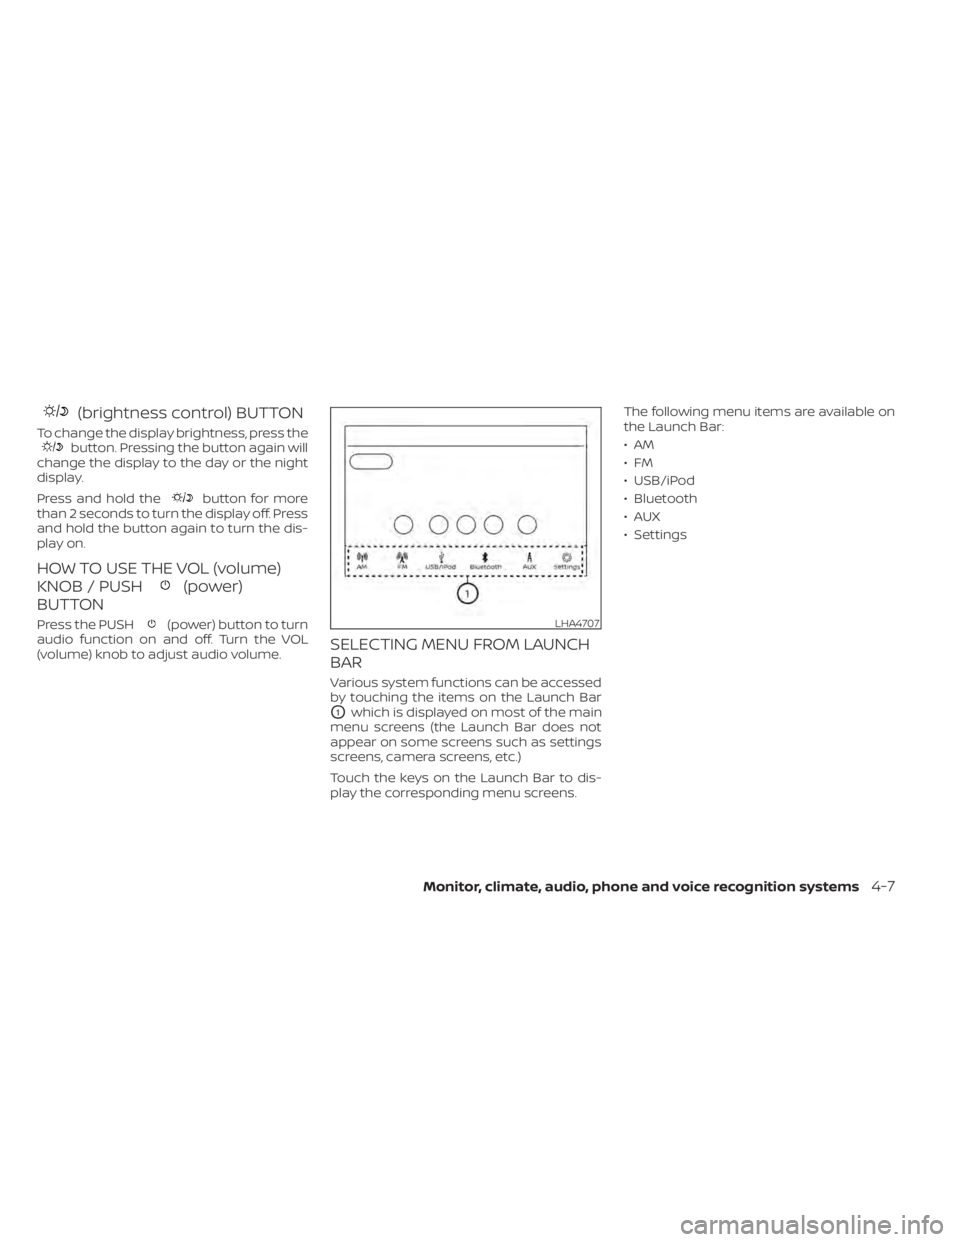
SELECTING MENU FROM LAUNCH
BAR
Various system functions can be accessed
by touching the items on the Launch Bar
O1which is displayed on most of the main
menu screens (the Launch Bar does not
appear on some screens such as settings
screens, camera screens, etc.)
Touch the keys on the Launch Bar to dis-
play the corresponding menu screens. The following menu items are available on
the Launch Bar:
•AM
•FM
• USB/iPod
• Bluetooth
•AUX
• Settings
LHA4707
Monitor, climate, audio, phone and voice recognition systems4-7
Page 239 of 644
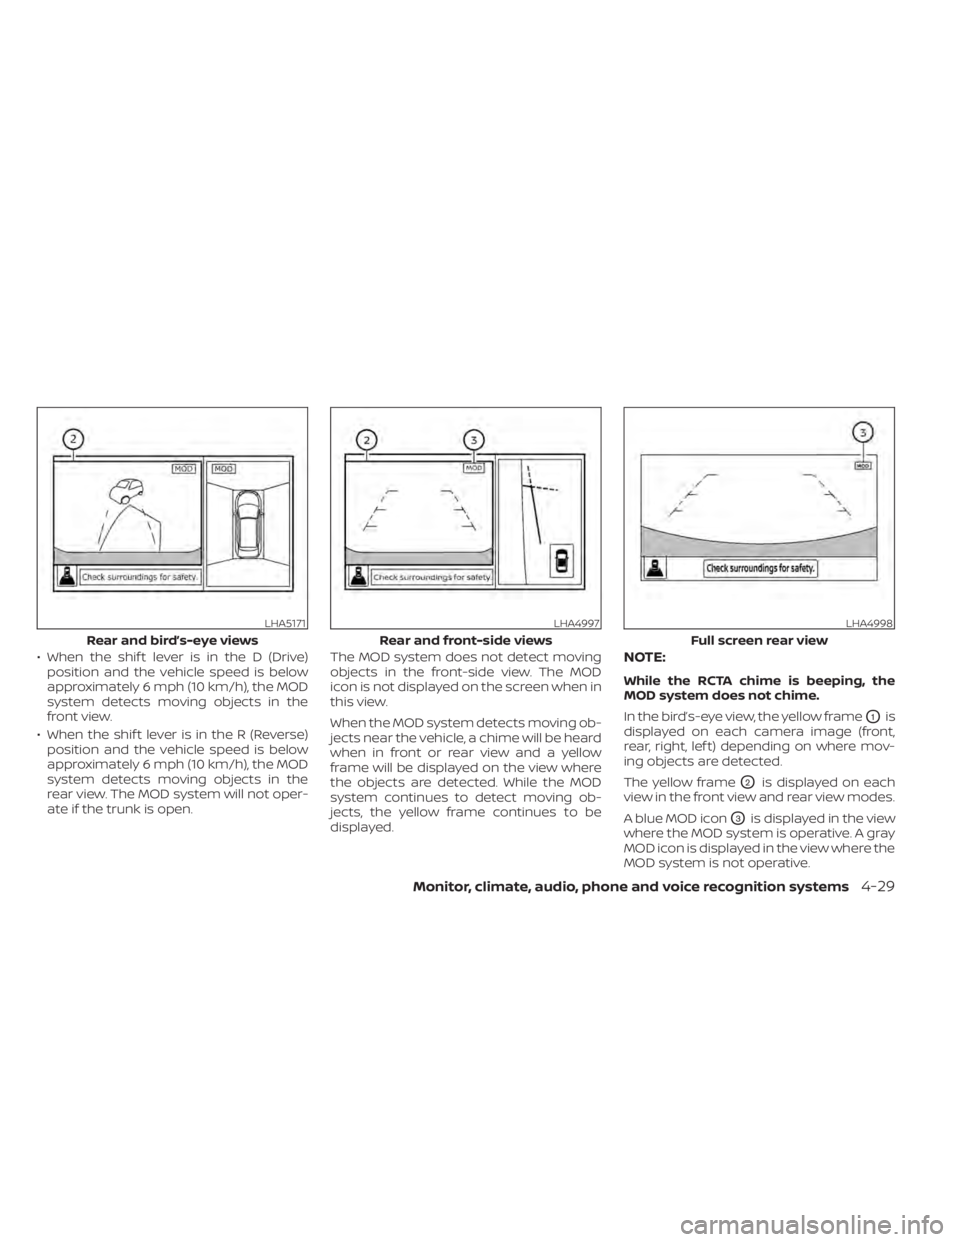
• When the shif t lever is in the D (Drive)position and the vehicle speed is below
approximately 6 mph (10 km/h), the MOD
system detects moving objects in the
front view.
• When the shif t lever is in the R (Reverse) position and the vehicle speed is below
approximately 6 mph (10 km/h), the MOD
system detects moving objects in the
rear view. The MOD system will not oper-
ate if the trunk is open. The MOD system does not detect moving
objects in the front-side view. The MOD
icon is not displayed on the screen when in
this view.
When the MOD system detects moving ob-
jects near the vehicle, a chime will be heard
when in front or rear view and a yellow
frame will be displayed on the view where
the objects are detected. While the MOD
system continues to detect moving ob-
jects, the yellow frame continues to be
displayed.NOTE:
While the RCTA chime is beeping, the
MOD system does not chime.
In the bird’s-eye view, the yellow frame
O1is
displayed on each camera image (front,
rear, right, lef t) depending on where mov-
ing objects are detected.
The yellow frame
O2is displayed on each
view in the front view and rear view modes.
A blue MOD icon
O3is displayed in the view
where the MOD system is operative. A gray
MOD icon is displayed in the view where the
MOD system is not operative.
LHA5171
Rear and bird’s-eye views
LHA4997
Rear and front-side views
LHA4998
Full screen rear view
Monitor, climate, audio, phone and voice recognition systems4-29
Page 240 of 644
If the MOD system is turned off, the MOD
icon
O3is not displayed.
TURNING MOD ON AND OFF (if so
equipped)
Some vehicles include the option to allow
the MOD system to be turned on or off.
To turn the MOD system on or off:
1. Touch the “Setting” key.
2. Touch the “Camera” key.
3. Touch the “Moving Object Detection” keyto switch between ON or OFF.
MOD SYSTEM LIMITATIONS
WARNING
Listed below are the system limitations
for MOD. Failure to operate the vehicle
in accordance with these system limi-
tations could result in serious injury or
death.
• Do not use the MOD system when
towing a trailer. The system may not
function properly.
• Excessive noise (for example, audio
system volume or open vehicle win-
dow) will interfere with the chime
sound, and it may not be heard. •
The MOD system performance will be
limited according to environmental
conditions and surrounding objects
such as:
– When there is low contrast be-
tween background and the mov-
ing objects.
– When there is a blinking source of
light.
– When strong light such as another
vehicle’s headlight or sunlight is
present.
– When camera orientation is not in
its usual position, such as when a
mirror is folded.
– When there is dirt, water drops or
snow on the camera lens.
– When the position of the moving
objects in the display is not
changed.
• The MOD system might detect flow-
ing water droplets on the camera
lens, white smoke from the muffler,
moving shadows, etc.
• The MOD system may not function
properly depending on the speed, di-
rection, distance or shape of the
moving objects. •
If your vehicle sustains damage to
the parts where the camera is in-
stalled, leaving it misaligned or bent,
the sensing zone may be altered and
the MOD system may not detect ob-
jects properly.
• When the temperature is extremely
high or low, the screen may not dis-
play objects clearly. This is not a
malfunction.
NOTE:
The blue MOD icon will change to or-
ange if one of the following has oc-
curred:
• When the system is malfunctioning.
• When the component temperature
reaches a high level (icon will blink).
• When the RearView camera has de-
tected a blockage (icon will blink).
If the icon light continues to illuminate
orange, have the MOD system checked. It
is recommended that you visit a NISSAN
dealer for this service.
4-30Monitor, climate, audio, phone and voice recognition systems
Page 258 of 644
• The iPod® nano (1st Generation) may re-main in fast forward or rewind mode if it is
connected during a seek operation. In
this case, please manually reset the
iPod®.
• If you are using an iPod® (3rd Generation with Dock connector), do not use very
long names for the song title, album
name or artist name to prevent the iPod®
from resetting itself.
• Be careful not to do the following, or the cable could be damaged and a loss of
function may occur:– Bend the cable excessively (1.6 in (40 mm) radius maximum).
– Twist the cable excessively (more than 180 degrees).
– Pull or drop the cable.
– Do not force the iPod® cable connector into the device port.
– Close the center console lid on the cable or connectors.
– Store objects with sharp edges in the storage where the cable is stored.
– Spill liquids on the cable and connectors.
• Do not connect the cable to the iPod® if the cable and/or connectors are wet. It
may damage the iPod®. • If the cable and connectors are exposed
to water, allow the cable and/or connec-
tors to dry completely before connecting
the cable to the iPod® (wait 24 hours for it
to dry).
• If the connector is exposed to fluids other than water, evaporative residue may
cause a short between the connector
pins. In this case, replace the cable, other-
wise damage to the iPod® and a loss of
function may occur.
• If the cable is damaged (insulation cut, connectors cracked, contamination such
as liquids, dust, dirt, etc. in the connec-
tors), do not use the cable. It is recom-
mended that you visit a NISSAN dealer to
replace the cable with a new one.
• When not in use for extended periods of time, store the cable in a clean, dust free
environment at room temperature and
without direct sun exposure.
• Do not use the cable for any other pur- poses other than its intended use in the
vehicle.
*iPod® is a trademark of Apple Inc., regis-
tered in the U.S. and other countries.Bluetooth® streaming audio
• Some Bluetooth® audio devices may not be recognized by the in-vehicle audio
system.
• It is necessary to set up the wireless con- nection between a compatible
Bluetooth® audio device and the in-
vehicle Bluetooth® module before using
the Bluetooth® audio.
• Operating procedure of the Bluetooth® audio will vary depending on the devices.
Make sure how to operate your audio de-
vice before using it with this system.
• The Bluetooth® audio may be stopped under the following conditions:– Receiving a call on the Bluetooth® Hands-Free Phone System.
– Checking the connection to the hands-free phone.
• Do not place the Bluetooth® audio device in an area surrounded by metal or far
away from the in-vehicle Bluetooth®
module to prevent tone quality degrada-
tion and wireless connection disruption.
• While an audio device is connected through the Bluetooth® wireless connec-
tion, the battery power of the device may
discharge quicker than usual.
4-48Monitor, climate, audio, phone and voice recognition systems
Page 259 of 644
• This system supports the Bluetooth® Au-dio Distribution Profile (A2DP, AVRCP).
BLUETOOTH® is a
trademark owned by
Bluetooth SIG, Inc. and
licensed to
Panasonic.
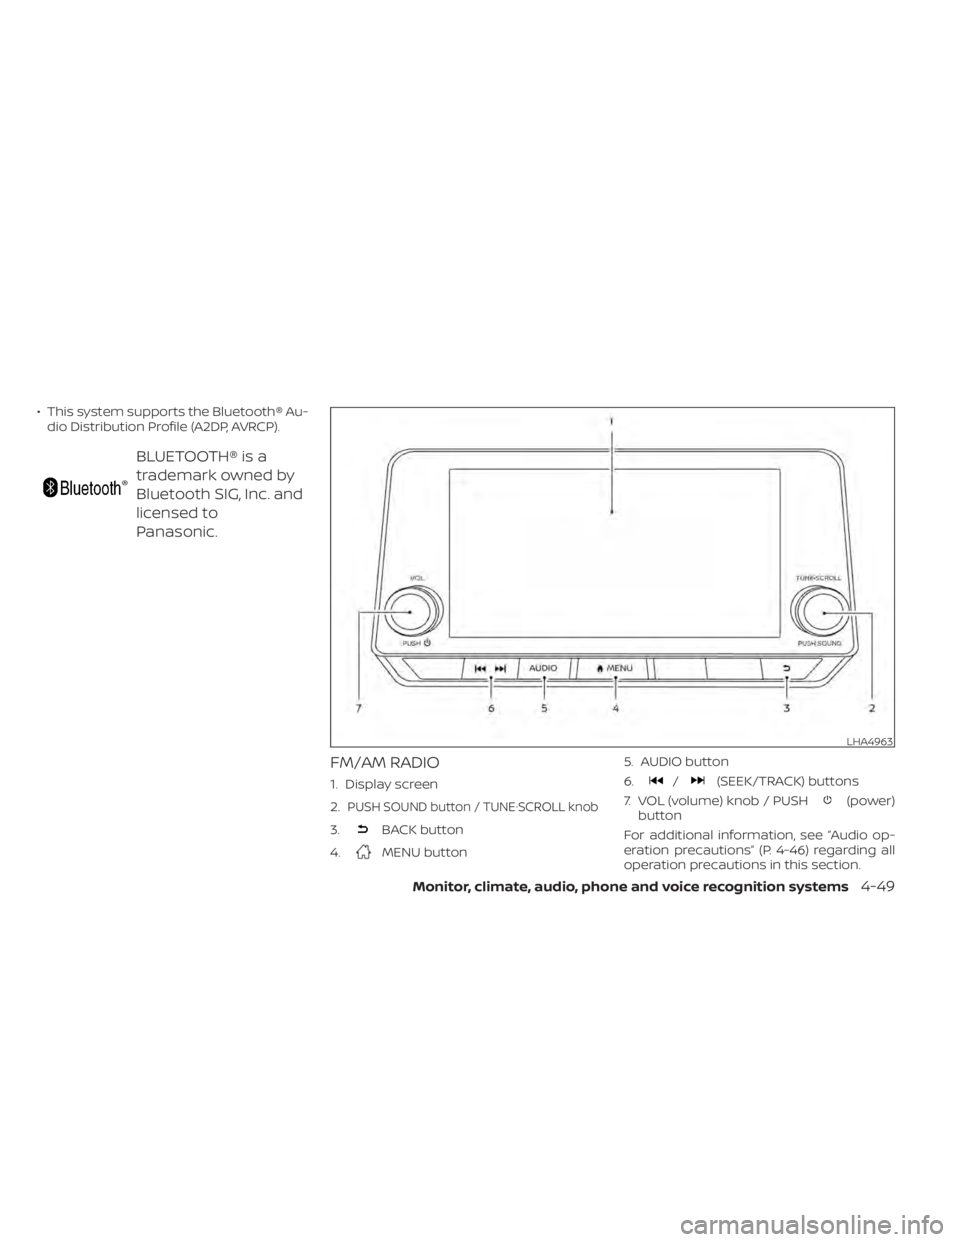
FM/AM RADIO
1. Display screen
2.
PUSH SOUND button / TUNE·SCROLL knob
3.BACK button
4.
MENU button 5. AUDIO button
6.
/(SEEK/TRACK) buttons
7. VOL (volume) knob / PUSH
(power)
button
For additional information, see “Audio op-
eration precautions” (P. 4-46) regarding all
operation precautions in this section.
LHA4963
Monitor, climate, audio, phone and voice recognition systems4-49
Page 260 of 644
Audio main operation
VOL (volume) knob / PUSH(power) button
Place the ignition switch in the ON position
and press the PUSH(power) button
while the system is off to call up the mode
(radio, AUX, Bluetooth® audio, USB or iPod®)
that was playing immediately before the
system was turned off. To turn the system off, press the PUSH
(power) button.
Turn the VOL (volume) knob to adjust the
volume.
This vehicle may be equipped with Speed
Sensitive Volume. When this feature is ac-
tive, the audio volume changes as the driv-
ing speed changes.MENU button
Press theMENU button to show the
Menu screen. Touch the “Settings” key on
the display, then touch the “Sound” key.
Sound Settings
Bass Adjusts the bass to the desired level.
Treble Adjusts the treble to the desired level.
Balance Adjusts the balance to the desired level. Balance adjusts the sound level between the lef t and right
speakers.
Fade Adjusts the fade to the desired level. Fade adjusts the sound level between the front and rear
speakers.
Speed Sensitive Volume Adjusts the speed sensitive volume function, which increases the volume of the audio system as
the speed of the vehicle increases. Set to “OFF” to disable the feature. The higher the setting, the
more the volume increases in relation to vehicle speed.
Bass, treble, balance, fade and Speed Sensitive Volume can be adjusted by touching “-”/“+” , “L”/”R”, or “R”/”F” keys.
4-50Monitor, climate, audio, phone and voice recognition systems
Page 263 of 644
The AUX input jack accepts any standard
analog audio input such as from a portable
cassette player, CD player, MP3 player or
phone.
Insert a 1/8 in (3.5 mm) stereo mini plug in
the audio input jack. If a cable with a mono
plug is used, the audio output may not
function normally.
Activation and playing
Turn on the AUX device. Connect an AUX
cable to the AUX device and the AUX input
jack. Select AUX mode from the audio
source menu screen or by pressing the
Source button on the steering wheel.
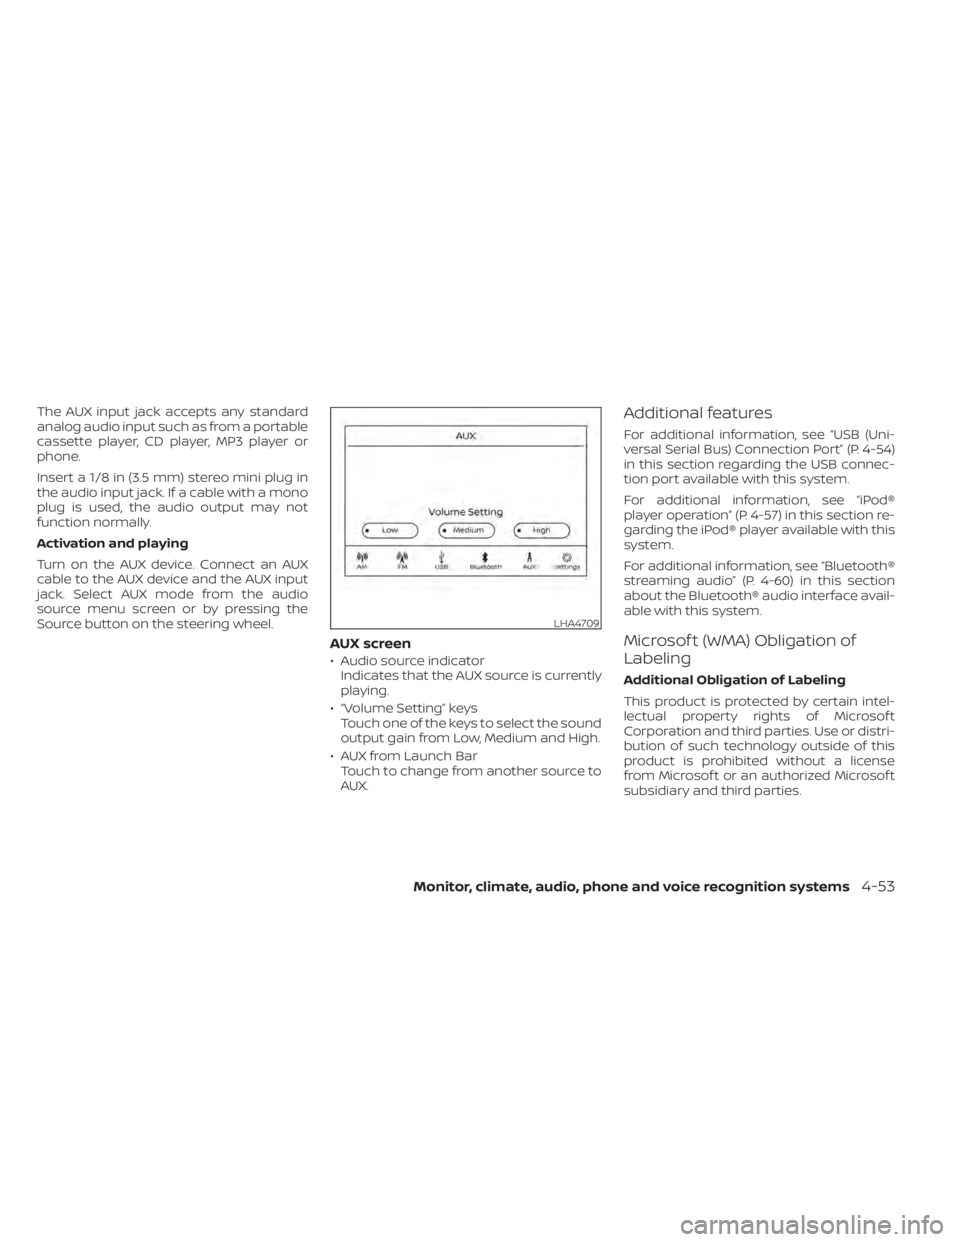
AUX screen
• Audio source indicatorIndicates that the AUX source is currently
playing.
• “Volume Setting” keys Touch one of the keys to select the sound
output gain from Low, Medium and High.
• AUX from Launch Bar Touch to change from another source to
AUX.
Additional features
For additional information, see “USB (Uni-
versal Serial Bus) Connection Port” (P. 4-54)
in this section regarding the USB connec-
tion port available with this system.
For additional information, see “iPod®
player operation” (P. 4-57) in this section re-
garding the iPod® player available with this
system.
For additional information, see “Bluetooth®
streaming audio” (P. 4-60) in this section
about the Bluetooth® audio interface avail-
able with this system.
Microsof t (WMA) Obligation of
Labeling
Additional Obligation of Labeling
This product is protected by certain intel-
lectual property rights of Microsof t
Corporation and third parties. Use or distri-
bution of such technology outside of this
product is prohibited without a license
from Microsof t or an authorized Microsof t
subsidiary and third parties.
LHA4709
Monitor, climate, audio, phone and voice recognition systems4-53