2023 NISSAN ALTIMA center console
[x] Cancel search: center consolePage 35 of 644
• The front passenger’s seat belt is not fas-tened and the seat is occupied by a
passenger.
• The front passenger’s seat belt is not fas- tened and objects or external force on
the passenger seat change the seat belt
reminder classification to Occupied.
The seat belt warning light will flash under
the conditions shown above until the nec-
essary seat belt is securely fastened.
A warning chime will sound for approxi-
mately 90 seconds or until one of the fol-
lowing conditions is met:
• The unbuckled front occupant’s seat belt is securely fastened.
• The seat belt reminder function in the front passenger seat no longer detects
that the front passenger seat is occupied.
• The ignition is turned off or the vehicle is placed in P (Park).
The below situations could result in the
seat belt reminder light being illuminated
and the chime sounding, even with no oc-
cupant present in the passenger seat:
• Heavy objects placed on the seat.
• Someone pushing or pulling on the front passenger seat. • An object placed under the front passen-
ger seat.
• An object placed between the seat cush- ion and center console or between the
seat cushion and the door.
• An object hanging on the seat or placed in the seatback pocket.
• A child restraint or other object pressing against the rear of the seatback.
PREGNANT WOMEN
NISSAN recommends that pregnant
women use seat belts. The seat belt should
be worn snug and always position the lap
belt as low as possible around the hips, not
the waist. Place the shoulder belt over your
shoulder and across your chest. Never run
the lap/shoulder belt over your abdominal
area. Contact your doctor for specific
recommendations.
INJURED PERSONS
NISSAN recommends that injured persons
use seat belts. Check with your doctor for
specific recommendations.
THREE-POINT TYPE SEAT BELT
WITH RETRACTOR
WARNING
• Every person who drives or rides in
this vehicle should use a seat belt at
all times. Children should be in the
rear seats and in an appropriate
restraint.
• Do not ride in a moving vehicle when
the seatback is reclined. This can be
dangerous. The shoulder belt will not
be against your body. In an accident,
you could be thrown into it and re-
ceive neck or other serious injuries.
You could also slide under the lap belt
and receive serious internal injuries.
• For the most effective protection
when the vehicle is in motion, the
seat should be upright. Always sit
well back and upright in the seat with
both feet on the floor and adjust the
seat belt properly.
Safety-Seats, seat belts and supplemental restraint system1-15
Page 75 of 644
16. Satellite sensors (passenger’s sideshown; driver’s side similar)
17. Rear outboard seat-mounted side- impact supplemental air bags
WARNING
To ensure proper operation of the pas-
senger’s NISSAN Advanced Air Bag Sys-
tem, please observe the following
items.
• Do not allow a passenger in the rear
seat to push or pull on the seatback
pocket.
• Do not place heavy loads heavier
than 9.1 lbs. (4 kg) on the seatback,
head restraint/headrest or in the
seatback pocket.
• Make sure that there is nothing
pressing against the rear of the seat-
back, such as a child restraint in-
stalled in the rear seat or an object
stored on the floor.
• Make sure that there is no object
placed under the front passenger
seat.
• Make sure that there is no object
placed between the seat cushion and
center console or between the seat
cushion and the door. •
If a forward facing child restraint is
installed in the front passenger seat,
do not position the front passenger
seat so the child restraint contacts
the instrument panel. If the child re-
straint does contact the instrument
panel, the system may determine the
seat is occupied and the passenger
air bag and front passenger supple-
mental knee air bag may deploy in a
collision. Also the front passenger air
bag status light may not illuminate.
For additional information about in-
stalling and using child restraints,
see "Child restraints" (P. 1-23).
• Confirm the operating condition with
the front passenger air bag status
light.
• If you notice that the front passenger
air bag status light is not operating
as described in this section, get the
occupant classification system
checked. It is recommended that you
visit a NISSAN dealer for this service.
• Until you have confirmed with a
dealer that your passenger seat oc-
cupant classification system is work-
ing properly, position the occupants
in the rear seating positions. •
Do not position the front passenger
seat so it contacts the rear seat. If the
front seat does contact the rear seat,
the air bag system may determine a
sensor malfunction has occurred
and the front passenger air bag sta-
tus light may illuminate and the
supplemental air bag warning light
may flash.
This vehicle is equipped with the NISSAN
Advanced Air Bag System for the driver and
front passenger seats. This system is de-
signed to meet certification requirements
under U.S. regulations. It is also permitted in
Canada. However, all of the information,
cautions and warnings in this manual
still apply and must be followed.
The driver supplemental front-impact air
bag is located in the center of the steering
wheel. The front passenger supplemental
front-impact air bag is mounted in the dash-
board above the glove box. The front air bags
are designed to inflate in higher severity
frontal collisions, although they may inflate if
the forces in another type of collision are
similar to those of a higher severity frontal
impact. They may not inflate in certain fron-
tal collisions. Vehicle damage (or lack of it) is
not always an indication of proper front air
bag system operation.
Safety-Seats, seat belts and supplemental restraint system1-55
Page 80 of 644
4. Remain in this position for 30 secondsallowing the system to classif y the front
passenger before the vehicle is put into
motion.
5. Ensure proper classification by checking the front passenger air bag status light.
NOTE:
This vehicle’s occupant classification
sensor system generally keeps the clas-
sification locked during driving, so it is
important that you confirm that the
front passenger is properly classified
prior to driving. However, the occupant
classification sensor may recalculate the
weight of the occupant under some con-
ditions (both while driving and when
stopped), so front passenger seat occu-
pants should continue to remain seated
as outlined above.
Troubleshooting
If you think the front passenger air bag
status light is incorrect:
1. If the light is ON with an adult occupyingthe front passenger seat:
•
Occupant is a small adult — the air bag light
is functioning as intended. The front pas-
senger air bag and front passenger supple-
mental knee air bag are suppressed.
However, if the occupant is not a small
adult, then this may be due to the following
conditions that may be interfering with the
weight sensors:
• Occupant is not sitting upright, leaning against the seatback, and centered on
the seat cushion with his/her feet com-
fortably extended to the floor.
• A child restraint or other object pressing against the rear of the seatback.
• A rear passenger pushing or pulling on the back of the front passenger seat.
• Forcing the front seat or seatback against an object on the seat or floor be-
hind it.
• An object placed under the front passen- ger seat.
• An object placed between the seat cush- ion and center console or between the
seat cushion and the door.
If the vehicle is moving, please come to a
stop when it is safe to do so. Check and
correct any of the above conditions. Re-
start the vehicle and wait 1 minute.NOTE:
A system check will be performed during
which the front passenger air bag status
light will remain lit for about 7 seconds
initially.
If the light is still ON af ter this, the person
should be advised not to ride in the front
passenger seat and the vehicle should be
checked as soon as possible. It is recom-
mended that you visit a NISSAN dealer for
this service.
2. If the light is OFF with a small adult, child or child restraint occupying the front
passenger seat.
This may be due to the following condi-
tions that may be interfering with the
weight sensors:
• Small adult or child is not sitting upright, leaning against the seatback, and cen-
tered on the seat cushion with his/her
feet comfortably extended to the floor.
• The child restraint is not properly in- stalled, as outlined in the “Child restraints”
section of this manual.
• An object weighing over 9.1 lbs. (4 kg) hanging on the seat or placed in the seat-
back pocket.
1-60Safety-Seats, seat belts and supplemental restraint system
Page 81 of 644
• A child restraint or other object pressingagainst the rear of the seatback.
• A rear passenger pushing or pulling on the back of the front passenger seat.
• Forcing the front seat or seatback against an object on the seat or floor be-
hind it.
• An object placed under the front passen- ger seat.
• An object placed between the seat cush- ion and center console.
If the vehicle is moving, please come to a
stop when it is safe to do so. Check and
correct any of the above conditions. Re-
start the vehicle and wait 1 minute.
NOTE:
A system check will be performed during
which the front passenger air bag status
light will remain lit for about 7 seconds
initially.
If the light is still OFF af ter this, the small
adult, child or child restraint should be re-
positioned in the rear seat and the vehicle
should be checked as soon as possible. It is
recommended that you visit a NISSAN
dealer for this service. 3. If the light is OFF with no front passenger
and no objects on the front passenger
seat, the vehicle should be checked. It is
recommended that you visit a NISSAN
dealer as soon as possible.
Other supplemental front-impact air
bag precautions
WARNING
• Do not place any objects on the
steering wheel pad or on the instru-
ment panel. Also, do not place any
objects between any occupant and
the steering wheel or instrument
panel. Such objects may become
dangerous projectiles and cause in-
jury if the front air bags inflate.
• Immediately af ter inflation, several
front air bag system components will
be hot. Do not touch them; you may
severely burn yourself.
• No unauthorized changes should be
made to any components or wiring
of the supplemental air bag system.
This is to prevent accidental inflation
of the supplemental air bag or dam-
age to the supplemental air bag
system. •
Do not make unauthorized changes
to your vehicle's electrical system,
suspension system or front end
structure. This could affect proper
operation of the front air bag system.
• Tampering with the front air bag sys-
tem may result in serious personal
injury. Tampering includes changes
to the steering wheel and the instru-
ment panel assembly by placing ma-
terial over the steering wheel pad
and above the instrument panel or
by installing additional trim material
around the air bag system.
• Removing or modif ying the front
passenger seat may affect the func-
tion of the air bag system and result
in serious personal injury.
Safety-Seats, seat belts and supplemental restraint system1-61
Page 160 of 644
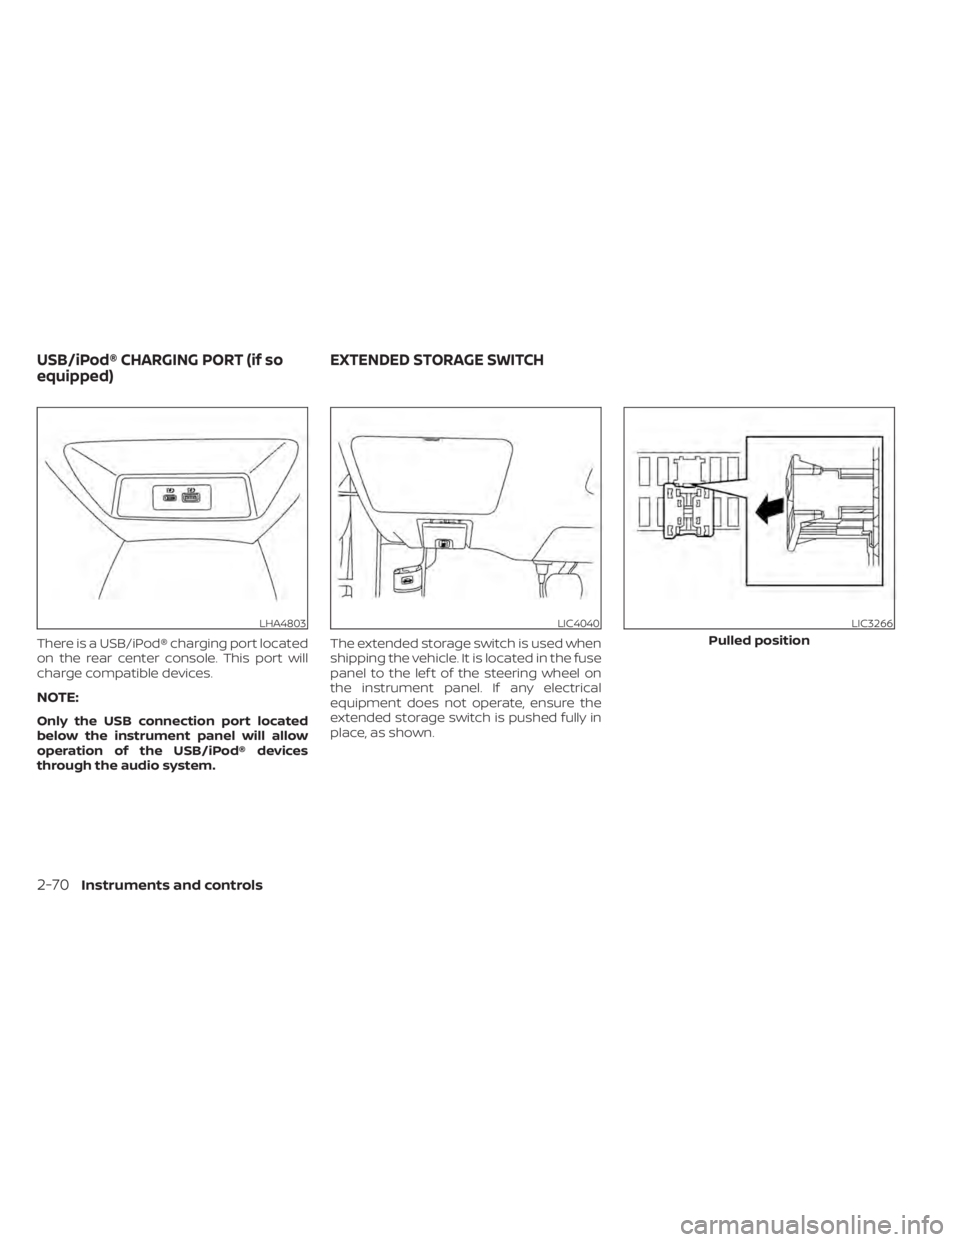
There is a USB/iPod® charging port located
on the rear center console. This port will
charge compatible devices.
NOTE:
Only the USB connection port located
below the instrument panel will allow
operation of the USB/iPod® devices
through the audio system.The extended storage switch is used when
shipping the vehicle. It is located in the fuse
panel to the lef t of the steering wheel on
the instrument panel. If any electrical
equipment does not operate, ensure the
extended storage switch is pushed fully in
place, as shown.
LHA4803LIC4040LIC3266
Pulled position
USB/iPod® CHARGING PORT (if so
equipped)
EXTENDED STORAGE SWITCH
2-70Instruments and controls
Page 258 of 644
• The iPod® nano (1st Generation) may re-main in fast forward or rewind mode if it is
connected during a seek operation. In
this case, please manually reset the
iPod®.
• If you are using an iPod® (3rd Generation with Dock connector), do not use very
long names for the song title, album
name or artist name to prevent the iPod®
from resetting itself.
• Be careful not to do the following, or the cable could be damaged and a loss of
function may occur:– Bend the cable excessively (1.6 in (40 mm) radius maximum).
– Twist the cable excessively (more than 180 degrees).
– Pull or drop the cable.
– Do not force the iPod® cable connector into the device port.
– Close the center console lid on the cable or connectors.
– Store objects with sharp edges in the storage where the cable is stored.
– Spill liquids on the cable and connectors.
• Do not connect the cable to the iPod® if the cable and/or connectors are wet. It
may damage the iPod®. • If the cable and connectors are exposed
to water, allow the cable and/or connec-
tors to dry completely before connecting
the cable to the iPod® (wait 24 hours for it
to dry).
• If the connector is exposed to fluids other than water, evaporative residue may
cause a short between the connector
pins. In this case, replace the cable, other-
wise damage to the iPod® and a loss of
function may occur.
• If the cable is damaged (insulation cut, connectors cracked, contamination such
as liquids, dust, dirt, etc. in the connec-
tors), do not use the cable. It is recom-
mended that you visit a NISSAN dealer to
replace the cable with a new one.
• When not in use for extended periods of time, store the cable in a clean, dust free
environment at room temperature and
without direct sun exposure.
• Do not use the cable for any other pur- poses other than its intended use in the
vehicle.
*iPod® is a trademark of Apple Inc., regis-
tered in the U.S. and other countries.Bluetooth® streaming audio
• Some Bluetooth® audio devices may not be recognized by the in-vehicle audio
system.
• It is necessary to set up the wireless con- nection between a compatible
Bluetooth® audio device and the in-
vehicle Bluetooth® module before using
the Bluetooth® audio.
• Operating procedure of the Bluetooth® audio will vary depending on the devices.
Make sure how to operate your audio de-
vice before using it with this system.
• The Bluetooth® audio may be stopped under the following conditions:– Receiving a call on the Bluetooth® Hands-Free Phone System.
– Checking the connection to the hands-free phone.
• Do not place the Bluetooth® audio device in an area surrounded by metal or far
away from the in-vehicle Bluetooth®
module to prevent tone quality degrada-
tion and wireless connection disruption.
• While an audio device is connected through the Bluetooth® wireless connec-
tion, the battery power of the device may
discharge quicker than usual.
4-48Monitor, climate, audio, phone and voice recognition systems
Page 262 of 644
• Refresh: Touch the “Refresh” key to scanand update the station list displayed on
the right side of the AM Menu screen.
(SEEK/TRACK) buttons
Press the
orbuttons to tune
from low to high or high to low frequencies
and to stop at the next broadcasting
station.
1 to 6 Station memory operations
Up to six stations can be registered in the
preset list.
1. Select the AM radio band.
2. Tune to the station you wish to store.
3. Touch and hold one of the preset num- bers in the preset list.
The information such as frequency will be
displayed on the preset list.
To select and listen to the preset stations,
push
on the steering wheel briefly or
touch a preferred station on the preset list
on the radio screen.
FM radio operation
Press theMENU button and touch the
“FM Menu” key or press the AUDIO button
and select FM on the bottom of the Launch
Bar to bring up the FM display screen. If another audio source is playing when the
“FM” key is pressed, the audio source play-
ing will automatically be turned off and the
last radio station played will begin playing.
The FM stereo indicator (STEREO) is shown
on the screen during FM stereo reception.
When the stereo broadcast signal is weak,
the radio automatically changes from ste-
reo to monaural reception.
FM Menu
Touch the “FM” Menu key to display the FM
Menu screen options:
• SCAN: To scan tune the stations, touch
the “FM Menu” key on the radio screen
and then touch the “SCAN” key. The sta-
tions will be tuned from low to high fre-
quencies and stop at each broadcasting
stations for several seconds. Touching
the “SCAN” key again during this period of
several seconds will stop tuning and the
radio will remain tuned to that station.
• Refresh: Touch the “Refresh” key to up- date the station list displayed on the right
side of the FM Menu screen.
• RDS Info: Radio station and song informa- tion can be displayed on the FM display
screen.
(SEEK/TRACK) buttons
Press the
orbuttons to tune
from low to high or high to low frequencies
and to stop at the next broadcasting
station.
1 to 12 Station memory operations
Up to 12 stations can be registered in the
preset list.
1. Select the FM radio band.
2. Tune to the station you wish to store.
3. Touch and hold one of the preset num- bers in the preset list.
The information such as frequency will be
displayed on the preset list.
To select and listen to the preset stations,
push
on the steering wheel briefly or
touch a preferred station on the preset list
on the radio screen.
Auxiliary (AUX) devices operation
Connecting auxiliary devices
Connect an AUX device into the AUX input
jack located on the center console below
the heater and air conditioner controls.
4-52Monitor, climate, audio, phone and voice recognition systems