2023 NISSAN ALTIMA AV Control Unit
[x] Cancel search: AV Control UnitPage 159 of 644
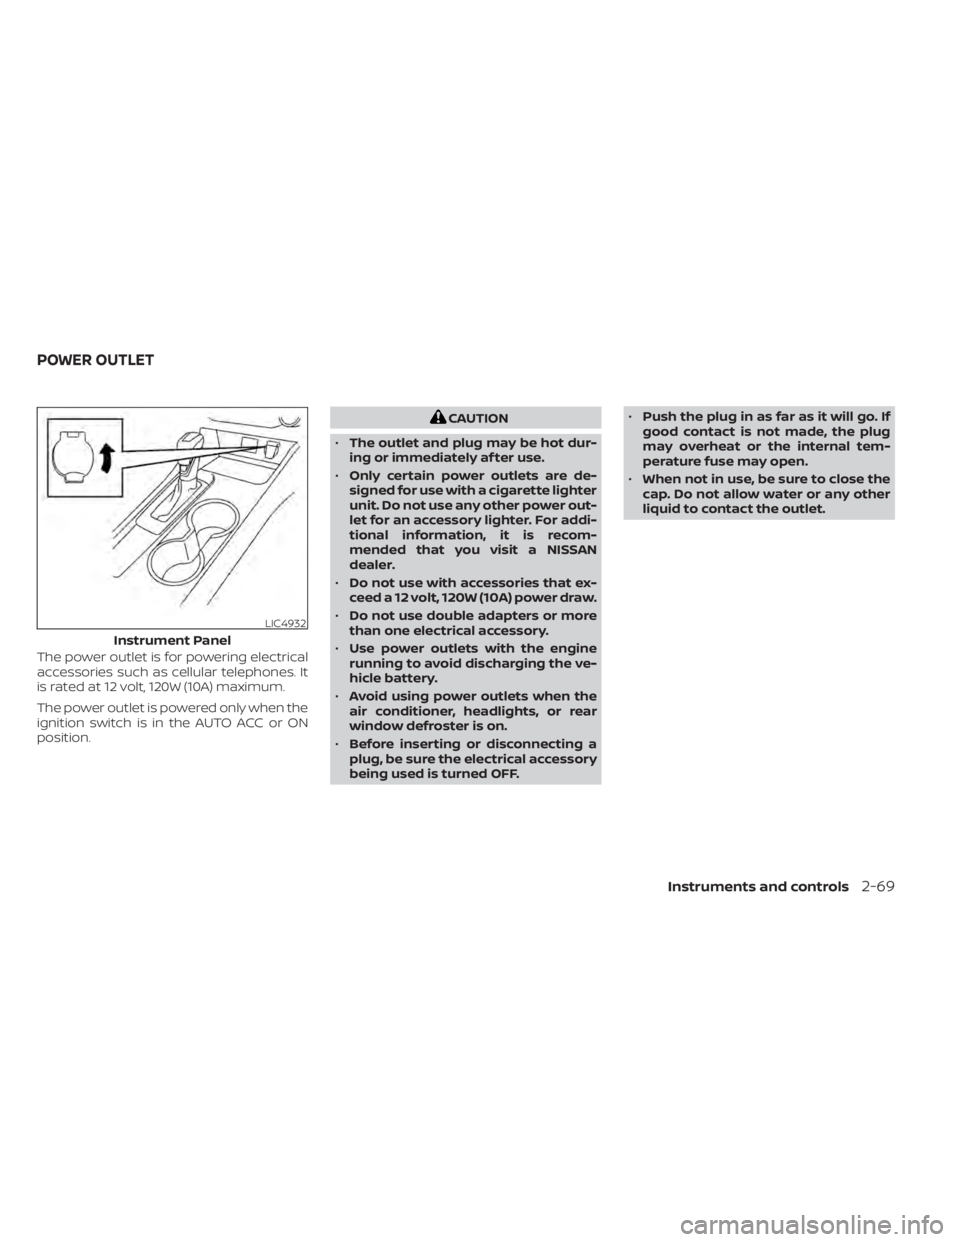
The power outlet is for powering electrical
accessories such as cellular telephones. It
is rated at 12 volt, 120W (10A) maximum.
The power outlet is powered only when the
ignition switch is in the AUTO ACC or ON
position.
CAUTION
• The outlet and plug may be hot dur-
ing or immediately af ter use.
• Only certain power outlets are de-
signed for use with a cigarette lighter
unit. Do not use any other power out-
let for an accessory lighter. For addi-
tional information, it is recom-
mended that you visit a NISSAN
dealer.
• Do not use with accessories that ex-
ceed a 12 volt, 120W (10A) power draw.
• Do not use double adapters or more
than one electrical accessory.
• Use power outlets with the engine
running to avoid discharging the ve-
hicle battery.
• Avoid using power outlets when the
air conditioner, headlights, or rear
window defroster is on.
• Before inserting or disconnecting a
plug, be sure the electrical accessory
being used is turned OFF. •
Push the plug in as far as it will go. If
good contact is not made, the plug
may overheat or the internal tem-
perature fuse may open.
• When not in use, be sure to close the
cap. Do not allow water or any other
liquid to contact the outlet.
LIC4932
Instrument Panel
POWER OUTLET
Instruments and controls2-69
Page 167 of 644
Auto-reverse function
If the control unit detects something
caught in the window as it is closing, the
window will be immediately lowered.
The auto-reverse function can be acti-
vated when the window is closed by auto-
matic operation when the ignition switch is
placed in the ON position or for a period of
time af ter the ignition switch is placed in
the OFF position.
Depending on the environment or driv-
ing conditions, the auto-reverse func-
tion may be activated if an impact or
load similar to something being caught
in the window occurs.
WARNING
There are some small distances imme-
diately before the closed position
which cannot be detected. Make sure
that all passengers have their hands,
etc., inside the vehicle before closing
the window.
When power window switch does
not operate
If the power window automatic function
(closing only) does not operate properly, perform the following procedure to initial-
ize the power window system:
1. Place the ignition switch in the ON
position.
2. Open the window more than half way by operating the power window switch.
3. Pull the power window switch and hold it to close the window, and then hold the
switch more than 3 seconds af ter the
window is closed.
4. Release the power window switch. Op- erate the window by the automatic
function to confirm the initialization is
complete. The power window automati-
cally opens or closes depending on if the
automatic down or up function is
selected.
5. Perform steps 2 through 4 above for other windows.
If the power window function does not op-
erate properly af ter performing the above
procedure have the system checked and
repaired. It is recommended that you visit a
NISSAN dealer for this service.
POWER MOONROOF
The moonroof will only operate when the
ignition switch is placed in the ON position.
The power moonroof is operational for a
period of time, even if the ignition switch is
placed in the AUTO ACC or OFF position. If
the driver's door or the front passenger's
door is opened during this period of time,
the power to the moonroof is canceled.
Sliding the moonroof
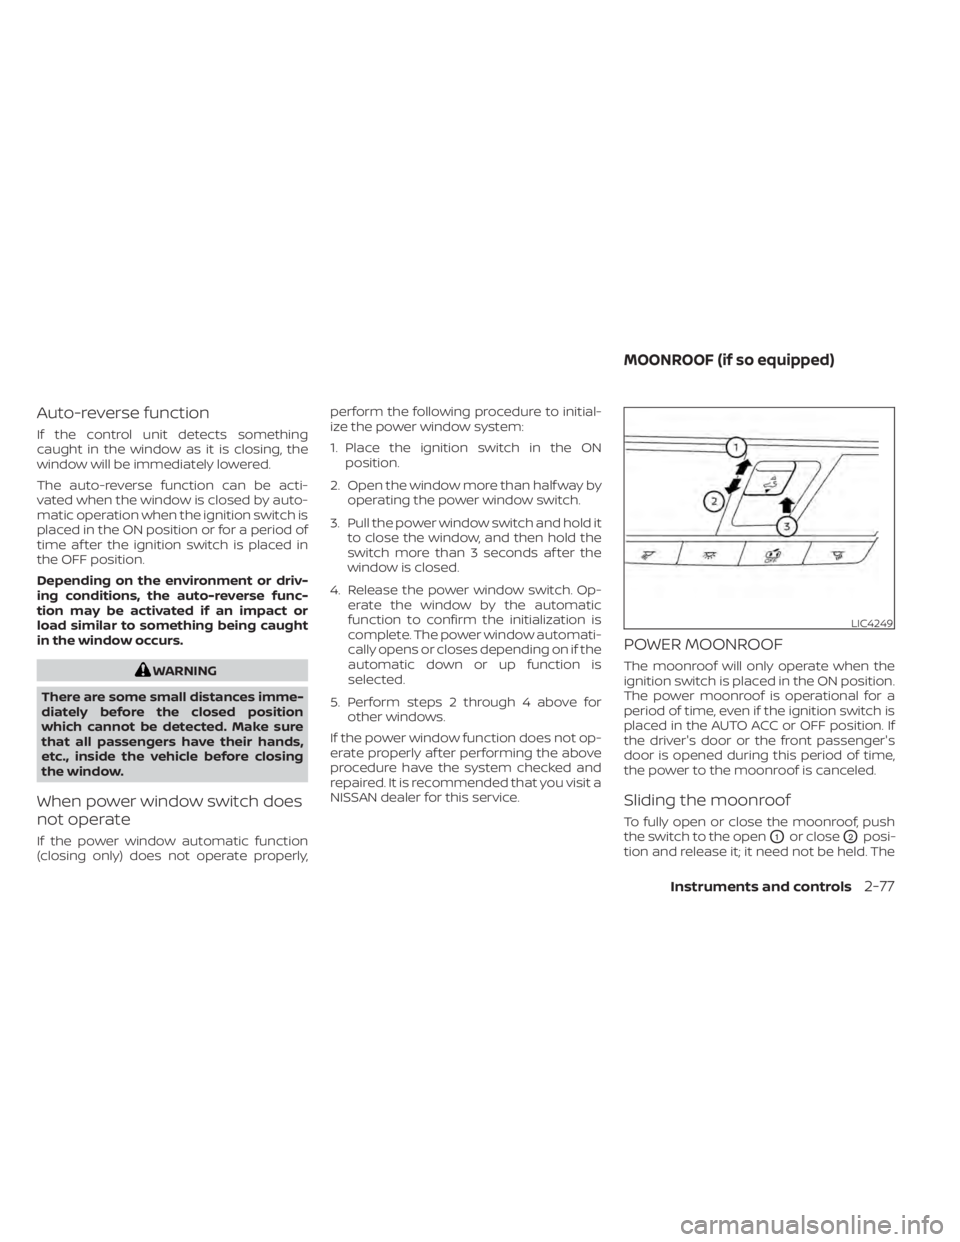
To fully open or close the moonroof, push
the switch to the open
O1or closeO2posi-
tion and release it; it need not be held. The
LIC4249
MOONROOF (if so equipped)
Instruments and controls2-77
Page 168 of 644
roof will automatically open or close all the
way. To stop the roof, push the switch once
more while it is opening or closing.
Tilting the moonroof
To tilt up, first close the moonroof, then
push the switch
O3and release it; it need
not be held. To tilt down the moonroof,
push the switch to the tilt down position
O2.
Resetting the moonroof switch
If the moonroof does not operate properly,
perform the following procedure to initial-
ize the moonroof operation system.
1. If the moonroof is open, close it fully by repeatedly pushing the moonroof
switch to the closed position
O2.
2. Push and hold the switch to the closed position
O2for approximately 15
seconds.
3. Release the switch af ter the moonroof moves up, down, then back to the full tilt
up position.
4. Push and hold the switch to the closed position
O2. 5. Release the switch af ter the moonroof
completes one full cycle from the tilt up
position to the closed position, then to
the open position, and again to the fully
closed position.
6. Check if the moonroof switch operates normally.
If the moonroof does not operate properly
af ter performing the procedure above,
have your vehicle serviced. It is recom-
mended that you visit a NISSAN dealer for
this service.
Auto-reverse function (when
closing or tilting down the
moonroof)
The auto-reverse function can be acti-
vated when the moonroof is closed or
tilted down by automatic operation when
the ignition switch is placed in the ON po-
sition or for a period of time af ter the igni-
tion switch is placed in the OFF position.
Depending on the environment or driv-
ing conditions, the auto-reverse func-
tion may be activated if an impact or
load similar to something being caught
in the moonroof occurs.
WARNING
There are some small distances imme-
diately before the closed position
which cannot be detected. Make sure
that all passengers have their hands,
etc., inside the vehicle before closing
the moonroof.
When closing
If the control unit detects something
caught in the moonroof as it moves to the
front, the moonroof will immediately open
backward.
When tilting down
If the control unit detects something
caught in the moonroof as it tilts down, the
moonroof will immediately tilt up.
If the auto-reverse function malfunctions
and repeats opening or tilting up the
moonroof, keep pushing the tilt down
switch within 5 seconds af ter it happens;
the moonroof will fully close gradually.
Make sure nothing is caught in the
moonroof.
2-78Instruments and controls
Page 173 of 644
4. At the receiver located on the garagedoor opener motor in the garage, locate
the “learn” or “smart” button (the name
and color of the button may vary by
manufacturer but it is usually located
near where the hanging antenna wire is
attached to the unit). If there is difficulty
locating the button, reference the ga-
rage door opener’s manual.
5. Press and release the “learn” or “smart” button.
NOTE:Once the button is pressed, you have ap-
proximately 30 seconds to initiate the
next step.
6. Return to the vehicle and firmly press and hold the trained HomeLink® button
for 2 seconds and release. Repeat the
“press/hold/release” sequence up to
three times to complete the training
process. HomeLink® should now acti-
vate your rolling code equipped device.
7. If you have any questions or are having difficulty programming your HomeLink®
buttons, refer to the HomeLink® web site
at: www.homelink.com or call
1-800-355-3515.
PROGRAMMING HOMELINK® FOR
CANADIAN CUSTOMERS AND GATE
OPENERS
Canadian radio-frequency laws require
transmitter signals to “time-out” (or quit)
af ter several seconds of transmission –
which may not be long enough for
HomeLink® to pick up the signal during
training. Similar to this Canadian law, some
U.S. gate operators are designed to “tim-
eout” in the same manner.
If you live in Canada or you are having diffi-
culties training a gate operator orgarage
door opener by using the “Training” proce-
dures, replace “Programming HomeLink®”
step 2 with the following:
NOTE:
When programming a garage door
opener, etc., unplug the device during
the “cycling” process to prevent possible
damage to the garage door opener
components.
1. For additional information, see “Pro-
gramming HomeLink®” step 1, (P. 2-81). 2. Using both hands, simultaneously press
and hold the desired HomeLink® button
and the hand-held transmitter button.
During training, your hand-held trans-
mitter may automatically stop transmit-
ting. Continue to press and hold the de-
sired HomeLink® button while you press
and re-press (“cycle”) your hand-held
transmitter every 2 seconds until the
frequency signal has been learned. The
HomeLink® indicator light will flash
slowly and then rapidly af ter several
seconds upon successful training. DO
NOT release until the HomeLink® indica-
tor light flashes slowly and then rapidly.
When the indicator light flashes rapidly,
both buttons may be released. The rapid
flashing indicates successful training.
Proceed with “Programming
HomeLink®” step 3 to complete.
If the device was unplugged during the
programming procedure, remember to
plug it back in when programming is
completed.
Instruments and controls2-83
Page 183 of 644
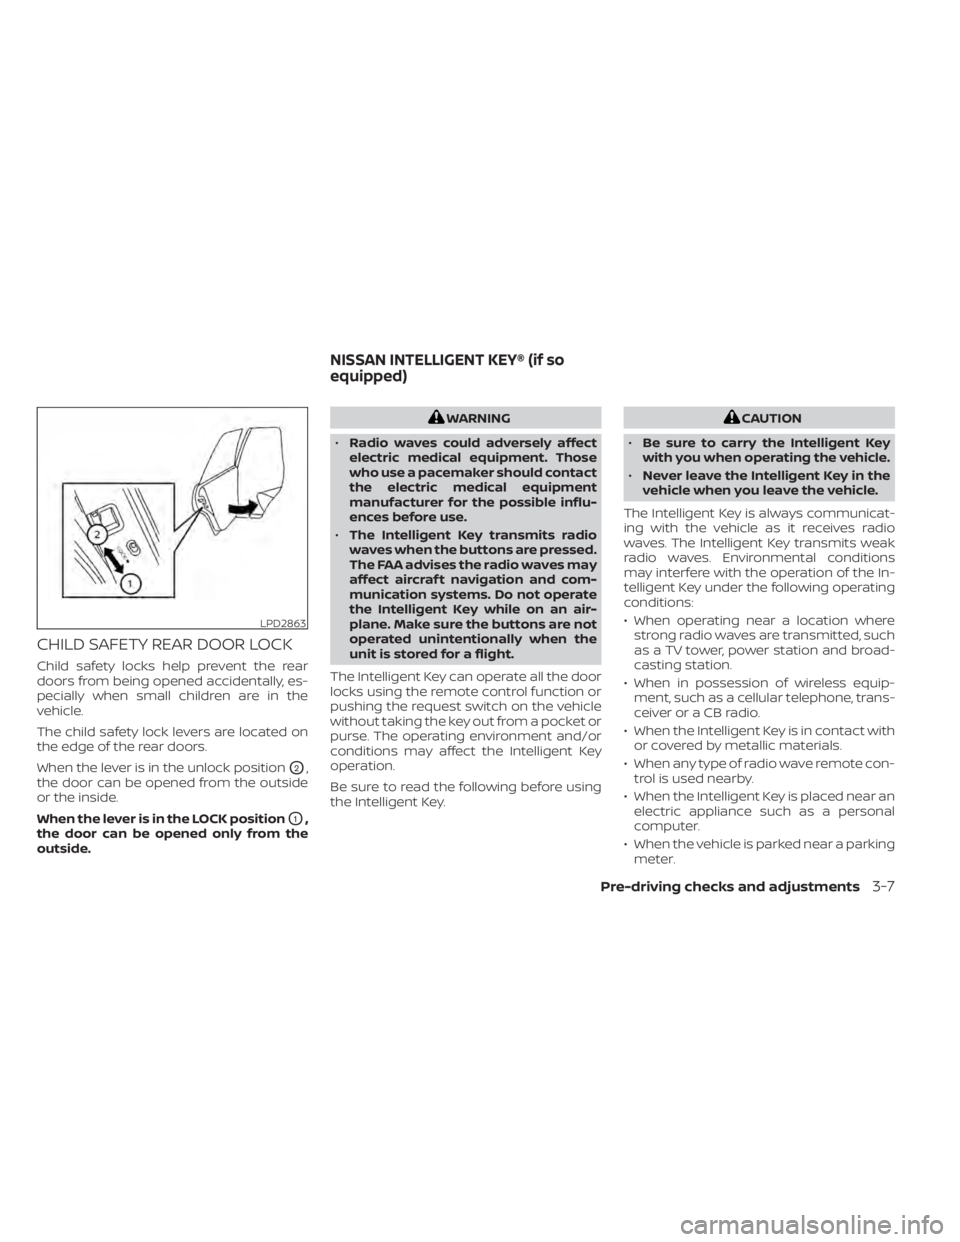
CHILD SAFETY REAR DOOR LOCK
Child safety locks help prevent the rear
doors from being opened accidentally, es-
pecially when small children are in the
vehicle.
The child safety lock levers are located on
the edge of the rear doors.
When the lever is in the unlock position
O2,
the door can be opened from the outside
or the inside.
When the lever is in the LOCK position
O1,
the door can be opened only from the
outside.
WARNING
• Radio waves could adversely affect
electric medical equipment. Those
who use a pacemaker should contact
the electric medical equipment
manufacturer for the possible influ-
ences before use.
• The Intelligent Key transmits radio
waves when the buttons are pressed.
The FAA advises the radio waves may
affect aircraf t navigation and com-
munication systems. Do not operate
the Intelligent Key while on an air-
plane. Make sure the buttons are not
operated unintentionally when the
unit is stored for a flight.
The Intelligent Key can operate all the door
locks using the remote control function or
pushing the request switch on the vehicle
without taking the key out from a pocket or
purse. The operating environment and/or
conditions may affect the Intelligent Key
operation.
Be sure to read the following before using
the Intelligent Key.CAUTION
• Be sure to carry the Intelligent Key
with you when operating the vehicle.
• Never leave the Intelligent Key in the
vehicle when you leave the vehicle.
The Intelligent Key is always communicat-
ing with the vehicle as it receives radio
waves. The Intelligent Key transmits weak
radio waves. Environmental conditions
may interfere with the operation of the In-
telligent Key under the following operating
conditions:
• When operating near a location where strong radio waves are transmitted, such
as a TV tower, power station and broad-
casting station.
• When in possession of wireless equip- ment, such as a cellular telephone, trans-
ceiver or a CB radio.
• When the Intelligent Key is in contact with or covered by metallic materials.
• When any type of radio wave remote con- trol is used nearby.
• When the Intelligent Key is placed near an electric appliance such as a personal
computer.
• When the vehicle is parked near a parking meter.
LPD2863
NISSAN INTELLIGENT KEY® (if so
equipped)
Pre-driving checks and adjustments3-7
Page 195 of 644
Thebutton will be on the NISSAN
Intelligent Key® if the vehicle has Remote
Engine Start. This feature allows the engine
to start from outside the vehicle.
The following features may be affected
when Remote Engine Start is used:
• Vehicles with a manual climate control system (if so equipped )will default to the
last used heating or cooling mode. • Vehicles with an automatic climate con-
trol system (if so equipped) will default to
either a heating or cooling mode de-
pending on outside and cabin tempera-
tures. For additional information, see “Re-
mote Engine Start with Intelligent
Climate Control” (P. 4-41).
Laws in some local communities may re-
strict or prohibit the use of Remote Engine
Start, or the amount of time a parked ve-
hicle engine may idle. For example, some
laws require a person using Remote Engine
Start to have the vehicle in view or may
restrict idling time except in freezing tem-
peratures. Check local regulations for any
requirements.
Other conditions may affect the function of
the Remote Engine Start feature. For addi-
tional information, see “Conditions the Re-
mote Engine Start will not work” (P. 3-21).
Other conditions can affect the perfor-
mance of the Intelligent Key transmitter.
For additional information, see “NISSAN In-
telligent Key®” (P. 3-2).
REMOTE ENGINE START
OPERATING RANGE
WARNING
• To help avoid risk of injury or death
through unintended operation of the
vehicle and/or its systems, including
entrapment in windows or inadver-
tent door lock activation, do not
leave children, people who require
the assistance of others or pets unat-
tended in your vehicle. Additionally,
the temperature inside a closed ve-
hicle on a warm day can quickly be-
come high enough to cause a signifi-
cant risk of injury or death to people
and pets.
• Do not use Remote Engine Start in
closed spaces such as a garage. Do
not breathe exhaust gases; they con-
tain colorless and odorless carbon
monoxide. Carbon monoxide is dan-
gerous. It can cause unconscious-
ness or death.
LPD2995
REMOTE ENGINE START
Pre-driving checks and adjustments3-19
Page 243 of 644
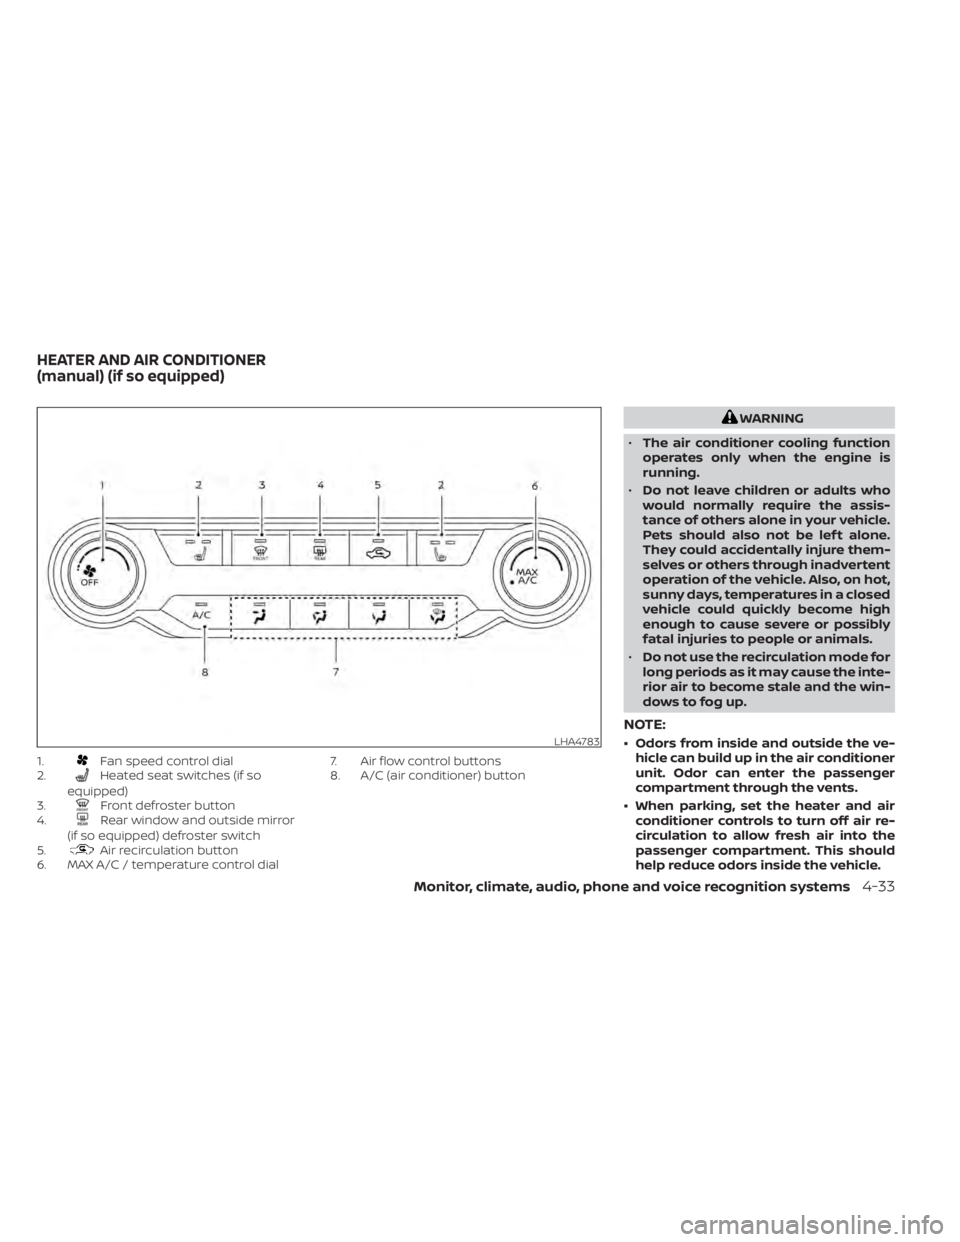
1.Fan speed control dial
2.Heated seat switches (if so
equipped)
3.
Front defroster button
4.Rear window and outside mirror
(if so equipped) defroster switch
5.
Air recirculation button
6. MAX A/C / temperature control dial 7. Air flow control buttons
8. A/C (air conditioner) button
WARNING
• The air conditioner cooling function
operates only when the engine is
running.
• Do not leave children or adults who
would normally require the assis-
tance of others alone in your vehicle.
Pets should also not be lef t alone.
They could accidentally injure them-
selves or others through inadvertent
operation of the vehicle. Also, on hot,
sunny days, temperatures in a closed
vehicle could quickly become high
enough to cause severe or possibly
fatal injuries to people or animals.
• Do not use the recirculation mode for
long periods as it may cause the inte-
rior air to become stale and the win-
dows to fog up.
NOTE:
• Odors from inside and outside the ve- hicle can build up in the air conditioner
unit. Odor can enter the passenger
compartment through the vents.
• When parking, set the heater and air conditioner controls to turn off air re-
circulation to allow fresh air into the
passenger compartment. This should
help reduce odors inside the vehicle.LHA4783
HEATER AND AIR CONDITIONER
(manual) (if so equipped)
Monitor, climate, audio, phone and voice recognition systems4-33
Page 250 of 644
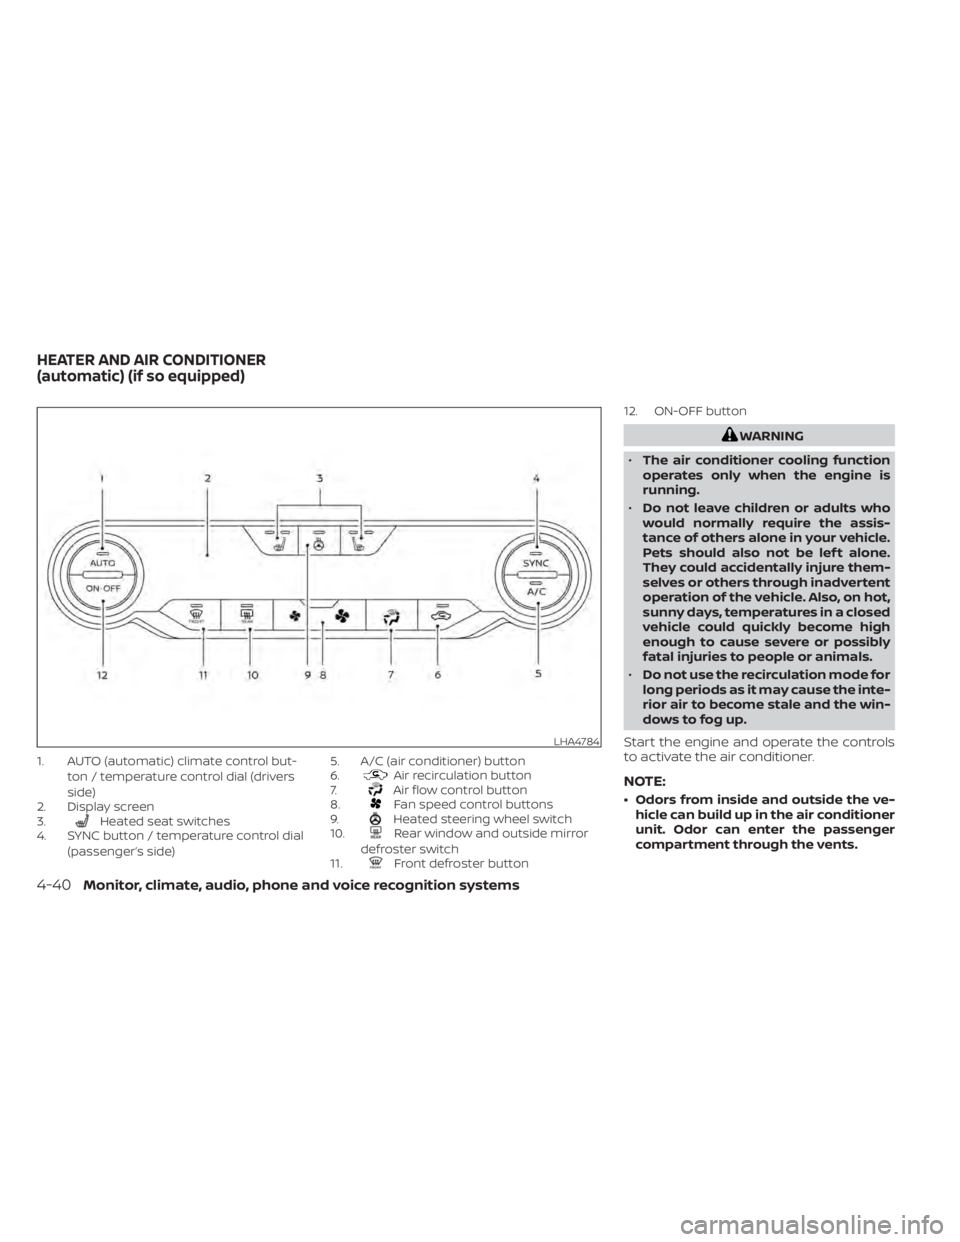
1. AUTO (automatic) climate control but-ton / temperature control dial (drivers
side)
2. Display screen
3.
Heated seat switches
4. SYNC button / temperature control dial
(passenger’s side) 5. A/C (air conditioner) button
6.
Air recirculation button
7.Air flow control button
8.Fan speed control buttons
9.Heated steering wheel switch
10.Rear window and outside mirror
defroster switch
11.
Front defroster button 12. ON-OFF button
WARNING
• The air conditioner cooling function
operates only when the engine is
running.
• Do not leave children or adults who
would normally require the assis-
tance of others alone in your vehicle.
Pets should also not be lef t alone.
They could accidentally injure them-
selves or others through inadvertent
operation of the vehicle. Also, on hot,
sunny days, temperatures in a closed
vehicle could quickly become high
enough to cause severe or possibly
fatal injuries to people or animals.
• Do not use the recirculation mode for
long periods as it may cause the inte-
rior air to become stale and the win-
dows to fog up.
Start the engine and operate the controls
to activate the air conditioner.
NOTE:
• Odors from inside and outside the ve- hicle can build up in the air conditioner
unit. Odor can enter the passenger
compartment through the vents.
LHA4784
HEATER AND AIR CONDITIONER
(automatic) (if so equipped)
4-40Monitor, climate, audio, phone and voice recognition systems