2023 NISSAN ALTIMA lock
[x] Cancel search: lockPage 470 of 644
•Tire type and condition may also af-
fect braking effectiveness.
– When replacing tires, install the
specified size of tires on all four
wheels.
– When installing a spare tire, make
sure that it is the proper size and
type as specified on the Tire and
Loading Information label. For ad-
ditional information, see “Tire and
Loading Information label”
(P. 10-14).
– For additional information, see
“Wheels and tires” (P. 8-29).
The ABS controls the brakes so the wheels
do not lock during hard braking or when
braking on slippery surfaces. The system
detects the rotation speed at each wheel
and varies the brake fluid pressure to pre-
vent each wheel from locking and sliding.
By preventing each wheel from locking, the
system helps the driver maintain steering
control and helps to minimize swerving
and spinning on slippery surfaces.Using the system
Depress the brake pedal and hold it down.
Depress the brake pedal with firm steady
pressure, but do not pump the brakes. The
Anti-lock Braking System will operate to
prevent the wheels from locking up. Steer
the vehicle to avoid obstacles.
WARNING
Do not pump the brake pedal. Doing so
may result in increased stopping
distances.
Self-test feature
The Anti-lock Braking System (ABS) in-
cludes electronic sensors, electric pumps,
hydraulic solenoids and a computer. The
computer has a built-in diagnostic feature
that tests the system each time you start
the engine and move the vehicle at a low
speed in forward or reverse. When the self-
test occurs, you may hear a “clunk” noise
and/or feel a pulsation in the brake pedal.
This is normal and does not indicate a mal-
function. If the computer senses a mal-
function, it switches the ABS off and illumi-
nates the ABS warning light on the instrument panel. The brake system then
operates normally but without anti-lock
assistance.
If the ABS warning light illuminates during
the self-test or while driving, have the ve-
hicle checked. It is recommended that you
visit a NISSAN dealer for this service.
Normal operation
The Anti-lock Braking System (ABS) oper-
ates at speeds abov
e3-6mph(5-10
km/h). The speed varies according to road
conditions.
When the ABS senses that one or more
wheels are close to locking up, the actuator
rapidly applies and releases hydraulic pres-
sure. This action is similar to pumping the
brakes very quickly. You may feel a pulsa-
tion in the brake pedal and hear a noise
from under the hood or feel a vibration
from the actuator when it is operating. This
is normal and indicates that the ABS is op-
erating properly. However, the pulsation
may indicate that road conditions are haz-
ardous and extra care is required while
driving.
5-174Starting and driving
Page 480 of 644
SONAR LIMITATIONS
WARNING
Listed below are the system limitations
for the sonar system. Failure to operate
the vehicle in accordance with these
system limitations could result in seri-
ous injury or death.
• The system is deactivated at speeds
above 6 mph (10 km/h). It is reacti-
vated at lower speeds.
• Inclement weather or ultrasonic
sources such as an automatic car
wash, a truck’s compressed-air
brakes or a pneumatic drill may af-
fect the function of the system; this
may include reduced performance or
a false activation.
• The system is not designed to pre-
vent contact with small or moving
objects. Always move slowly. The
system will not detect small objects
below the bumper or on the ground.
• The system may not detect the fol-
lowing objects: fluff y objects such as
snow, cloth, cotton, glass-wool, etc.;
thin objects such as rope, wire and
chain, etc.; or wedge-shaped objects. •
The system may not detect objects
at speeds above 3 mph (5 km/h) and
may not detect certain angular or
moving objects.
• Do not attach stickers (including
transparent material), install acces-
sories, or apply anything blocking
the sensors. These conditions may
reduce the ability of the system.
SYSTEM TEMPORARILY
UNAVAILABLE
When sonar blockage is detected, the sys-
tem will be deactivated automatically.
The system is not available until the condi-
tions no longer exist.
The sonar sensors may be blocked by tem-
porary ambient conditions such as splash-
ing water, mist or fog. The blocked condi-
tion may also be caused by objects such as
ice, frost or dirt obstructing the sonar
sensors.
Action to take:
When the above conditions no longer exist,
the system will resume automatically.
SYSTEM MAINTENANCE
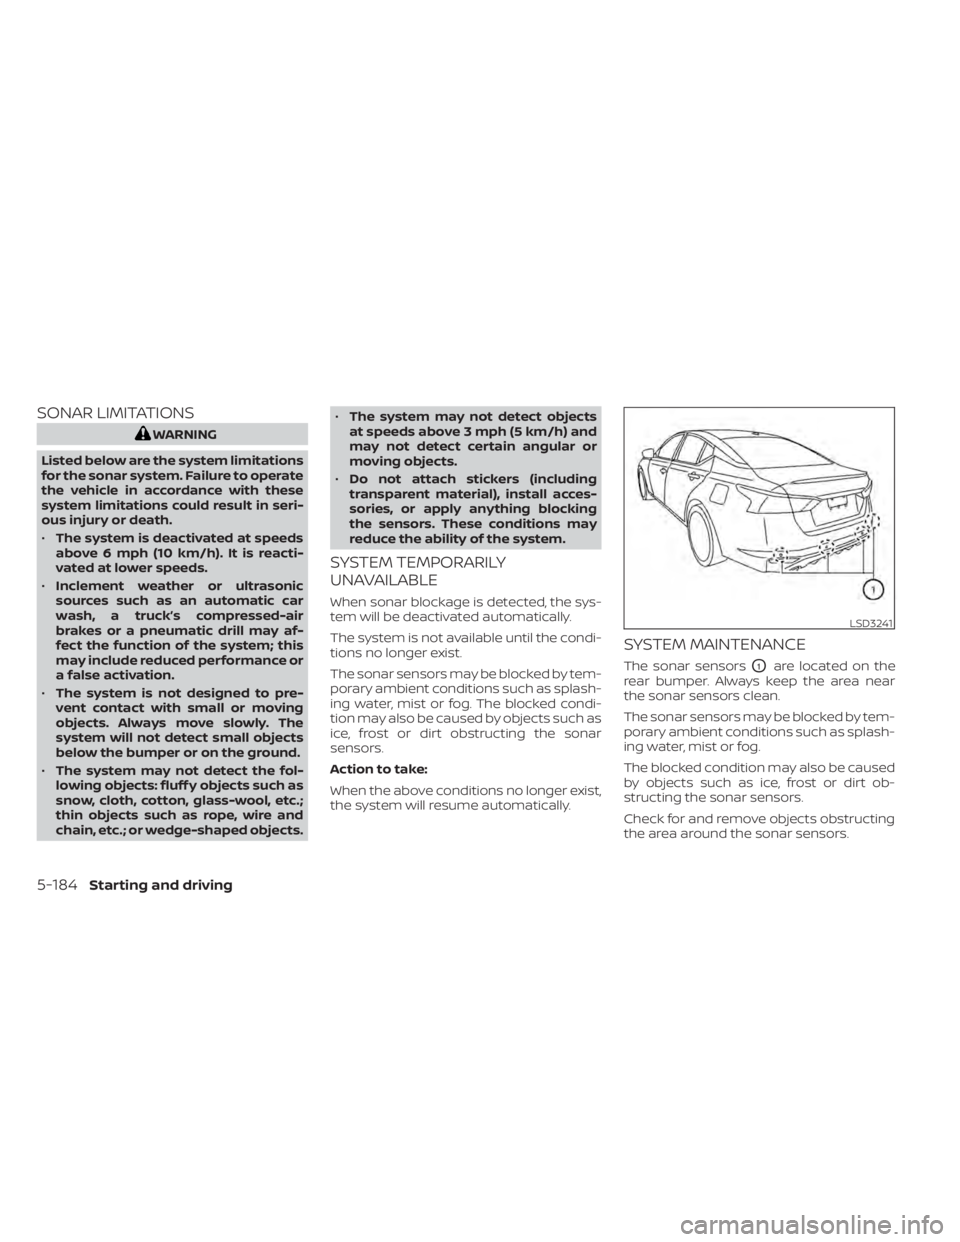
The sonar sensorsO1are located on the
rear bumper. Always keep the area near
the sonar sensors clean.
The sonar sensors may be blocked by tem-
porary ambient conditions such as splash-
ing water, mist or fog.
The blocked condition may also be caused
by objects such as ice, frost or dirt ob-
structing the sonar sensors.
Check for and remove objects obstructing
the area around the sonar sensors.
LSD3241
5-184Starting and driving
Page 481 of 644
Do not attach stickers (including transpar-
ent material), install accessories or apply
additional paint near the sonar sensors.
Do not strike or damage the area around
the sonar sensors. It is recommended that
you visit a NISSAN dealer if the area around
the sonar sensors is damaged due to a
collision.FREEING A FROZEN DOOR LOCK
To prevent a door lock from freezing, apply
de-icer through the key hole. If the lock
becomes frozen, heat the key before in-
serting it into the key hole or use the re-
mote keyless entry function on the Intelli-
gent Key.
ANTIFREEZE
In the winter when it is anticipated that the
temperature will drop below 32°F (0°C),
check the antifreeze to assure proper win-
ter protection. For additional information,
see “Engine cooling system” (P. 8-5).
BATTERY
If the battery is not fully charged during
extremely cold weather conditions, the
battery fluid may freeze and damage the
battery. To maintain maximum efficiency,
the battery should be checked regularly.
For additional information, see “Battery”
(P. 8-14).
DRAINING OF COOLANT WATER
If the vehicle is to be lef t outside without
antifreeze, drain the cooling system, includ-
ing the engine block. Refill before operating
the vehicle. For additional information, see
“Changing engine coolant” (P. 8-6).
TIRE EQUIPMENT
1. SUMMER tires have a tread designed toprovide superior performance on dry
pavement. However, the performance of
these tires will be substantially reduced
in snowy and icy conditions. If you oper-
ate your vehicle on snowy or icy roads,
NISSAN recommends the use of MUD &
SNOW or ALL SEASON TIRES on all four
wheels. It is recommended that you visit
a NISSAN dealer for the tire type, size,
speed rating and availability information.
2. For additional traction on icy roads, studded tires may be used. However,
some U.S. states and Canadian prov-
inces prohibit their use. Check local,
state and provincial laws before install-
ing studded tires.
Skid and traction capabilities of studded
snow tires on wet or dry surfaces may be
poorer than that of non-studded snow
tires.
3. Tire chains may be used. For additional information, see “Tire chains” (P. 8-37).
COLD WEATHER DRIVING
Starting and driving5-185
Page 482 of 644
SPECIAL WINTER EQUIPMENT
It is recommended that the following items
be carried in the vehicle during winter:
• A scraper and stiff-bristled brush to re-move ice and snow from the windows
and wiper blades.
• A sturdy, flat board to be placed under the jack to give it firm support.
• A shovel to dig the vehicle out of snowdrif ts.
• Extra washer fluid to refill the windshield- washer fluid reservoir.
DRIVING ON SNOW OR ICE
WARNING
• Wet ice (32°F, 0°C and freezing rain),
very cold snow or ice can be slick and
very hard to drive on. The vehicle will
have much less traction or “grip” un-
der these conditions. Try to avoid
driving on wet ice until the road is
salted or sanded.
• Whatever the condition, drive with
caution. Accelerate and slow down
with care. If accelerating or down-
shif ting too fast, the drive wheels will
lose even more traction. •
Allow more stopping distance under
these conditions. Braking should be
started sooner than on dry
pavement.
• Allow greater following distances on
slippery roads.
• Watch for slippery spots (glare ice).
These may appear on an otherwise
clear road in shaded areas. If a patch
of ice is seen ahead, brake before
reaching it. Try not to brake while on
the ice, and avoid any sudden steer-
ing maneuvers.
• Do not use the cruise control on slip-
pery roads.
• Snow can trap dangerous exhaust
gases under your vehicle. Keep snow
clear of the exhaust pipe and from
around your vehicle.
ENGINE BLOCK HEATER (if so
equipped)
Engine block heaters are used to assist
with cold temperature starting.
The engine block heater should be used
when the outside temperature is 20°F (-7°C)
or lower.
WARNING
• Do not use your engine block heater
with an ungrounded electrical sys-
tem or a 2-pronged adapter. You can
be seriously injured by an electrical
shock if you use an ungrounded
connection.
• Disconnect and properly store the
engine block heater cord before
starting the engine. Damage to the
cord could result in an electrical
shock and can cause serious injury.
• Use a heavy-duty 3-wire, 3-pronged
extension cord rated for at least 10 A.
Plug the extension cord into a
Ground Fault Interrupt (GFI) pro-
tected, grounded 110-VAC outlet.
Failure to use the proper extension
cord or a grounded outlet can result
in a fire or electrical shock and cause
serious personal injury.
5-186Starting and driving
Page 483 of 644
To use the engine block heater:
1. Turn the engine off.
2. Open the hood and unwrap the engineblock heater cord.
3. Plug the engine block heater cord into a grounded 3-wire, 3-pronged extension
cord.
4. Plug the extension cord into a Ground Fault Interrupt (GFI) protected, grounded
110-volt AC (VAC) outlet.
5. The engine block heater must be plugged in for at least 2–4 hours, de-
pending on outside temperatures, to
properly warm the engine coolant. Use
an appropriate timer to turn the engine
block heater on.
6. Before starting the engine, unplug and properly store the cord to keep it away
from moving parts.
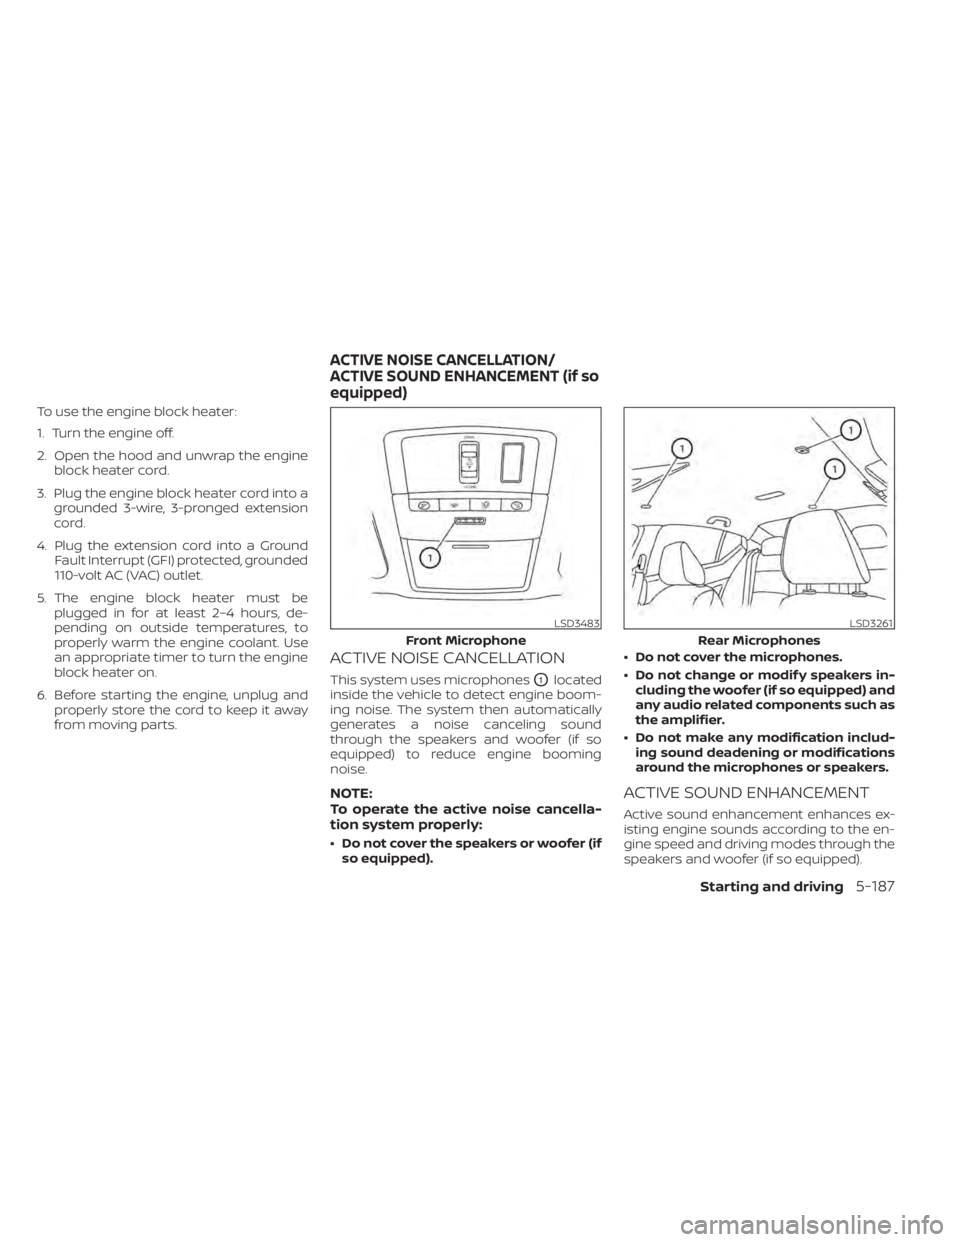
ACTIVE NOISE CANCELLATION
This system uses microphonesO1located
inside the vehicle to detect engine boom-
ing noise. The system then automatically
generates a noise canceling sound
through the speakers and woofer (if so
equipped) to reduce engine booming
noise.
NOTE:
To operate the active noise cancella-
tion system properly:
• Do not cover the speakers or woofer (if so equipped). • Do not cover the microphones.
• Do not change or modif y speakers in-
cluding the woofer (if so equipped) and
any audio related components such as
the amplifier.
• Do not make any modification includ- ing sound deadening or modifications
around the microphones or speakers.
ACTIVE SOUND ENHANCEMENT
Active sound enhancement enhances ex-
isting engine sounds according to the en-
gine speed and driving modes through the
speakers and woofer (if so equipped).
LSD3483
Front Microphone
LSD3261
Rear Microphones
ACTIVE NOISE CANCELLATION/
ACTIVE SOUND ENHANCEMENT (if so
equipped)
Starting and driving5-187
Page 488 of 644
CHANGING A FLAT TIRE (for
models with spare tire)
If you have a flat tire, follow the instructions
below:
NOTE:
For models with the emergency tire
puncture repair kit, a spare tire, jack
and rod are not equipped as stan-
dard.
Stopping the vehicle
1. Safely move the vehicle off the road andaway from traffic.
2. Turn on the hazard warning flashers.
3. Park on a level surface and apply the parking brake. Move the shif t lever to P
(Park).
4. Turn off the engine.
5. Raise the hood to warn other traffic and to signal professional road assistance
personnel that you need assistance.
6. Have all passengers get out of the ve- hicle and stand in a safe place, away
from traffic and clear of the vehicle.
WARNING
• Make sure the parking brake is se-
curely applied and the Continuously
Variable Transmission (CVT) is
shif ted into P (Park).
• Never change tires when the vehicle
is on a slope, ice or slippery areas.
This is hazardous.
• Never change tires if oncoming traf-
fic is close to your vehicle. Wait for
professional road assistance.
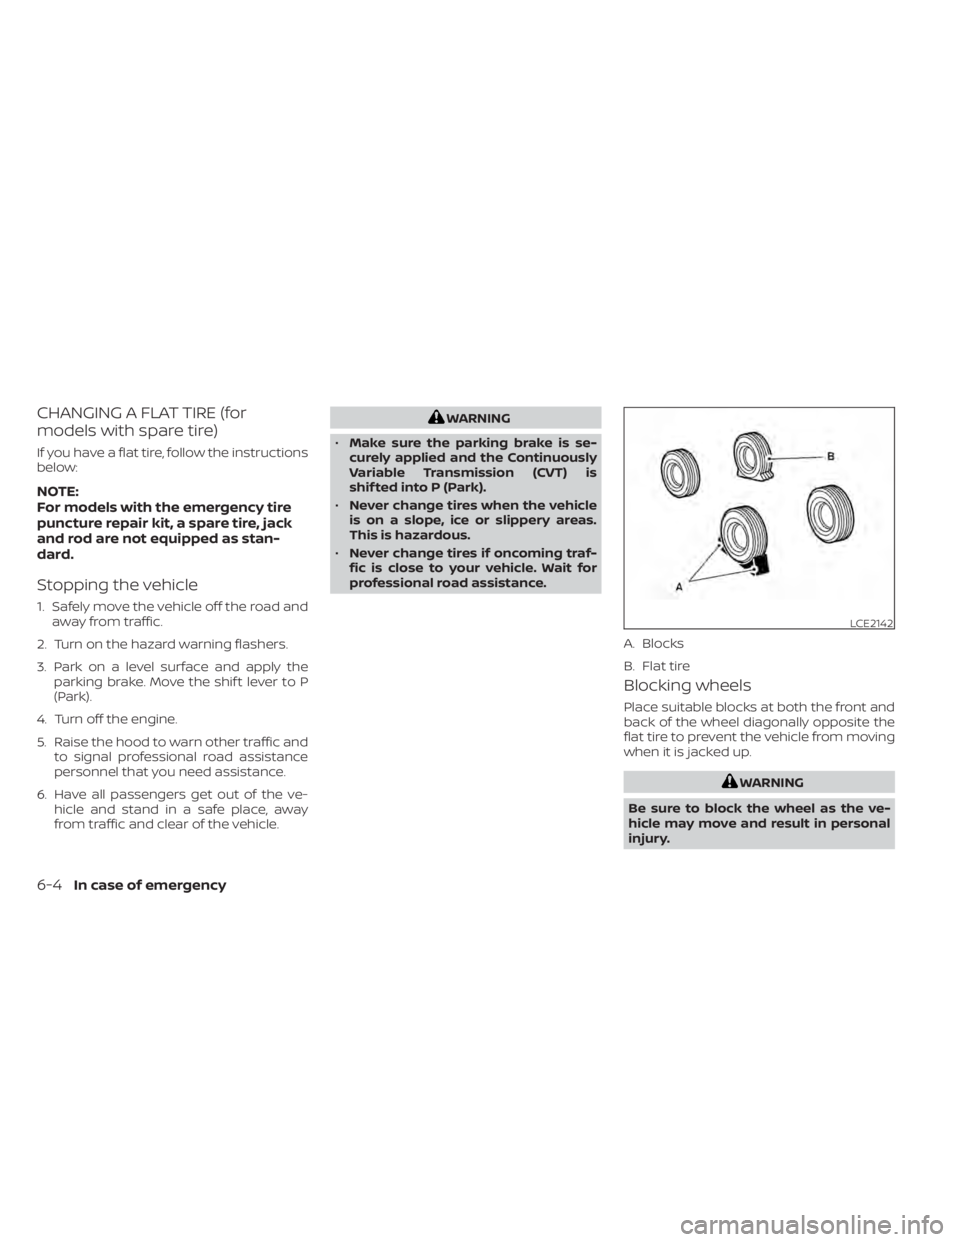
Blocking wheels
Place suitable blocks at both the front and
back of the wheel diagonally opposite the
flat tire to prevent the vehicle from moving
when it is jacked up.
WARNING
Be sure to block the wheel as the ve-
hicle may move and result in personal
injury.
LCE2142
A. Blocks
B. Flat tire
6-4In case of emergency
Page 490 of 644
Use caution not to scratch the wheel cover
or wheel surface.
Jacking up vehicle and removing
the damaged tire (2WD models)
WARNING
• Never get under the vehicle while it is
supported only by the jack. If it is nec-
essary to work under the vehicle,
support it with safety stands. •
Use only the jack provided with your
vehicle to lif t the vehicle. Do not use
the jack provided with your vehicle
on other vehicles. The jack is de-
signed for lif ting only your vehicle
during a tire change.
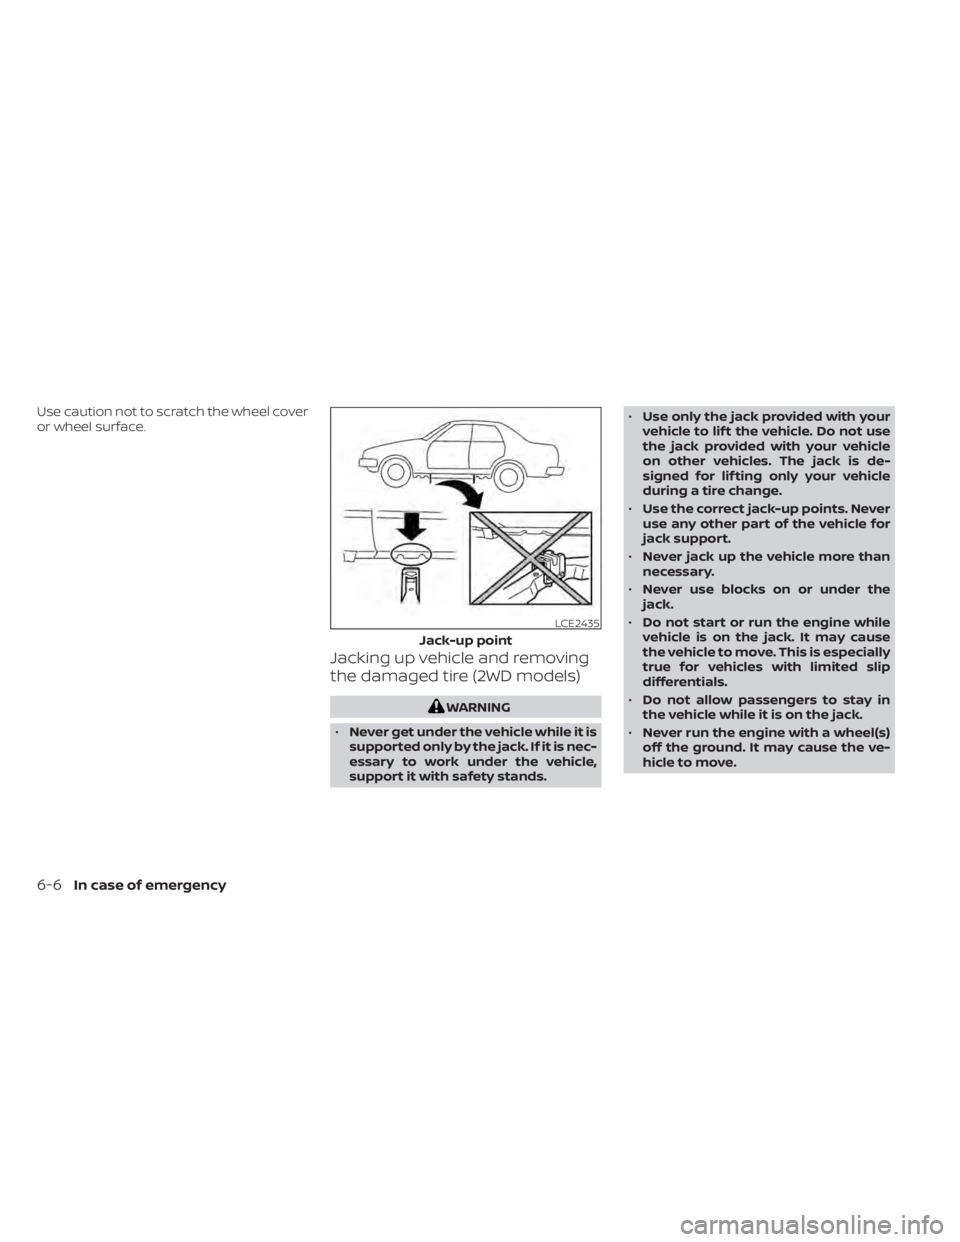
• Use the correct jack-up points. Never
use any other part of the vehicle for
jack support.
• Never jack up the vehicle more than
necessary.
• Never use blocks on or under the
jack.
• Do not start or run the engine while
vehicle is on the jack. It may cause
the vehicle to move. This is especially
true for vehicles with limited slip
differentials.
• Do not allow passengers to stay in
the vehicle while it is on the jack.
• Never run the engine with a wheel(s)
off the ground. It may cause the ve-
hicle to move.
LCE2435
Jack-up point
6-6In case of emergency
Page 491 of 644
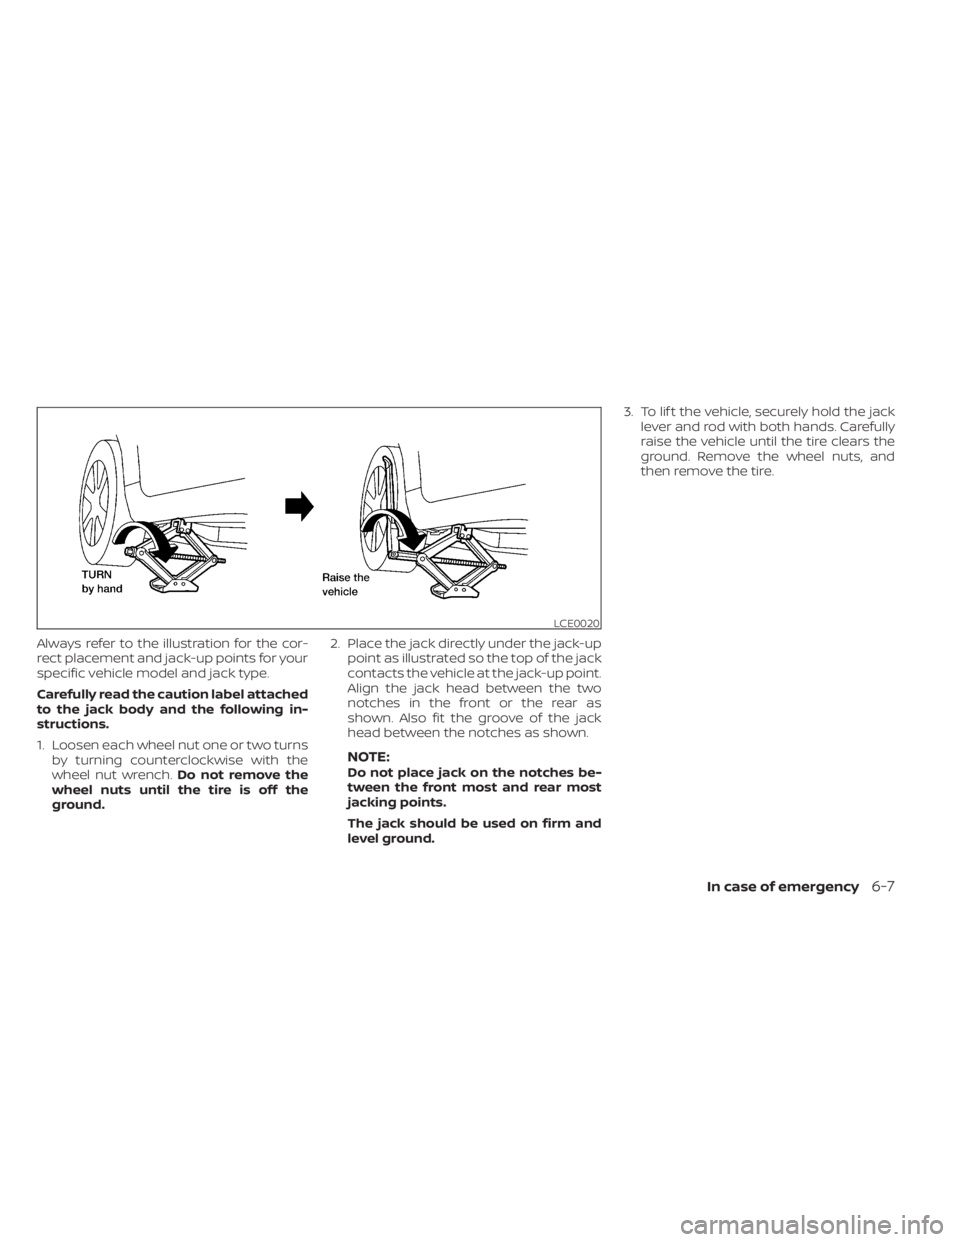
Always refer to the illustration for the cor-
rect placement and jack-up points for your
specific vehicle model and jack type.
Carefully read the caution label attached
to the jack body and the following in-
structions.
1. Loosen each wheel nut one or two turnsby turning counterclockwise with the
wheel nut wrench. Do not remove the
wheel nuts until the tire is off the
ground. 2. Place the jack directly under the jack-up
point as illustrated so the top of the jack
contacts the vehicle at the jack-up point.
Align the jack head between the two
notches in the front or the rear as
shown. Also fit the groove of the jack
head between the notches as shown.
NOTE:Do not place jack on the notches be-
tween the front most and rear most
jacking points.
The jack should be used on firm and
level ground. 3. To lif t the vehicle, securely hold the jack
lever and rod with both hands. Carefully
raise the vehicle until the tire clears the
ground. Remove the wheel nuts, and
then remove the tire.
LCE0020
In case of emergency6-7