2023 HYUNDAI TUCSON Speed
[x] Cancel search: SpeedPage 262 of 638
Convenient features
5-118
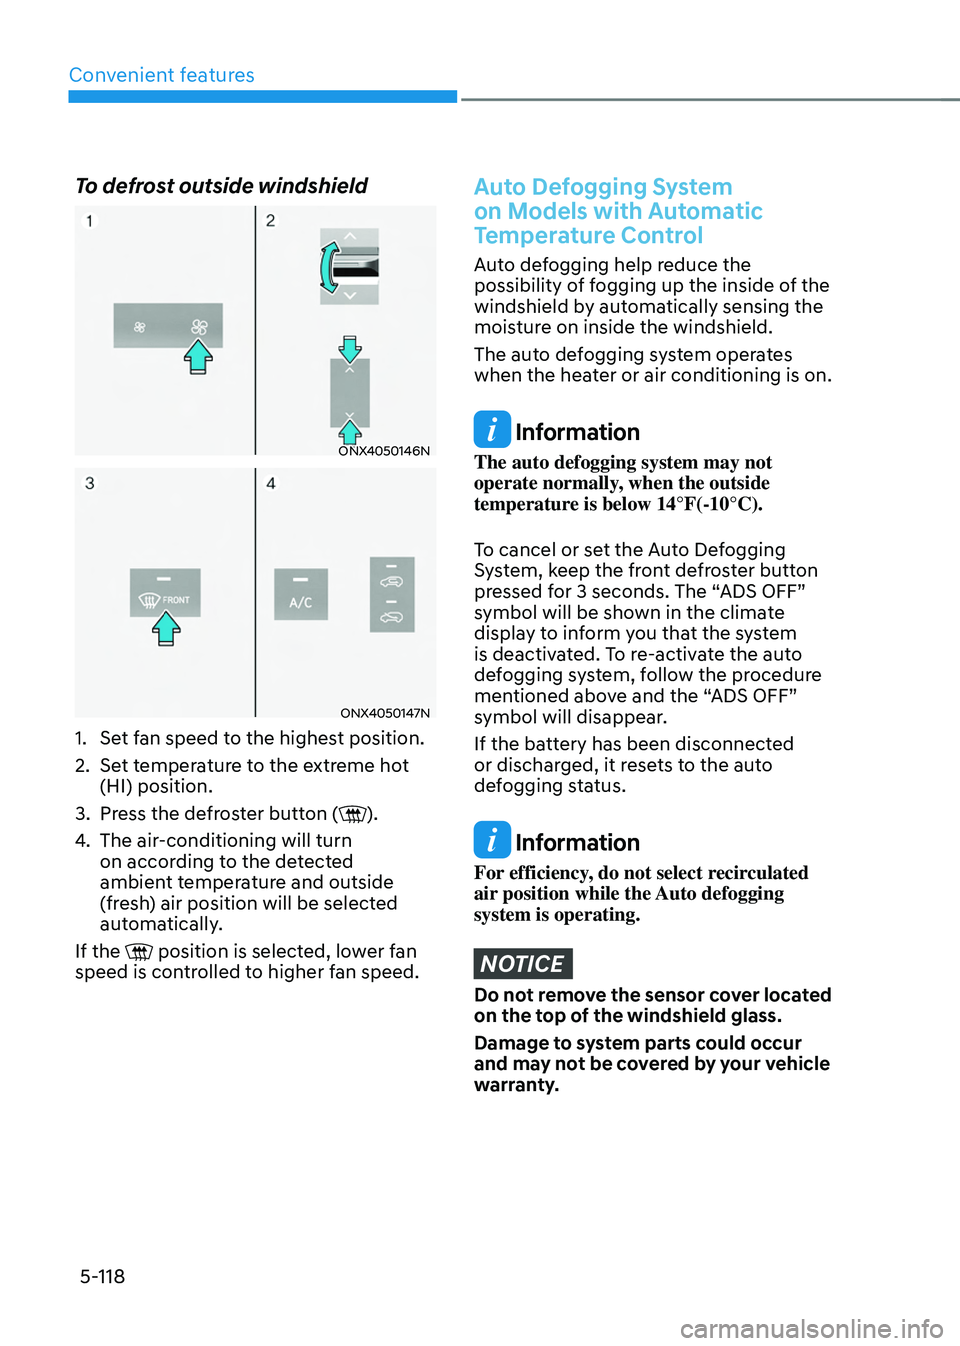
To defrost outside windshield
ONX4050146N
ONX4050147N
1. Set fan speed to the highest position.
2. Set temperature to the extreme hot
(HI) position.
3. Press the defroster button ().
4. The air-conditioning will turn
on according to the detected
ambient temperature and outside
(fresh) air position will be selected
automatically.
If the
position is selected, lower fan speed is controlled to higher fan speed.
Auto Defogging System
on Models with Automatic
Temperature Control
Auto defogging help reduce the
possibility of fogging up the inside of the
windshield by automatically sensing the
moisture on inside the windshield.
The auto defogging system operates
when the heater or air conditioning is on.
Information
The auto defogging system may not
operate normally, when the outside
temperature is below 14°F(-10°C).
To cancel or set the Auto Defogging
System, keep the front defroster button
pressed for 3 seconds. The “ADS OFF”
symbol will be shown in the climate
display to inform you that the system
is deactivated. To re-activate the auto
defogging system, follow the procedure
mentioned above and the “ADS OFF”
symbol will disappear.
If the battery has been disconnected
or discharged, it resets to the auto
defogging status.
Information
For efficiency, do not select recirculated
air position while the Auto defogging
system is operating.
NOTICE
Do not remove the sensor cover located
on the top of the windshield glass.
Damage to system parts could occur
and may not be covered by your vehicle
warranty.
Page 264 of 638
Convenient features
5-120
Auto Defogging System
on Models with Automatic
Temperature Control
ONX4050046
Auto defogging helps reduce the
possibility of fogging up the inside of the
windshield by automatically sensing the
moisture on inside the windshield.
The auto defogging system operates
when the heater or air conditioning is on.
Information
The auto defogging system may not
operate normally, when the outside
temperature is below 14°F (10°C).
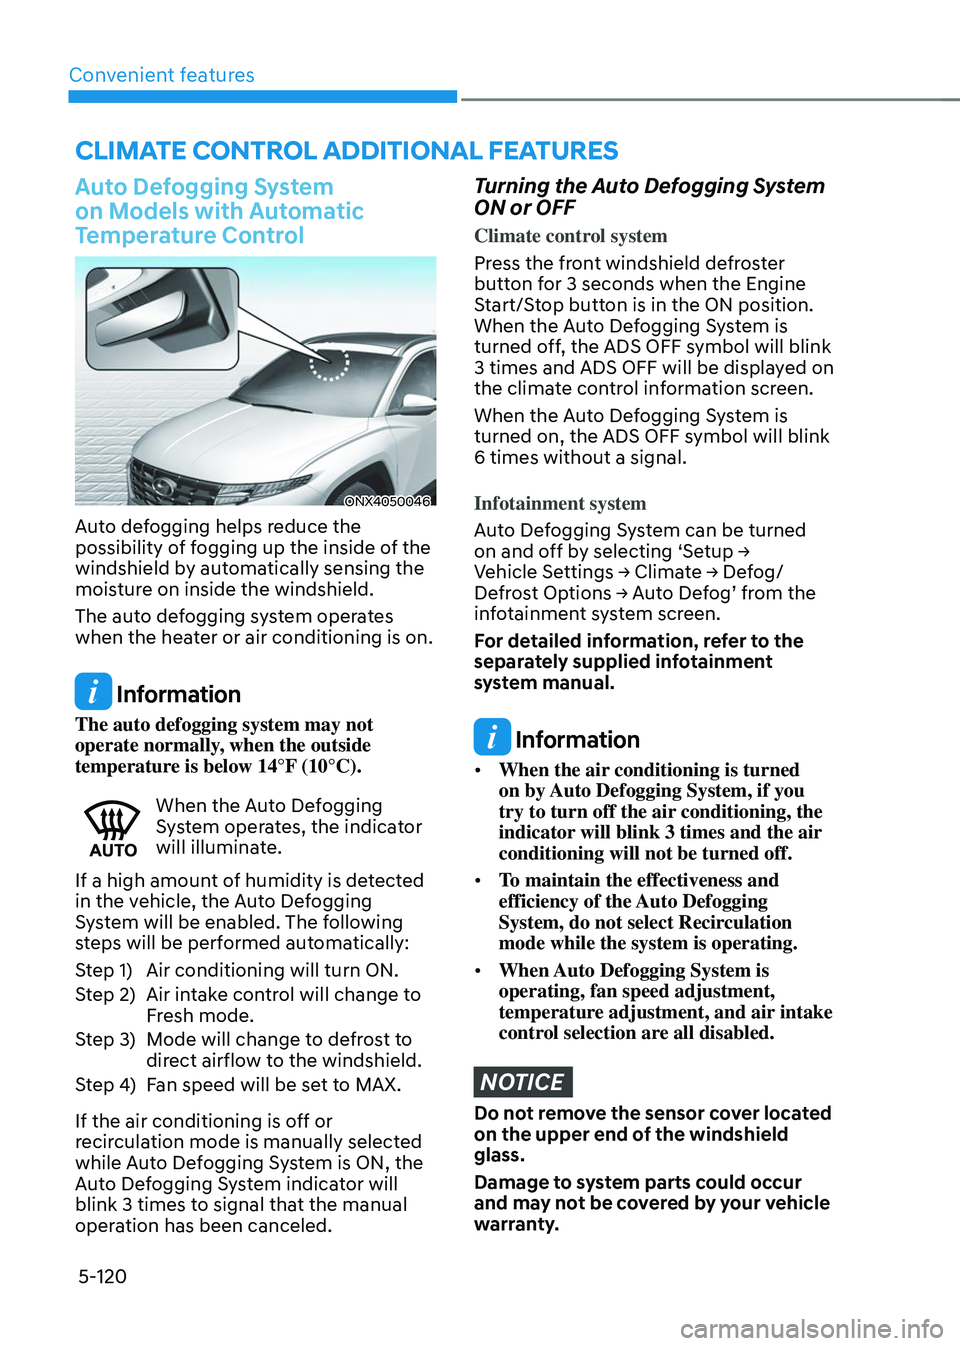
When the Auto Defogging System operates, the indicator
will illuminate.
If a high amount of humidity is detected
in the vehicle, the Auto Defogging
System will be enabled. The following
steps will be performed automatically:
Step 1) Air conditioning will turn ON.
Step 2) Air intake control will change to
Fresh mode.
Step 3) Mode will change to defrost to
direct airflow to the windshield.
Step 4) Fan speed will be set to MAX.
If the air conditioning is off or
recirculation mode is manually selected
while Auto Defogging System is ON, the
Auto Defogging System indicator will
blink 3 times to signal that the manual
operation has been canceled.
Turning the Auto Defogging System
ON or OFF
Climate control system
Press the front windshield defroster
button for 3 seconds when the Engine
Start/Stop button is in the ON position.
When the Auto Defogging System is
turned off, the ADS OFF symbol will blink
3 times and ADS OFF will be displayed on
the climate control information screen.
When the Auto Defogging System is
turned on, the ADS OFF symbol will blink
6 times without a signal.
Infotainment system
Auto Defogging System can be turned
on and off by selecting ‘Setup → Vehicle Settings → Climate → Defog/Defrost Options → Auto Defog’ from the infotainment system screen.
For detailed information, refer to the
separately supplied infotainment
system manual.
Information
• When the air conditioning is turned
on by Auto Defogging System, if you
try to turn off the air conditioning, the
indicator will blink 3 times and the air
conditioning will not be turned off.
• To maintain the effectiveness and
efficiency of the Auto Defogging
System, do not select Recirculation
mode while the system is operating.
• When Auto Defogging System is
operating, fan speed adjustment,
temperature adjustment, and air intake
control selection are all disabled.
NOTICE
Do not remove the sensor cover located
on the upper end of the windshield
glass.
Damage to system parts could occur
and may not be covered by your vehicle
warranty.
CLIMATE CONTROL ADDITIONAL FEATURES
Page 274 of 638
Convenient features
5-130
• When charging some smart phones
with a self-protection feature,
the wireless charging speed may
decrease and the wireless charging
may stop.
• If the smart phone has a thick cover,
the wireless charging may not be
possible.
• If the smart phone is not completely
contacting the charging pad,
wireless charging may not operate
properly.
• Some magnetic items like credit
cards, phone cards or rail tickets may
be damaged if left with the smart
phone during the charging process.
• When any smart phone without
a wireless charging function or a
metallic object is placed on the
charging pad, a small noise may
sound. This small sound is due to the
vehicle discerning compatibility of
the object placed on the charging
pad. It does not affect your vehicle or
the smart phone in any way. Information
If the Ignition switch is in the OFF
position, the charging also stops.
Information
This device complies with Part 15 of the
FCC rules. Operation is subject to the
following three conditions:
1. This device may not cause harmful
interference, and
2. This device must accept any
interference received, including
interference that may cause undesired
operation.
3. Changes or modifications not expressly
approved by the party responsible
for compliance could void the user’s
authority to operate the device.
Clock
The clock can be set from the
infotainment system.
For detailed information, refer to the
separately supplied infotainment
system manual.
WARNING
Do not attempt to adjust the clock
while driving. Doing so may result in
distracted driving which may lead to
an accident involving personal injury or
death.
Page 279 of 638
05
5-135
EXTERIOR FEATURES
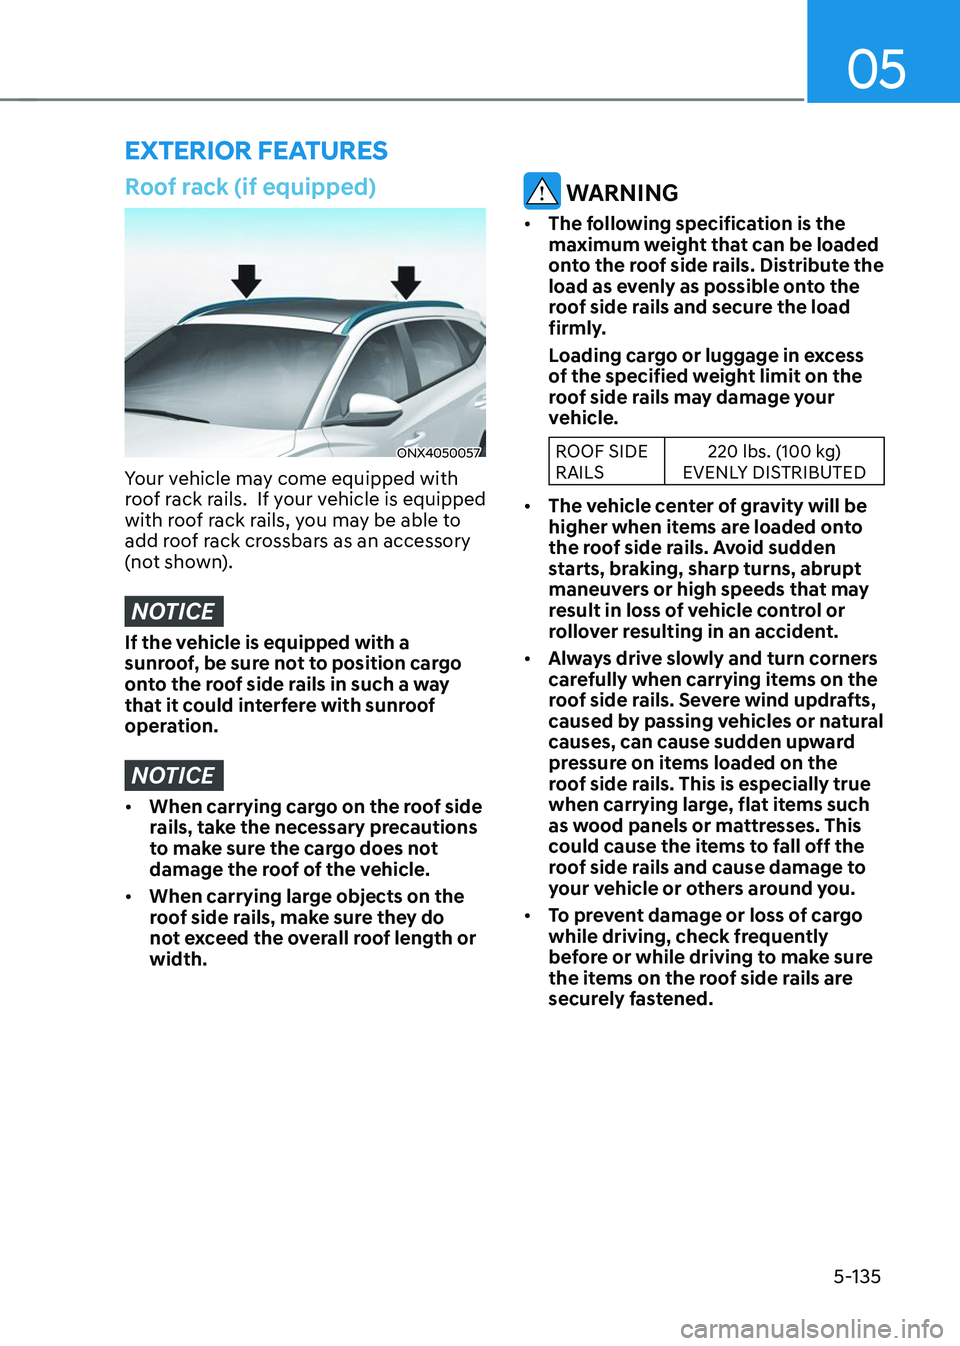
Roof rack (if equipped)
ONX4050057
Your vehicle may come equipped with
roof rack rails. If your vehicle is equipped
with roof rack rails, you may be able to
add roof rack crossbars as an accessory
(not shown).
NOTICE
If the vehicle is equipped with a
sunroof, be sure not to position cargo
onto the roof side rails in such a way
that it could interfere with sunroof
operation.
NOTICE
• When carrying cargo on the roof side
rails, take the necessary precautions
to make sure the cargo does not
damage the roof of the vehicle.
• When carrying large objects on the
roof side rails, make sure they do
not exceed the overall roof length or
width.
WARNING
• The following specification is the
maximum weight that can be loaded
onto the roof side rails. Distribute the
load as evenly as possible onto the
roof side rails and secure the load
firmly.
Loading cargo or luggage in excess
of the specified weight limit on the
roof side rails may damage your
vehicle.
ROOF SIDE
RAILS 220 lbs. (100 kg)
EVENLY DISTRIBUTED
• The vehicle center of gravity will be
higher when items are loaded onto
the roof side rails. Avoid sudden
starts, braking, sharp turns, abrupt
maneuvers or high speeds that may
result in loss of vehicle control or
rollover resulting in an accident.
• Always drive slowly and turn corners
carefully when carrying items on the
roof side rails. Severe wind updrafts,
caused by passing vehicles or natural
causes, can cause sudden upward
pressure on items loaded on the
roof side rails. This is especially true
when carrying large, flat items such
as wood panels or mattresses. This
could cause the items to fall off the
roof side rails and cause damage to
your vehicle or others around you.
• To prevent damage or loss of cargo
while driving, check frequently
before or while driving to make sure
the items on the roof side rails are
securely fastened.
Page 292 of 638
06
6 -7
Starting the engine
WARNING
• Always wear appropriate shoes when
operating your vehicle. Unsuitable
shoes, such as high heels, ski boots,
sandals, flip-flops, etc., may interfere
with your ability to use the brake,
accelerator and clutch pedals.
• Do not start the vehicle with the
accelerator pedal depressed. The
vehicle can move which can lead to
an accident.
• Wait until the engine RPM is normal.
The vehicle may suddenly move if
the brake pedal is released when the
RPM is high.
1. Make sure the Electronic Parking
Brake (EPB) is applied.
2. Make sure the shift lever/button is in
P (Park).
3. Depress the brake pedal.
4. Turn the ignition switch to the START
position. Hold the key (maximum of
10 seconds) until the engine starts and
release it.
Information
• Do not wait for the engine to warm up
while the vehicle remains stationary.
Start driving at moderate engine
speeds. (Steep accelerating and
decelerating should be avoided.)
• Always start the vehicle with your foot
on the brake pedal. Do not depress the
accelerator while starting the vehicle.
Do not race the engine while warming
it up.
NOTICE
To prevent damage to the vehicle:
• Do not hold the ignition key in the
START position for more than 10
seconds. Wait 5 to 10 seconds before
trying again.
• Do not turn the ignition switch to
the START position with the engine
running. It may damage the starter.
• If traffic and road conditions permit,
you may put the shift lever in the N
(Neutral) position while the vehicle
is still moving and turn the ignition
switch to the START position in an
attempt to restart the engine.
• Do not push or tow your vehicle to
start the engine.
Page 295 of 638
Driving your vehicle
6-10
Starting the engine
WARNING
• Always wear appropriate shoes when
operating your vehicle. Unsuitable
shoes, such as high heels, ski boots,
sandals, flipflops, etc., may interfere
with your ability to use the brake and
accelerator pedals.
• Do not start the vehicle with the
accelerator pedal depressed.
The vehicle can move which can lead
to an accident.
• Wait until the engine RPM is normal.
The vehicle may suddenly move if
the brake pedal is released when the
RPM is high.
Information
• The vehicle will start by pressing the
Engine Start/Stop button, only when
the smart key is in the vehicle.
• Even if the smart key is in the vehicle,
and when it is far away from the driver,
the engine may not start.
• When the Engine Start/Stop button
is in the ACC or ON position, if any
door is open, the system checks for the
smart key. When the smart key is not
in the vehicle, the “
” indicator
will blink and the warning 'Key not in
vehicle' will come on. When all doors
are closed, the chime will also sound for
about 5 seconds. Keep the smart key in
the vehicle.
1. Always carry the smart key with you.
2. Make sure the parking brake is
applied.
3. Make sure the shift lever/button is in
P(Park).
4. Depress the brake pedal.
5. Press the Engine Start/Stop button.
Information
• Do not wait for the engine to warm up
while the vehicle remains stationary.
Start driving at moderate engine
speeds. Steep accelerating and
decelerating should be avoided.
• Always start the vehicle with your foot
on the brake pedal. Do not depress the
accelerator while starting the vehicle.
Do not race the engine while warming
it up.
Page 297 of 638
Driving your vehicle
6-12
Auto shut-off system (if equipped)
To prevent accidents caused by carbon
dioxide poisoning, the engine is turned
off automatically 60 minutes later when
the following conditions are satisfied.
The timer appears on the instrument
cluster 30 minutes before it turns off
automatically.
Operating conditions
• The driver does not fasten a seat belt
• No one in the passenger's seat
• Stop the vehicle and the speed is
under 1.86mph and the gear shift is
in P
• While the brake or accelerator is not
working
• When AVN update is performing
Cluster timer reset conditions
• Release the accelerator or brake after
completing operation
• Press the OK button on the steering
wheel while the timer appears on the
instrument cluster
Off conditions
• The driver fastened the seat belt
• A passenger is in the pasenger's seat
• Driving over 1.86mph
• Shifting the gear in R, N or D
CAUTION
Please do not leave a passenger or a pet
in the vehicle since the air conditioning
system stops when the engine is off.
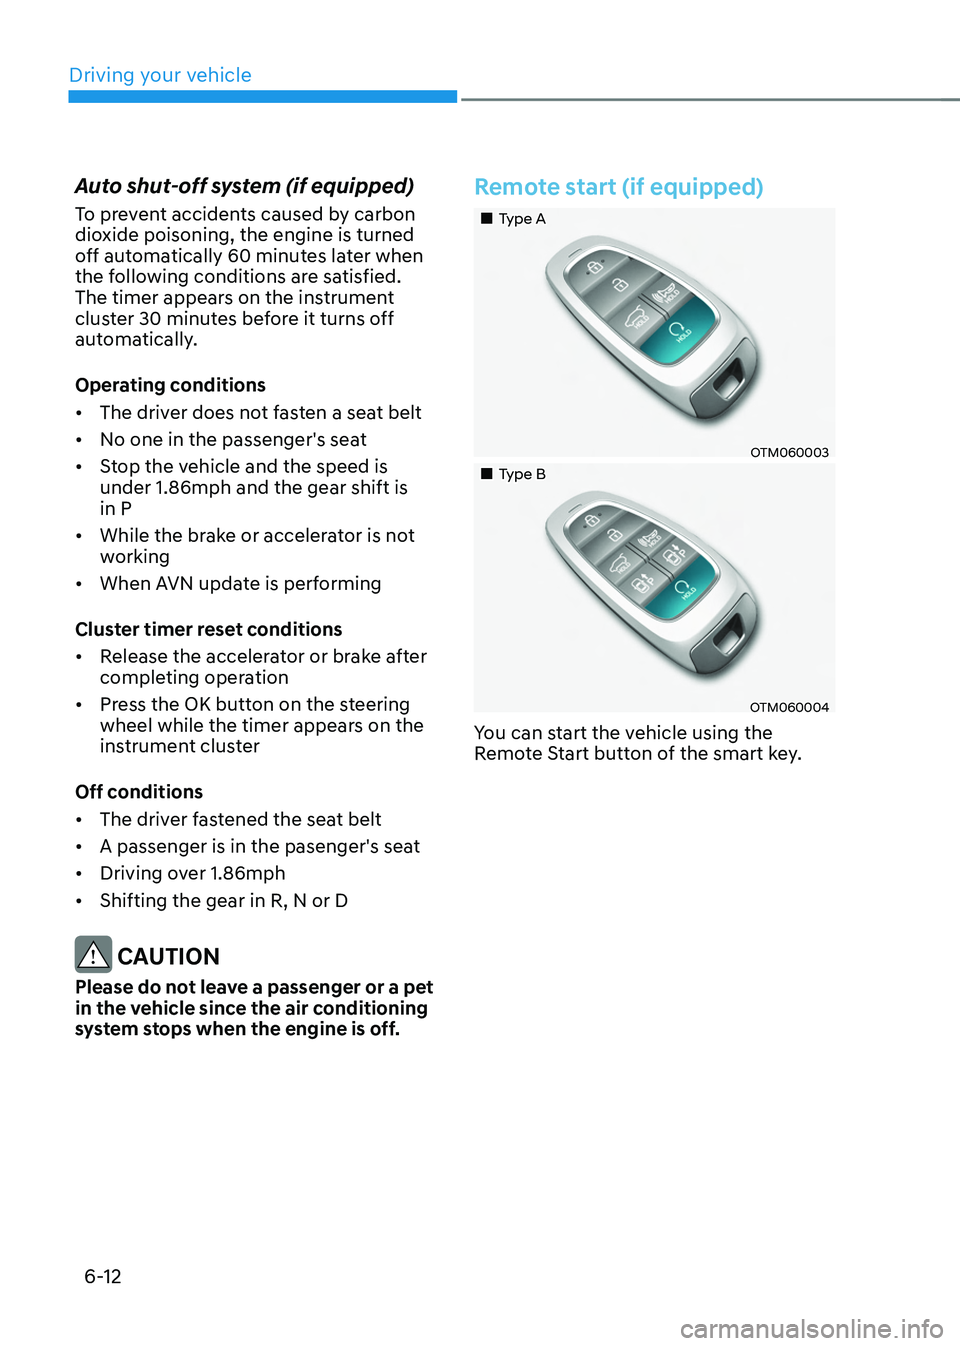
Remote start (if equipped)
„„Type A
OTM060003
„„Type B
OTM060004
You can start the vehicle using the
Remote Start button of the smart key.
Page 299 of 638
![HYUNDAI TUCSON 2023 Owners Manual Driving your vehicle6-14
„„Lever type„„Button type
ONX4E060039ONX4060003
[A] : Shift lever, [B] : Shift release button, [C] : Manual shift mode
Depress the brake pedal and press th HYUNDAI TUCSON 2023 Owners Manual Driving your vehicle6-14
„„Lever type„„Button type
ONX4E060039ONX4060003
[A] : Shift lever, [B] : Shift release button, [C] : Manual shift mode
Depress the brake pedal and press th](/manual-img/35/56195/w960_56195-298.png)
Driving your vehicle6-14
„„Lever type„„Button type
ONX4E060039ONX4060003
[A] : Shift lever, [B] : Shift release button, [C] : Manual shift mode
Depress the brake pedal and press the Shift release button while moving the shift lever.
Press the Shift release button while moving the shift lever.
The shift lever can freely operate.
Automatic transmission operation
The automatic transmission has six forward speeds (eight forward speeds, if equipped)
and one reverse speed.
The individual speeds are selected automatically in the D (Drive) position.
AUTOMATIC TRANSMISSION