Page 197 of 638
05
5-53
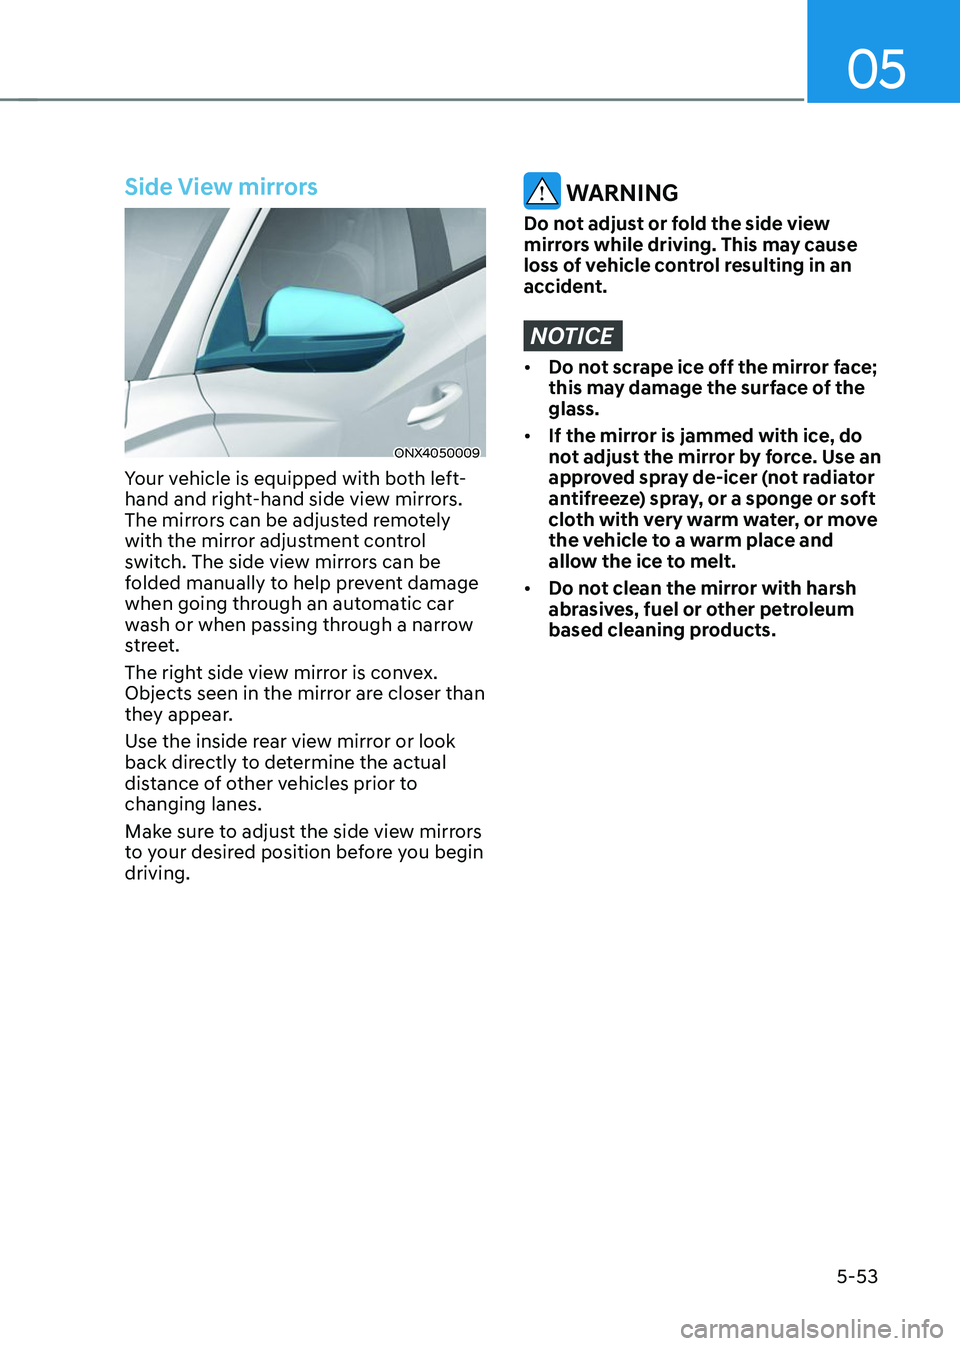
Side View mirrors
ONX4050009
Your vehicle is equipped with both left-
hand and right-hand side view mirrors.
The mirrors can be adjusted remotely
with the mirror adjustment control
switch. The side view mirrors can be
folded manually to help prevent damage
when going through an automatic car
wash or when passing through a narrow
street.
The right side view mirror is convex.
Objects seen in the mirror are closer than
they appear.
Use the inside rear view mirror or look
back directly to determine the actual
distance of other vehicles prior to
changing lanes.
Make sure to adjust the side view mirrors
to your desired position before you begin
driving.
WARNING
Do not adjust or fold the side view
mirrors while driving. This may cause
loss of vehicle control resulting in an
accident.
NOTICE
• Do not scrape ice off the mirror face;
this may damage the surface of the
glass.
• If the mirror is jammed with ice, do
not adjust the mirror by force. Use an
approved spray de-icer (not radiator
antifreeze) spray, or a sponge or soft
cloth with very warm water, or move
the vehicle to a warm place and
allow the ice to melt.
• Do not clean the mirror with harsh
abrasives, fuel or other petroleum
based cleaning products.
Page 198 of 638
Convenient features
5-54
Adjusting the side view mirrors
ONX4050010N
1. Move the lever (1) either to the L (left
side) or R (right side) to select the side
view mirror you would like to adjust.
2. Use the mirror adjustment control (2)
to position the selected mirror up,
down, left or right.
3. After adjustment, move the lever (1)
to the middle to prevent inadvertent
adjustment.
Folding the side view mirror
ONX4E050009
To fold the side view mirror, grasp the
housing of the mirror and then fold it
toward the rear of the vehicle.
Page 229 of 638
05
5-85
Limitations of the system
High Beam Assist may not work properly
in the following situations:
• Light from a vehicle is not detected
because of lamp damage, or because
it is hidden from sight, etc.
• Headlamp of a vehicle is covered with
dust, snow or water.
• A vehicle’s headlamps are off but the
fog lamps are on and etc.
• There is a lamp that has a similar
shape as a vehicle’s lamp.
• Headlamps have been damaged or
not repaired properly.
• Headlamps are not aimed properly.
• Driving on a narrow curved road,
rough road, uphill or downhill.
• Vehicle in front is partially visible on a
crossroad or curved road.
• There is a traffic light, reflecting sign,
flashing sign or mirror ahead.
• There is a temporary reflector or flash
ahead (construction area).
• The road conditions are bad such as
being wet, iced or covered with snow.
• A vehicle suddenly appears from a
curve.
• The vehicle is tilted from a flat tire or
is being towed.
• Light from a vehicle is not detected
because of exhaust fume, smoke, fog,
snow, etc.
For more details on the limitations
of the front view camera, refer to
“Forward Collision-Avoidance Assist
(FCA)” section in chapter 7. WARNING
• At times, High Beam Assist may not
work properly. It is the responsibility
of the driver for safe driving
practices and always check the road
conditions for your safety.
• When High Beam Assist does
not operate normally, change
the headlamp position manually
between high beam and low beam.
Page 231 of 638
05
5-87
Rear lamps (if equipped)
„„Type A
ODN8059211
„„Type B
OLFP048099
Rear room lamp switch :
Press this button to turn the room lamp
on and off.
Vanity mirror lamp
OTM050200
Push the switch to turn the light on or off.
•
: The lamp will turn on if this button is pressed.
•
: The lamp will turn off if this button is pressed.
Glove box lamp (if equipped)
ONX4050039
The glove box lamp turns on when the
glove box is opened.
Page 233 of 638
05
5-89
Puddle Lamp or Door Handle Lamp
(if equipped)
When all the doors (and liftgate) are
closed and locked, the puddle lamp
and door handle lamp will turn on for
approximately 15 seconds if any of the
below is performed.
1. If ‘Convenience → Welcome mirror/light → On door unlock’ is selected in the User Settings mode on the LCD
display,• the lamps will turn on when the
door lock button is pressed on the
smart key.
• the lamps will turn on when the
button of the outside door handle
is pressed with the smart key in
possession.
2. If both ‘Convenience → Welcome mirror/light → On door unlock’ and ‘Convenience → Welcome mirror/light → On driver approach’ is selected in the User Settings mode on the LCD
display, the lamps will turn on when
the vehicle is approached with the
smart key in possession.
You can activate or deactivate Welcome
Light function from the User Settings
mode on the LCD display.
Headlamp and position lamp
When the headlamp (lamp switch in the
headlamp or AUTO position) is on and
all doors (and liftgate) are locked and
closed, the position lamp and headlamp
will come on for 15 seconds when the
door unlock button is pressed on the
remote key or smart key.
At this time, if you press the door lock
or unlock button, the position lamp and
headlamp will turn off immediately.
Interior lamp
When the interior lamp switch is in the position and all doors (and liftgate) are closed and locked, the room lamp
will come on for 30 seconds if any of the
below is performed.
- When the door unlock button is
pressed on the remote key or smart
key.
-When you put your hand in the
outside door handle while carrying the
smart key.
At this time, if you press the door lock
or unlock button on the smart key the
lamps will turn off immediately.
Page 260 of 638
Convenient features5-116
WARNING
Windshield heating
Do not use the
position during cooling operation in extremely humid
weather. The difference between the
temperature of the outside air and that
of the windshield could cause the outer
surface of the windshield to fog up,
causing loss of visibility could cause
an accident resulting in serious injury
or death. In this case, set the mode
selection button to the
position and fan speed control knob to a lower
speed.
• For maximum defrost performance,
set the temperature control to the
highest temperature setting and
the fan speed control to the highest
setting.
• If warm air to the floor is desired while
defrosting or defogging, set the mode
to the floor-defrost position.
• Before driving, clear all snow and ice
from the windshield, rear window,
side view mirrors, and all side
windows.
• Clear all snow and ice from the
hood and air inlet in the cowl grill
to improve heater and defroster
efficiency and to reduce the
probability of fogging up the inside of
the windshield.
NOTICE
If the engine temperature is still cold
after starting, then a brief engine warm
up period may be required for the
vented air flow to become warm or hot.
Manual climate control system
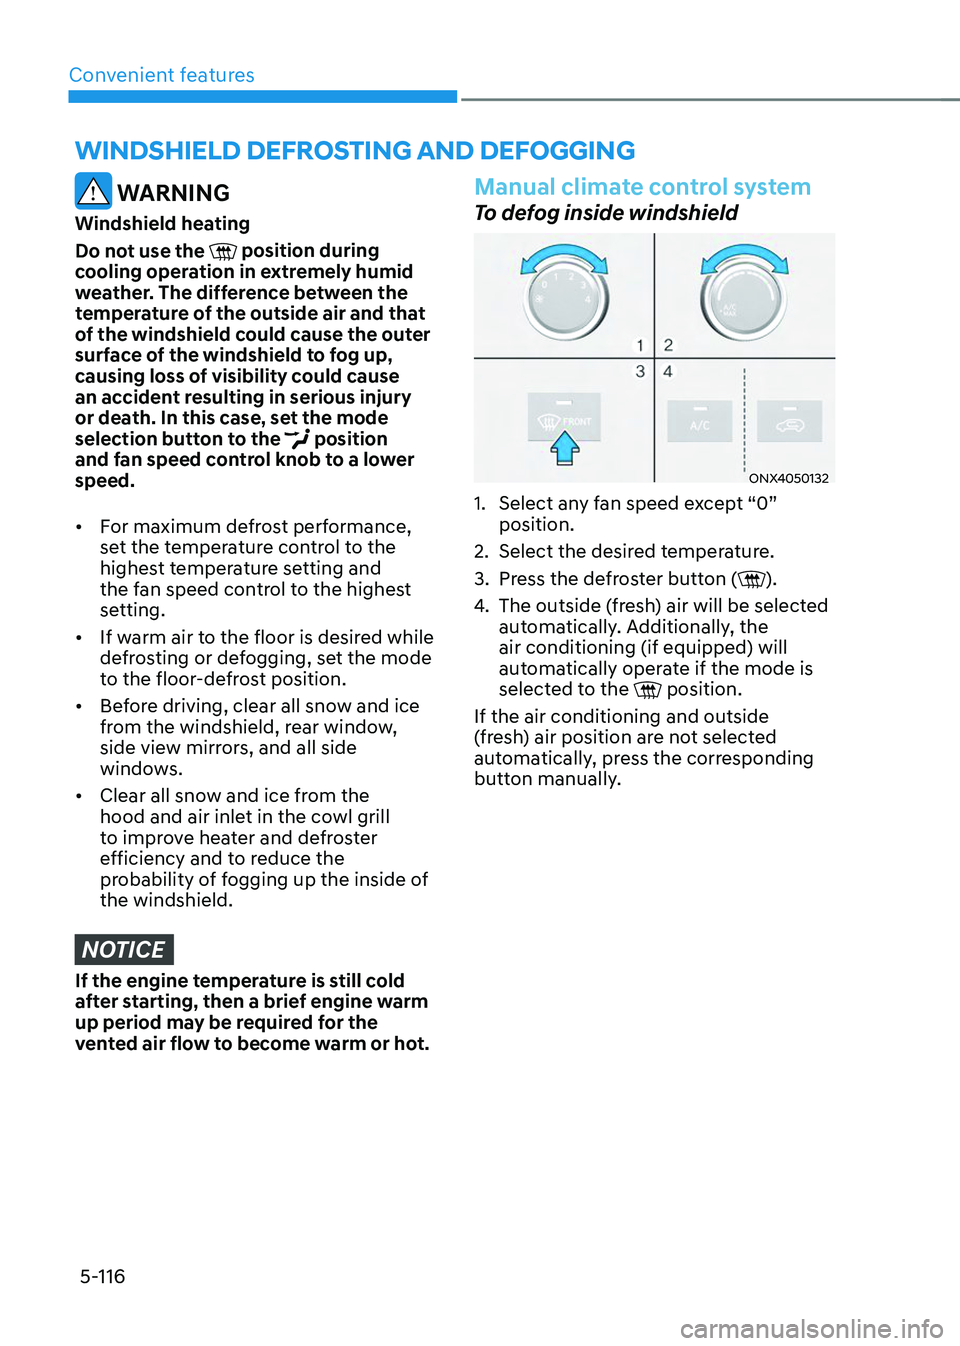
To defog inside windshield
ONX4050132
1. Select any fan speed except “0”
position.
2. Select the desired temperature.
3. Press the defroster button ().
4. The outside (fresh) air will be selected
automatically. Additionally, the
air conditioning (if equipped) will
automatically operate if the mode is
selected to the
position.
If the air conditioning and outside
(fresh) air position are not selected
automatically, press the corresponding
button manually.
WINDSHIELD DEFROSTING AND DEFOGGING
Page 263 of 638
05
5-119
Rear window defrosterNOTICE
To prevent damage to the rear window
defroster conducting elements bonded
to the inside surface of the rear window,
never use sharp instruments or window
cleaners containing abrasives to clean
the window.
The defroster heats the window to remove frost, fog
and thin ice from the interior
and exterior of the rear
window, while the engine is
running.
• To activate the rear window defroster,
press the rear window defroster
button located in the center control
panel. The indicator on the rear
window defroster button illuminates
when the defroster is ON.
• To turn off the defroster, press the rear
window defroster button again.
Information
• If there is heavy accumulation of snow
on the rear window, brush it off before
operating the rear defroster.
• The rear window defroster
automatically turns off after
approximately 20 minutes or when the
Engine Start/Stop button is in the OFF
position.
Side view mirror defroster (if
equipped)
If your vehicle is equipped with the Side
view mirror defrosters, they will operate
at the same time you turn on the rear
window defroster.
Page 270 of 638
Convenient features
5-126
Sunvisor
OTM048089
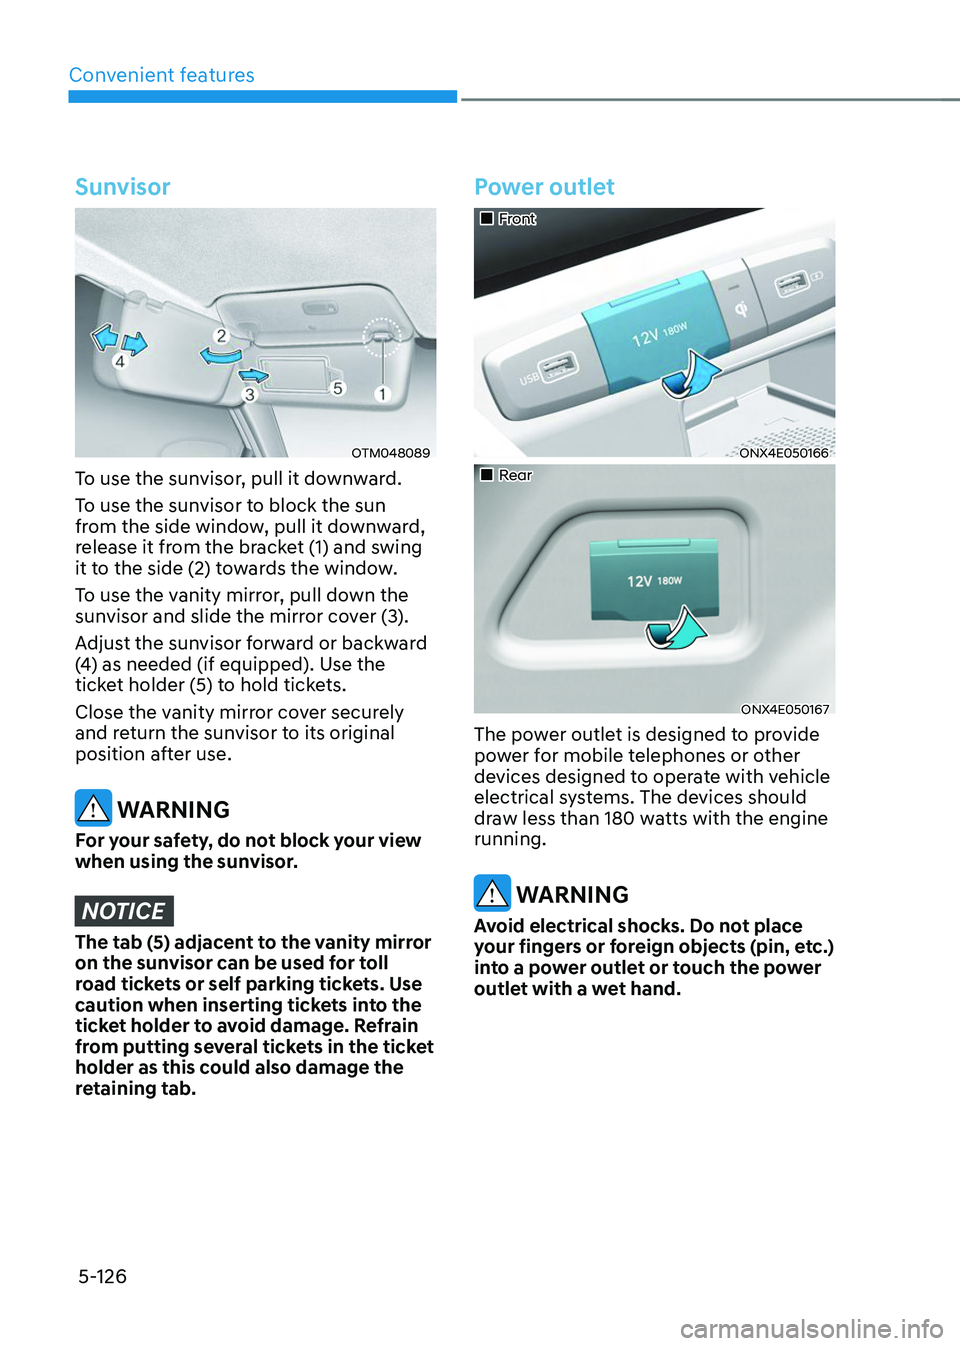
To use the sunvisor, pull it downward.
To use the sunvisor to block the sun
from the side window, pull it downward,
release it from the bracket (1) and swing
it to the side (2) towards the window.
To use the vanity mirror, pull down the
sunvisor and slide the mirror cover (3).
Adjust the sunvisor forward or backward
(4) as needed (if equipped). Use the
ticket holder (5) to hold tickets.
Close the vanity mirror cover securely
and return the sunvisor to its original
position after use.
WARNING
For your safety, do not block your view
when using the sunvisor.
NOTICE
The tab (5) adjacent to the vanity mirror
on the sunvisor can be used for toll
road tickets or self parking tickets. Use
caution when inserting tickets into the
ticket holder to avoid damage. Refrain
from putting several tickets in the ticket
holder as this could also damage the
retaining tab.
Power outlet
„„Front
ONX4E050166
„„Rear
ONX4E050167
The power outlet is designed to provide
power for mobile telephones or other
devices designed to operate with vehicle
electrical systems. The devices should
draw less than 180 watts with the engine
running.
WARNING
Avoid electrical shocks. Do not place
your fingers or foreign objects (pin, etc.)
into a power outlet or touch the power
outlet with a wet hand.