2023 HYUNDAI SONATA Fuel door
[x] Cancel search: Fuel doorPage 15 of 555
2-4
Vehicle Information and Reporting Safety Defects
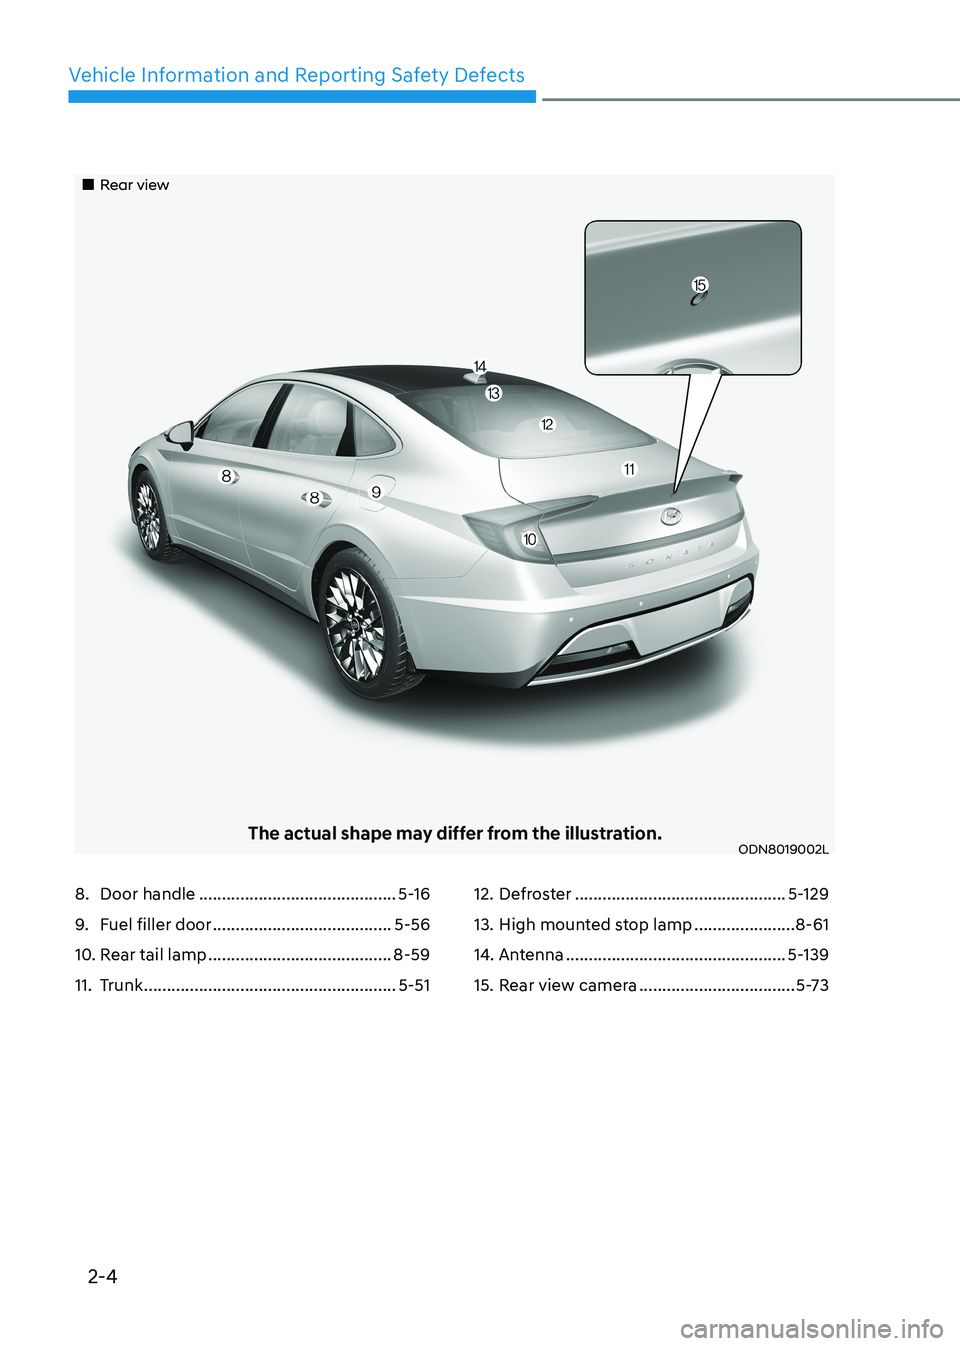
„„Rear view
The actual shape may differ from the illustration.ODN8019002L
8. Door handle ........................................... 5-16
9. Fuel filler door ....................................... 5-56
10. Rear tail lamp ........................................ 8-59
11. Trunk ....................................................... 5-5112. Defroster
.............................................. 5-129
13. High mounted stop lamp ......................8-61
14. Antenna ................................................ 5-139
15. Rear view camera ..................................5-73
Page 16 of 555
2-5
02
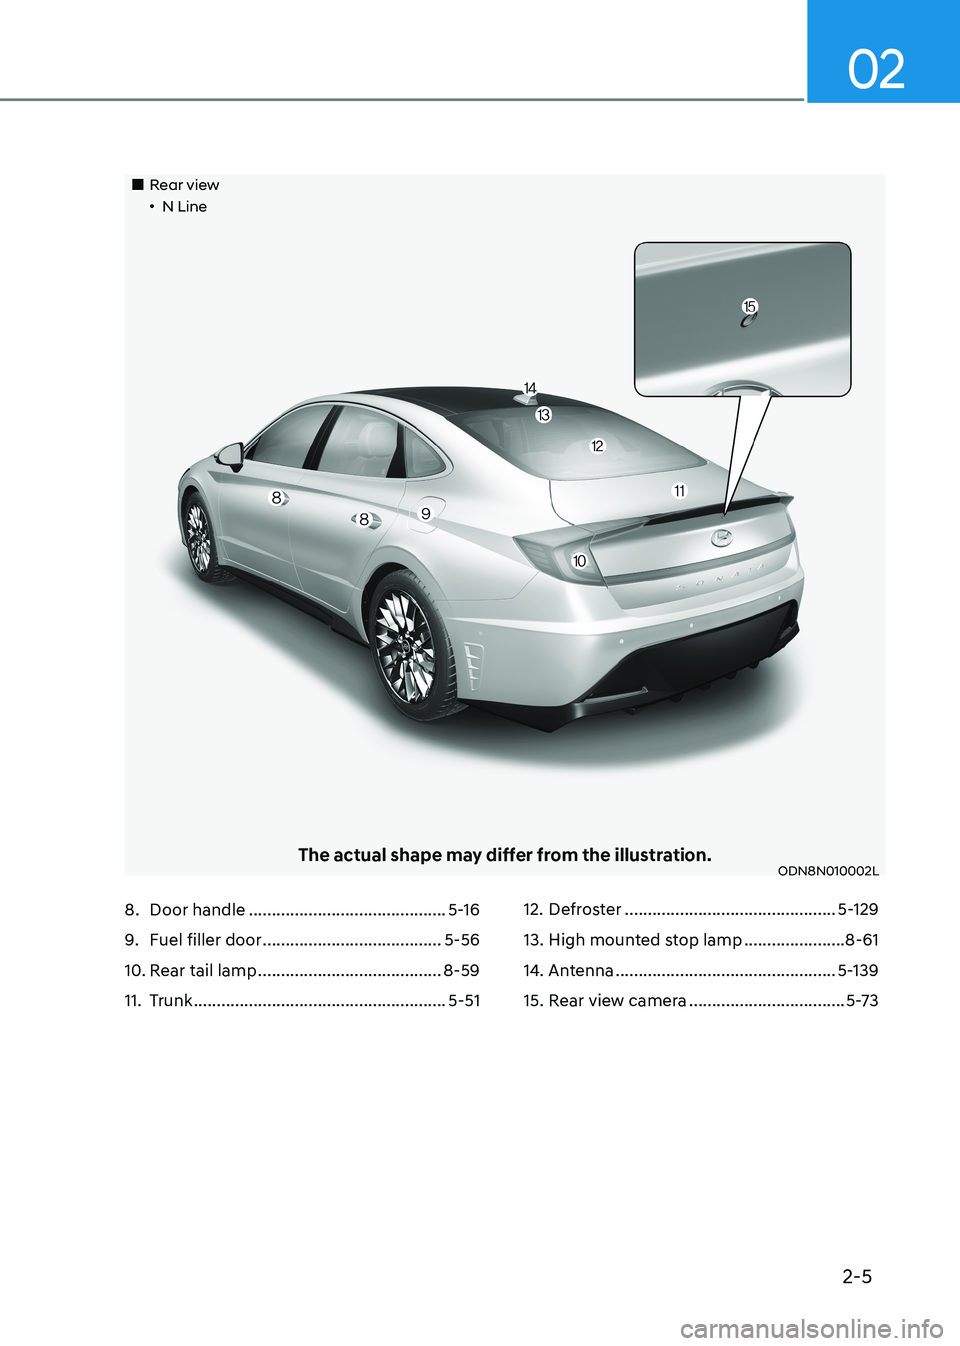
„„Rear view„•N Line
The actual shape may differ from the illustration.ODN8N010002L
8. Door handle ........................................... 5-16
9. Fuel filler door ....................................... 5-56
10. Rear tail lamp ........................................ 8-59
11. Trunk ....................................................... 5-5112. Defroster
.............................................. 5-129
13. High mounted stop lamp ......................8-61
14. Antenna ................................................ 5-139
15. Rear view camera ..................................5-73
Page 109 of 555

04
4-23
LCD Display Modes
Modes Symbol Explanation
Trip ComputerThis mode displays driving information such as the
tripmeter, fuel economy, etc.
Turn By Turn (TBT)
This mode displays the state of the navigation.
Drive Assist
(if equipped)
This mode displays the state of: - Smart Cruise Control system
Lane Following Assist system
Lane Keeping Assist system
- Driver Attention Warning system
- Tire pressure
User Settings
The User Settings menu provides user options for
a variety of settings including door lock/unlock
features, convenience features, driver assistance
settings, etc.
Master Warning
The Warning mode displays warning messages
related to the vehicle when one or more systems is
not operating normally.
The information provided may differ depending on which functions are applicable
to your vehicle.
Page 148 of 555
Exterior Features .......................................................................................... 5-50
Hood ........................................................................................................................ 5-50
Trunk ......................................................................................................................... 5-51
Emergency Trunk Safety Release .......................................................................... 5-52
Fuel Filler Door ....................................................................................................... 5-56
Head Up Display (HUD) ............................................................................... 5-59
Lighting ......................................................................................................... 5-61
Exterior Lights ......................................................................................................... 5-61
Interior Lights ......................................................................................................... 5-67
Welcome System .................................................................................................... 5-70
Wipers and Washers ..................................................................................... 5-71
Windshield Wipers .................................................................................................. 5-71
Windshield Washers ................................................................................................ 5-72
Rear View Monitor (RVM) ............................................................................ 5-73
Rear View Monitor with Parking Guidance ............................................................5-73
Rear View Monitor - Top View ............................................................................... 5-73
Surround View Monitor (SVM) .................................................................... 5-75
Reverse Parking Collision-Avoidance Assist .............................................5 -76
System Setting and Operation .............................................................................. 5 -76
Warning and System Control .................................................................................. 5-77
Detecting Sensor .................................................................................................... 5-79
System Malfunction ............................................................................................... 5-80
Limitations of the System ...................................................................................... 5-80
Reverse Parking Distance Warning (PDW) ................................................5-82
Operation of Reverse Parking Distance Warning System ....................................5-82
To Turn off Reverse Parking Distance Warning System ......................................5-84
Non-Operational Conditions of Reverse Parking Distance Warning System .....5-84
Reverse Parking Distance Warning System Precautions .....................................5-85
Forward/Reverse Parking Distance Warning (PDW) .................................5-86
Operation of Forward/Reverse Parking Distance Warning System ....................5-87
Non-Operational Conditions of Forward/
Reverse Parking Distance Warning System ..........................................................5-89
Forward/Reverse Parking Distance Warning System Precautions .....................5-90
Remote smart parking assist (RSPA) ..........................................................5-91
Operating Condition .............................................................................................. 5-92
How Remote Smart Parking Assist System Works ...............................................5-95
Additional Instructions ......................................................................................... 5-100
Display Operation Status ...................................................................................... 5-101
How the Remote Moving Forward/Backward System Works ............................5-102
5
Page 202 of 555
Convenience Features
5-56
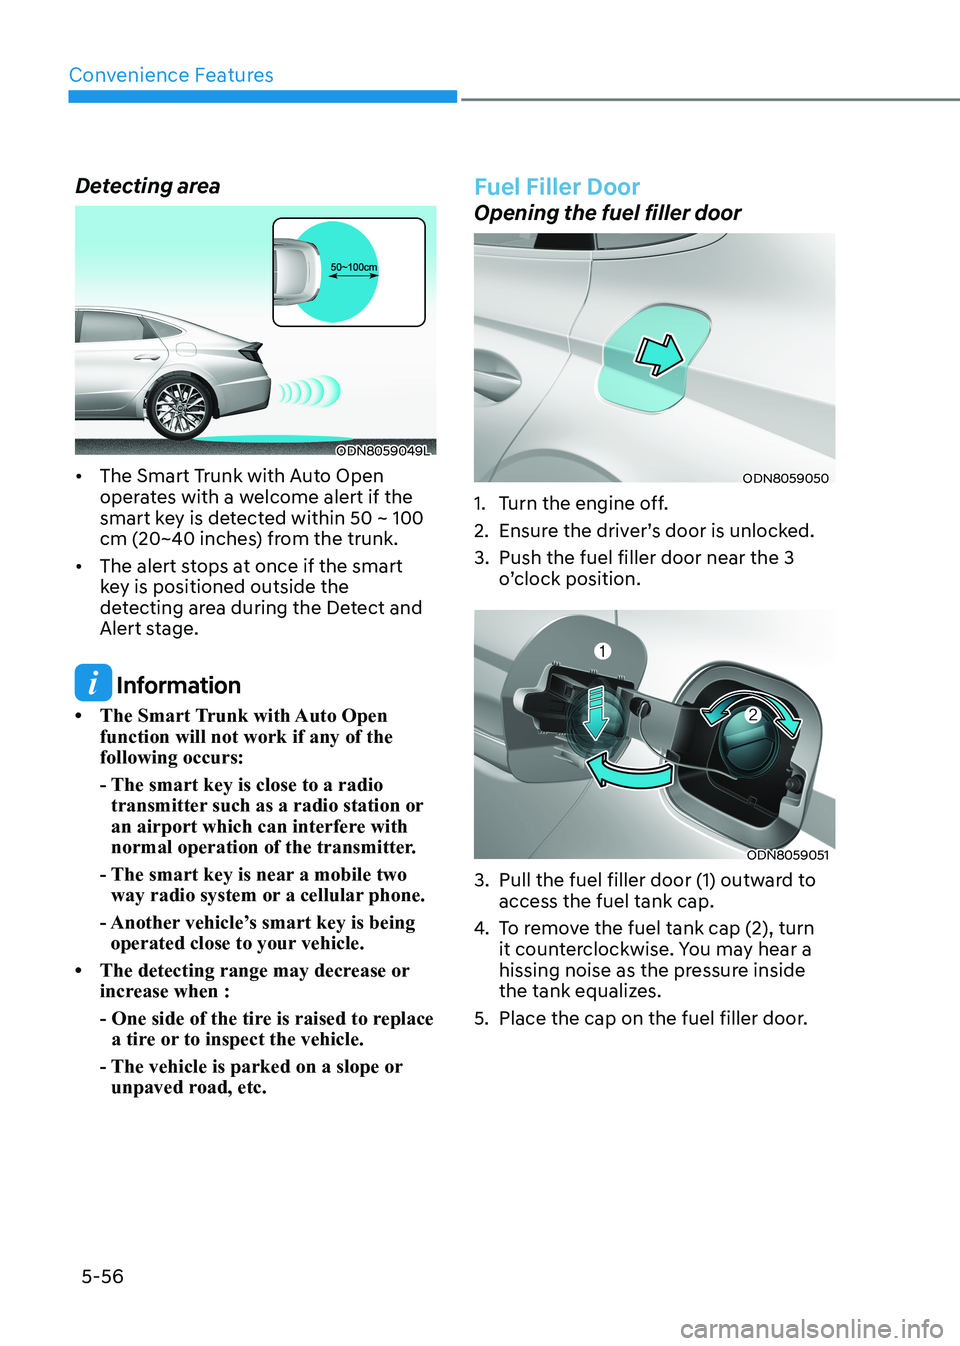
Detecting area
ODN8059049L
• The Smart Trunk with Auto Open operates with a welcome alert if the
smart key is detected within 50 ~ 100
cm (20~40 inches) from the trunk.
• The alert stops at once if the smart key is positioned outside the
detecting area during the Detect and
Alert stage.
Information
• The Smart Trunk with Auto Open function will not work if any of the following occurs:
- The smart key is close to a radio transmitter such as a radio station or
an airport which can interfere with
normal operation of the transmitter.
- The smart key is near a mobile two way radio system or a cellular phone.
- Another vehicle’s smart key is being operated close to your vehicle.
• The detecting range may decrease or increase when :
- One side of the tire is raised to replace a tire or to inspect the vehicle.
- The vehicle is parked on a slope or unpaved road, etc.
Fuel Filler Door
Opening the fuel filler door
ODN8059050
1. Turn the engine off.
2. Ensure the driver’s door is unlocked.
3. Push the fuel filler door near the 3 o’clock position.
ODN8059051
3. Pull the fuel filler door (1) outward to access the fuel tank cap.
4. To remove the fuel tank cap (2), turn
it counterclockwise. You may hear a
hissing noise as the pressure inside
the tank equalizes.
5. Place the cap on the fuel filler door.
Page 203 of 555
05
5-57
Information
If the fuel filler door does not open
because ice has formed around it, tap
lightly or push on the door to break the
ice and release the door. Do not pry on the
door. If necessary, spray around the door
with an approved deicer fluid (do not use
radiator antifreeze) or move the vehicle to a warm place and allow the ice to melt. Closing the fuel filler door
1. To install the fuel tank cap, turn it clockwise until it “clicks” one time.
2. Close the fuel filler door until it is latched securely.
WARNING
Gasoline is highly flammable and
explosive. Failure to follow these
guidelines may result in SERIOUS
INJURY or DEATH: • Read and follow all warnings posted
at the gas station.
• Before refueling, note the location of
the Emergency Gasoline Shut-Off, if
available, at the gas station.
• Before touching the fuel nozzle, you
should eliminate the potential build-
up of static electricity by touching
a metal part of the vehicle, a safe
distance away from the fuel filler
neck, nozzle, or other gas source,
with your bare hand.
• Do not use cellular phones while
refueling. Electric current and/or
electronic interference from cellular
phones can potentially ignite fuel
vapors and cause a fire. •
Do not get back into a vehicle
once you have begun refueling.
You can generate a buildup of
static electricity by touching,
rubbing or sliding against any item
or fabric capable of producing
static electricity. Static electricity
discharge can ignite fuel vapors
causing a fire. If you must re-enter
the vehicle, you should once again
eliminate potentially dangerous
static electricity discharge by
touching a metal part of the vehicle,
away from the fuel filler neck, nozzle
or other gasoline source, with your
bare hand.
• When using an approved portable
fuel container, be sure to place the
container on the ground prior to
refueling. Static electricity discharge
from the container can ignite fuel
vapors causing a fire.
Once refueling has begun, contact
between your bare hand and the
vehicle should be maintained until
the filling is complete.
• Use only approved portable plastic
fuel containers designed to carry and
store gasoline.
• When refueling, always move the
shift button to the P (Park) position
set the parking brake, and place
the ignition switch to the LOCK/
OFF position. Sparks produced by
electrical components related to the
engine can ignite fuel vapors causing
a fire.
• Do not use matches or a lighter and
do not smoke or leave a lit cigarette
in your vehicle while at a gas station,
especially during refueling.
• Do not over-fill or top-off your
vehicle tank, which can cause gasoline spillage.
Page 302 of 555
06
6-15
D (Drive)
This is the normal driving position. The
transmission will automatically shift
through a 8-gear sequence, providing
the best fuel economy and power.
To start the vehicle forward, push the D
(Drive) button by depressing the brake
pedal with the engine ON. Then depress
the accelerator pedal smoothly.
For extra power when passing another
vehicle or driving uphill, depress the
accelerator fully. The transmission will
automatically downshift to the next
lower gear (or gears, as appropriate).
When the vehicle is stopped in D (Drive)
position, if you open the driver's door
with the seat belt unfastened, the gear is
shifted to P (Park) position automatically.
However when the vehicle moves in D
(Drive) position, if you open the driver's
door with the seat belt unfastened, the
gear may not shift to P (Park) position
automatically to protect the automatic
transmission.
Shift-lock system
For your safety, the automatic
transmission has a shift-lock system
which prevents shifting the gear from
P (Park) or N (Neutral) to R (Reverse)
or D (Drive) unless the brake pedal is
depressed.
To shift the gear from P (Park) or N
(Neutral) to R (Reverse) or D (Drive):
1. Depress and hold the brake pedal.
2. Start the engine or place the ignition switch in the ON position.
3. Depress the brake pedal and push the R (Reverse) or D (Drive) button. Stay in N (Neutral) position when engine is Off
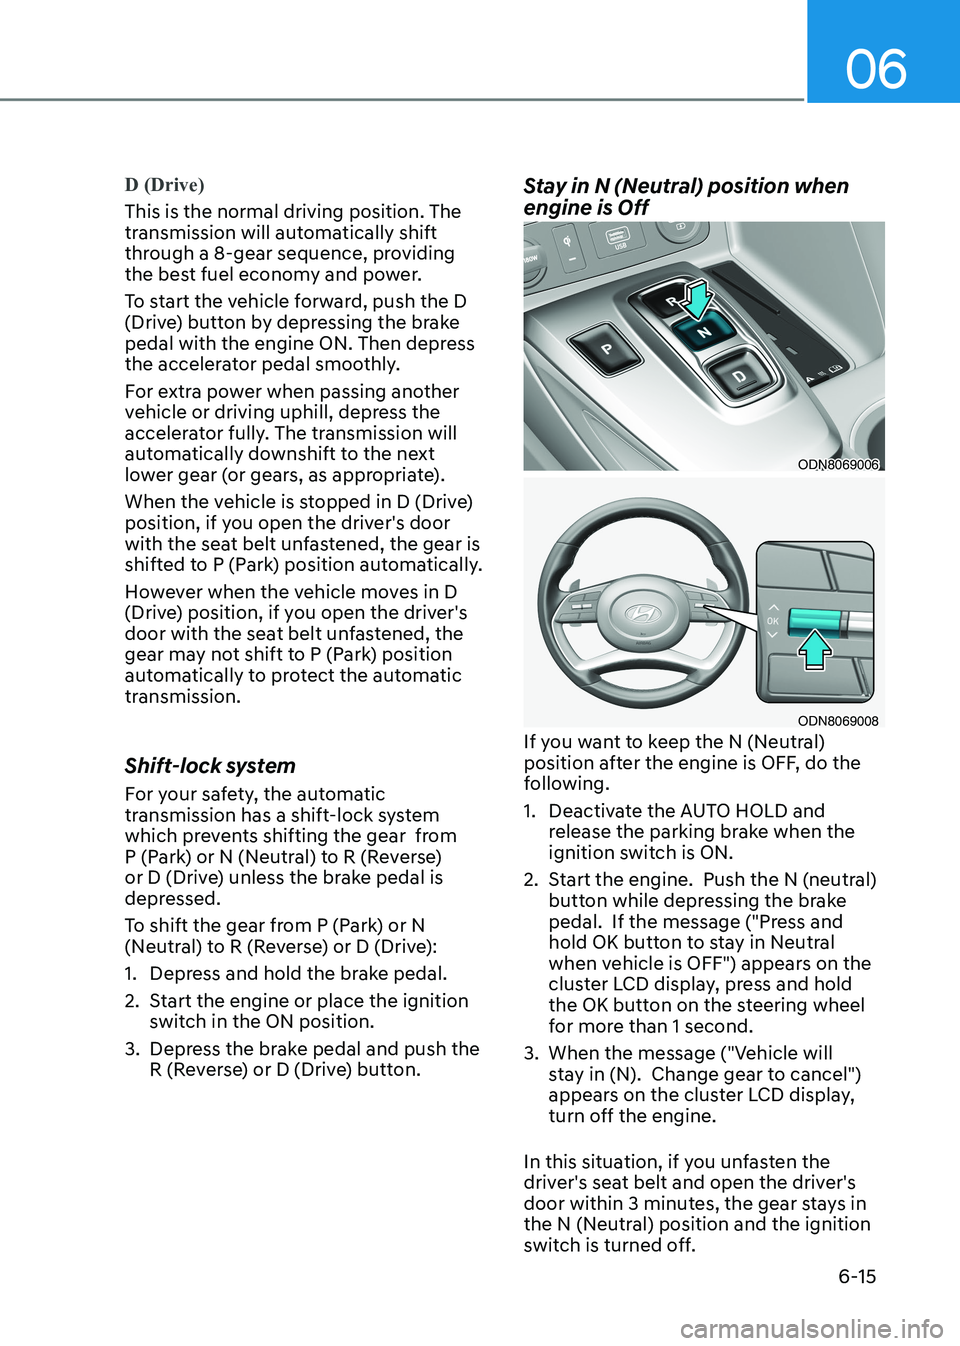
ODN8069006
ODN8069008
If you want to keep the N (Neutral)
position after the engine is OFF, do the
following.
1. Deactivate the AUTO HOLD and release the parking brake when the
ignition switch is ON.
2. Start the engine. Push the N (neutral) button while depressing the brake
pedal. If the message ("Press and
hold OK button to stay in Neutral
when vehicle is OFF") appears on the
cluster LCD display, press and hold
the OK button on the steering wheel
for more than 1 second.
3. When the message ("Vehicle will stay in (N). Change gear to cancel")
appears on the cluster LCD display,
turn off the engine.
In this situation, if you unfasten the
driver's seat belt and open the driver's
door within 3 minutes, the gear stays in
the N (Neutral) position and the ignition
switch is turned off.
Page 313 of 555
While Driving
6-26
D (Drive)
This is the normal driving position. The
transmission will automatically shift
through a 8-gear sequence, providing
the best fuel economy and power.
To start the vehicle forward, push the D
(Drive) button by depressing the brake
pedal with the engine ON. Then depress
the accelerator pedal smoothly. For extra
power when passing another vehicle or
driving uphill, depress the accelerator
fully. The transmission will automatically
downshift to the next lower gear (or
gears, as appropriate). When the vehicle
is stopped in D (Drive) position, if you
open the driver’s door with the seat belt
unfastened, the gear is shifted to P (Park)
position automatically.
However when the vehicle moves in D
(Drive) position, if you open the driver’s
door with the seat belt unfastened,
the gear may be not shifted to P (Park)
position automatically for protecting the
dual clutch transmission.
The DRIVE MODE switch, located on
the shift lever/button console, allows
the driver to switch from NORMAL/
COMFORT mode to SPORT or ECO mode. (if equipped)
For more details, refer to “Drive Mode
Integrated Control System” later in this
chapter. Shift-lock system
For your safety, the automatic
transmission has a shift-lock system
which prevents shifting the transmission
from P (Park) or N (Neutral) to R
(Reverse) or D (Drive) unless the brake
pedal is depressed.
To shift the transmission from P (Park)
into R (Reverse):
1. Depress and hold the brake pedal.
2. Start the engine or place the ignition
switch in the ON position.
3. Depress the brake pedal and move the shift lever to R (Reverse). (shift lever
type)
Depress the brake pedal and push the
R (Reverse) button. (shift button type)
When the battery is discharged:
You cannot shift the shift lever/button,
when the battery is discharged.
In emergencies, do the following
to move the shift lever/button to N
(Neutral) on a level ground.
1. Connect the battery cables from another vehicle or from a another
battery to the jump-starting terminals
inside the engine compartment.
For more details, refer to “Jump
Starting” in chapter 8.
2. Release the parking brake with the ignition switch in the ON position.
3. Shift the gear to the N(Neutral) position refer to the “Stay in Neutral
when vehicle is Off” in this chapter.