2023 HYUNDAI SONATA ignition
[x] Cancel search: ignitionPage 275 of 555

05
5-129
Defroster
NOTICE
To prevent damage to the conductors
bonded to the inside surface of the rear
window, never use sharp instruments or
window cleaners containing abrasives
to clean the window.
Information
If you want to defrost and defog the
front windshield, refer to “Windshield
Defrosting and Defogging” in this chapter.
Rear window defroster
ODN8059284L
„
„Manual climate control system
„„Automatic climate control system
ODN8059283L
The defroster heats the window to
remove frost, fog and thin ice from the
interior and exterior of the rear window, while engine is running. • To activate the rear window defroster,
press the rear window defroster
button located in the center facia
switch panel. The indicator on the rear
window defroster button illuminates
when the defroster is ON.
• To turn off the defroster, press the rear window defroster button again.
Information
• If there is heavy accumulation of snow on the rear window, brush it off before
operating the rear defroster.
• The rear window defroster automatically turns off after
approximately 20 minutes or when the
ignition switch is in the LOCK/OFF position.
Outside mirror defroster (if equipped)
If your vehicle is equipped with the
outside mirror defrosters, they will
operate at the same time you turn on the
rear window defroster.
Page 280 of 555
Convenience Features
5-134
NOTICE
To prevent damage to the Power
Outlets: • Use the power outlet only when the
engine is running and remove the
accessory plug after use. Using the
accessory plug for prolonged periods
of time with the engine off could
cause the battery to discharge.
• Only use 12V electric accessories
which are less than 180 W in electric
capacity.
• Adjust the air-conditioner or heater
to the lowest operating level when
using the power outlet.
• Close the cover when not in use.
• Some electronic devices can
cause electronic interference
when plugged into a vehicle’s
power outlet. These devices may
cause excessive audio static and
malfunctions in other electronic
systems or devices used in your
vehicle.
• Push the plug in as far as it will go. If
good contact is not made, the plug
may overheat and the fuse may open.
• Plug in battery equipped electrical/
electronic devices with reverse
current protection. The current
from the battery may flow into the
vehicle’s electrical/electronic system
and cause system malfunction.
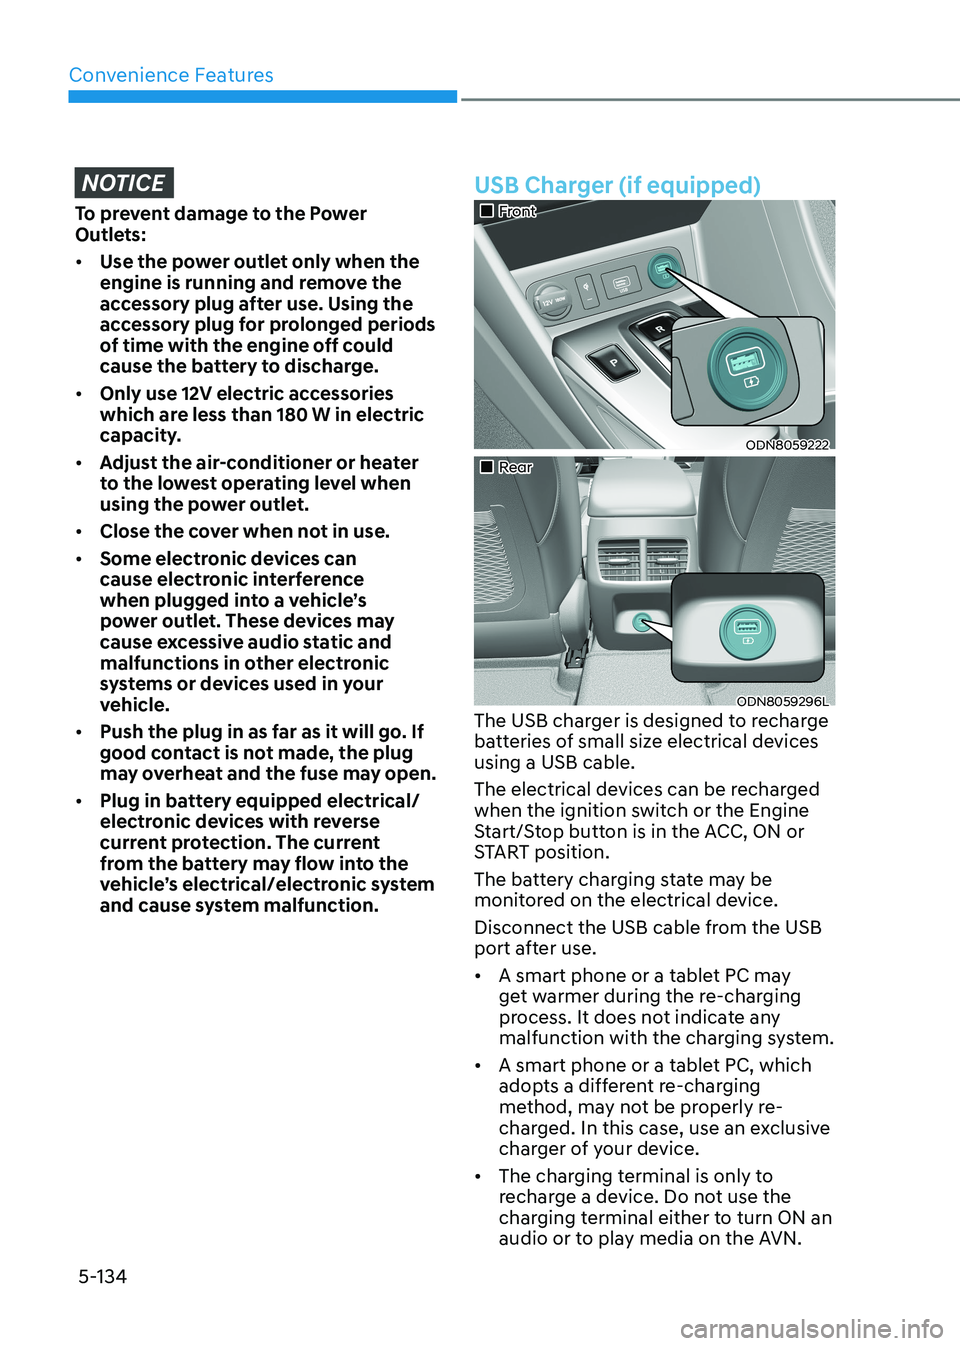
USB Charger (if equipped)
„„Front
ODN8059222
„„Rear
ODN8059296L
The USB charger is designed to recharge
batteries of small size electrical devices using a USB cable.
The electrical devices can be recharged
when the ignition switch or the Engine
Start/Stop button is in the ACC, ON or
START position.
The battery charging state may be
monitored on the electrical device.
Disconnect the USB cable from the USB
port after use. • A smart phone or a tablet PC may
get warmer during the re-charging
process. It does not indicate any
malfunction with the charging system.
• A smart phone or a tablet PC, which
adopts a different re-charging
method, may not be properly re-
charged. In this case, use an exclusive
charger of your device.
• The charging terminal is only to
recharge a device. Do not use the
charging terminal either to turn ON an
audio or to play media on the AVN.
Page 281 of 555
![HYUNDAI SONATA 2023 Owners Manual 05
5-135
Wireless Cellular Phone
Charging System (if equipped)
ODN8059223
[A]: Indicator light, [B]: Charging pad
On certain models, the vehicle comes
equipped with a wireless cellular phone
cha HYUNDAI SONATA 2023 Owners Manual 05
5-135
Wireless Cellular Phone
Charging System (if equipped)
ODN8059223
[A]: Indicator light, [B]: Charging pad
On certain models, the vehicle comes
equipped with a wireless cellular phone
cha](/manual-img/35/56185/w960_56185-280.png)
05
5-135
Wireless Cellular Phone
Charging System (if equipped)
ODN8059223
[A]: Indicator light, [B]: Charging pad
On certain models, the vehicle comes
equipped with a wireless cellular phone
charger.
The system is available when all doors
are closed, and when the ignition switch is ON.
To charge a cellular phone
The wireless cellular phone charging
system charges only the Qi-enabled
cellular phones. Read the label on the
cellular phone accessory cover or visit
your cellular phone manufacturer’s
website to check whether your cellular
phone supports the Qi technology.
The wireless charging process starts
when you put a Qi-enabled cellular
phone on the wireless charging unit.
1. Remove other items, including the smart key, from the wireless charging
unit. If not, the wireless charging
process may be interrupted. Place
the cellular phone on the center of
the charging pad (
).
2. The indicator light is orange when the cellular phone is charging. The
indicator light turns green when
phone charging is complete.
3. You can turn ON or OFF the wireless charging function in the user settings
mode on the instrument cluster. For
further information, refer to the “LCD
Display Modes” in this chapter.
If your cellular phone is not charging:
- Slightly change the position of the cellular phone on the charging pad.
- Make sure the indicator light is orange.
The indicator light will blink orange for 10
seconds if there is a malfunction in the
wireless charging system.
In this case, temporarily stop the
charging process, and re-attempt to
charge your cellular phone again.
The system warns you with a message
on the LCD display if the cellular phone
is still on the wireless charging unit after
the engine is turned OFF and the front door is opened.
Information
For some manufacturers’ cellular phones, the system may not warn you even though
the cellular phone is left on the wireless
charging unit. This is due to the particular
characteristic of the cellular phone and
not a malfunction of the wireless charging.
NOTICE
• The wireless cellular phone charging system may not support certain
cellular phones, which are not
verified for the Qi specification (
).
• When placing your cellular phone on the charging mat, position the
phone in the middle of the mat for
optimal charging performance. If
your cellular phone is off to the side,
the charging rate may be less and in
some cases the cellular phone may
experience higher heat conduction.
• In some cases, the wireless charging may stop temporarily when the
Remote Key or Smart Key is used,
either when starting the vehicle or
locking/unlocking the doors, etc.
• When charging certain cellular phones, the charging indicator
may not change to green when the
cellular phone is fully charged.
Page 282 of 555
Convenience Features
5-136
• The wireless charging process may
temporarily stop, when temperature
abnormally increases inside the
wireless cellular phone charging
system. Stop the charging cellular
phone and wait until temperature
falls to a certain level.
• The wireless charging process may temporarily stop when there is
any metallic item, such as a coin,
between the wireless cellular phone
charging system and the cellular phone.
• When charging some cellular phones with a self-protection feature,
the wireless charging speed may
decrease and the wireless charging
may stop.
• If the cellular phone has a thick cover, the wireless charging may not be possible.
• If the cellular phone is not completely contacting the charging
pad, wireless charging may not
operate properly.
• Some magnetic items like credit cards, phone cards or rail tickets may
be damaged if left with the cellular
phone during the charging process.
• When any cellular phone without a wireless charging function or a
metallic object is placed on the
charging pad, a small noise may
sound. This small sound is due to the
vehicle discerning compatibility of
the object placed on the charging
pad. It does not affect your vehicle or
the cellular phone in any way.
Information
If the ignition switch is in the OFF position, the charging also stops.
Information
This device complies with Industry Canada RSS-210 standard. Operation is subject to the following two conditions: 1. This device may not cause harmful
interference.
2. This device must accept any
interference received, including
interference that may cause undesired operation.
Page 288 of 555
6
6. While Driving
Before Driving ................................................................................................ 6-5
Before Entering the Vehicle ..................................................................................... 6-5
Before Starting ......................................................................................................... 6-5
Ignition Switch ............................................................................................... 6-6
Key Ignition Switch .................................................................................................. 6-6
Engine Start/Stop Button ........................................................................................ 6-9
Remote Start ............................................................................................................ 6-12
Automatic Transmission ............................................................................... 6-13
Automatic Transmission Operation ........................................................................ 6-13
Parking ..................................................................................................................... 6-16
LCD Display Message .............................................................................................. 6-17
Good Driving Practices .......................................................................................... 6-18
Paddle Shifter (Manual Shift Mode) ...................................................................... 6-19
Dual Clutch Transmission ........................................................................... 6-20
Dual Clutch Transmission Operation .................................................................... 6-20
Parking .................................................................................................................... 6-27
LCD Display Message (Button Type) ..................................................................... 6-27
Good Driving Practices ......................................................................................... 6-29
Brake System ................................................................................................ 6-30
Power Brakes .......................................................................................................... 6-30
Disc Brakes Wear Indicator.................................................................................... 6-30
Electronic Parking Brake (EPB) ............................................................................... 6-31
Auto Hold ................................................................................................................ 6-34
Anti-Lock Brake System (ABS) ............................................................................... 6-37
Electronic Stability Control (ESC) ......................................................................... 6-39
Vehicle Stability Management (VSM) .................................................................... 6-41
Hill-Start Assist Control (HAC) ............................................................................... 6-42
Good Braking Practices ......................................................................................... 6-42
Launch Control ............................................................................................. 6-43
Launch Control Operation and Release ................................................................6-43
Launch Control Limitation ..................................................................................... 6-44
Drive Mode Integrated Control System .....................................................6-45
Drive Mode ............................................................................................................. 6-45
Vehicle Characteristic ............................................................................................ 6-49
Page 292 of 555
06
6-5
Before Entering the Vehicle
• Be sure all windows, outside mirror(s),
and outside lights are clean and
unobstructed.
• Remove frost, snow, or ice.
• Visually check the tires for uneven
wear and damage.
• Check under the vehicle for any sign
of leaks.
• Be sure there are no obstacles behind
you if you intend to back up.
Before Starting
• Make sure the hood, the trunk, and
the doors are securely closed and
locked.
• Adjust the position of the seat and
steering wheel.
• Adjust the inside and side view
mirrors.
• Verify all the lights work.
• Fasten your seatbelt. Check that
all passengers have fastened their
seatbelts.
• Check the gauges and indicators
in the instrument panel and the
messages on the instrument display
when the ignition switch is in the ON position.
• Check that any items you are carrying
are stored properly or fastened down
securely.
WARNING
To reduce the risk of SERIOUS INJURY or
DEATH, take the following precautions: • ALWAYS wear your seat belt. All
passengers must be properly belted
whenever the vehicle is moving.
For more information, refer to "Seat
Belts" in chapter 3.
• Always drive defensively. Assume
other drivers or pedestrians may be
careless and make mistakes.
• Stay focused on the task of driving.
Driver distraction can cause
accidents.
• Leave plenty of space between you
and the vehicle in front of you.
WARNING
NEVER drink alcohol or take drugs and
drive.
Drinking alcohol or taking drugs and
driving is dangerous and may result in
an accident and SERIOUS INJURY or
DEATH. Drunk driving is the number one
contributor to the highway death
toll each year. Even a small amount
of alcohol will affect your reflexes,
perceptions and judgment. Just
one drink can reduce your ability to
respond to changing conditions and
emergencies and your reaction time
gets worse with each additional drink.
Driving while under the influence
of drugs is as dangerous or more
dangerous than driving under the
influence of alcohol.
You are much more likely to have a
serious accident if you drink or take
drugs and drive. If you are drinking or
taking drugs, don't drive. Do not ride
with a driver who has been drinking
or taking drugs. Choose a designated
driver or call a taxi.
Before Driving
Page 293 of 555

While Driving
6-6
Key Ignition Switch (if equipped)
WARNING
To reduce the risk of SERIOUS INJURY or
DEATH, take the following precautions: • NEVER allow children or any person
who is unfamiliar with the vehicle to
touch the ignition switch or related
parts. Unexpected and sudden
vehicle movement can occur.
• NEVER reach through the steering
wheel for the ignition switch, or any
other control, while the vehicle is in
motion. The presence of your hand
or arm in this area may cause a loss
of vehicle control resulting in an
accident.
OAE056172L
Whenever the front door is opened, the
ignition switch will illuminate, provided
the ignition switch is not in the ON
position. The light will go off immediately
when the ignition switch is turned on or
go off after about 30 seconds when the door is closed. (if equipped)
WARNING
NEVER turn the ignition switch to the
LOCK or ACC position while the vehicle
is in motion except in an emergency.
This will result in the engine turning
off and loss of power assist for the
steering and brake systems. This may
lead to loss of directional control and
braking function, which could cause an
accident.
Before leaving the driver's seat, always
make sure the shift button is in P (Park)
position, apply the parking brake,
and turn ignition switch to the LOCK position.
Unexpected vehicle movement may
occur if these precautions are not
followed.
ignition Switch
LOCK ACC
ON
START
Page 294 of 555
06
6 -7
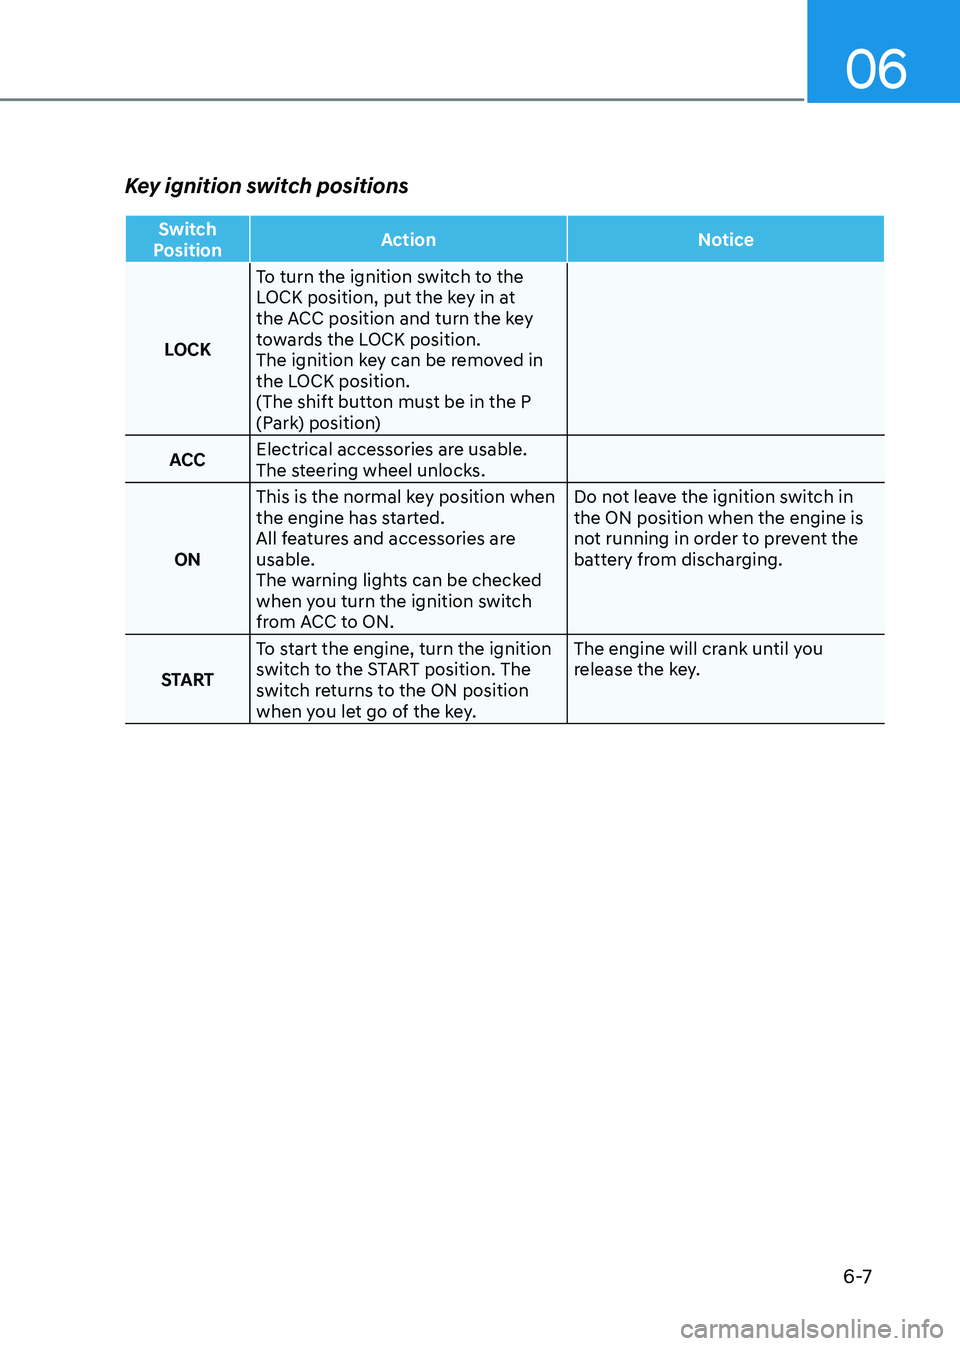
Key ignition switch positions
Switch
Position Action Notice
LOCKTo turn the ignition switch to the
LOCK position, put the key in at
the ACC position and turn the key
towards the LOCK position.
The ignition key can be removed in
the LOCK position.
(The shift button must be in the P
(Park) position)
ACC Electrical accessories are usable.
The steering wheel unlocks.
ON This is the normal key position when
the engine has started.
All features and accessories are usable.
The warning lights can be checked
when you turn the ignition switch
from ACC to ON. Do not leave the ignition switch in the ON position when the engine is
not running in order to prevent the
battery from discharging.
START To start the engine, turn the ignition
switch to the START position. The
switch returns to the ON position
when you let go of the key. The engine will crank until you
release the key.