2023 HYUNDAI SONATA ignition
[x] Cancel search: ignitionPage 175 of 555
05
5-29
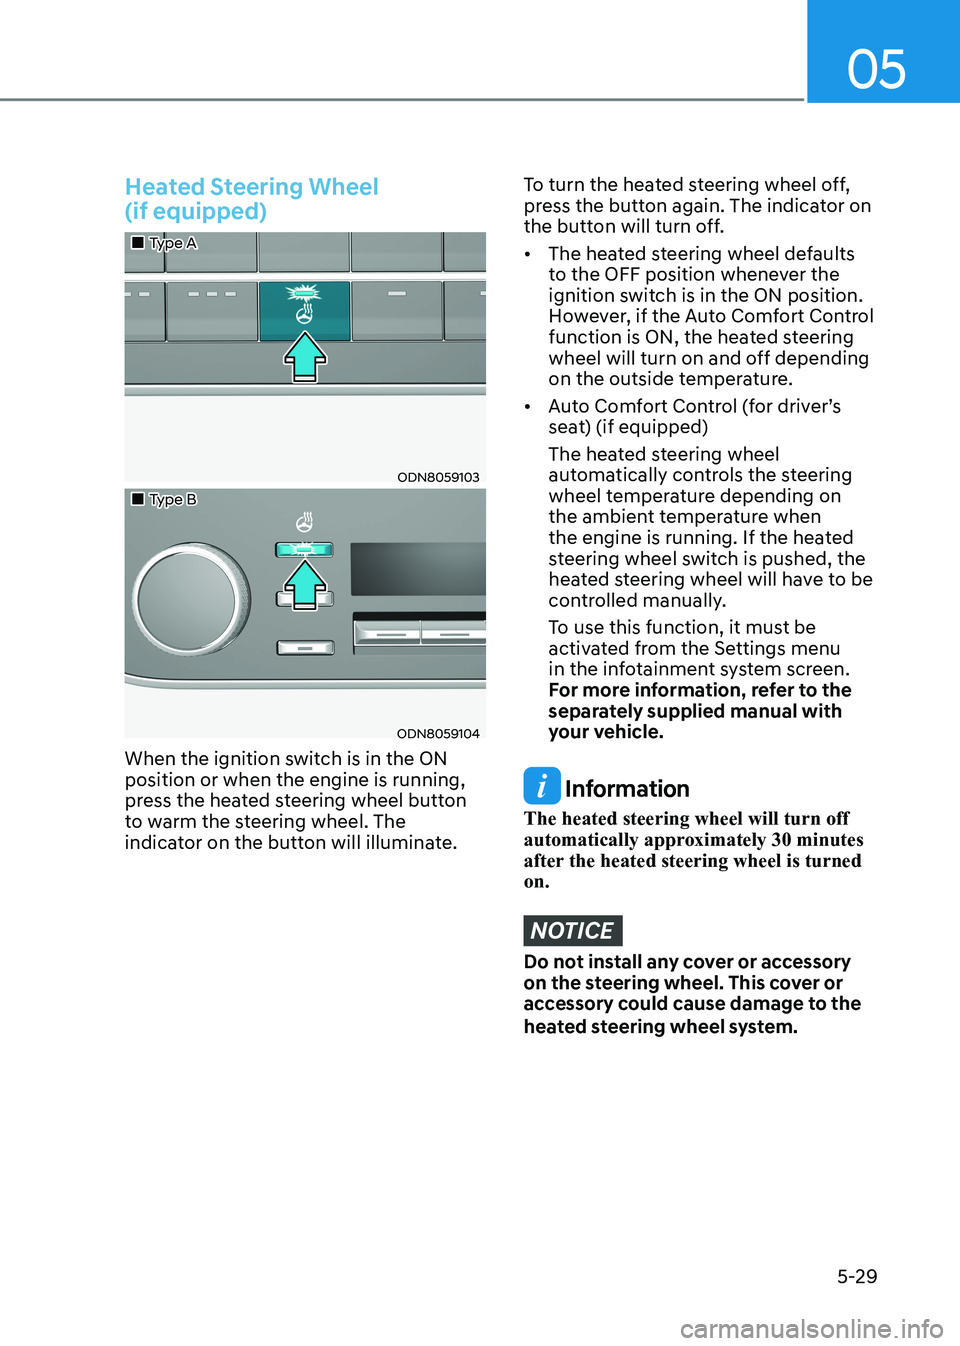
Heated Steering Wheel (if equipped)
„„Type A
ODN8059103
„„Type B
ODN8059104
When the ignition switch is in the ON position or when the engine is running,
press the heated steering wheel button
to warm the steering wheel. The
indicator on the button will illuminate.
To turn the heated steering wheel off,
press the button again. The indicator on
the button will turn off.
• The heated steering wheel defaults to the OFF position whenever the
ignition switch is in the ON position.
However, if the Auto Comfort Control
function is ON, the heated steering
wheel will turn on and off depending
on the outside temperature.
• Auto Comfort Control (for driver’s seat) (if equipped)
The heated steering wheel automatically controls the steering
wheel temperature depending on
the ambient temperature when
the engine is running. If the heated
steering wheel switch is pushed, the
heated steering wheel will have to be
controlled manually.
To use this function, it must be activated from the Settings menu
in the infotainment system screen.
For more information, refer to the
separately supplied manual with
your vehicle.
Information
The heated steering wheel will turn off
automatically approximately 30 minutes
after the heated steering wheel is turned on.
NOTICE
Do not install any cover or accessory
on the steering wheel. This cover or
accessory could cause damage to the
heated steering wheel system.
Page 187 of 555
05
5-41
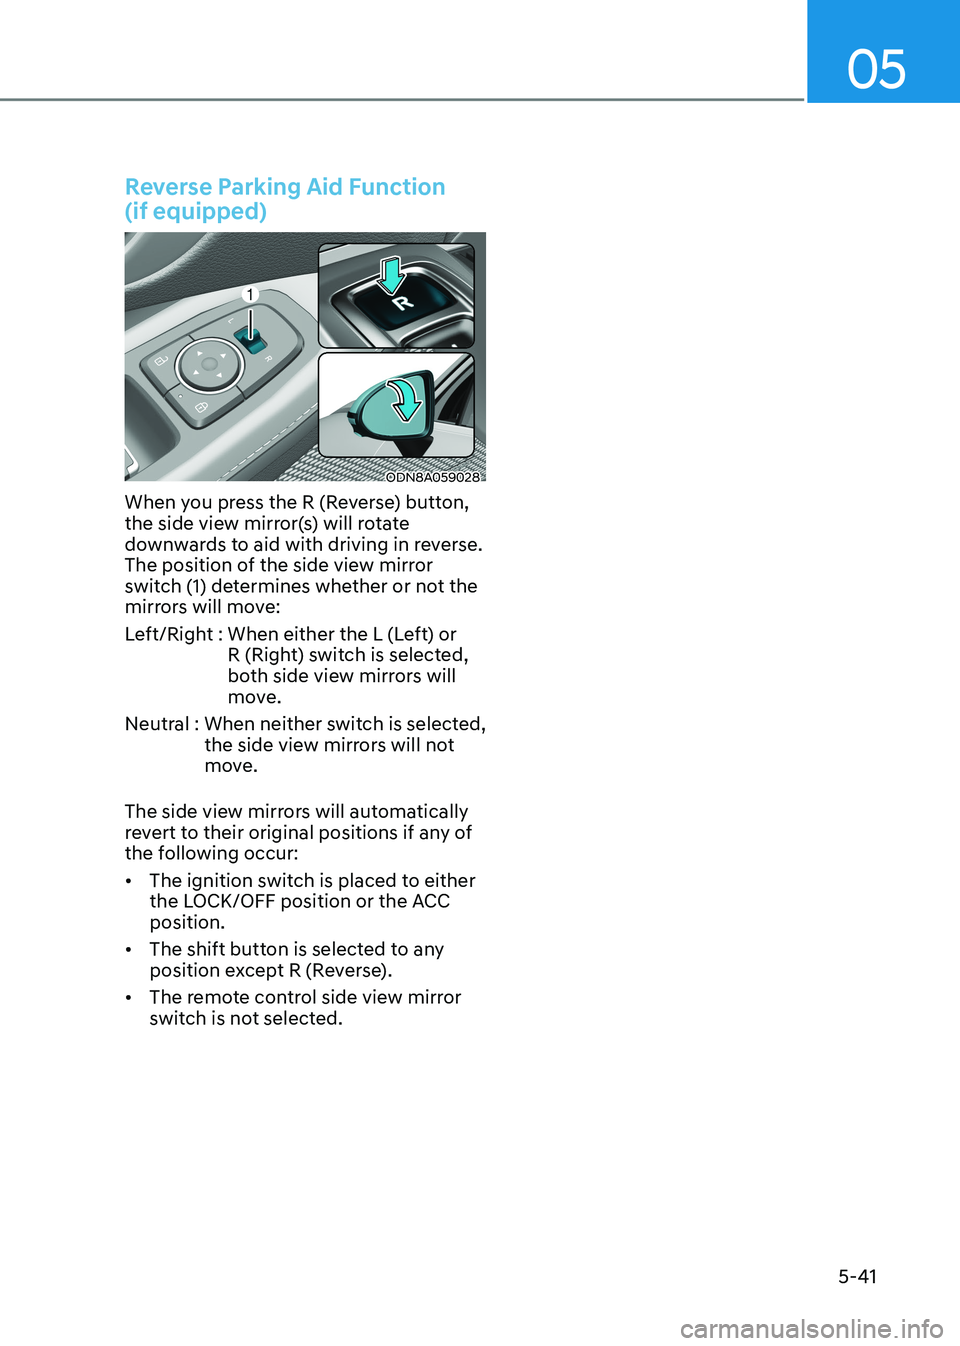
Reverse Parking Aid Function (if equipped)
ODN8A059028
When you press the R (Reverse) button,
the side view mirror(s) will rotate
downwards to aid with driving in reverse.
The position of the side view mirror
switch (1) determines whether or not the
mirrors will move:
Left/Right : When either the L (Left) or R (Right) switch is selected,
both side view mirrors will
move.
Neutral : When neither switch is selected, the side view mirrors will not
move.
The side view mirrors will automatically
revert to their original positions if any of
the following occur: • The ignition switch is placed to either
the LOCK/OFF position or the ACC position.
• The shift button is selected to any
position except R (Reverse).
• The remote control side view mirror
switch is not selected.
Page 189 of 555
5-43
05
Power Windows
The ignition switch must be in the
ON position to be able to raise or
lower the windows. Each door has a
Power Window switch to control that
door’s window. The driver has a Power
Window Lock switch which can block
the operation of passenger windows.
The power windows will operate for
approximately 30 seconds after the
ignition switch is placed in the ACC or
LOCK/OFF position. However, if the front
doors are opened, the Power Windows
will not operate even within the 30 second period.
WARNING
To avoid serious injury or death, do not
extend your head, arms or body outside
the windows while driving.
Information
• In cold and wet climates, power
windows may not work properly due to
freezing conditions.
• While driving with the rear windows
down or with the sunroof (if equipped)
opened (or partially opened), your vehicle may demonstrate a wind
buffeting or pulsation noise. This
noise is normal and can be reduced
or eliminated by taking the following actions. If the noise occurs with one
or both of the rear windows down,
partially lower both front windows
approximately 2.5 cm (1 inch). If you
experience the noise with the sunroof
open, slightly close the sunroof. Window opening and closing
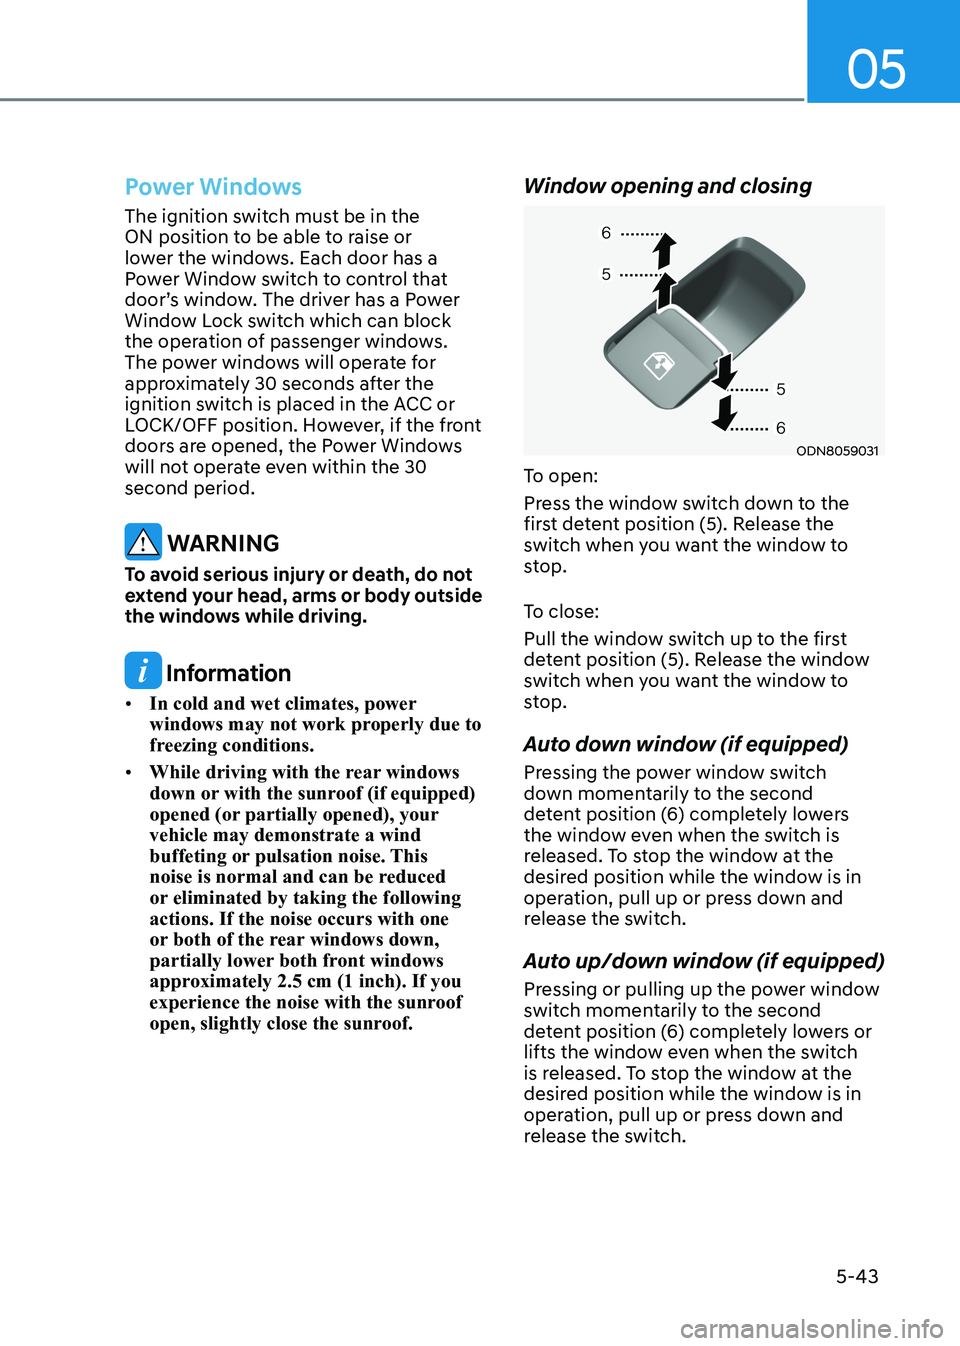
ODN8059031
To open:
Press the window switch down to the
first detent position (5). Release the
switch when you want the window to
stop.
To close:
Pull the window switch up to the first
detent position (5). Release the window
switch when you want the window to
stop.
Auto down window (if equipped)
Pressing the power window switch
down momentarily to the second
detent position (6) completely lowers
the window even when the switch is
released. To stop the window at the
desired position while the window is in
operation, pull up or press down and
release the switch.
Auto up/down window (if equipped)
Pressing or pulling up the power window
switch momentarily to the second
detent position (6) completely lowers or
lifts the window even when the switch
is released. To stop the window at the
desired position while the window is in
operation, pull up or press down and
release the switch.
Page 190 of 555
Convenience Features
5-44
To reset the power windows
If the power windows do not operate
normally, the automatic power window
system must be reset as follows:
1. Place the ignition switch to the ON
position.
2. Close the window and continue pulling up on the power window
switch for at least one second.
If the power windows do not operate
properly after resetting, have the system
checked by an authorized HYUNDAI
dealer.
WARNING
The automatic reverse feature doesn’t
activate while resetting the power
window system. Make sure body parts
or other objects are safely out of the
way before closing the windows to
avoid injuries or vehicle damage. Automatic reverse (if equipped)
ODN8059032
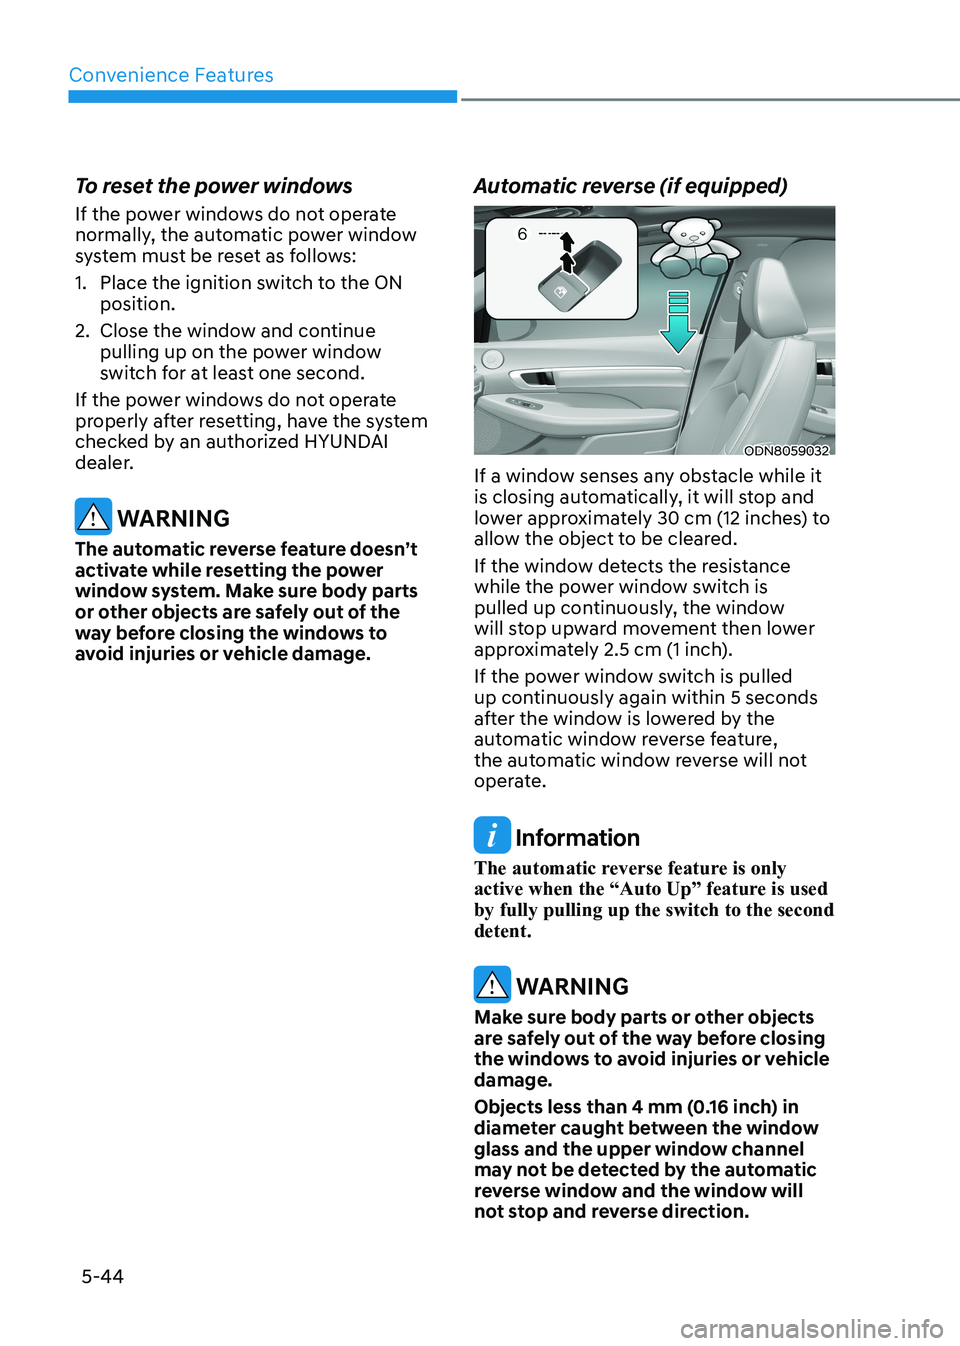
If a window senses any obstacle while it
is closing automatically, it will stop and
lower approximately 30 cm (12 inches) to
allow the object to be cleared.
If the window detects the resistance
while the power window switch is
pulled up continuously, the window
will stop upward movement then lower
approximately 2.5 cm (1 inch).
If the power window switch is pulled
up continuously again within 5 seconds
after the window is lowered by the
automatic window reverse feature,
the automatic window reverse will not
operate.
Information
The automatic reverse feature is only
active when the “Auto Up” feature is used by fully pulling up the switch to the second detent.
WARNING
Make sure body parts or other objects
are safely out of the way before closing
the windows to avoid injuries or vehicle damage.
Objects less than 4 mm (0.16 inch) in
diameter caught between the window
glass and the upper window channel
may not be detected by the automatic
reverse window and the window will
not stop and reverse direction.
Page 192 of 555
Convenience Features
5-46
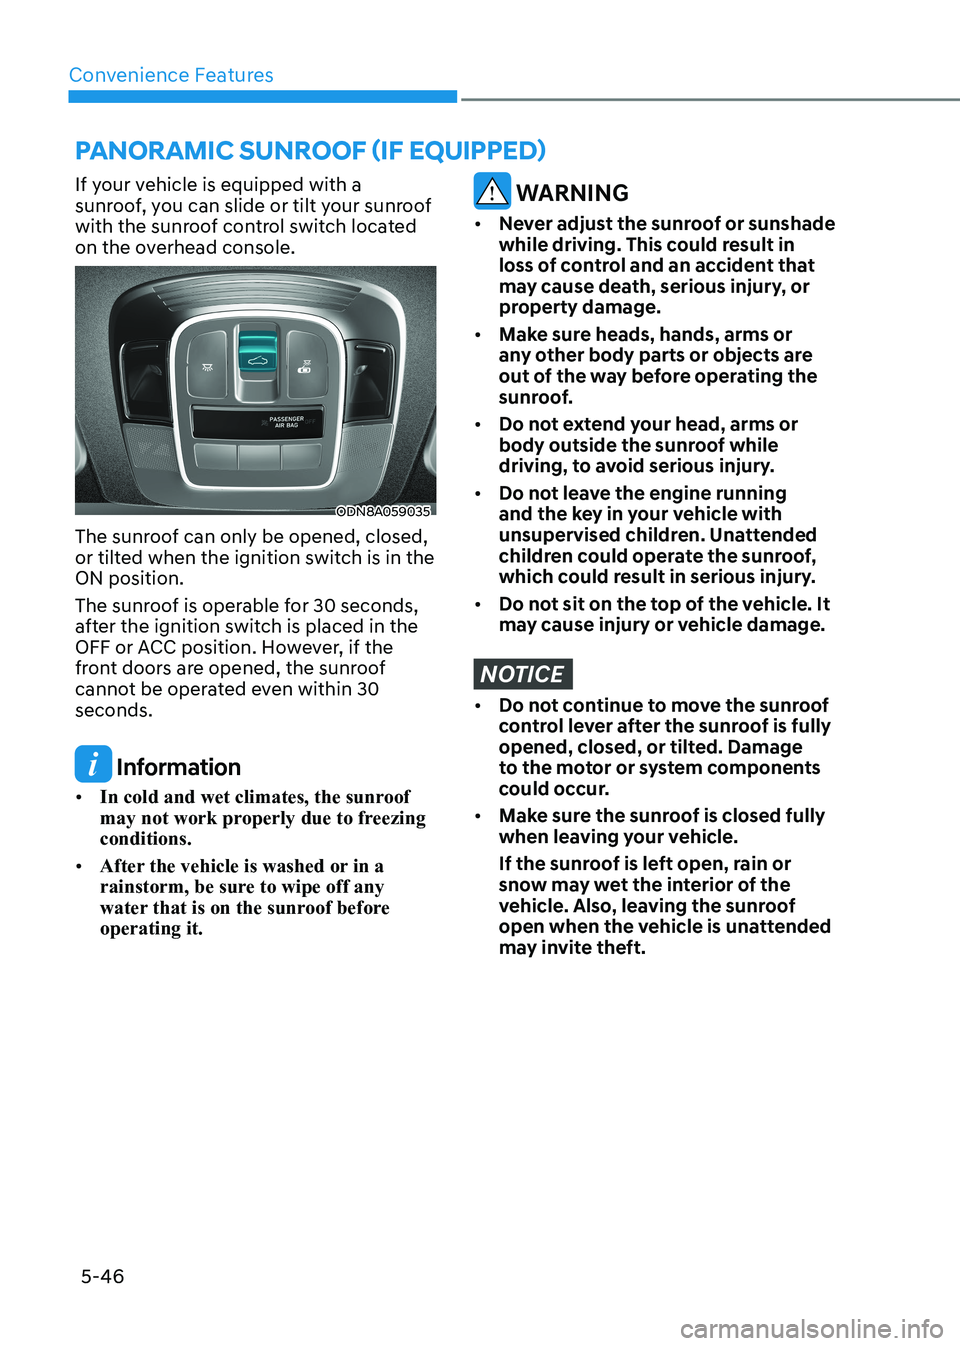
If your vehicle is equipped with a
sunroof, you can slide or tilt your sunroof
with the sunroof control switch located
on the overhead console.
ODN8A059035
The sunroof can only be opened, closed,
or tilted when the ignition switch is in the ON position.
The sunroof is operable for 30 seconds,
after the ignition switch is placed in the
OFF or ACC position. However, if the
front doors are opened, the sunroof
cannot be operated even within 30 seconds.
Information
• In cold and wet climates, the sunroof
may not work properly due to freezing conditions.
• After the vehicle is washed or in a
rainstorm, be sure to wipe off any
water that is on the sunroof before operating it.
WARNING
• Never adjust the sunroof or sunshade
while driving. This could result in
loss of control and an accident that
may cause death, serious injury, or
property damage.
• Make sure heads, hands, arms or
any other body parts or objects are
out of the way before operating the
sunroof.
• Do not extend your head, arms or
body outside the sunroof while
driving, to avoid serious injury.
• Do not leave the engine running
and the key in your vehicle with
unsupervised children. Unattended
children could operate the sunroof,
which could result in serious injury.
• Do not sit on the top of the vehicle. It
may cause injury or vehicle damage.
NOTICE
• Do not continue to move the sunroof
control lever after the sunroof is fully
opened, closed, or tilted. Damage
to the motor or system components
could occur.
• Make sure the sunroof is closed fully
when leaving your vehicle.
If the sunroof is left open, rain or
snow may wet the interior of the
vehicle. Also, leaving the sunroof
open when the vehicle is unattended
may invite theft.
pAnorAmic SUnroof (if eQUippeD)
Page 203 of 555
05
5-57
Information
If the fuel filler door does not open
because ice has formed around it, tap
lightly or push on the door to break the
ice and release the door. Do not pry on the
door. If necessary, spray around the door
with an approved deicer fluid (do not use
radiator antifreeze) or move the vehicle to a warm place and allow the ice to melt. Closing the fuel filler door
1. To install the fuel tank cap, turn it clockwise until it “clicks” one time.
2. Close the fuel filler door until it is latched securely.
WARNING
Gasoline is highly flammable and
explosive. Failure to follow these
guidelines may result in SERIOUS
INJURY or DEATH: • Read and follow all warnings posted
at the gas station.
• Before refueling, note the location of
the Emergency Gasoline Shut-Off, if
available, at the gas station.
• Before touching the fuel nozzle, you
should eliminate the potential build-
up of static electricity by touching
a metal part of the vehicle, a safe
distance away from the fuel filler
neck, nozzle, or other gas source,
with your bare hand.
• Do not use cellular phones while
refueling. Electric current and/or
electronic interference from cellular
phones can potentially ignite fuel
vapors and cause a fire. •
Do not get back into a vehicle
once you have begun refueling.
You can generate a buildup of
static electricity by touching,
rubbing or sliding against any item
or fabric capable of producing
static electricity. Static electricity
discharge can ignite fuel vapors
causing a fire. If you must re-enter
the vehicle, you should once again
eliminate potentially dangerous
static electricity discharge by
touching a metal part of the vehicle,
away from the fuel filler neck, nozzle
or other gasoline source, with your
bare hand.
• When using an approved portable
fuel container, be sure to place the
container on the ground prior to
refueling. Static electricity discharge
from the container can ignite fuel
vapors causing a fire.
Once refueling has begun, contact
between your bare hand and the
vehicle should be maintained until
the filling is complete.
• Use only approved portable plastic
fuel containers designed to carry and
store gasoline.
• When refueling, always move the
shift button to the P (Park) position
set the parking brake, and place
the ignition switch to the LOCK/
OFF position. Sparks produced by
electrical components related to the
engine can ignite fuel vapors causing
a fire.
• Do not use matches or a lighter and
do not smoke or leave a lit cigarette
in your vehicle while at a gas station,
especially during refueling.
• Do not over-fill or top-off your
vehicle tank, which can cause gasoline spillage.
Page 208 of 555
Convenience Features
5-62
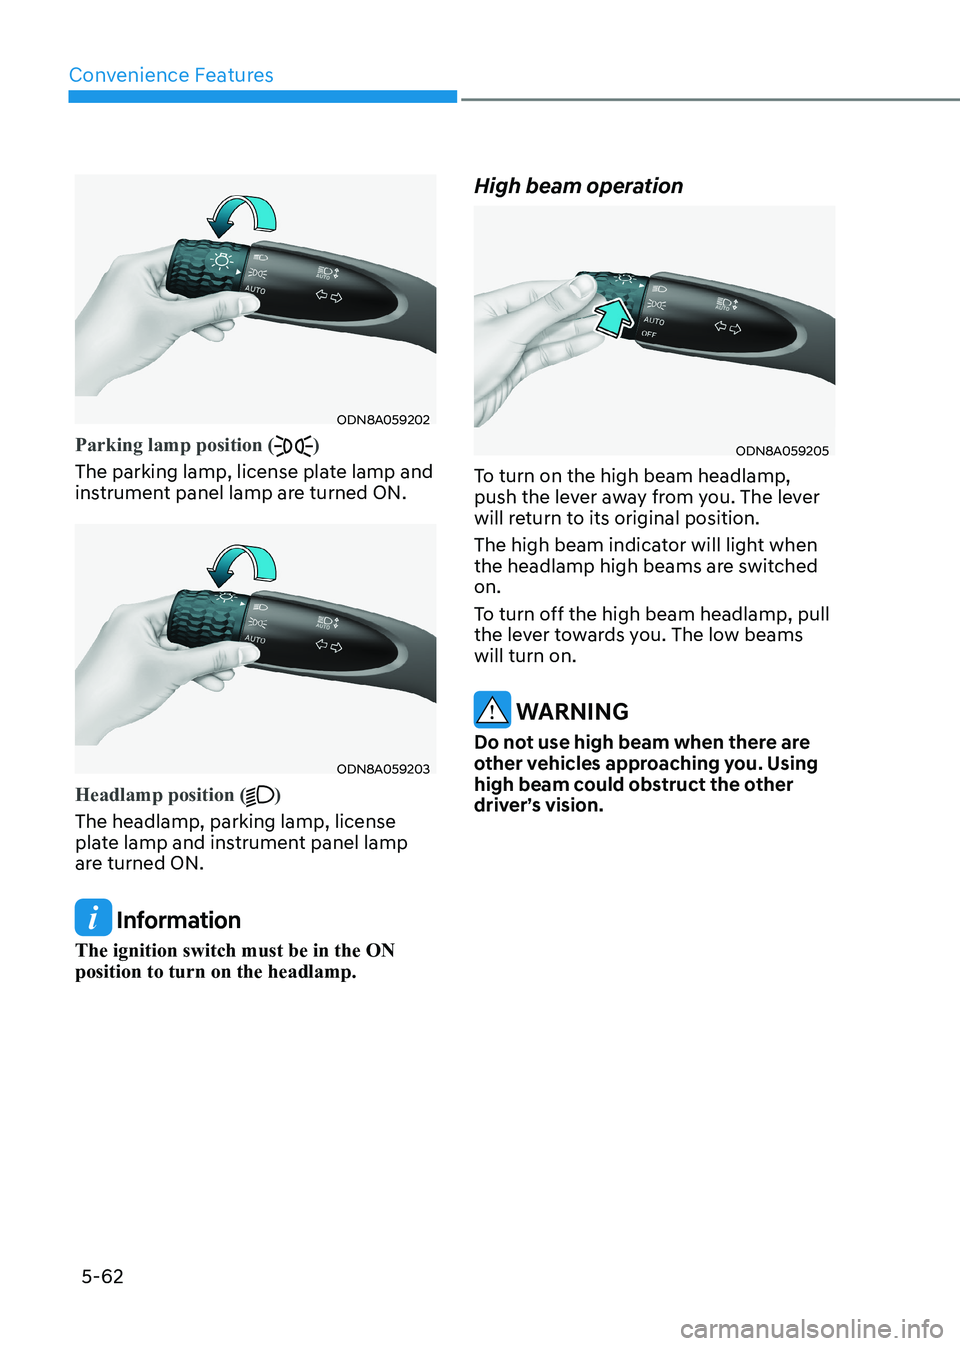
ODN8A059202
Parking lamp position ()
The parking lamp, license plate lamp and
instrument panel lamp are turned ON.
ODN8A059203
Headlamp position ()
The headlamp, parking lamp, license
plate lamp and instrument panel lamp
are turned ON.
Information
The ignition switch must be in the ON position to turn on the headlamp. High beam operation
ODN8A059205
To turn on the high beam headlamp,
push the lever away from you. The lever
will return to its original position.
The high beam indicator will light when
the headlamp high beams are switched on.
To turn off the high beam headlamp, pull
the lever towards you. The low beams will turn on.
WARNING
Do not use high beam when there are
other vehicles approaching you. Using
high beam could obstruct the other
driver’s vision.
Page 209 of 555
05
5-63
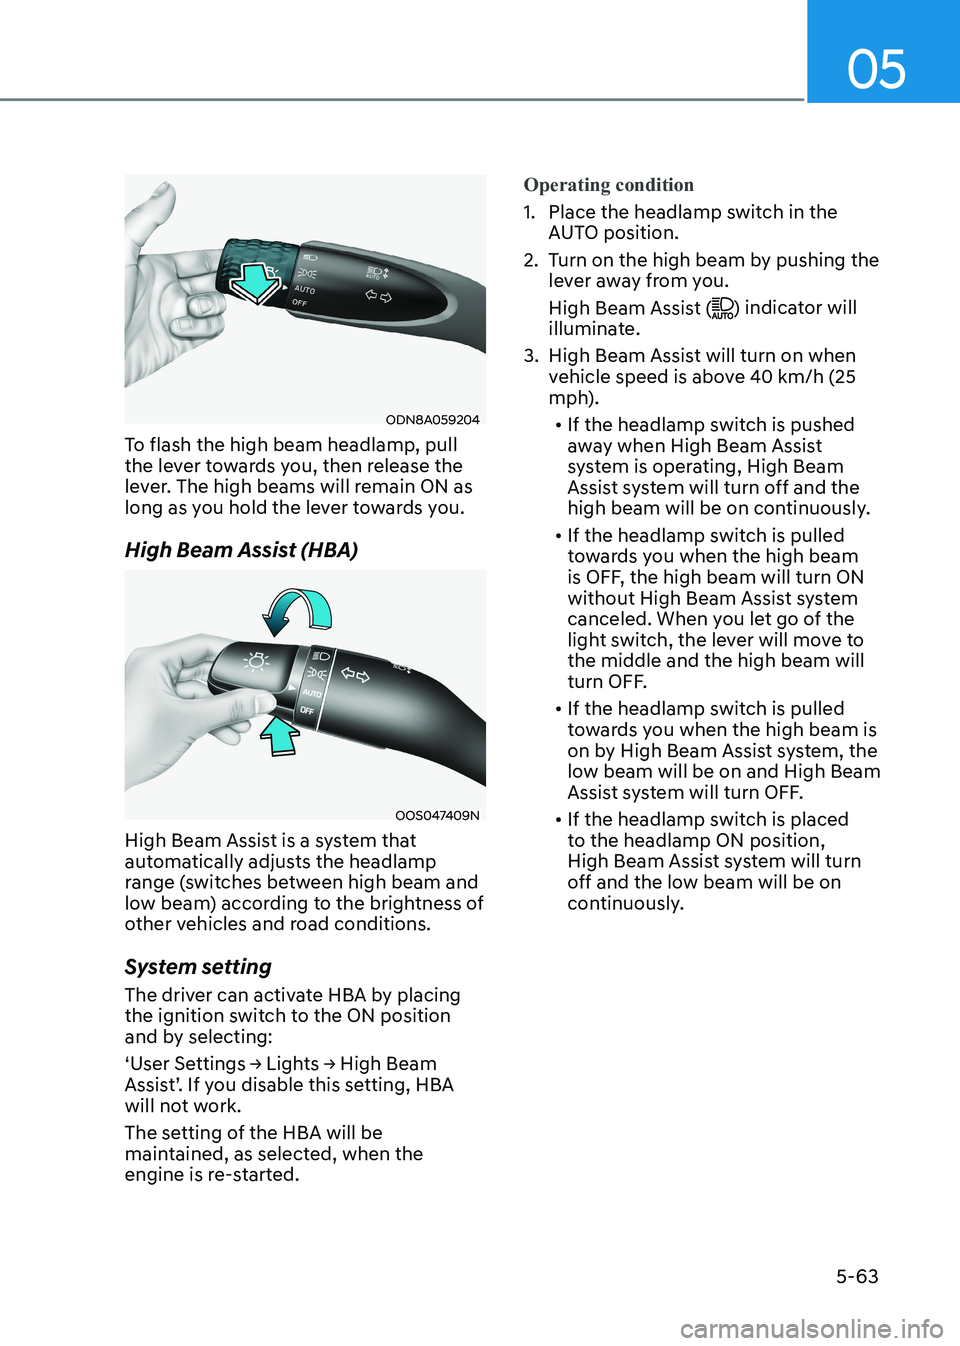
ODN8A059204
To flash the high beam headlamp, pull
the lever towards you, then release the
lever. The high beams will remain ON as
long as you hold the lever towards you.
High Beam Assist (HBA)
OOS047409N
High Beam Assist is a system that
automatically adjusts the headlamp
range (switches between high beam and
low beam) according to the brightness of
other vehicles and road conditions.
System setting
The driver can activate HBA by placing
the ignition switch to the ON position
and by selecting:
‘User Settings → Lights → High Beam
Assist’. If you disable this setting, HBA
will not work.
The setting of the HBA will be
maintained, as selected, when the
engine is re-started.
Operating condition
1. Place the headlamp switch in the AUTO position.
2. Turn on the high beam by pushing the lever away from you.
High Beam Assist (
) indicator will
illuminate.
3. High Beam Assist will turn on when vehicle speed is above 40 km/h (25
mph).
• If the headlamp switch is pushed
away when High Beam Assist
system is operating, High Beam
Assist system will turn off and the
high beam will be on continuously.
• If the headlamp switch is pulled
towards you when the high beam
is OFF, the high beam will turn ON
without High Beam Assist system
canceled. When you let go of the
light switch, the lever will move to the middle and the high beam will
turn OFF.
• If the headlamp switch is pulled
towards you when the high beam is
on by High Beam Assist system, the
low beam will be on and High Beam
Assist system will turn OFF.
• If the headlamp switch is placed
to the headlamp ON position,
High Beam Assist system will turn
off and the low beam will be on
continuously.