2023 HYUNDAI SONATA warning light
[x] Cancel search: warning lightPage 195 of 555
05
5-49
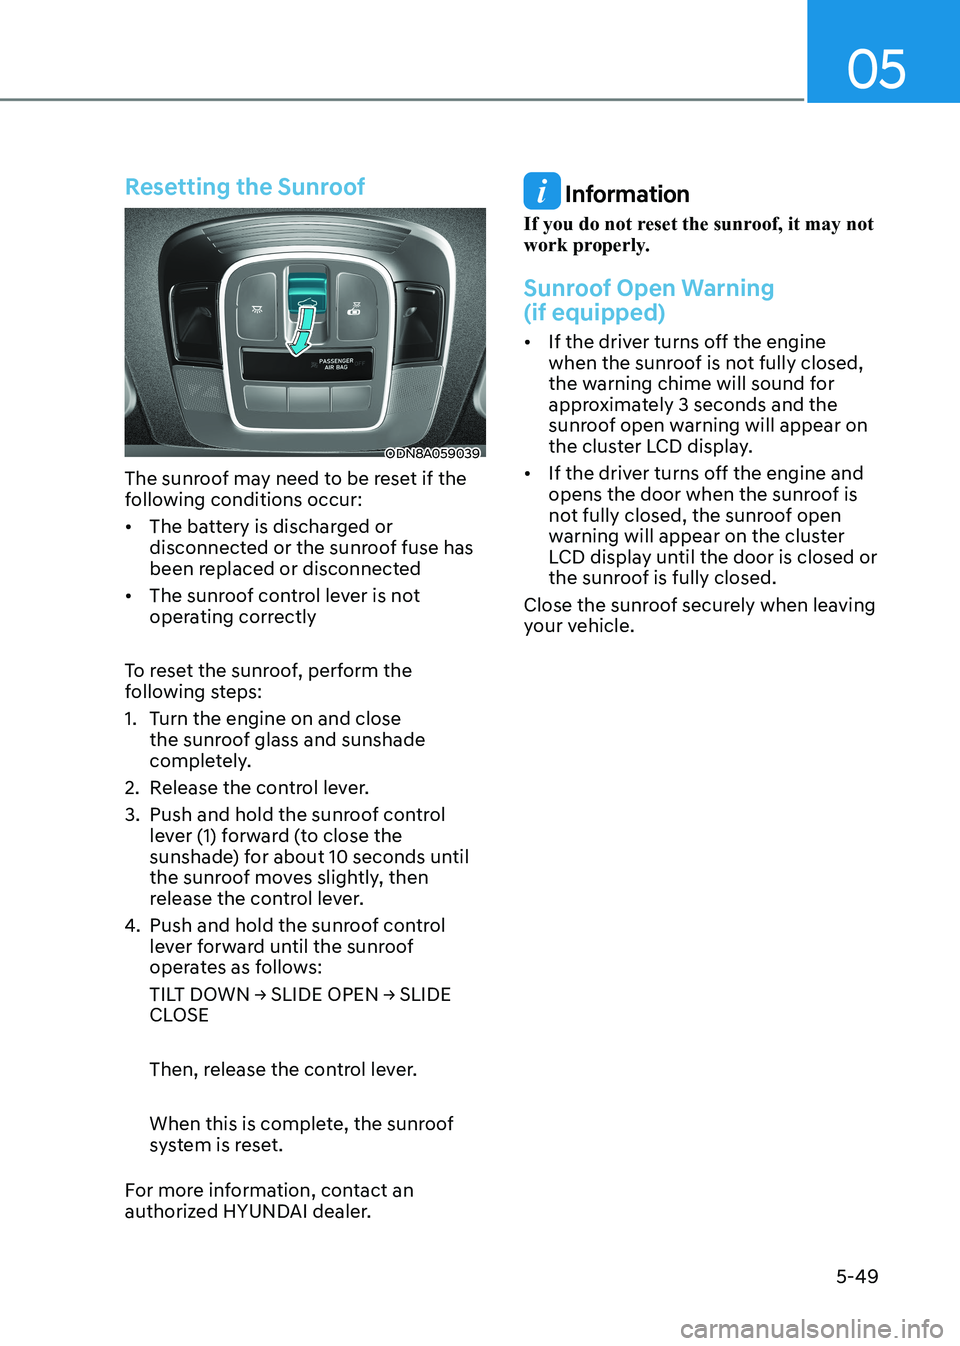
Resetting the Sunroof
ODN8A059039
The sunroof may need to be reset if the
following conditions occur:
• The battery is discharged or disconnected or the sunroof fuse has
been replaced or disconnected
• The sunroof control lever is not operating correctly
To reset the sunroof, perform the
following steps:
1. Turn the engine on and close the sunroof glass and sunshade
completely.
2. Release the control lever.
3. Push and hold the sunroof control lever (1) forward (to close the
sunshade) for about 10 seconds until
the sunroof moves slightly, then
release the control lever.
4. Push and hold the sunroof control lever forward until the sunroof
operates as follows:
TILT DOWN → SLIDE OPEN → SLIDE
CLOSE
Then, release the control lever.
When this is complete, the sunroof
system is reset.
For more information, contact an
authorized HYUNDAI dealer.
Information
If you do not reset the sunroof, it may not
work properly.
Sunroof Open Warning (if equipped)
• If the driver turns off the engine when the sunroof is not fully closed,
the warning chime will sound for
approximately 3 seconds and the
sunroof open warning will appear on
the cluster LCD display.
• If the driver turns off the engine and opens the door when the sunroof is
not fully closed, the sunroof open
warning will appear on the cluster
LCD display until the door is closed or
the sunroof is fully closed.
Close the sunroof securely when leaving
your vehicle.
Page 196 of 555
Convenience Features
5-50
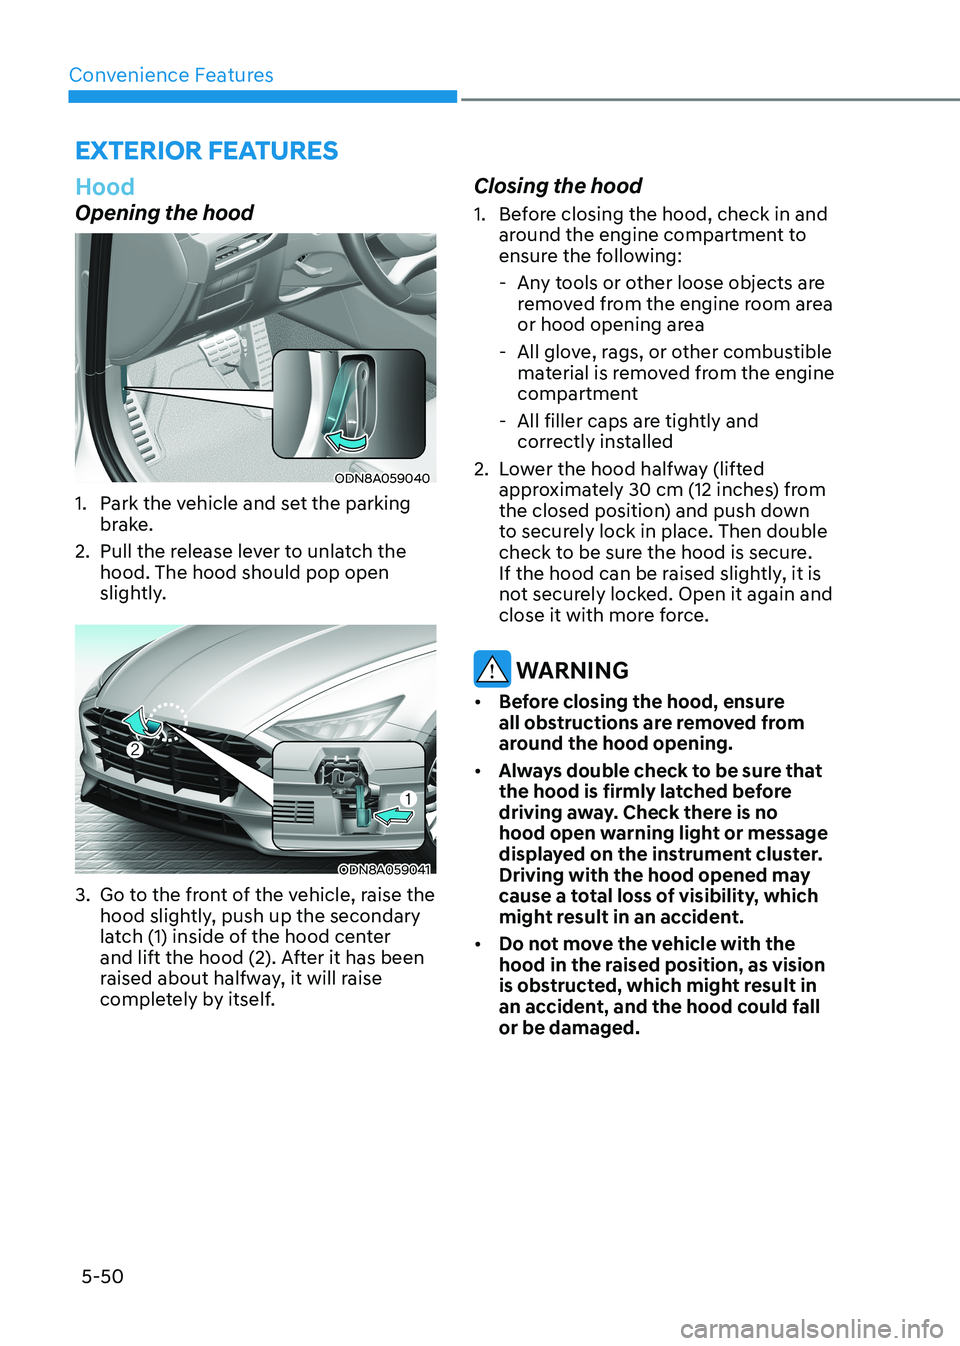
Hood
Opening the hood
ODN8A059040
1. Park the vehicle and set the parking brake.
2. Pull the release lever to unlatch the hood. The hood should pop open
slightly.
ODN8A059041
3. Go to the front of the vehicle, raise the hood slightly, push up the secondary
latch (1) inside of the hood center
and lift the hood (2). After it has been
raised about halfway, it will raise
completely by itself. Closing the hood
1. Before closing the hood, check in and
around the engine compartment to
ensure the following:
- Any tools or other loose objects are removed from the engine room area
or hood opening area
- All glove, rags, or other combustible material is removed from the engine
compartment
- All filler caps are tightly and correctly installed
2. Lower the hood halfway (lifted approximately 30 cm (12 inches) from
the closed position) and push down
to securely lock in place. Then double
check to be sure the hood is secure.
If the hood can be raised slightly, it is
not securely locked. Open it again and
close it with more force.
WARNING
• Before closing the hood, ensure
all obstructions are removed from
around the hood opening.
• Always double check to be sure that
the hood is firmly latched before
driving away. Check there is no
hood open warning light or message
displayed on the instrument cluster.
Driving with the hood opened may
cause a total loss of visibility, which
might result in an accident.
• Do not move the vehicle with the
hood in the raised position, as vision
is obstructed, which might result in
an accident, and the hood could fall or be damaged.
exterior FeAtures
Page 200 of 555
Convenience Features
5-54
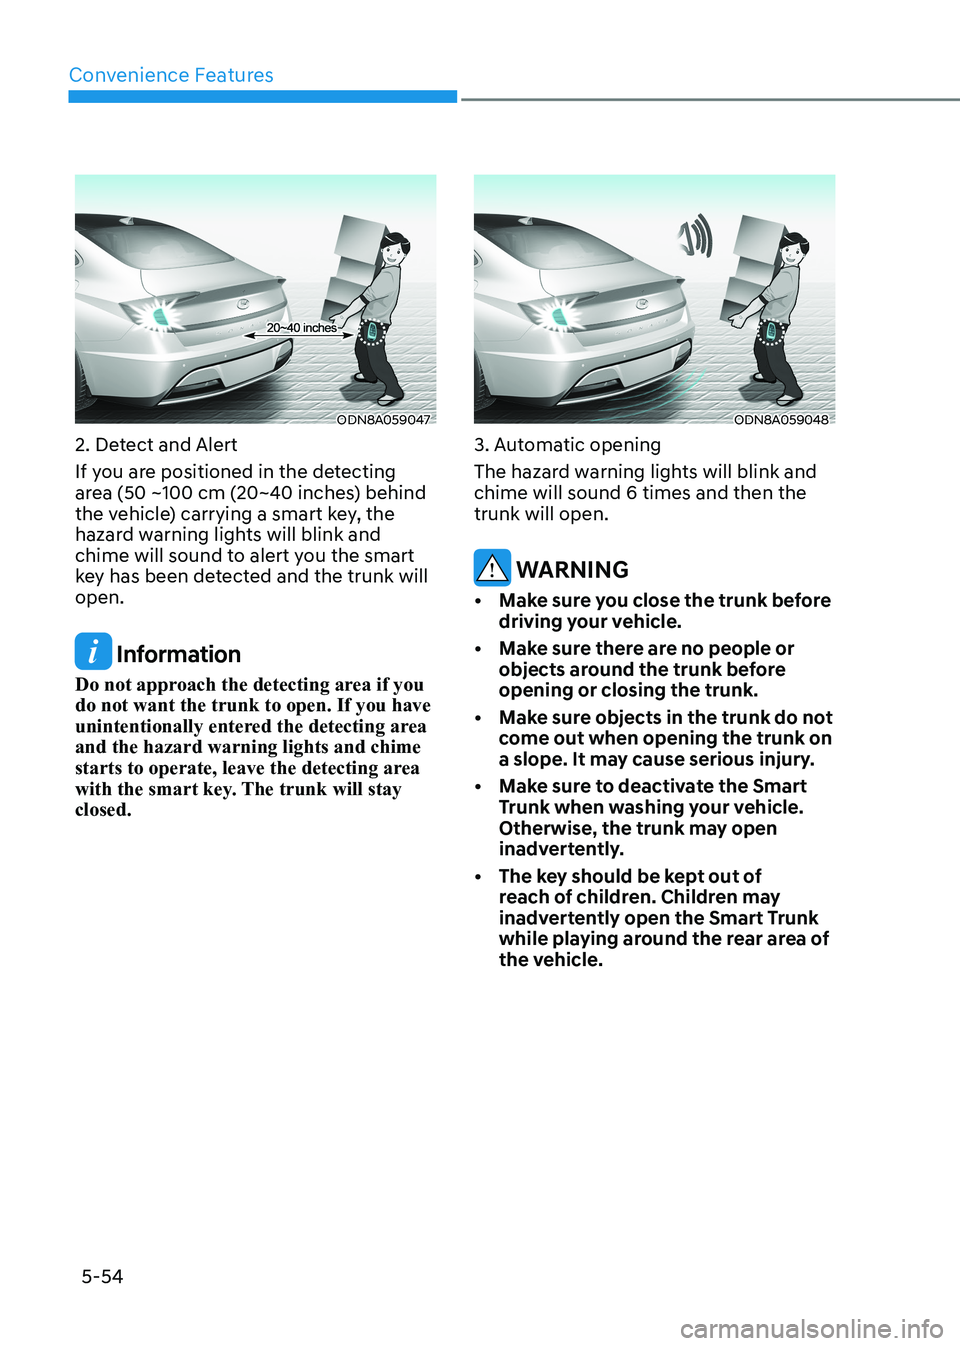
ODN8A059047
2. Detect and Alert
If you are positioned in the detecting
area (50 ~100 cm (20~40 inches) behind
the vehicle) carrying a smart key, the
hazard warning lights will blink and
chime will sound to alert you the smart
key has been detected and the trunk will open.
Information
Do not approach the detecting area if you do not want the trunk to open. If you have
unintentionally entered the detecting area and the hazard warning lights and chime
starts to operate, leave the detecting area
with the smart key. The trunk will stay closed.
ODN8A059048
3. Automatic opening
The hazard warning lights will blink and chime will sound 6 times and then the trunk will open.
WARNING
• Make sure you close the trunk before driving your vehicle.
• Make sure there are no people or objects around the trunk before opening or closing the trunk.
• Make sure objects in the trunk do not come out when opening the trunk on
a slope. It may cause serious injury.
• Make sure to deactivate the Smart Trunk when washing your vehicle.
Otherwise, the trunk may open
inadvertently.
• The key should be kept out of reach of children. Children may
inadvertently open the Smart Trunk
while playing around the rear area of
the vehicle.
Page 203 of 555
05
5-57
Information
If the fuel filler door does not open
because ice has formed around it, tap
lightly or push on the door to break the
ice and release the door. Do not pry on the
door. If necessary, spray around the door
with an approved deicer fluid (do not use
radiator antifreeze) or move the vehicle to a warm place and allow the ice to melt. Closing the fuel filler door
1. To install the fuel tank cap, turn it clockwise until it “clicks” one time.
2. Close the fuel filler door until it is latched securely.
WARNING
Gasoline is highly flammable and
explosive. Failure to follow these
guidelines may result in SERIOUS
INJURY or DEATH: • Read and follow all warnings posted
at the gas station.
• Before refueling, note the location of
the Emergency Gasoline Shut-Off, if
available, at the gas station.
• Before touching the fuel nozzle, you
should eliminate the potential build-
up of static electricity by touching
a metal part of the vehicle, a safe
distance away from the fuel filler
neck, nozzle, or other gas source,
with your bare hand.
• Do not use cellular phones while
refueling. Electric current and/or
electronic interference from cellular
phones can potentially ignite fuel
vapors and cause a fire. •
Do not get back into a vehicle
once you have begun refueling.
You can generate a buildup of
static electricity by touching,
rubbing or sliding against any item
or fabric capable of producing
static electricity. Static electricity
discharge can ignite fuel vapors
causing a fire. If you must re-enter
the vehicle, you should once again
eliminate potentially dangerous
static electricity discharge by
touching a metal part of the vehicle,
away from the fuel filler neck, nozzle
or other gasoline source, with your
bare hand.
• When using an approved portable
fuel container, be sure to place the
container on the ground prior to
refueling. Static electricity discharge
from the container can ignite fuel
vapors causing a fire.
Once refueling has begun, contact
between your bare hand and the
vehicle should be maintained until
the filling is complete.
• Use only approved portable plastic
fuel containers designed to carry and
store gasoline.
• When refueling, always move the
shift button to the P (Park) position
set the parking brake, and place
the ignition switch to the LOCK/
OFF position. Sparks produced by
electrical components related to the
engine can ignite fuel vapors causing
a fire.
• Do not use matches or a lighter and
do not smoke or leave a lit cigarette
in your vehicle while at a gas station,
especially during refueling.
• Do not over-fill or top-off your
vehicle tank, which can cause gasoline spillage.
Page 205 of 555
05
5-59
heAD Up DiSplAy (hUD) (if eQUippeD)
ODN8A059054C
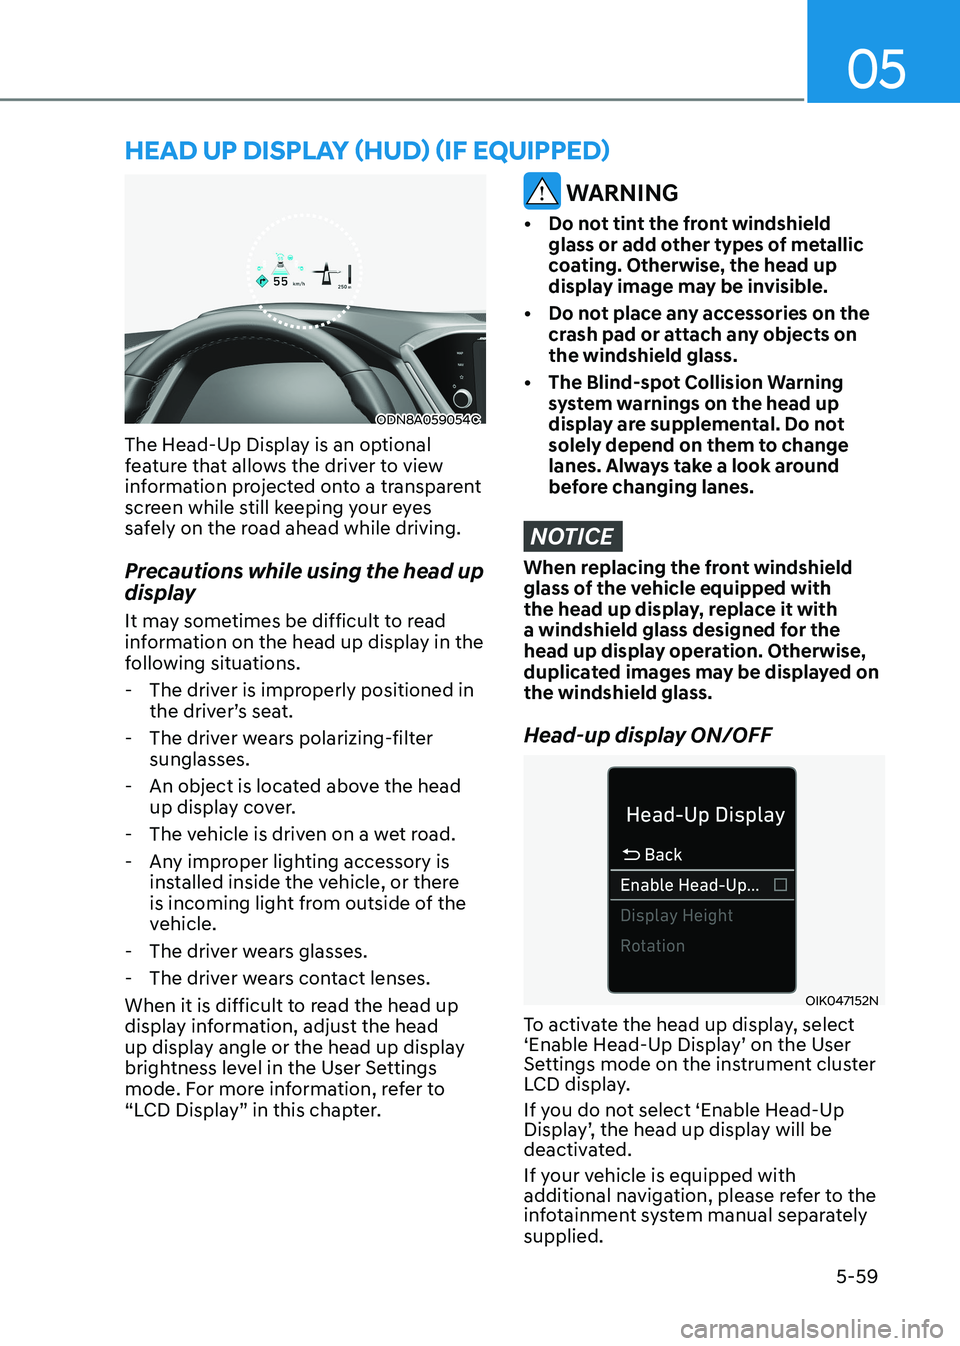
The Head-Up Display is an optional
feature that allows the driver to view
information projected onto a transparent
screen while still keeping your eyes
safely on the road ahead while driving.
Precautions while using the head up
display
It may sometimes be difficult to read
information on the head up display in the
following situations.
- The driver is improperly positioned in the driver’s seat.
- The driver wears polarizing-filter sunglasses.
- An object is located above the head up display cover.
- The vehicle is driven on a wet road.
- Any improper lighting accessory is installed inside the vehicle, or there
is incoming light from outside of the
vehicle.
- The driver wears glasses.
- The driver wears contact lenses.
When it is difficult to read the head up
display information, adjust the head
up display angle or the head up display
brightness level in the User Settings
mode. For more information, refer to
“LCD Display” in this chapter.
WARNING
• Do not tint the front windshield glass or add other types of metallic
coating. Otherwise, the head up
display image may be invisible.
• Do not place any accessories on the crash pad or attach any objects on the windshield glass.
• The Blind-spot Collision Warning system warnings on the head up
display are supplemental. Do not
solely depend on them to change
lanes. Always take a look around
before changing lanes.
NOTICE
When replacing the front windshield
glass of the vehicle equipped with
the head up display, replace it with
a windshield glass designed for the
head up display operation. Otherwise,
duplicated images may be displayed on the windshield glass.
Head-up display ON/OFF
OIK047152N
To activate the head up display, select
‘Enable Head-Up Display’ on the User
Settings mode on the instrument cluster
LCD display.
If you do not select ‘Enable Head-Up
Display’, the head up display will be
deactivated.
If your vehicle is equipped with
additional navigation, please refer to the
infotainment system manual separately supplied.
Page 208 of 555
Convenience Features
5-62
ODN8A059202
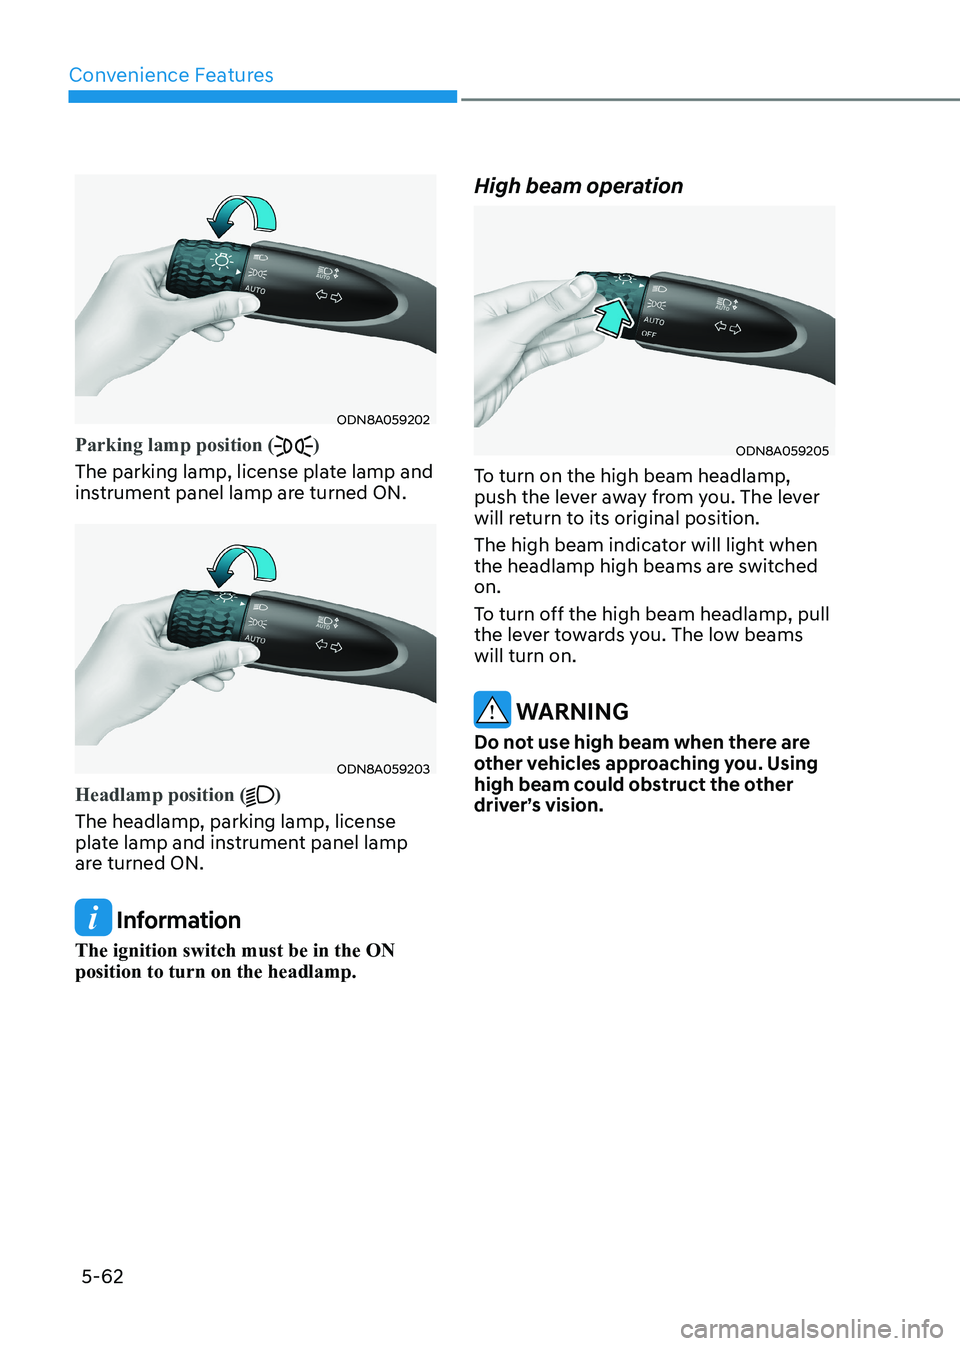
Parking lamp position ()
The parking lamp, license plate lamp and
instrument panel lamp are turned ON.
ODN8A059203
Headlamp position ()
The headlamp, parking lamp, license
plate lamp and instrument panel lamp
are turned ON.
Information
The ignition switch must be in the ON position to turn on the headlamp. High beam operation
ODN8A059205
To turn on the high beam headlamp,
push the lever away from you. The lever
will return to its original position.
The high beam indicator will light when
the headlamp high beams are switched on.
To turn off the high beam headlamp, pull
the lever towards you. The low beams will turn on.
WARNING
Do not use high beam when there are
other vehicles approaching you. Using
high beam could obstruct the other
driver’s vision.
Page 210 of 555
Convenience Features
5-64
When High Beam Assist system is
operating, the high beam switches to low
beam if any of the following conditions occur:
- When the headlamp of an on-coming vehicle is detected.
- When the tail lamp of a vehicle in front
is detected.
- When the headlamp or tail lamp of a motorcycle or a bicycle is detected.
- When the surrounding ambient light is bright enough that high beams are not
required.
- When streetlights or other lights are detected.
- When the headlamp switch is not in the AUTO position.
- When High Beam Assist system is off.
- When vehicle speed is below 24 km/h (15 mph).
OIK047132N
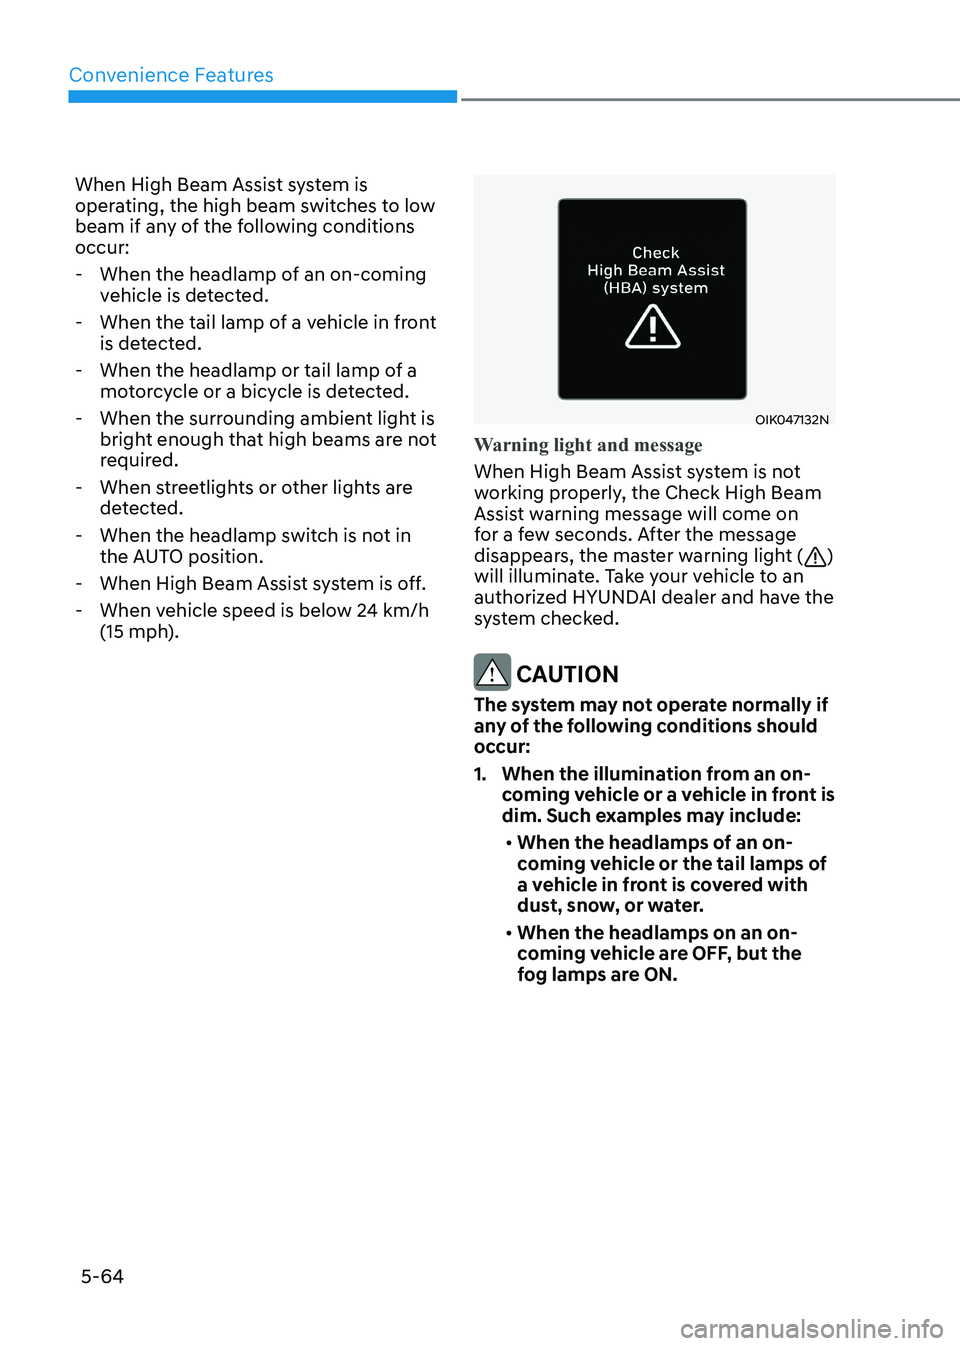
Warning light and message
When High Beam Assist system is not
working properly, the Check High Beam
Assist warning message will come on
for a few seconds. After the message
disappears, the master warning light (
)
will illuminate. Take your vehicle to an
authorized HYUNDAI dealer and have the
system checked.
CAUTION
The system may not operate normally if
any of the following conditions should
occur:
1. When the illumination from an on- coming vehicle or a vehicle in front is
dim. Such examples may include:
• When the headlamps of an on-
coming vehicle or the tail lamps of
a vehicle in front is covered with
dust, snow, or water.
• When the headlamps on an on-
coming vehicle are OFF, but the
fog lamps are ON.
Page 211 of 555
05
5-65
2. When the High Beam Assist camera
is adversely affected by an external
condition. Such examples may include:
• When the vehicle’s headlamps
have been damaged or not
repaired properly.
• When the vehicle headlamps are
not aimed properly.
• When the vehicle is driven on a
narrow curved road or rough road
• When the vehicle is driven on an
uphill road or downhill road
• When only part of the vehicle in
front is visible on a crossroad or
curved road.
• When there is a traffic light,
reflecting sign, flashing sign or
mirror.
• When the road conditions are bad
such as being wet or covered with
snow.
• When a vehicle suddenly appears
from a curve.
• When the vehicle is tilted from a
flat tire or being towed.
• When Lane Keeping Assist system
warning light illuminates.
• When the light from the on-coming
or front vehicle is not detected
because of exhaust fume, smoke,
fog, snow, etc.
• When the front window is covered
with foreign matters such as ice,
dust, fog, or is damaged.
3. When the forward visibility is poor. Such examples may include:
• When the headlamps of an on-
coming vehicle or a vehicle in front
is not detected due to poor outside
visibility (smog, smoke, dust, fog,
heavy rain, snow, etc.).
• When the windshield visibility is
poor.
WARNING
• Do not attempt to disassemble
the front view camera without the
assistance of an authorized HYUNDAI
dealer technician. If the front camera
is removed for any reason, the
system may need to be re-calibrated.
Have the system inspected by an
authorized HYUNDAI dealer.
• If the windshield of your vehicle is
replaced, most likely the front view
camera will need to be re-calibrated.
If this occurs, have your vehicle
inspected and have the system re-
calibrated by an authorized HYUNDAI
dealer.
• Be careful that water doesn’t get into
High Beam Assist unit and do not
remove or damage related parts of
High Beam Assist system.
• Do not place objects on the crash
pad that reflect light such as mirrors,
white paper, etc. The system may
malfunction if sunlight is reflected.
• At times, High Beam Assist system
may not work properly. The system
is for your convenience only. It is the
responsibility of the driver for safe
driving practices and always check
the road conditions for your safety.
• When the system does not operate
normally, change the headlamp
position manually between the high
beam and low beam.