2023 HYUNDAI SONATA climate control
[x] Cancel search: climate controlPage 274 of 555
Convenience Features
5-128
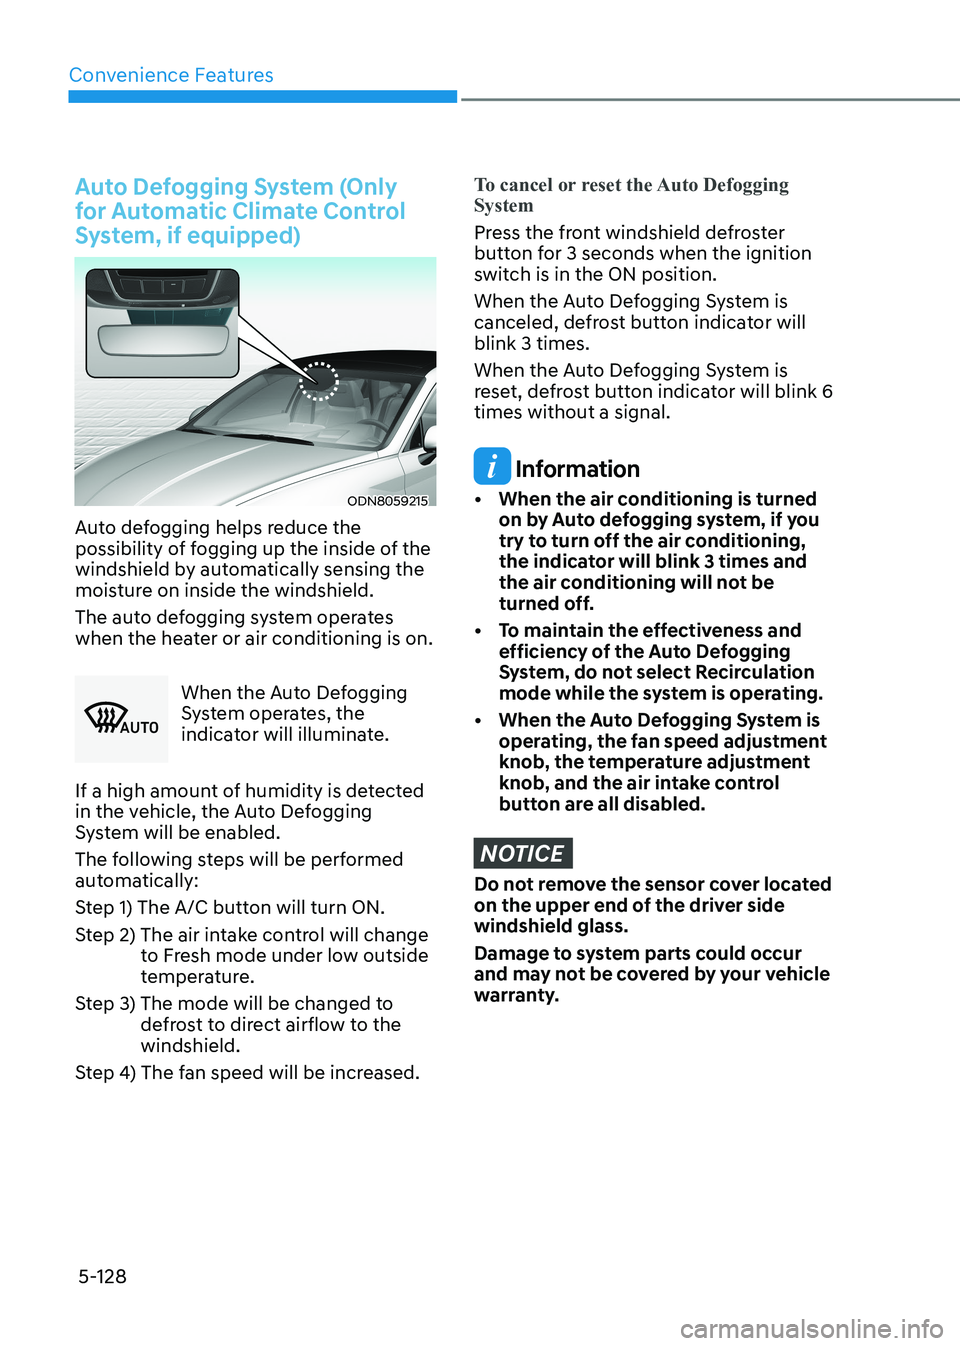
Auto Defogging System (Only
for Automatic Climate Control
System, if equipped)
ODN8059215
Auto defogging helps reduce the
possibility of fogging up the inside of the
windshield by automatically sensing the
moisture on inside the windshield.
The auto defogging system operates
when the heater or air conditioning is on.
�$�8 �7�2
When the Auto Defogging
System operates, the
indicator will illuminate.
If a high amount of humidity is detected
in the vehicle, the Auto Defogging
System will be enabled.
The following steps will be performed
automatically:
Step 1) The A/C button will turn ON.
Step 2) The air intake control will change to Fresh mode under low outside
temperature.
Step 3) The mode will be changed to defrost to direct airflow to the windshield.
Step 4) The fan speed will be increased.
To cancel or reset the Auto Defogging System
Press the front windshield defroster
button for 3 seconds when the ignition
switch is in the ON position.
When the Auto Defogging System is
canceled, defrost button indicator will blink 3 times.
When the Auto Defogging System is
reset, defrost button indicator will blink 6 times without a signal.
Information
• When the air conditioning is turned on by Auto defogging system, if you
try to turn off the air conditioning,
the indicator will blink 3 times and
the air conditioning will not be
turned off.
• To maintain the effectiveness and efficiency of the Auto Defogging
System, do not select Recirculation
mode while the system is operating.
• When the Auto Defogging System is operating, the fan speed adjustment
knob, the temperature adjustment
knob, and the air intake control
button are all disabled.
NOTICE
Do not remove the sensor cover located
on the upper end of the driver side windshield glass.
Damage to system parts could occur
and may not be covered by your vehicle
warranty.
Page 275 of 555

05
5-129
Defroster
NOTICE
To prevent damage to the conductors
bonded to the inside surface of the rear
window, never use sharp instruments or
window cleaners containing abrasives
to clean the window.
Information
If you want to defrost and defog the
front windshield, refer to “Windshield
Defrosting and Defogging” in this chapter.
Rear window defroster
ODN8059284L
„
„Manual climate control system
„„Automatic climate control system
ODN8059283L
The defroster heats the window to
remove frost, fog and thin ice from the
interior and exterior of the rear window, while engine is running. • To activate the rear window defroster,
press the rear window defroster
button located in the center facia
switch panel. The indicator on the rear
window defroster button illuminates
when the defroster is ON.
• To turn off the defroster, press the rear window defroster button again.
Information
• If there is heavy accumulation of snow on the rear window, brush it off before
operating the rear defroster.
• The rear window defroster automatically turns off after
approximately 20 minutes or when the
ignition switch is in the LOCK/OFF position.
Outside mirror defroster (if equipped)
If your vehicle is equipped with the
outside mirror defrosters, they will
operate at the same time you turn on the
rear window defroster.
Page 276 of 555
Convenience Features
5-130
climATe conTrol ADDiTionAl feATUreS
Sunroof Inside Air Recirculation (if equipped)
When the sunroof is opened, outside
(fresh) air will be automatically selected.
At this time, if you press the air intake
control button, recirculated air position
will be selected but will change back
to outside (fresh) air after 3 minutes.
When the sunroof is closed, the air
intake position will return to the original
position that was selected.
Automatic Ventilation
The system automatically selects the
fresh mode when the climate control
system operates Floor-Level or Bi-Level
for more than 5 minutes and the outdoor
temperature is under 15°C (59°F).
Page 299 of 555
While Driving
6-12
NOTICE
To prevent damage to the vehicle:
When the stop lamp switch fuse is
blown, you can't start the engine
normally. Replace the fuse with a new
one. If you are not able to replace
the fuse, you can start the engine by
pressing and holding the Engine Start/
Stop button for 10 seconds with the
Engine Start/Stop button in the ACC position.
Do not press the Engine Start/Stop
button for more than 10 seconds except
when the stop lamp switch fuse is
blown.
For your safety always depress the
brake pedal before starting the engine.
ODN8069002
Information
If the smart key battery is weak or the
smart key does not work correctly, you
can start the engine by pressing the Engine Start/Stop button with the smart key in
the direction of the picture above.
Remote Start
ODN8069003
ODN8069004
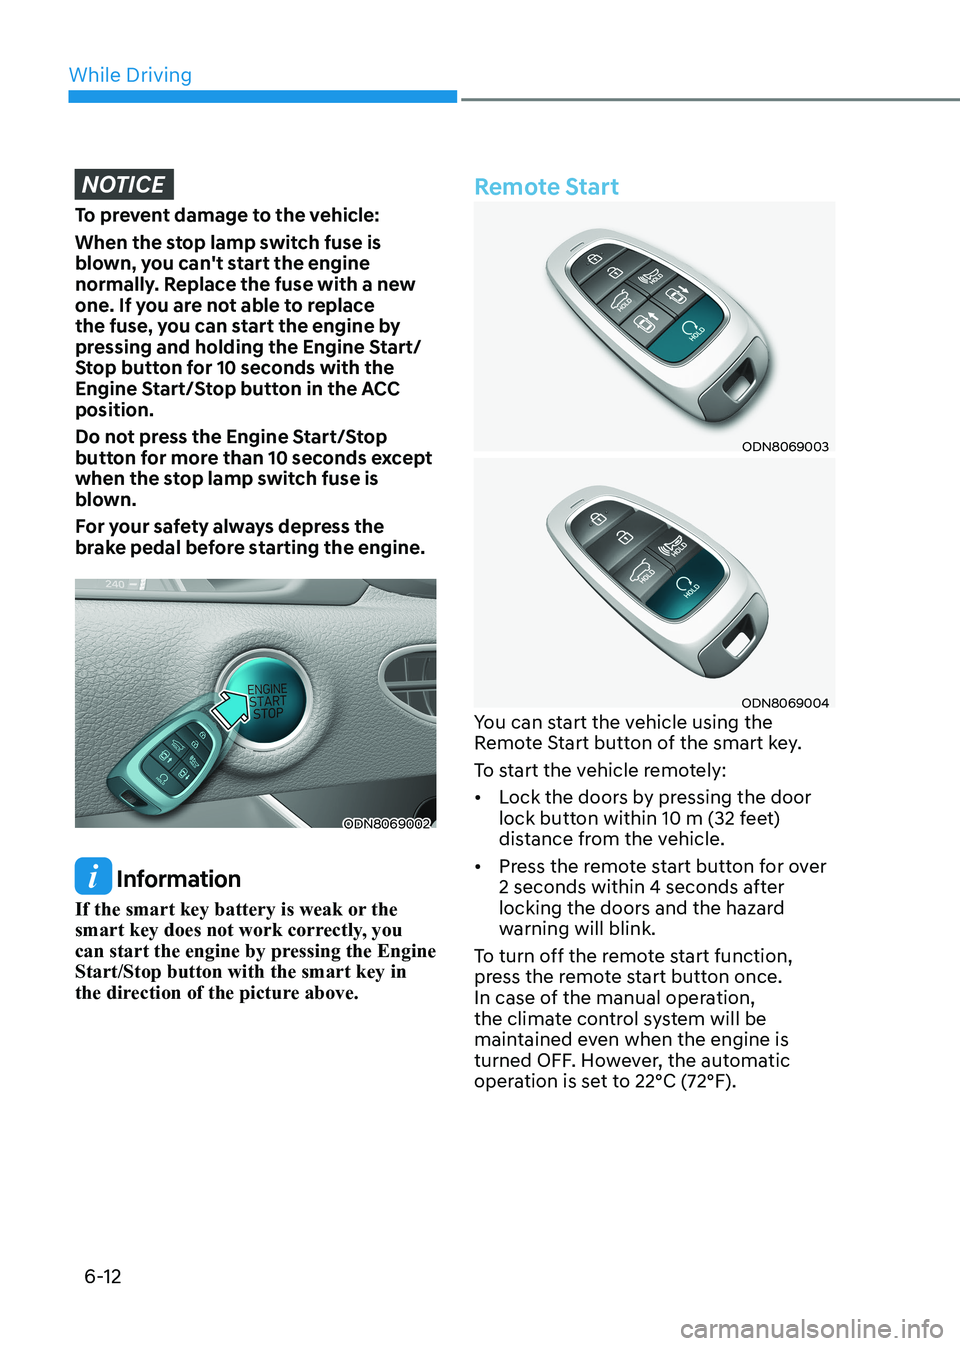
You can start the vehicle using the
Remote Start button of the smart key.
To start the vehicle remotely:• Lock the doors by pressing the door
lock button within 10 m (32 feet)
distance from the vehicle.
• Press the remote start button for over
2 seconds within 4 seconds after
locking the doors and the hazard
warning will blink.
To turn off the remote start function,
press the remote start button once.
In case of the manual operation,
the climate control system will be
maintained even when the engine is
turned OFF. However, the automatic
operation is set to 22°C (72°F).
Page 317 of 555
While Driving
6-30
BrAke SySteM
Power Brakes
Your vehicle has power-assisted brakes
that adjust automatically through normal usage.
If the engine is not running or is turned
off while driving, the power assist for
the brakes will not work. You can still
stop your vehicle by applying greater
force to the brake pedal than typical.
The stopping distance, however, will be
longer than with power brakes.
When the engine is not running, the
reserve brake power is partially depleted
each time the brake pedal is applied.
Do not pump the brake pedal when the
power assist has been interrupted.
Only pump the brakes on slippery
surfaces if the power assist has been
interrupted to maintain steering control.
Do not pump the brakes on slippery
surfaces if the brakes are operating
normally.
WARNING
Take the following precautions: • Do not drive with your foot resting
on the brake pedal. This will create
abnormal high brake temperatures,
excessive brake lining and pad wear,
and increased stopping distances.
• When descending down a long or
steep hill, move the gear shift button
to Manual Shift Mode and manually
downshift to a lower gear in order
to control your speed without using
the brake pedal excessively. Applying
the brakes continuously will cause
the brakes to overheat and could
result in a temporary loss of braking
performance.
• Wet brakes may impair the vehicle's
ability to safely slow down; the
vehicle may also pull to one side
when the brakes are applied.
Applying the brakes lightly will
indicate whether they have been
affected in this way. Always test your
brakes in this fashion after driving
through deep water. To dry the
brakes, lightly tap the brake pedal to
heat up the brakes while maintaining
a safe forward speed until brake
performance returns to normal.
Avoid driving at high speeds until the
brakes function correctly.
Disc Brakes Wear Indicator
When your brake pads are worn and new
pads are required, you will hear a high
pitched warning sound from your front
or rear brakes. You may hear this sound
come and go or it may occur whenever
you depress the brake pedal.
Note that some driving conditions or
climates may cause a brake squeal
when you first apply (or lightly apply)
the brakes. This is normal and does not
indicate a problem with your brakes.
NOTICE
To avoid costly brake repairs, do not
continue to drive with worn brake pads.
Information
Always replace brake pads as complete
front or rear axle sets.
Page 471 of 555
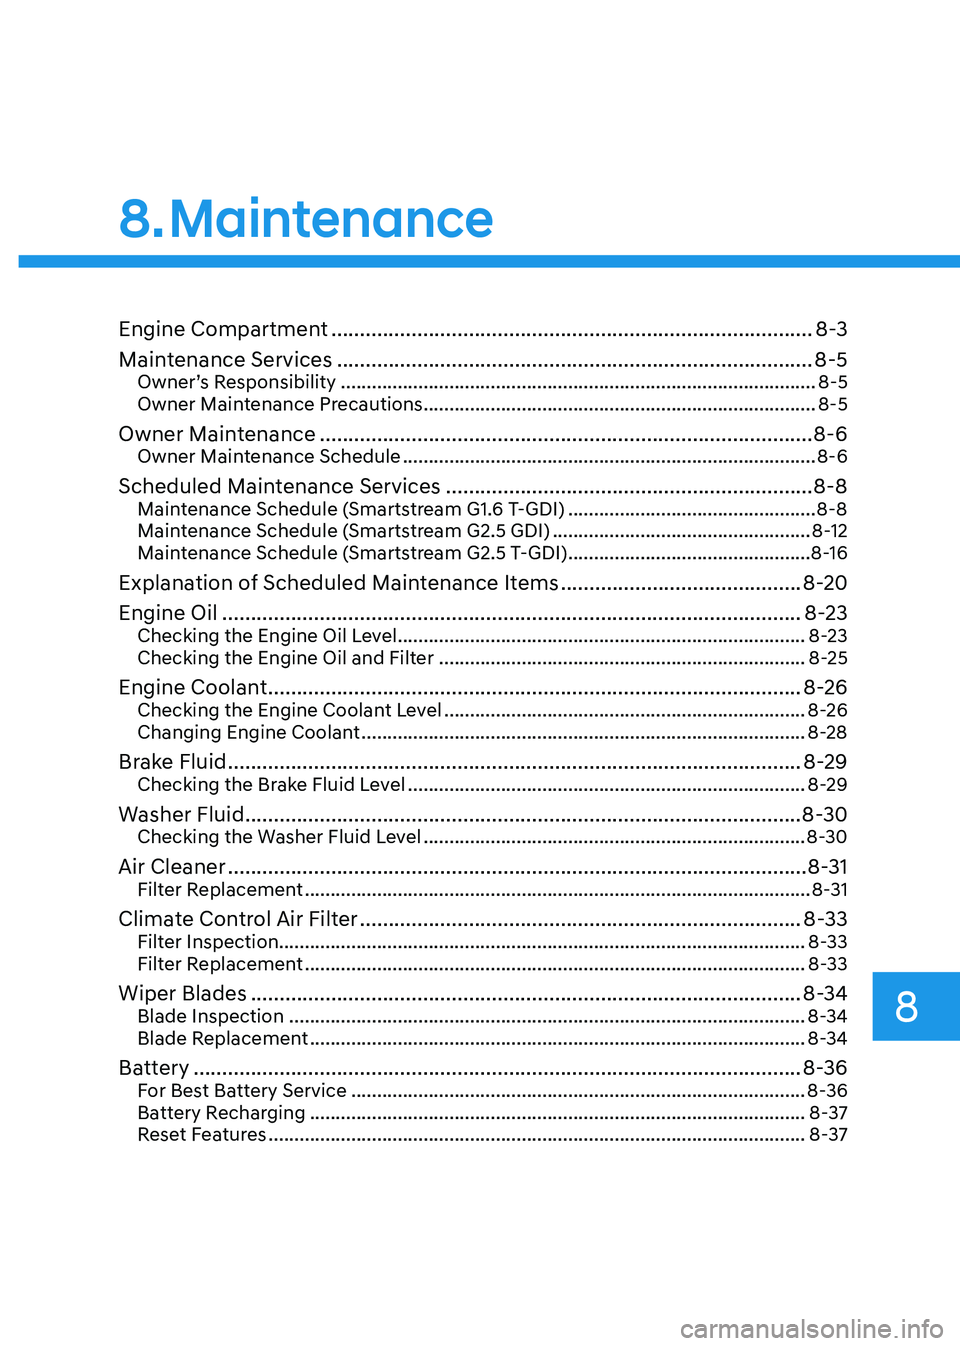
Engine Compartment .................................................................................... 8-3
Maintenance Services ................................................................................... 8-5
Owner’s Responsibility ............................................................................................ 8-5
Owner Maintenance Precautions ............................................................................ 8-5
Owner Maintenance ...................................................................................... 8-6
Owner Maintenance Schedule ................................................................................ 8-6
Scheduled Maintenance Services ................................................................ 8-8
Maintenance Schedule (Smartstream G1.6 T-GDI) ................................................8-8
Maintenance Schedule (Smartstream G2.5 GDI) ..................................................8-12
Maintenance Schedule (Smartstream G2.5 T-GDI) ...............................................8-16
Explanation of Scheduled Maintenance Items ..........................................8-20
Engine Oil ..................................................................................................... 8-23
Checking the Engine Oil Level ............................................................................... 8-23
Checking the Engine Oil and Filter ....................................................................... 8-25
Engine Coolant ............................................................................................. 8-26
Checking the Engine Coolant Level ...................................................................... 8-26
Changing Engine Coolant ...................................................................................... 8-28
Brake Fluid .................................................................................................... 8-29
Checking the Brake Fluid Level ............................................................................. 8-29
Washer Fluid ................................................................................................. 8-30
Checking the Washer Fluid Level .......................................................................... 8-30
Air Cleaner ..................................................................................................... 8-31
Filter Replacement .................................................................................................. 8-31
Climate Control Air Filter ............................................................................. 8-33
Filter Inspection...................................................................................................... 8-33
Filter Replacement ................................................................................................. 8-33
Wiper Blades ................................................................................................ 8-34
Blade Inspection .................................................................................................... 8-34
Blade Replacement ................................................................................................ 8-34
Battery .......................................................................................................... 8-36
For Best Battery Service ........................................................................................ 8-36
Battery Recharging ................................................................................................ 8-37
Reset Features ........................................................................................................ 8-37
8. Maintenance
8
Page 479 of 555
08
8-9
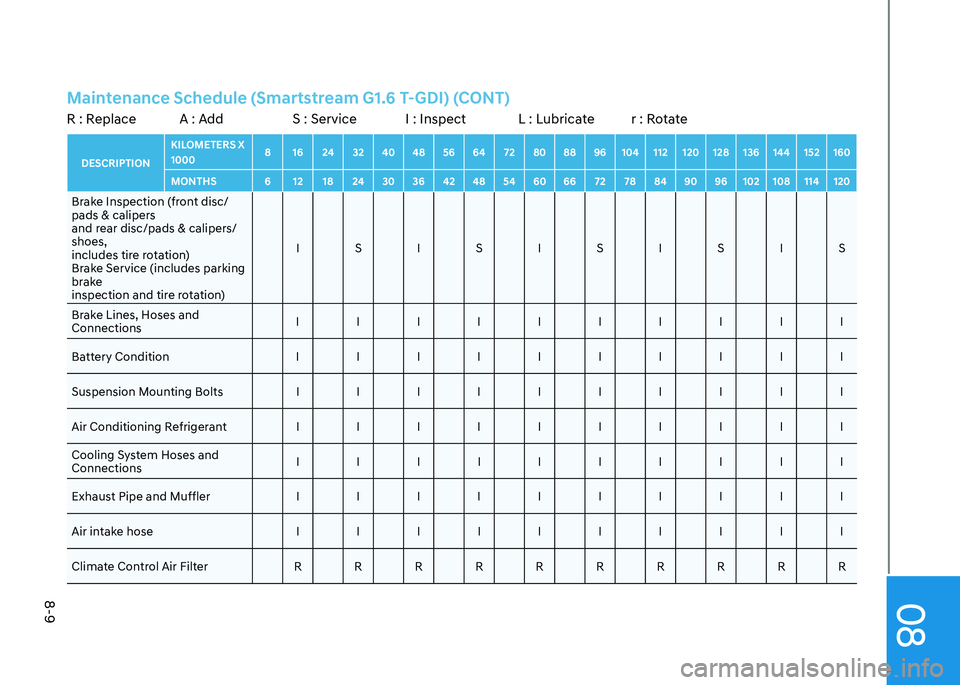
Maintenance Schedule (Smartstream G1.6 T-GDI) (CONT)R : Replace A : Add S : Service I : Inspect L : Lubricate r : RotateDESCRIPTIONKILOMETERS X 1000
8 16 24 32 40 48 56 64 72 80 88 96 104 112 120 128 136 144 152 160
MONTHS 6 12 18 24 30 36 42 48 54 60 66 72 78 84 90 96 102 108 114 120Brake Inspection (front disc/
pads & calipers
and rear disc/pads & calipers/shoes,
includes tire rotation)
Brake Service (includes parking
brake
inspection and tire rotation) I S I S I S I S I S
Brake Lines, Hoses and Connections I I I I I I I I I I
Battery Condition I I I I I I I I I I Suspension Mounting Bolts I I I I I I I I I I Air Conditioning Refrigerant I I I I I I I I I ICooling System Hoses and Connections I I I I I I I I I I
Exhaust Pipe and Muffler I I I I I I I I I I
Air intake hose I I I I I I I I I I Climate Control Air Filter R R R R R R R R R R
Page 483 of 555
08
8-13
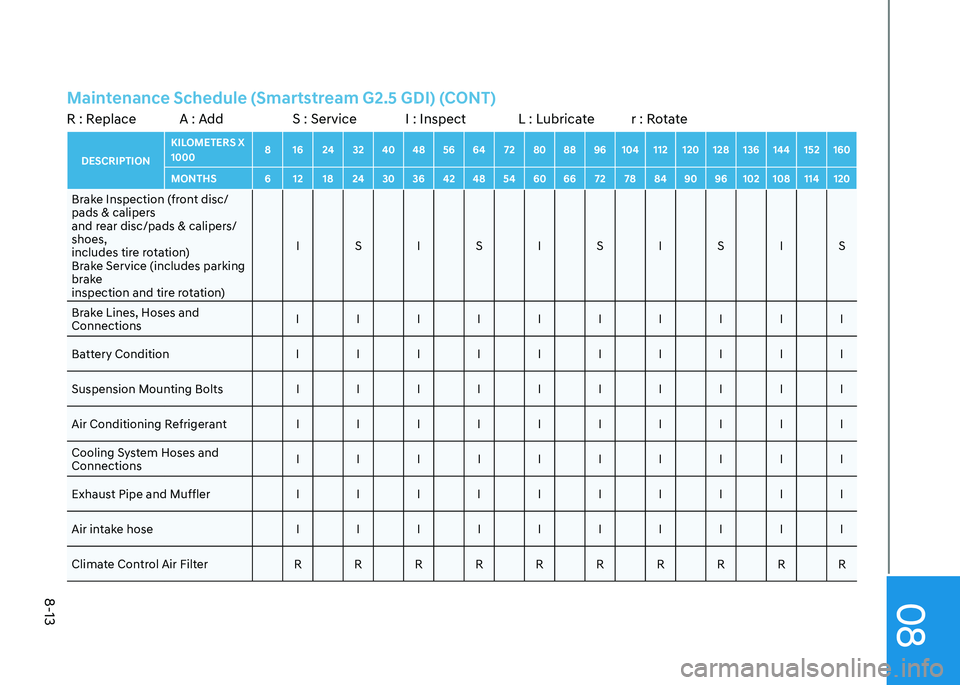
Maintenance Schedule (Smartstream G2.5 GDI) (CONT)R : Replace A : Add S : Service I : Inspect L : Lubricate r : RotateDESCRIPTIONKILOMETERS X 1000
8 16 24 32 40 48 56 64 72 80 88 96 104 112 120 128 136 144 152 160
MONTHS 6 12 18 24 30 36 42 48 54 60 66 72 78 84 90 96 102 108 114 120Brake Inspection (front disc/
pads & calipers
and rear disc/pads & calipers/shoes,
includes tire rotation)
Brake Service (includes parking
brake
inspection and tire rotation) I S I S I S I S I S
Brake Lines, Hoses and Connections I I I I I I I I I I
Battery Condition I I I I I I I I I I Suspension Mounting Bolts I I I I I I I I I I Air Conditioning Refrigerant I I I I I I I I I ICooling System Hoses and Connections I I I I I I I I I I
Exhaust Pipe and Muffler I I I I I I I I I I Air intake hose I I I I I I I I I I
Climate Control Air Filter R R R R R R R R R R