2023 HYUNDAI SONATA battery replacement
[x] Cancel search: battery replacementPage 152 of 555
Convenience Features
5-6
If the remote key is in close proximity to
your mobile phone, the signal could be
blocked by your mobile phone’s normal
operational signals. This is specifically
relevant when the phone is active such
as making and receiving calls, text
messaging, and/or sending/receiving emails.
When possible, avoid placing the remote
key and your mobile phone in the same
location such as a pants or jacket pocket
in order to avoid interference between
the two devices.
Information
This device complies with Industry Canada RSS-210 standard.
Operation is subject to the following three conditions: 1. This device may not cause harmful
interference.
2. This device must accept any
interference received, including
interference that may cause undesired operation.
3. Changes or modifications not expressly
approved by the party responsible
for compliance could void the user’s authority to operate the device.
NOTICE
Keep the remote key away from
electromagnetic materials that block
electromagnetic waves to the key
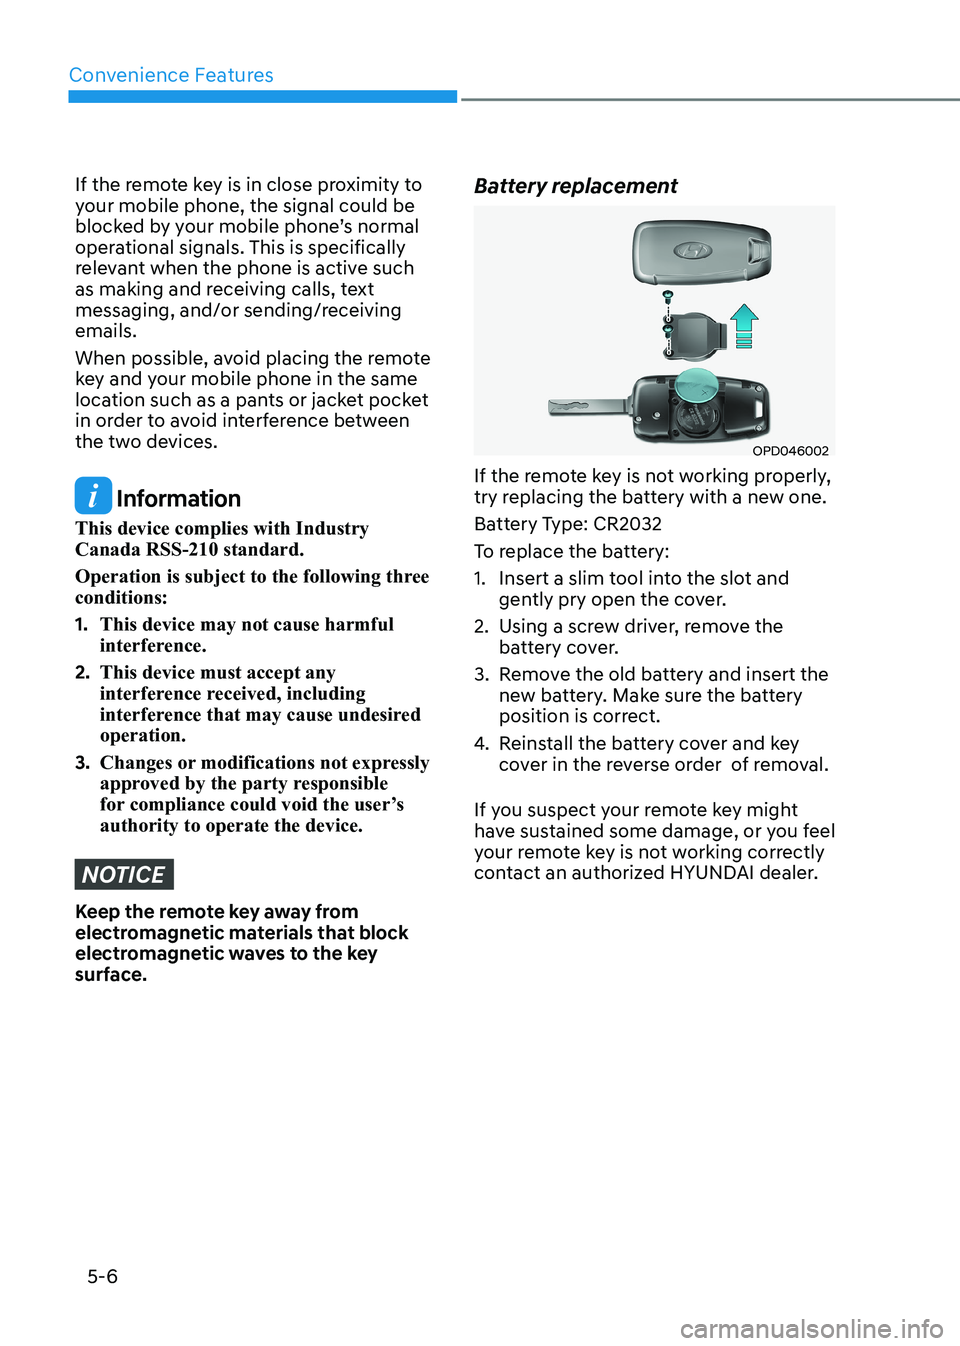
surface. Battery replacement
OPD046002
If the remote key is not working properly,
try replacing the battery with a new one.
Battery Type: CR2032
To replace the battery:
1. Insert a slim tool into the slot and gently pry open the cover.
2. Using a screw driver, remove the battery cover.
3. Remove the old battery and insert the new battery. Make sure the battery
position is correct.
4. Reinstall the battery cover and key
cover in the reverse order of removal.
If you suspect your remote key might
have sustained some damage, or you feel
your remote key is not working correctly
contact an authorized HYUNDAI dealer.
Page 159 of 555
05
5-13
Information
This device complies with Industry Canada RSS-210 standard.
Operation is subject to the following three conditions: 1. This device may not cause harmful
interference.
2. This device must accept any
interference received, including
interference that may cause undesired operation.
3. Changes or modifications not expressly
approved by the party responsible
for compliance could void the user’s authority to operate the device.
NOTICE
Keep the smart key away from
electromagnetic materials that blocks
electromagnetic waves to the key
surface.
NOTICE
Always have the smart key with you
when leaving the vehicle. If the smart
key is left near the vehicle, the vehicle
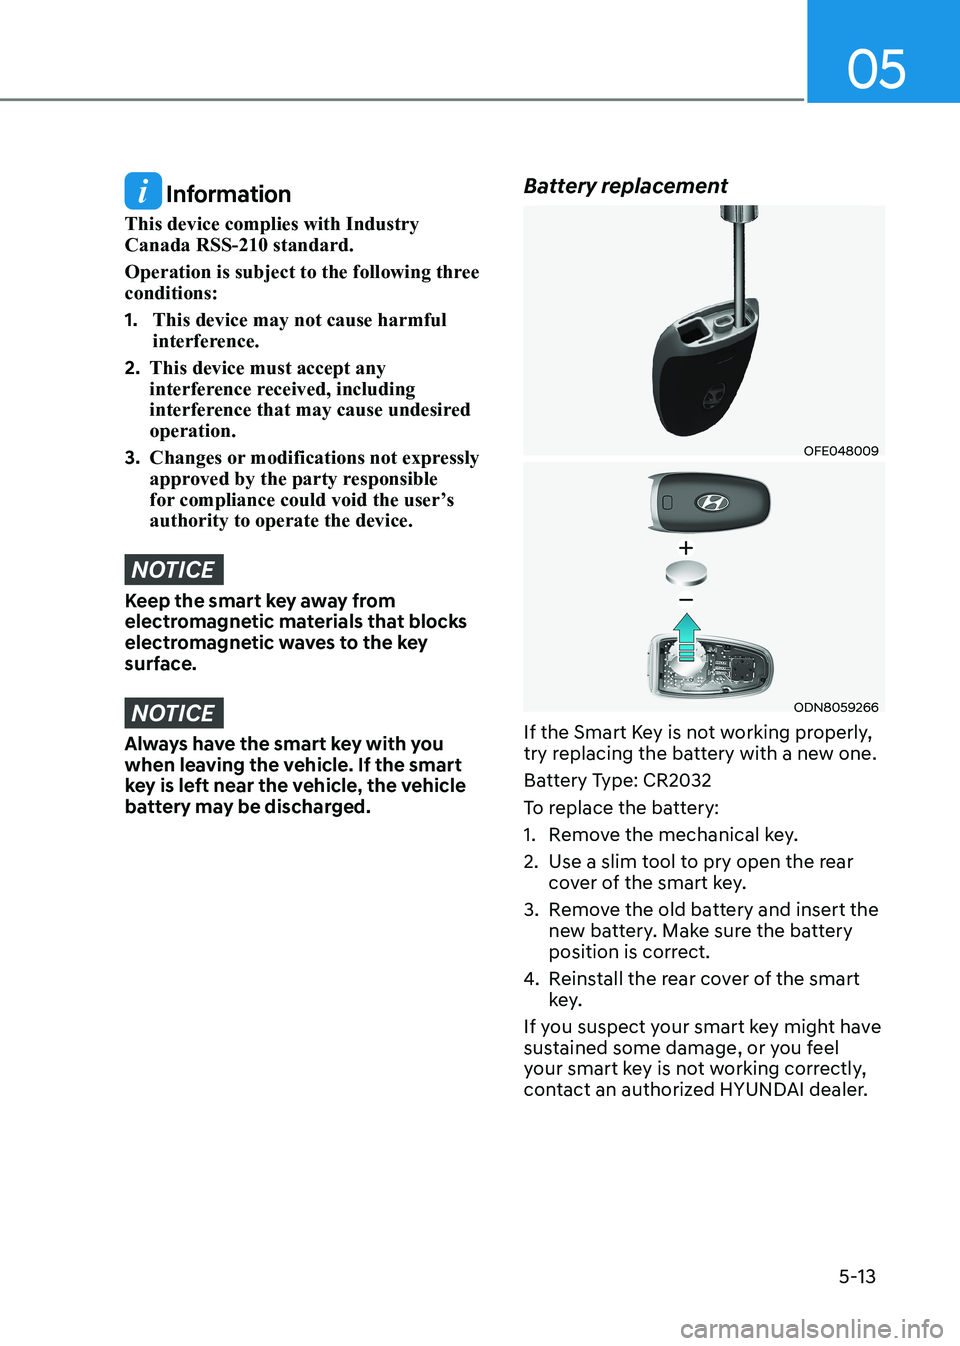
battery may be discharged. Battery replacement
OFE048009
ODN8059266
If the Smart Key is not working properly,
try replacing the battery with a new one.
Battery Type: CR2032
To replace the battery:
1. Remove the mechanical key.
2. Use a slim tool to pry open the rear cover of the smart key.
3. Remove the old battery and insert the new battery. Make sure the battery
position is correct.
4. Reinstall the rear cover of the smart
key.
If you suspect your smart key might have
sustained some damage, or you feel
your smart key is not working correctly,
contact an authorized HYUNDAI dealer.
Page 212 of 555
Convenience Features
5-66
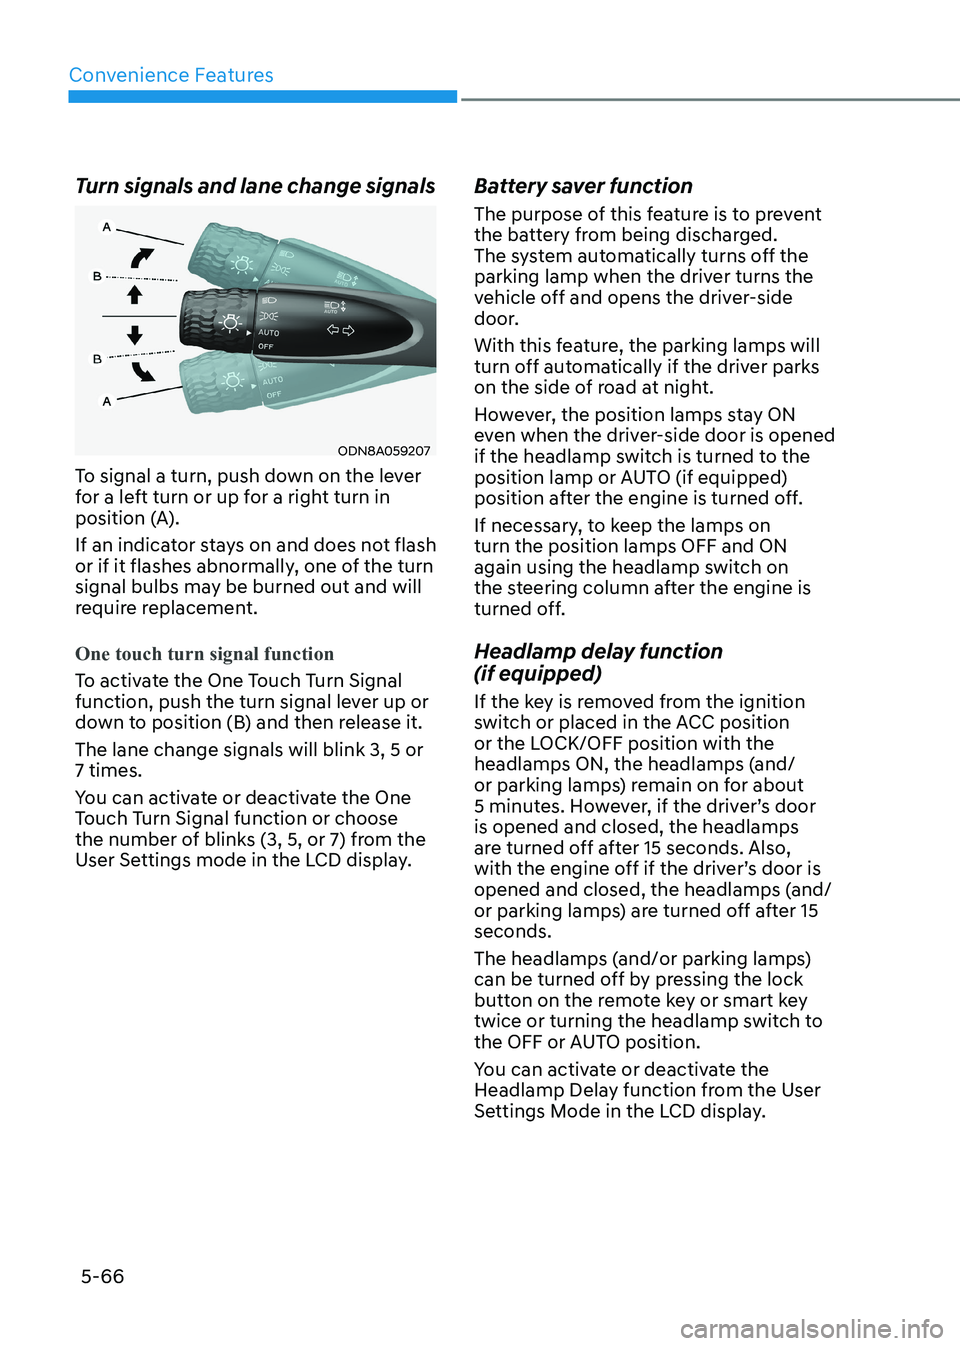
Turn signals and lane change signals
ODN8A059207
To signal a turn, push down on the lever
for a left turn or up for a right turn in
position (A).
If an indicator stays on and does not flash
or if it flashes abnormally, one of the turn
signal bulbs may be burned out and will
require replacement.
One touch turn signal function
To activate the One Touch Turn Signal
function, push the turn signal lever up or
down to position (B) and then release it. The lane change signals will blink 3, 5 or 7 times.
You can activate or deactivate the One
Touch Turn Signal function or choose
the number of blinks (3, 5, or 7) from the
User Settings mode in the LCD display. Battery saver function
The purpose of this feature is to prevent
the battery from being discharged.
The system automatically turns off the
parking lamp when the driver turns the
vehicle off and opens the driver-side
door.
With this feature, the parking lamps will
turn off automatically if the driver parks
on the side of road at night.
However, the position lamps stay ON
even when the driver-side door is opened
if the headlamp switch is turned to the
position lamp or AUTO (if equipped)
position after the engine is turned off.
If necessary, to keep the lamps on turn the position lamps OFF and ON
again using the headlamp switch on
the steering column after the engine is
turned off.
Headlamp delay function (if equipped)
If the key is removed from the ignition
switch or placed in the ACC position
or the LOCK/OFF position with the
headlamps ON, the headlamps (and/
or parking lamps) remain on for about
5 minutes. However, if the driver’s door is opened and closed, the headlamps
are turned off after 15 seconds. Also,
with the engine off if the driver’s door is
opened and closed, the headlamps (and/
or parking lamps) are turned off after 15 seconds.
The headlamps (and/or parking lamps)
can be turned off by pressing the lock
button on the remote key or smart key
twice or turning the headlamp switch to
the OFF or AUTO position.
You can activate or deactivate the
Headlamp Delay function from the User
Settings Mode in the LCD display.
Page 238 of 555
Convenience Features
5-92
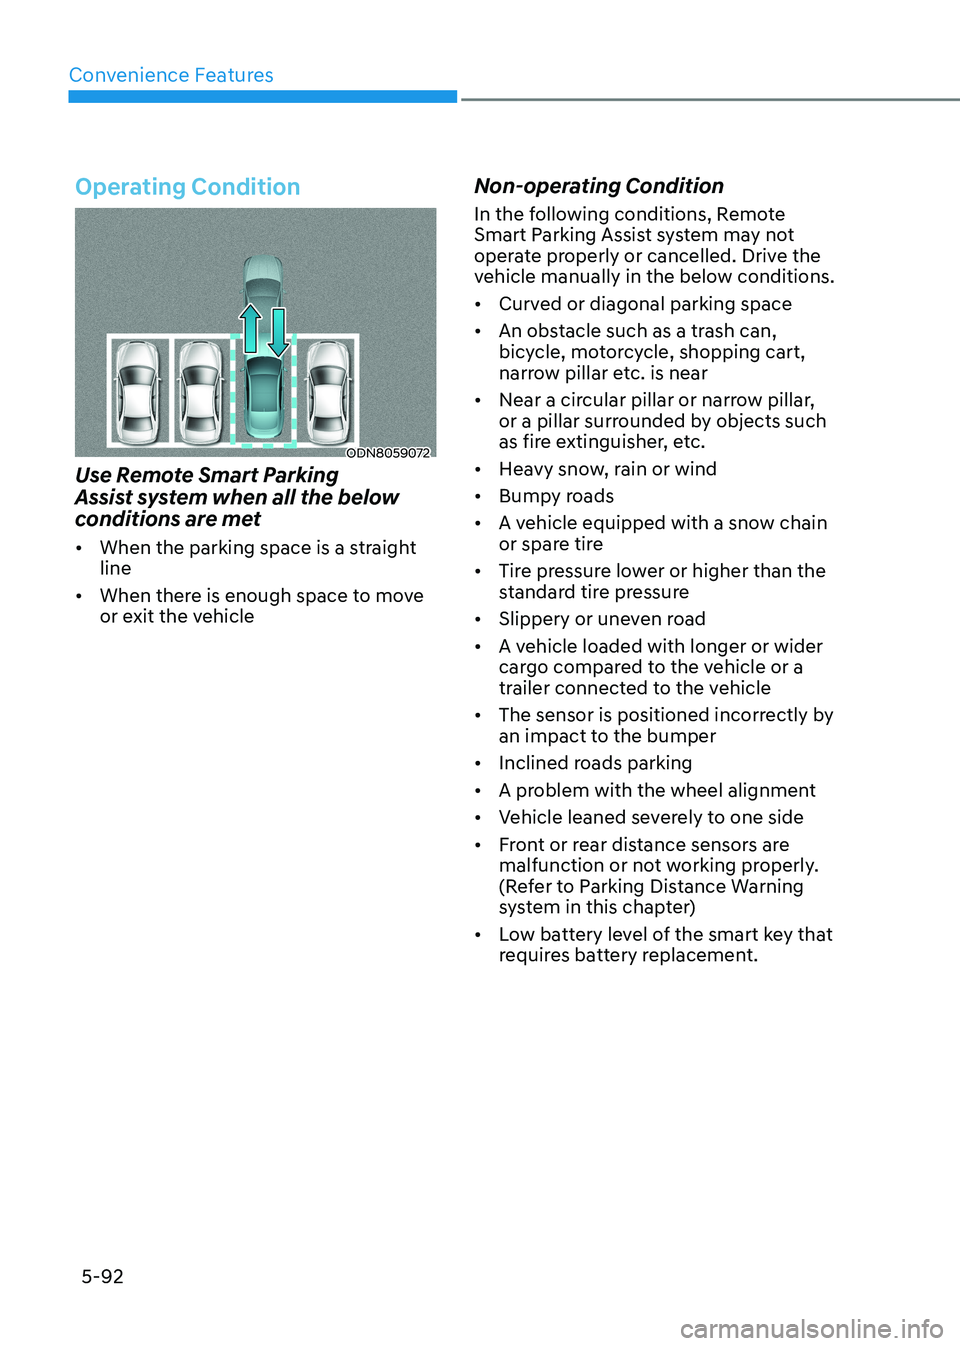
Operating Condition
ODN8059072
Use Remote Smart Parking
Assist system when all the below
conditions are met • When the parking space is a straight line
• When there is enough space to move
or exit the vehicle Non-operating Condition
In the following conditions, Remote
Smart Parking Assist system may not
operate properly or cancelled. Drive the
vehicle manually in the below conditions. •
Curved or diagonal parking space
• An obstacle such as a trash can,
bicycle, motorcycle, shopping cart,
narrow pillar etc. is near
• Near a circular pillar or narrow pillar,
or a pillar surrounded by objects such
as fire extinguisher, etc.
• Heavy snow, rain or wind
• Bumpy roads
• A vehicle equipped with a snow chain
or spare tire
• Tire pressure lower or higher than the
standard tire pressure
• Slippery or uneven road
• A vehicle loaded with longer or wider
cargo compared to the vehicle or a
trailer connected to the vehicle
• The sensor is positioned incorrectly by
an impact to the bumper
• Inclined roads parking
• A problem with the wheel alignment
• Vehicle leaned severely to one side
• Front or rear distance sensors are
malfunction or not working properly.
(Refer to Parking Distance Warning
system in this chapter)
• Low battery level of the smart key that
requires battery replacement.
Page 471 of 555
Engine Compartment .................................................................................... 8-3
Maintenance Services ................................................................................... 8-5
Owner’s Responsibility ............................................................................................ 8-5
Owner Maintenance Precautions ............................................................................ 8-5
Owner Maintenance ...................................................................................... 8-6
Owner Maintenance Schedule ................................................................................ 8-6
Scheduled Maintenance Services ................................................................ 8-8
Maintenance Schedule (Smartstream G1.6 T-GDI) ................................................8-8
Maintenance Schedule (Smartstream G2.5 GDI) ..................................................8-12
Maintenance Schedule (Smartstream G2.5 T-GDI) ...............................................8-16
Explanation of Scheduled Maintenance Items ..........................................8-20
Engine Oil ..................................................................................................... 8-23
Checking the Engine Oil Level ............................................................................... 8-23
Checking the Engine Oil and Filter ....................................................................... 8-25
Engine Coolant ............................................................................................. 8-26
Checking the Engine Coolant Level ...................................................................... 8-26
Changing Engine Coolant ...................................................................................... 8-28
Brake Fluid .................................................................................................... 8-29
Checking the Brake Fluid Level ............................................................................. 8-29
Washer Fluid ................................................................................................. 8-30
Checking the Washer Fluid Level .......................................................................... 8-30
Air Cleaner ..................................................................................................... 8-31
Filter Replacement .................................................................................................. 8-31
Climate Control Air Filter ............................................................................. 8-33
Filter Inspection...................................................................................................... 8-33
Filter Replacement ................................................................................................. 8-33
Wiper Blades ................................................................................................ 8-34
Blade Inspection .................................................................................................... 8-34
Blade Replacement ................................................................................................ 8-34
Battery .......................................................................................................... 8-36
For Best Battery Service ........................................................................................ 8-36
Battery Recharging ................................................................................................ 8-37
Reset Features ........................................................................................................ 8-37
8. Maintenance
8
Page 520 of 555
Maintenance
8-50
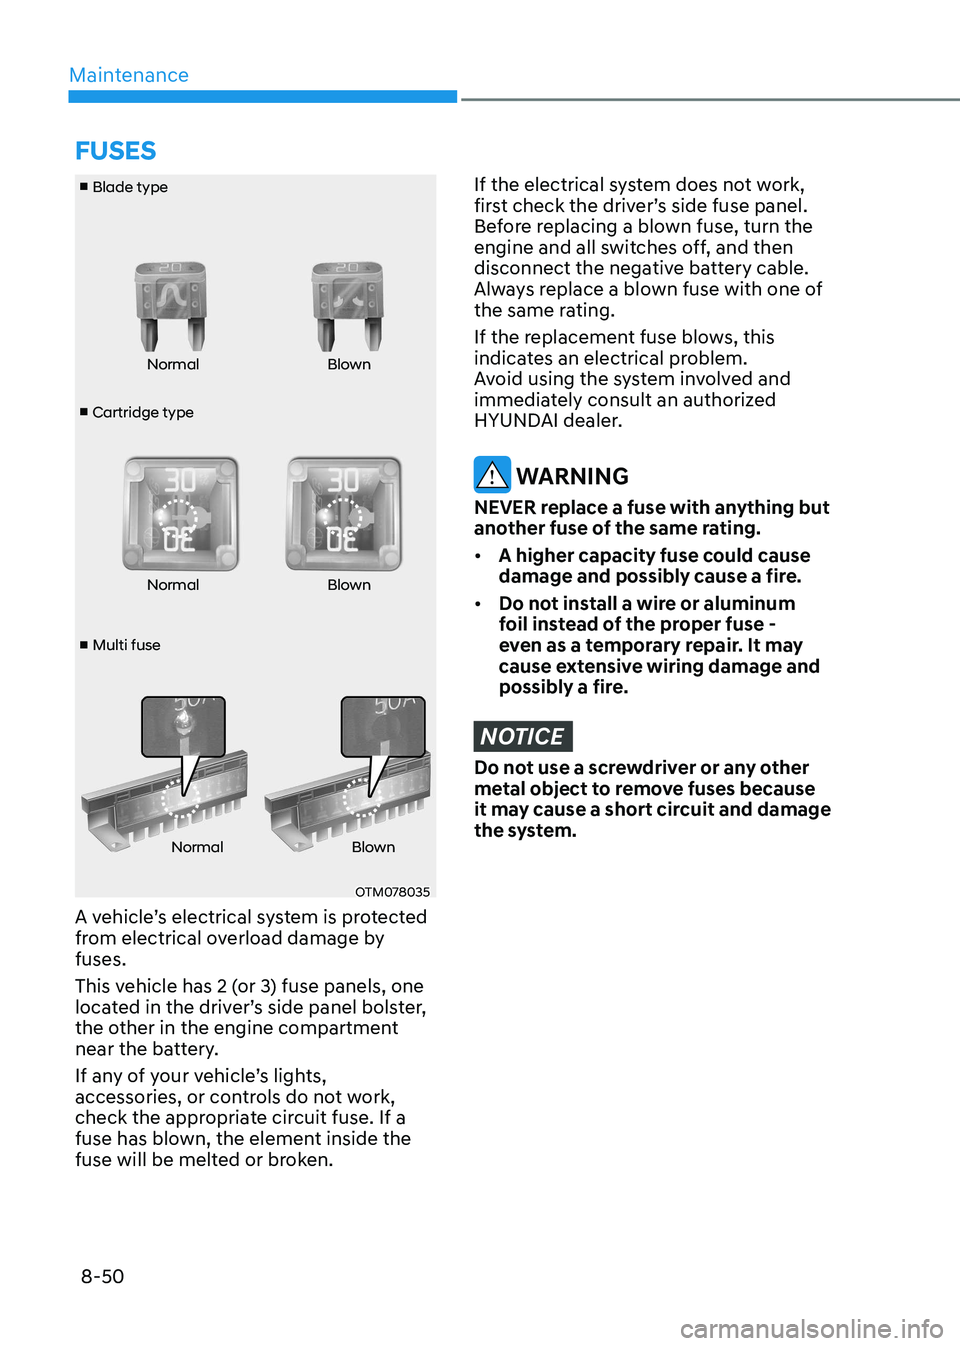
■ Cartridge type
■ Blade type
■ Multi fuse Normal Blown
Normal Blown
Normal Blown
OTM078035
A vehicle’s electrical system is protected
from electrical overload damage by fuses.
This vehicle has 2 (or 3) fuse panels, one
located in the driver’s side panel bolster,
the other in the engine compartment
near the battery.
If any of your vehicle’s lights,
accessories, or controls do not work,
check the appropriate circuit fuse. If a
fuse has blown, the element inside the
fuse will be melted or broken.
If the electrical system does not work,
first check the driver’s side fuse panel.
Before replacing a blown fuse, turn the
engine and all switches off, and then
disconnect the negative battery cable.
Always replace a blown fuse with one of
the same rating.
If the replacement fuse blows, this
indicates an electrical problem.
Avoid using the system involved and
immediately consult an authorized
HYUNDAI dealer.
WARNING
NEVER replace a fuse with anything but
another fuse of the same rating. • A higher capacity fuse could cause
damage and possibly cause a fire.
• Do not install a wire or aluminum
foil instead of the proper fuse -
even as a temporary repair. It may
cause extensive wiring damage and
possibly a fire.
NOTICE
Do not use a screwdriver or any other
metal object to remove fuses because
it may cause a short circuit and damage
the system.
fUSES
Page 522 of 555
Maintenance
8-52
Engine Compartment Panel Fuse
Replacement
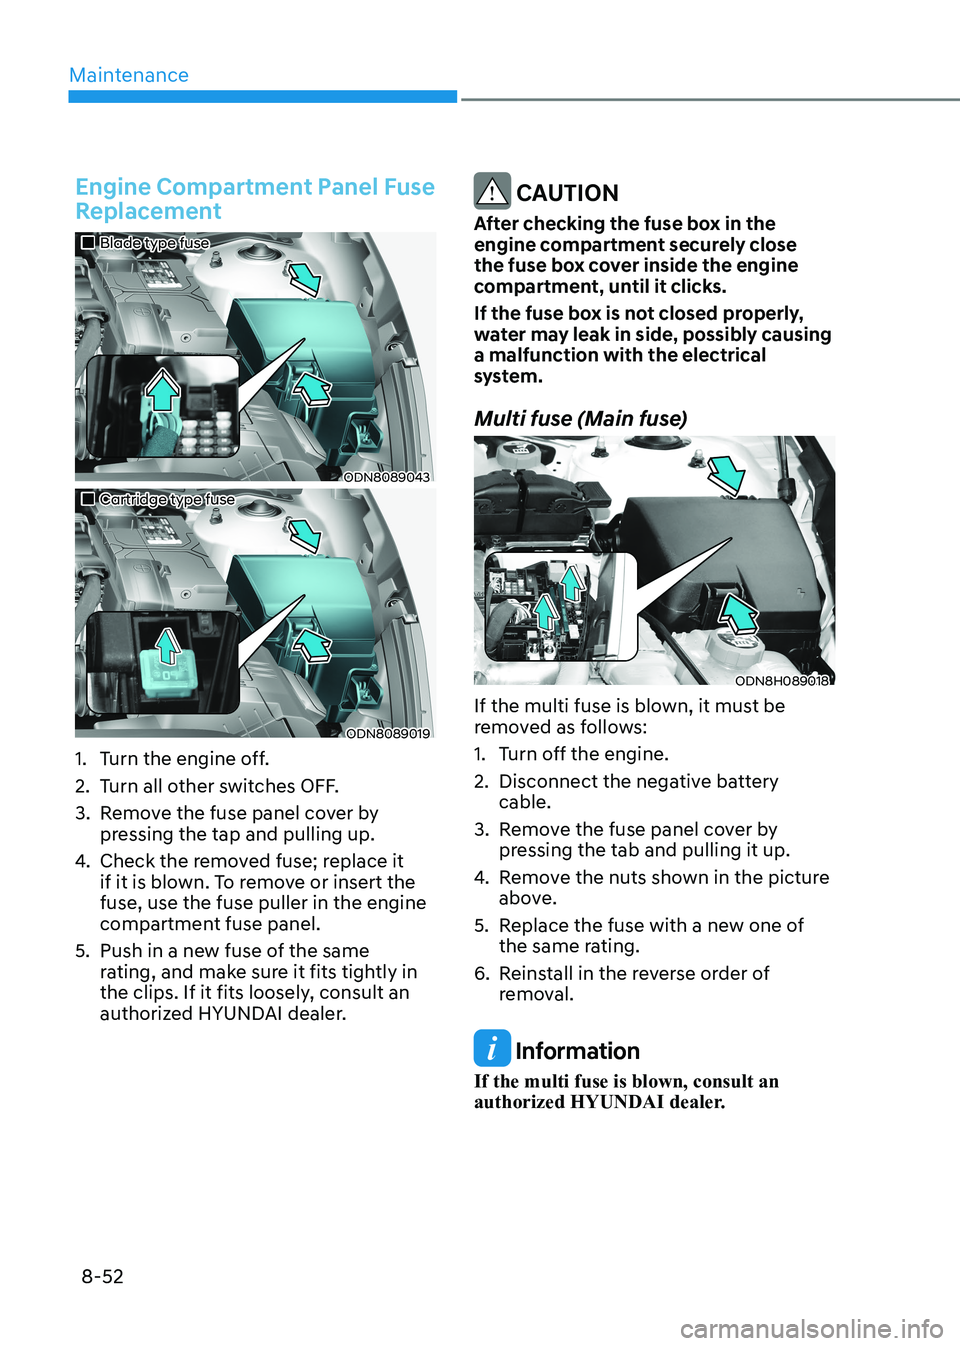
„„Blade type fuse
ODN8089043
„„Cartridge type fuse
ODN8089019
1. Turn the engine off.
2. Turn all other switches OFF.
3. Remove the fuse panel cover by pressing the tap and pulling up.
4. Check the removed fuse; replace it
if it is blown. To remove or insert the fuse, use the fuse puller in the engine
compartment fuse panel.
5. Push in a new fuse of the same rating, and make sure it fits tightly in
the clips. If it fits loosely, consult an
authorized HYUNDAI dealer.
CAUTION
After checking the fuse box in the
engine compartment securely close
the fuse box cover inside the engine
compartment, until it clicks.
If the fuse box is not closed properly,
water may leak in side, possibly causing a malfunction with the electrical
system.
Multi fuse (Main fuse)
ODN8H089018
If the multi fuse is blown, it must be
removed as follows:
1. Turn off the engine.
2. Disconnect the negative battery cable.
3. Remove the fuse panel cover by pressing the tab and pulling it up.
4. Remove the nuts shown in the picture
above.
5. Replace the fuse with a new one of the same rating.
6. Reinstall in the reverse order of removal.
Information
If the multi fuse is blown, consult an
authorized HYUNDAI dealer.