2023 HYUNDAI SONATA warning light
[x] Cancel search: warning lightPage 477 of 555
08
8 -7
While operating your vehicle: •
Note any changes in the sound of the
exhaust or any smell of exhaust fumes
in the vehicle.
• Check for vibrations in the steering
wheel. Notice if there is any increased
steering effort or looseness in the
steering wheel, or change in its
straight-ahead position.
• Notice if your vehicle constantly turns
slightly or “pulls” to one side when
traveling on smooth, level road.
• When stopping, listen and check for
unusual sounds, pulling to one side,
increased brake pedal travel or “hard-
to-push” brake pedal.
• If any slipping or changes in the
operation of your transmission occurs,
check the transmission fluid level.
• Check the automatic transmission P
(Park) function.
• Check the parking brake.
• Check for fluid leaks under your
vehicle (water dripping from the air
conditioning system during or after use is normal).
At least monthly: • Check coolant level in the engine
coolant reservoir.
• Check the operation of all exterior
lights, including the brake lights, turn
signals and hazard warning flashers.
• Check the inflation pressures of all
tires including the spare for tires that
are worn, show uneven wear, or are damaged.
• Check for loose wheel lug nuts. At least twice a year:
(i.e., every Spring and Autumn) •
Check radiator, heater and air
conditioning hoses for leaks or damage.
• Check windshield washer spray and
wiper operation. Clean wiper blades
with a clean cloth dampened with
washer a fluid.
• Check headlamp alignment.
• Check muffler, exhaust pipes, shields and clamps.
• Check the seat belts for wear and function.
At least once a year: • Clean body and door drain holes.
• Lubricate door hinges and hood hinges.
• Lubricate door and hood locks and
latches.
• Lubricate door rubber weather strips.
• Lubricate door checker.
• Check the air conditioning system.
• Inspect and lubricate automatic
transmission linkage and controls.
• Clean the battery and terminals.
• Check the brake fluid level.
Page 495 of 555
08
8-25
Checking the Engine Oil and
Filter
• Have engine oil and filter changed
by an authorized HYUNDAI dealer
according to the Maintenance
Schedule at the beginning of this
chapter.
• If the maintenance schedule to
replace engine oil is exceeded,
the engine oil performance may
deteriorate, and the engine condition
may be affected. Therefore, replace
the engine oil according to the
maintenance schedule.
• To keep the engine in optimal
condition, use the recommended
engine oil and filter. If the
recommended engine oil and filter are
not used, replace it according to the
maintenance schedule under severe usage conditions.
• The purpose of the maintenance
schedule for engine oil replacement
is to prevent oil deterioration and it is
irrelevant to oil consumption. Check
and refill engine oil regularly.
WARNING
Used engine oil may cause irritation or
cancer of the skin if left in contact with
the skin for prolonged periods of time.
Always protect your skin by washing
your hands thoroughly with soap and
warm water as soon as possible after handling used oil.
Information
When the oil pressure is low due to insufficient engine oil, the Engine
Oil Pressure (
) warning light will
illuminate. In addition, the enhanced
engine protection system, which limits
the engine’s power is activated and the
Malfunction Indicator Lamp (
) will
illuminate when the vehicle is driven in
this state continuously. When oil pressure
is restored, the Engine Oil Pressure warning light will turn off and the engine
power will no longer be limited.
However, for gasoline 2.5 turbo engine,
when the oil pressure is restored, the warning light and the enhanced engine
protection system will turn off after the
engine is restarted.
CAUTION
The engine oil is very hot immediately
after the vehicle has been driven and
can cause burns during replacement.
Replace the engine oil after the engine
oil has cooled down.
Page 507 of 555
08
8-37
Battery Recharging
WARNING
Always follow these instructions when
recharging your vehicle’s battery to
avoid the risk of SERIOUS INJURY or
DEATH from explosions or acid burns: • Before performing maintenance or
recharging the battery, turn off all
accessories and place the ignition
switch to the LOCK/OFF position.
• Keep all flames, sparks, or smoking
materials away from the battery.
• Always work outdoors or in an area
with plenty of ventilation.
• Wear eye protection when checking
the battery during charging.
• The battery must be removed from
the vehicle and placed in a well
ventilated area.
• Watch the battery during charging,
and stop or reduce the charging
rate if the battery cells begin boiling
violently.
• Vehicle is equipped with the
Absorbent Glass Mat (AGM) battery.
Do not charge the AGM battery with
a general charger. It may damage
or explode the AGM battery. Only
charge the AGM battery with a
charger that has AGM battery
setting.
• The negative battery cable must
be removed first to disconnect
the battery and installed last
to reconnect with the battery.
Disconnect the battery charger in the
following order:
1. Turn off the battery charger main
switch.
2. Unhook the negative clamp from the negative battery terminal.
3. Unhook the positive clamp from the positive battery terminal.
• Always use a genuine HYUNDAI
approved battery when you replace
the battery. By jump starting
After a jump start, idle the engine
with the headlights ON for 20-30
minutes before shutting the engine
off. The vehicle may not restart if you
shut it off before the battery had a
chance to adequately recharge. See
“Jump Starting” in chapter 7 for more
information on jump starting procedures.
Information
An inappropriately disposed battery can be harmful to
the environment and human health. Dispose of the battery
according to your local law(s) or
regulations.
Reset Features
The following items may need to be reset
after the battery has been discharged or
the battery has been disconnected. See
chapter 3 or 4 for: •
Power Windows
• Trip Computer
• Climate Control System
• Clock
• Audio System
• Sunroof
Page 520 of 555
Maintenance
8-50
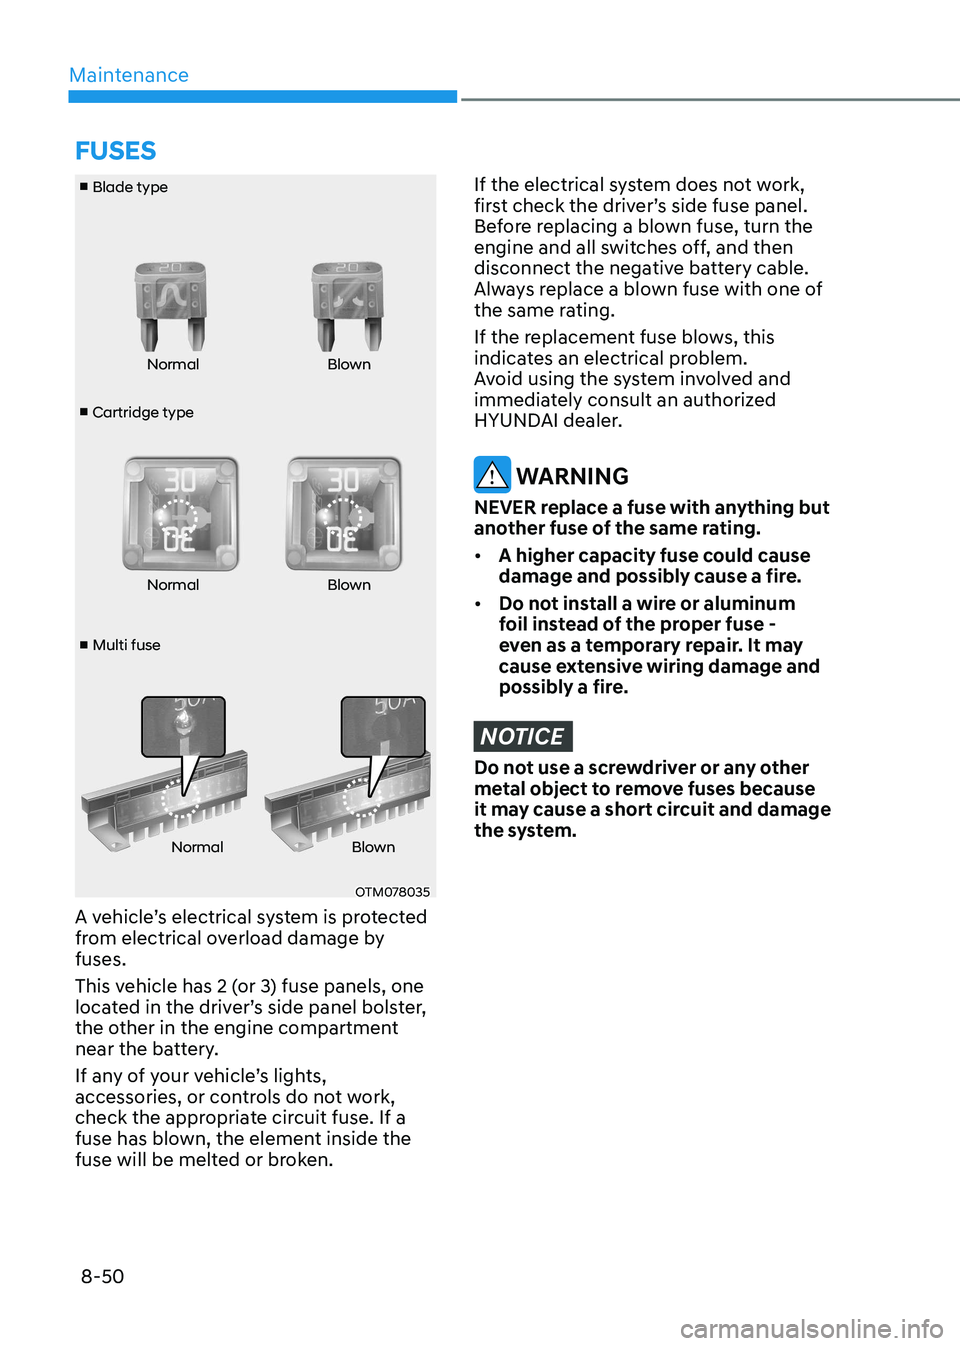
■ Cartridge type
■ Blade type
■ Multi fuse Normal Blown
Normal Blown
Normal Blown
OTM078035
A vehicle’s electrical system is protected
from electrical overload damage by fuses.
This vehicle has 2 (or 3) fuse panels, one
located in the driver’s side panel bolster,
the other in the engine compartment
near the battery.
If any of your vehicle’s lights,
accessories, or controls do not work,
check the appropriate circuit fuse. If a
fuse has blown, the element inside the
fuse will be melted or broken.
If the electrical system does not work,
first check the driver’s side fuse panel.
Before replacing a blown fuse, turn the
engine and all switches off, and then
disconnect the negative battery cable.
Always replace a blown fuse with one of
the same rating.
If the replacement fuse blows, this
indicates an electrical problem.
Avoid using the system involved and
immediately consult an authorized
HYUNDAI dealer.
WARNING
NEVER replace a fuse with anything but
another fuse of the same rating. • A higher capacity fuse could cause
damage and possibly cause a fire.
• Do not install a wire or aluminum
foil instead of the proper fuse -
even as a temporary repair. It may
cause extensive wiring damage and
possibly a fire.
NOTICE
Do not use a screwdriver or any other
metal object to remove fuses because
it may cause a short circuit and damage
the system.
fUSES
Page 528 of 555
Maintenance
8-58
Consult an authorized HYUNDAI dealer
to replace most vehicle light bulbs. It is
difficult to replace vehicle light bulbs
because other parts of the vehicle must
be removed before you can get to the
bulb. This is especially true for removing
the headlamp assembly to get to the
bulb(s).
Removing/installing the headlamp
assembly can result in damage to the
vehicle.
Information
The headlamp and tail lamp lenses could
appear frosty if the vehicle is washed after
driving or the vehicle is driven at night
in wet weather. This condition is caused
by temperature difference between the lamp inside and outside and, it does not
indicate a problem with your vehicle.
When moisture condenses in the lamp,
it will be removed after driving with the
headlamp on. The removable level may
differ depending on lamp size, lamp
position and environmental condition.
However, if moisture is not removed, we
recommend that your vehicle is inspected
by an authorized HYUNDAI dealer.
WARNING
• Prior to replacing a lamp, depress
the foot brake, move the shift button
into P (Park) apply the parking brake,
place the ignition switch to the
LOCK/OFF position, and take the key
with you when leaving the vehicle
to avoid sudden movement of the
vehicle and to prevent possible electric shock.
• Be aware the bulbs may be hot and
may burn your fingers.
Headlamp, Parking Lamp,
Daytime Running Light, Turn Signal Lamp, Cornering Lamp
and Side Marker
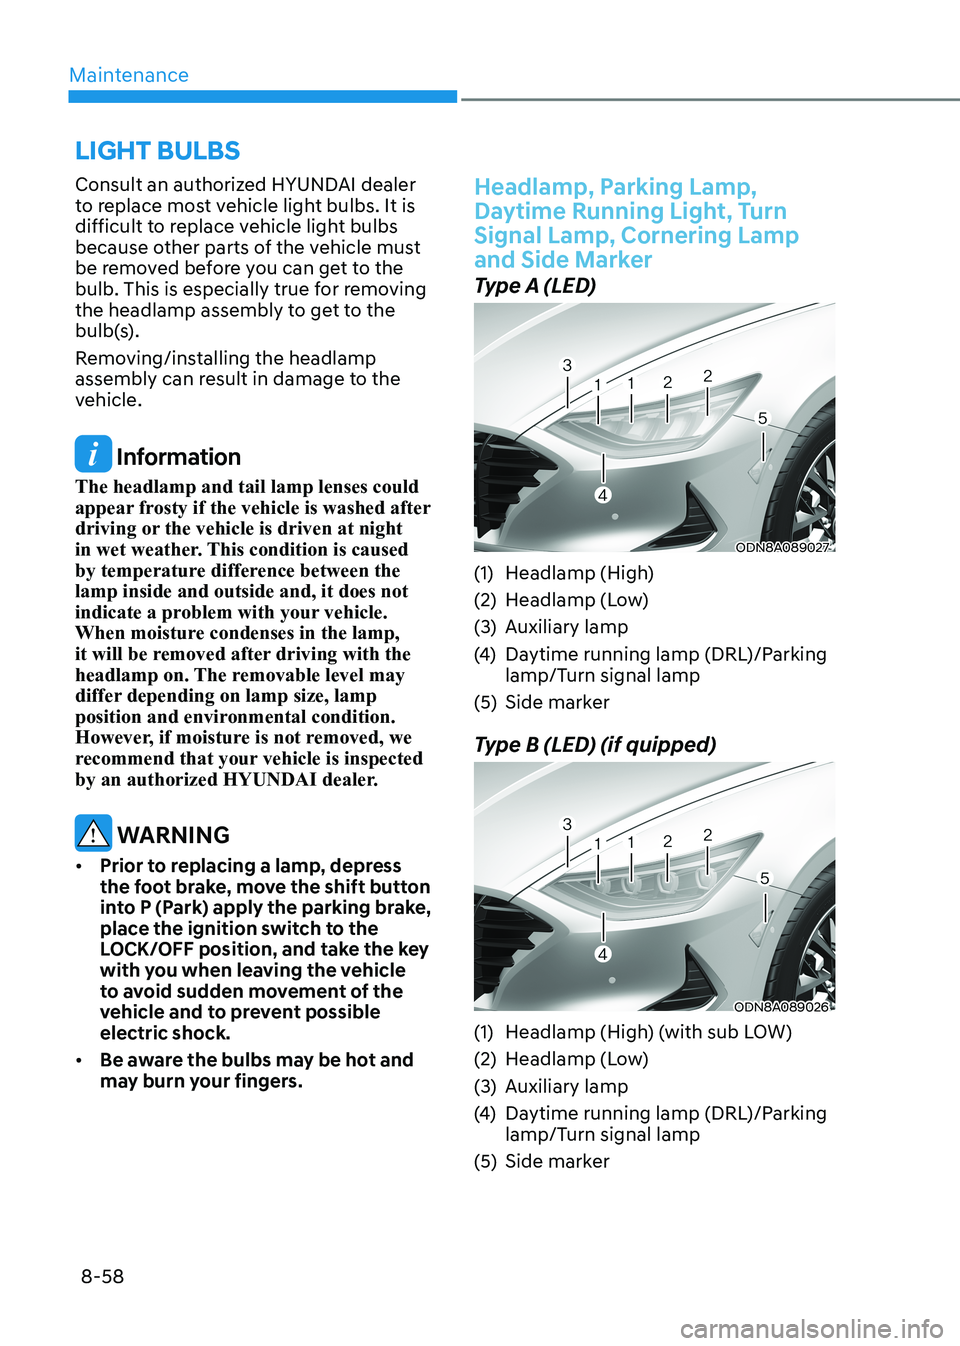
Type A (LED)
ODN8A089027
(1) Headlamp (High)
(2) Headlamp (Low)
(3) Auxiliary lamp
(4) Daytime running lamp (DRL)/Parking
lamp/Turn signal lamp
(5) Side marker
Type B (LED) (if quipped)
ODN8A089026
(1) Headlamp (High) (with sub LOW)
(2) Headlamp (Low)
(3) Auxiliary lamp
(4) Daytime running lamp (DRL)/Parking
lamp/Turn signal lamp
(5) Side marker
LigHt BULBS
Page 532 of 555
Maintenance
8-62
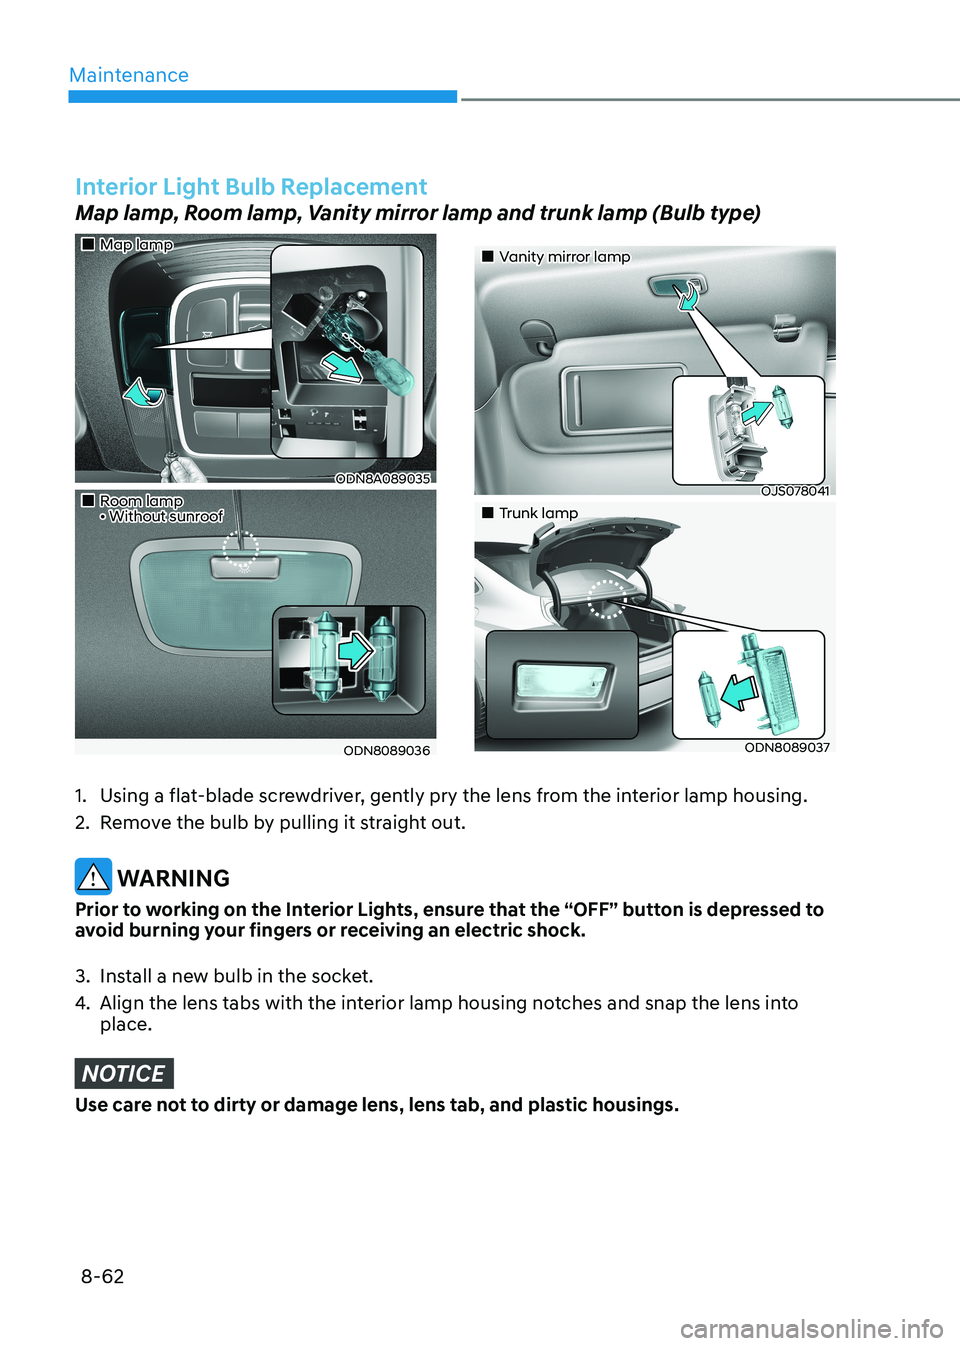
Interior Light Bulb Replacement
Map lamp, Room lamp, Vanity mirror lamp and trunk lamp (Bulb type)
„„Map lamp
ODN8A089035
„„Room lamp • Without sunroof
ODN8089036
„„Vanity mirror lamp
OJS078041
„„Trunk lamp
ODN8089037
1. Using a flat-blade screwdriver, gently pry the lens from the interior lamp housing.
2. Remove the bulb by pulling it straight out.
WARNING
Prior to working on the Interior Lights, ensure that the “OFF” button is depressed to
avoid burning your fingers or receiving an electric shock.
3. Install a new bulb in the socket.
4. Align the lens tabs with the interior lamp housing notches and snap the lens into place.
NOTICE
Use care not to dirty or damage lens, lens tab, and plastic housings.
Page 534 of 555
Maintenance
8-64
Exterior Care
Exterior general caution
It is very important to follow the label
directions when using any chemical
cleaner or polish. Read all warning and
caution statements that appear on the label.
High-pressure washing • When using high-pressure washers,
make sure to maintain sufficient
distance from the vehicle. Insufficient
clearance or excessive pressure can
lead to component damage or water
penetration.
• Do not spray the camera, sensors or
its surrounding area directly with a
high pressure washer. Shock applied
from high pressure water may cause
the device to not operate normally.
• Do not bring the nozzle tip close to
boots (rubber or plastic covers) or
connectors as they may be damaged
if they come into contact with high
pressure water.
• Do not use any high-pressure nozzles,
which induce either one-direct water
stream or water swirling.
Protecting your vehicle’s finish
Washing
To help protect your vehicle’s finish from
rust and deterioration, wash it thoroughly
and frequently at least once a month
with lukewarm or cold water.
If you use your vehicle for off-road
driving, you should wash it after each
off-road trip. Pay special attention to the
removal of any accumulation of salt, dirt,
mud, and other foreign materials. Make
sure the drain holes in the lower edges
of the doors and rocker panels are kept clear and clean.
Insects, tar, tree sap, bird droppings,
industrial pollution and similar deposits
can damage your vehicle’s finish if not
removed immediately.
Even prompt washing with plain water
may not completely remove all these
deposits. A mild soap, safe for use on
painted surfaces, should be used.
After washing, rinse the vehicle
thoroughly with lukewarm or cold water.
Do not allow soap to dry on the finish.
WARNING
After washing the vehicle, test the
brakes while driving slowly to see
if they have been affected by water
before getting on the road. If braking
performance is impaired, dry the
brakes by applying them lightly while
maintaining a slow forward speed.
NOTICE
• Do not use strong soap, chemical
detergents or hot water, and do not
wash the vehicle in direct sunlight
or when the body of the vehicle is
warm.
• Be careful when washing the side
windows of your vehicle.
Especially, with high-pressure water,
water may leak through the windows
and wet the interior.
• To prevent damage to the plastic
parts, do not clean with chemical
solvents or strong detergents.
appEaranCE CarE
Page 536 of 555
Maintenance
8-66
Repairing your vehicle’s finish
Deep scratches or stone chips in the
painted surface must be repaired
promptly. Exposed metal will quickly
rust and may develop into a major repair
expense.
NOTICE
If your vehicle is damaged and requires
any metal repair or replacement,
be sure the body shop applies anti-
corrosion materials to the parts
repaired or replaced.
NOTICE
Matte paint finish vehicle (if equipped)
In case of matte paint finish vehicles,
it is impossible to modify only the
damaged area and repair of the whole
part is necessary. If the vehicle is
damaged and painting is required,
we recommend that you have your
vehicle maintained and repaired by
an authorized HYUNDAI dealer. Take
extreme care, as it is difficult to restore
the quality after the repair.
Bright-metal maintenance • To remove road tar and insects, use
a tar remover, not a scraper or other sharp object.
• To protect the surfaces of bright metal
parts from corrosion, apply a coating
of wax or chrome preservative and rub
to a high luster.
• During winter weather or in coastal
areas, cover the bright metal parts
with a heavier coating of wax or
preservative. If necessary, coat the
parts with non-corrosive petroleum
jelly or other protective compound. Underbody maintenance
Corrosive materials used for ice and
snow removal and dust control may
collect on the underbody. If these
materials are not removed, accelerated
rusting can occur on underbody parts
such as the fuel lines, frame, floor pan
and exhaust system, even though they
have been treated with rust protection.
Thoroughly flush the vehicle underbody
and wheel openings with lukewarm or
cold water once a month, after off-road
driving and at the end of each winter. Pay
special attention to these areas because
it is difficult to see all the mud and dirt.
It will do more harm than good to wet
down the road grime without removing
it. The lower edges of doors, rocker
panels, and frame members have drain
holes that should not be allowed to clog
with dirt; trapped water in these areas
can cause rusting.
WARNING
After washing the vehicle, test the
brakes while driving slowly to see if
they have been affected by water. If
braking performance is impaired, dry
the brakes by applying them lightly
while maintaining a slow forward speed.
Aluminum wheel maintenance
The aluminum wheels are coated with a
clear protective finish.