Page 90 of 548
03
3-11
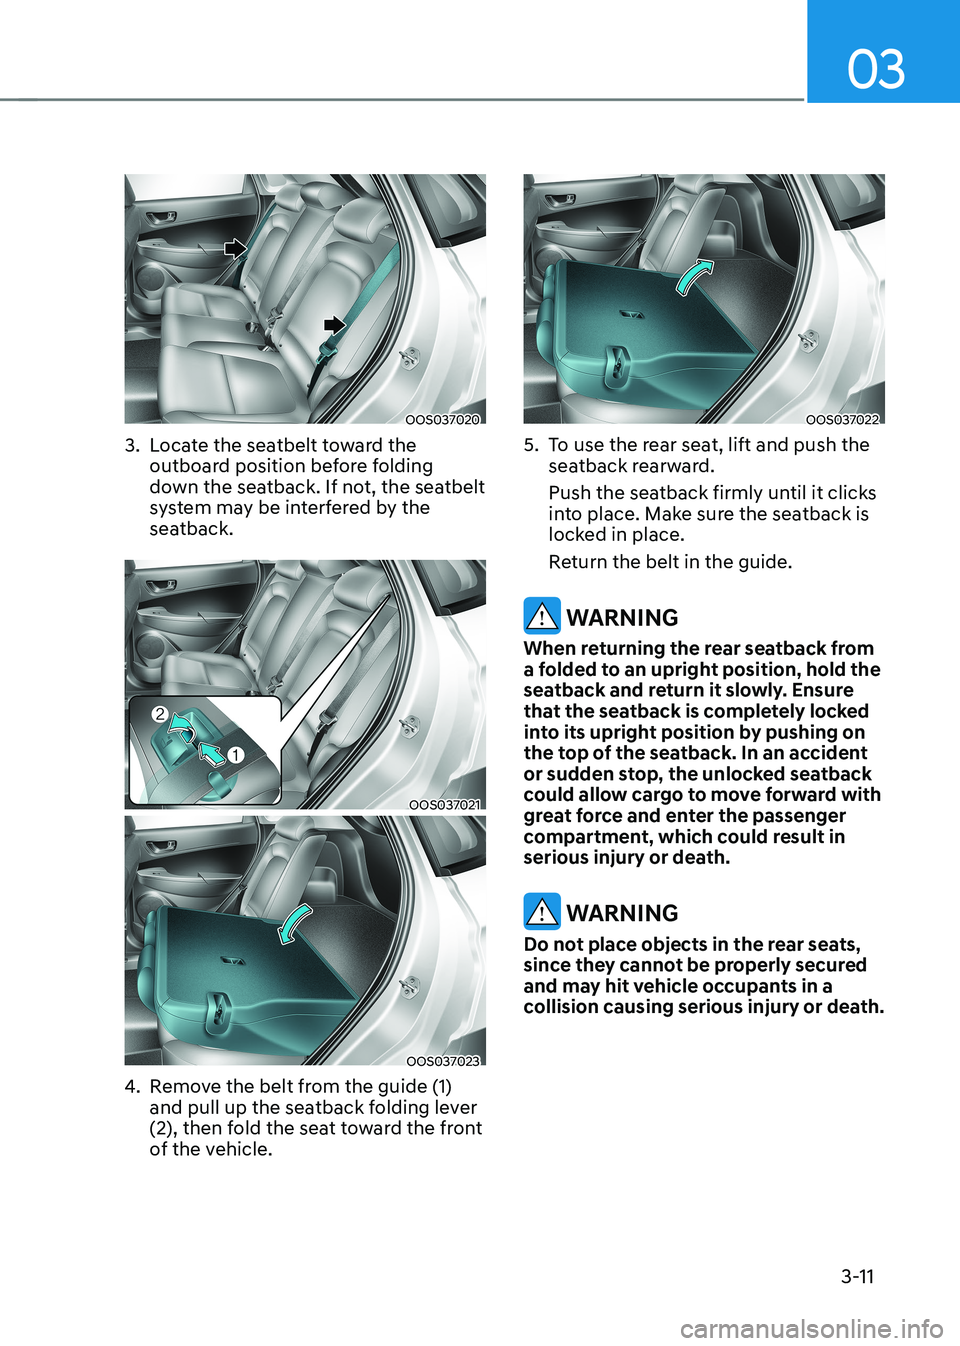
OOS037020
3. Locate the seatbelt toward the outboard position before folding
down the seatback. If not, the seatbelt
system may be interfered by the
seatback.
OOS037021
OOS037023
4. Remove the belt from the guide (1)
and pull up the seatback folding lever
(2), then fold the seat toward the front
of the vehicle.
OOS037022
5. To use the rear seat, lift and push the seatback rearward.
Push the seatback firmly until it clicks
into place. Make sure the seatback is
locked in place.
Return the belt in the guide.
WARNING
When returning the rear seatback from
a folded to an upright position, hold the
seatback and return it slowly. Ensure
that the seatback is completely locked
into its upright position by pushing on
the top of the seatback. In an accident
or sudden stop, the unlocked seatback
could allow cargo to move forward with
great force and enter the passenger
compartment, which could result in
serious injury or death.
WARNING
Do not place objects in the rear seats,
since they cannot be properly secured
and may hit vehicle occupants in a
collision causing serious injury or death.
Page 92 of 548
03
3-13
Headrest
The vehicle’s front and rear seats have
adjustable headrests. The headrests
provide comfort for passengers, but
more importantly they are designed to
help protect passengers from whiplash
and other neck and spinal injuries during
an accident, especially in a rear impact collision.
WARNING
To reduce the risk of serious injury or
death in an accident, take the following
precautions when adjusting your
headrests: • Always properly adjust the headrests
for all passengers BEFORE starting
the vehicle.
• NEVER let anyone ride in a seat with
the headrest removed or reversed.
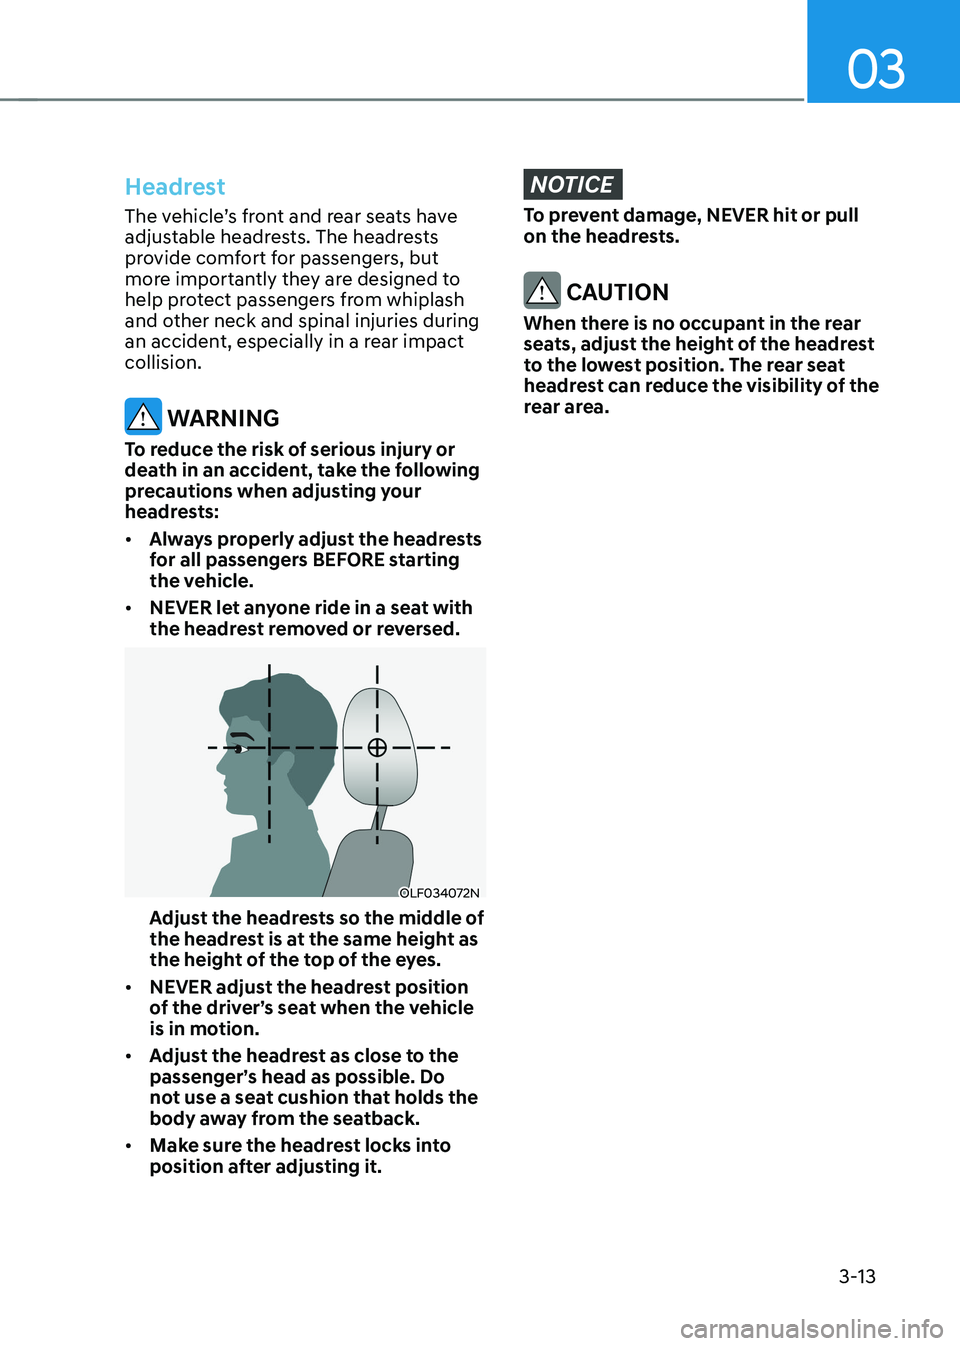
OLF034072N
Adjust the headrests so the middle of
the headrest is at the same height as
the height of the top of the eyes.
• NEVER adjust the headrest position
of the driver’s seat when the vehicle
is in motion.
• Adjust the headrest as close to the
passenger’s head as possible. Do
not use a seat cushion that holds the
body away from the seatback.
• Make sure the headrest locks into
position after adjusting it.
NOTICE
To prevent damage, NEVER hit or pull
on the headrests.
CAUTION
When there is no occupant in the rear
seats, adjust the height of the headrest
to the lowest position. The rear seat
headrest can reduce the visibility of the
rear area.
Page 95 of 548
Safety system
3-16
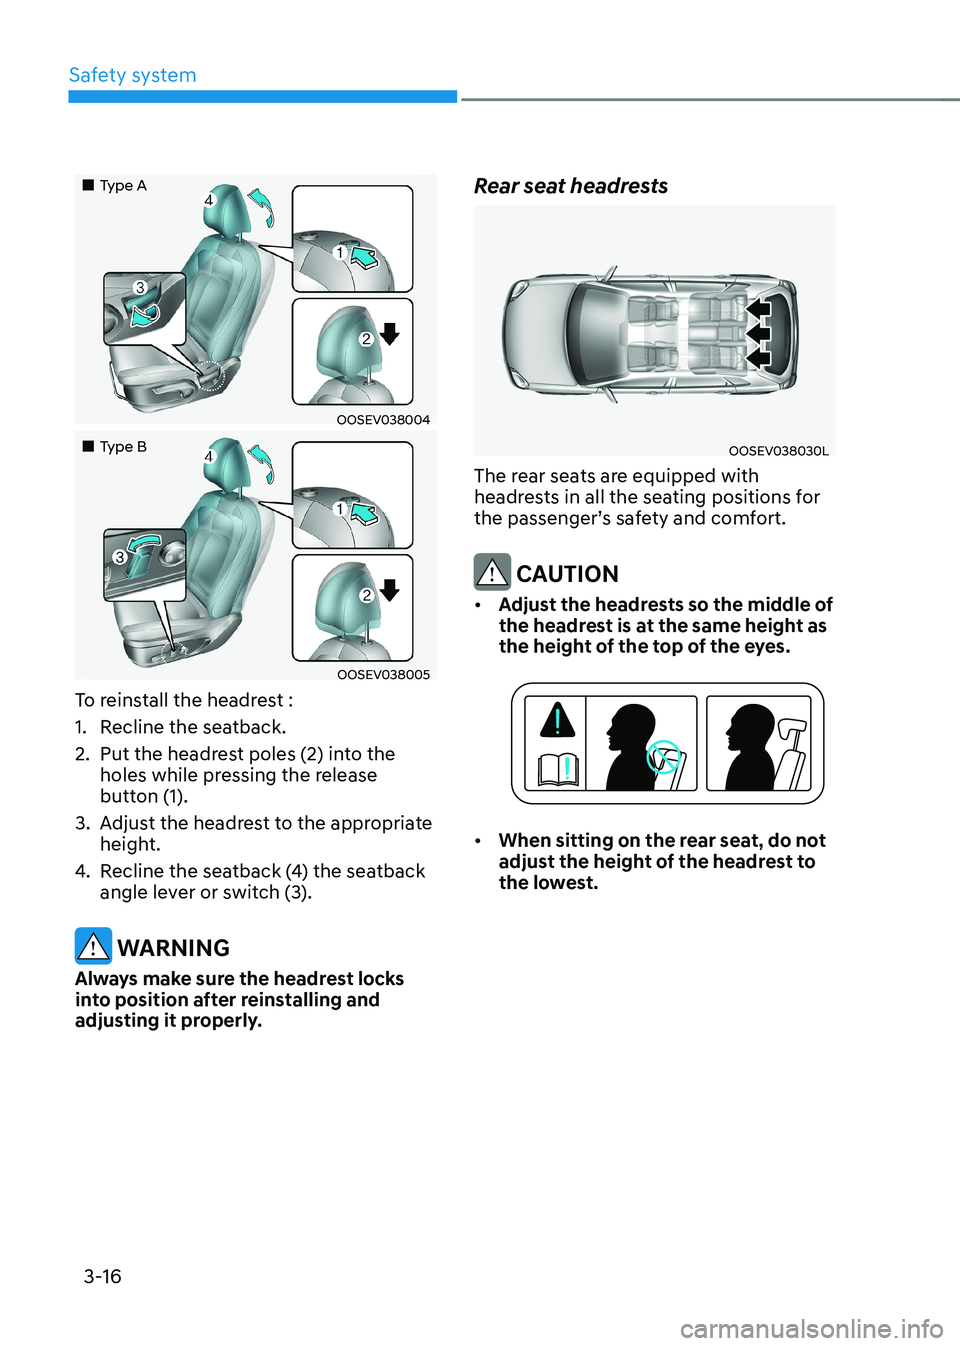
„„Type A
OOSEV038004
„„Type B
OOSEV038005
To reinstall the headrest :
1. Recline the seatback.
2. Put the headrest poles (2) into the holes while pressing the release
button (1).
3. Adjust the headrest to the appropriate height.
4. Recline the seatback (4) the seatback
angle lever or switch (3).
WARNING
Always make sure the headrest locks
into position after reinstalling and
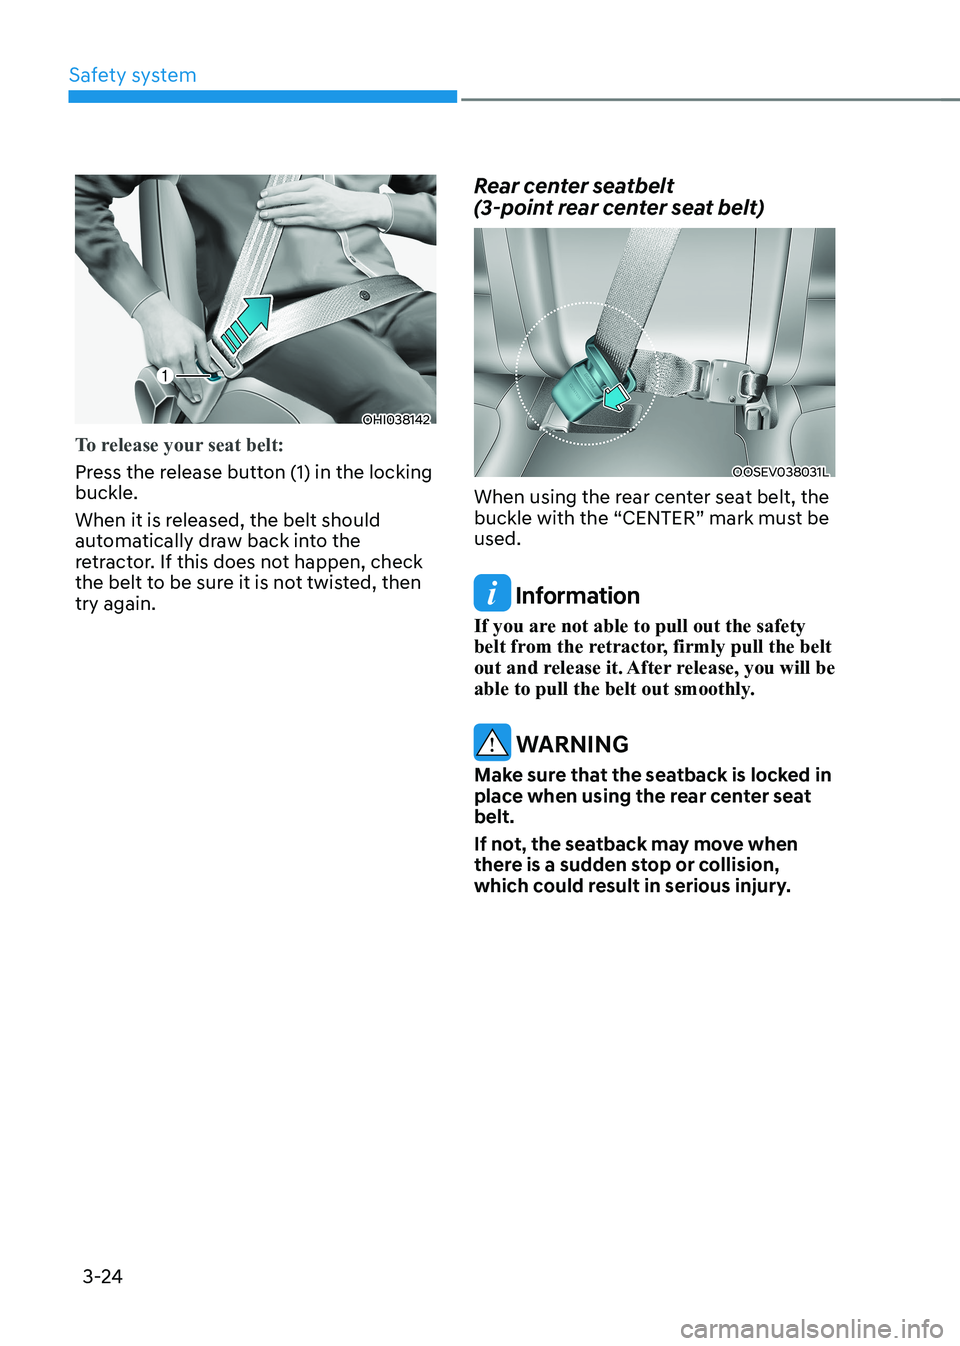
adjusting it properly. Rear seat headrests
OOSEV038030L
The rear seats are equipped with
headrests in all the seating positions for
the passenger’s safety and comfort.
CAUTION
• Adjust the headrests so the middle of
the headrest is at the same height as
the height of the top of the eyes.
• When sitting on the rear seat, do not
adjust the height of the headrest to
the lowest.
Page 96 of 548
03
3-17
OOS037018
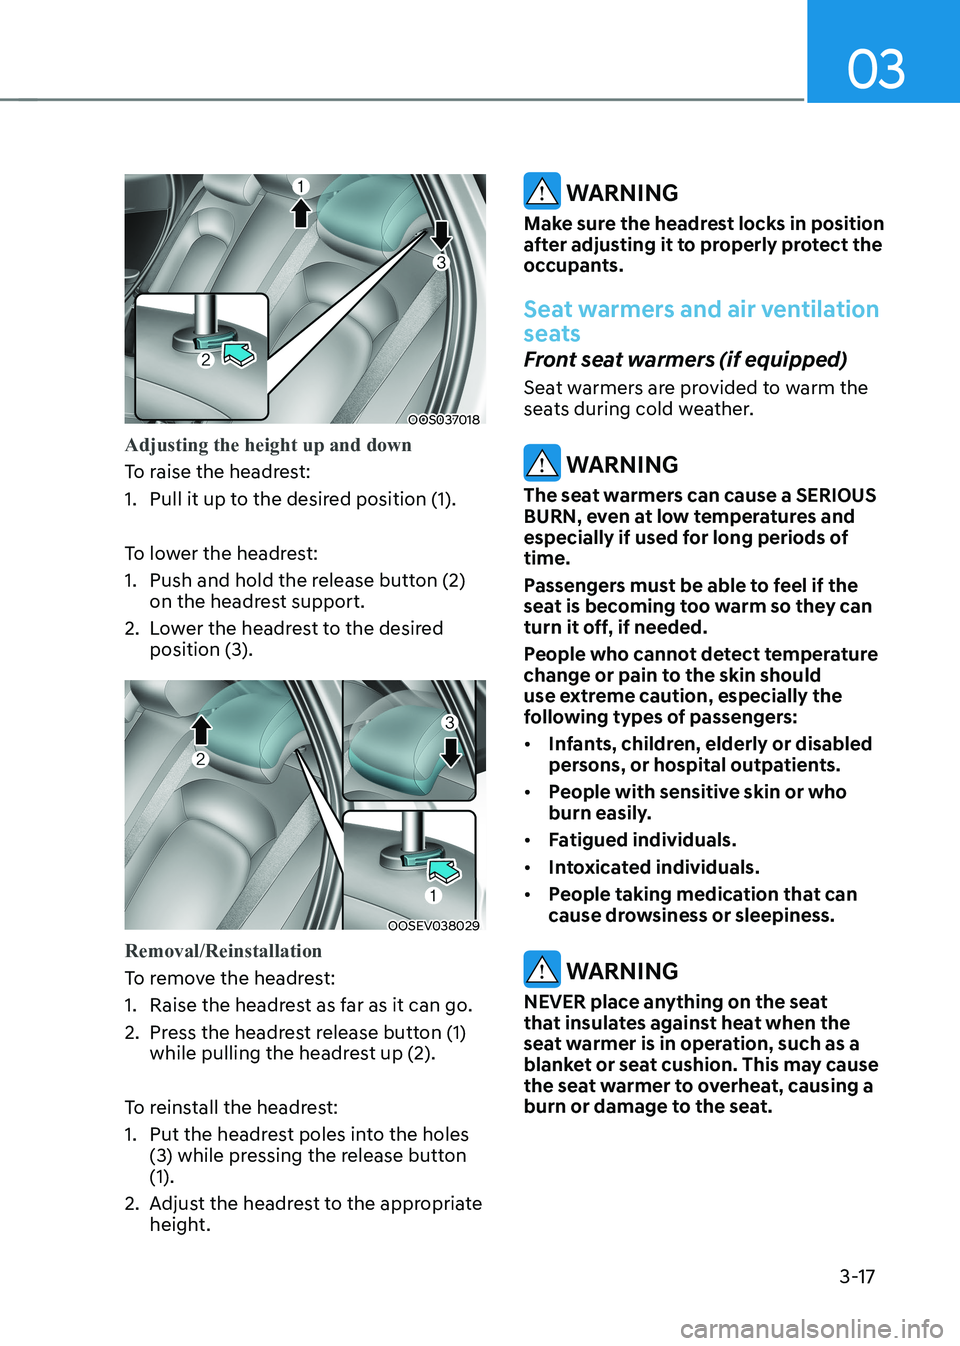
Adjusting the height up and down
To raise the headrest:
1. Pull it up to the desired position (1).
To lower the headrest:
1. Push and hold the release button (2) on the headrest support.
2. Lower the headrest to the desired position (3).
OOSEV038029
Removal/Reinstallation
To remove the headrest:
1. Raise the headrest as far as it can go.
2. Press the headrest release button (1) while pulling the headrest up (2).
To reinstall the headrest:
1. Put the headrest poles into the holes (3) while pressing the release button (1).
2. Adjust the headrest to the appropriate height.
WARNING
Make sure the headrest locks in position
after adjusting it to properly protect the
occupants.
Seat warmers and air ventilation
seats
Front seat warmers (if equipped)
Seat warmers are provided to warm the
seats during cold weather.
WARNING
The seat warmers can cause a SERIOUS
BURN, even at low temperatures and
especially if used for long periods of time.
Passengers must be able to feel if the
seat is becoming too warm so they can
turn it off, if needed.
People who cannot detect temperature
change or pain to the skin should
use extreme caution, especially the
following types of passengers: • Infants, children, elderly or disabled
persons, or hospital outpatients.
• People with sensitive skin or who
burn easily.
• Fatigued individuals.
• Intoxicated individuals.
• People taking medication that can
cause drowsiness or sleepiness.
WARNING
NEVER place anything on the seat
that insulates against heat when the
seat warmer is in operation, such as a
blanket or seat cushion. This may cause
the seat warmer to overheat, causing a
burn or damage to the seat.
Page 98 of 548
03
3-19
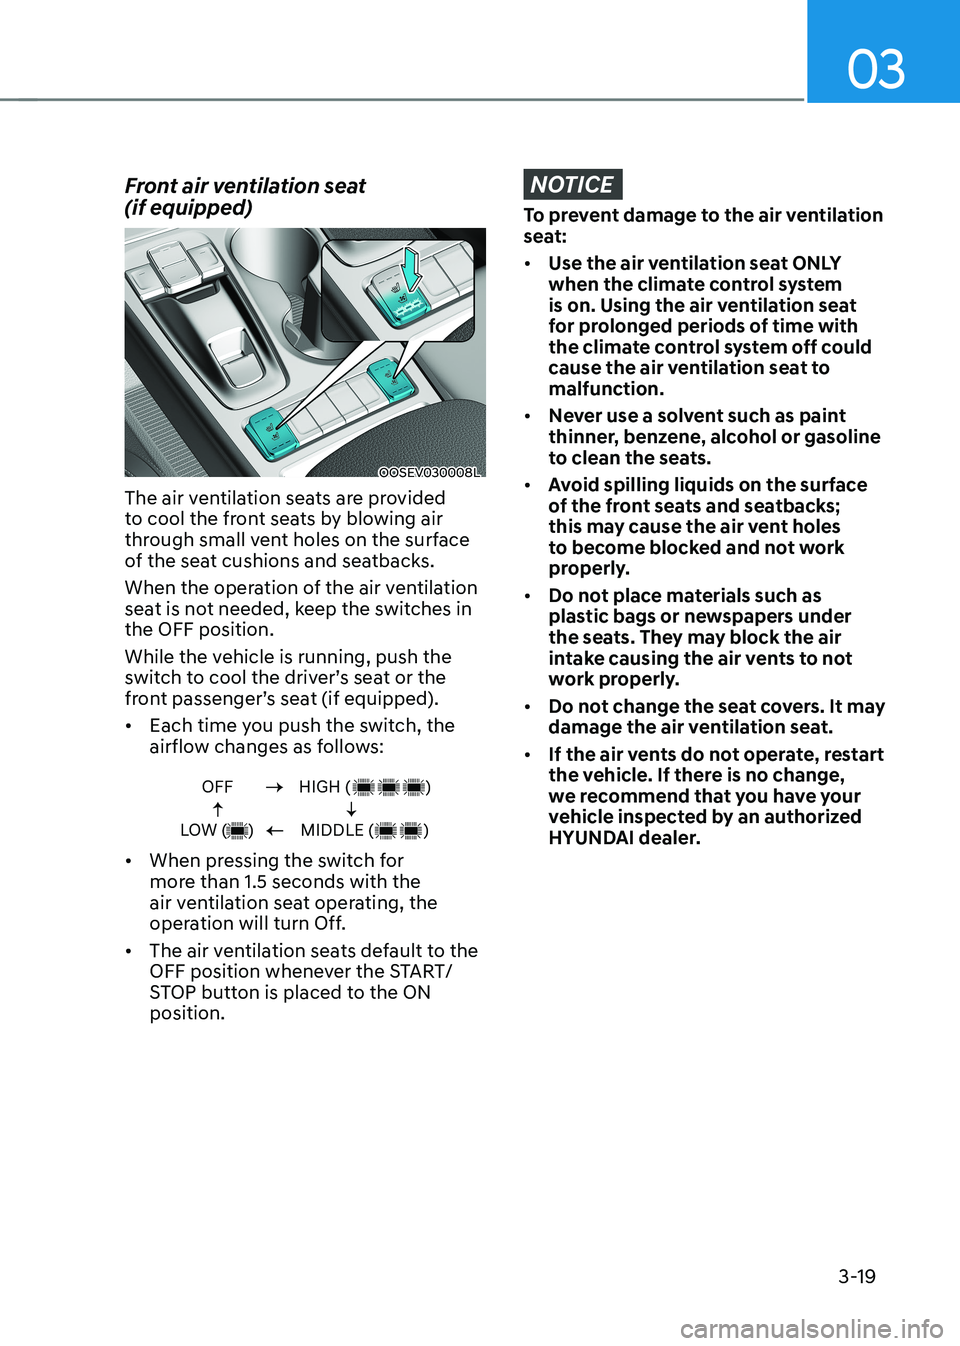
Front air ventilation seat (if equipped)
OOSEV030008L
The air ventilation seats are provided
to cool the front seats by blowing air
through small vent holes on the surface
of the seat cushions and seatbacks.
When the operation of the air ventilation
seat is not needed, keep the switches in the OFF position.
While the vehicle is running, push the
switch to cool the driver’s seat or the
front passenger’s seat (if equipped). • Each time you push the switch, the
airflow changes as follows:
OFF
LOW ( )HIGH ( )
MIDDLE ( )
• When pressing the switch for
more than 1.5 seconds with the
air ventilation seat operating, the
operation will turn Off.
• The air ventilation seats default to the
OFF position whenever the START/
STOP button is placed to the ON position.
NOTICE
To prevent damage to the air ventilation
seat: • Use the air ventilation seat ONLY
when the climate control system
is on. Using the air ventilation seat
for prolonged periods of time with
the climate control system off could
cause the air ventilation seat to malfunction.
• Never use a solvent such as paint
thinner, benzene, alcohol or gasoline
to clean the seats.
• Avoid spilling liquids on the surface
of the front seats and seatbacks;
this may cause the air vent holes
to become blocked and not work
properly.
• Do not place materials such as
plastic bags or newspapers under
the seats. They may block the air
intake causing the air vents to not
work properly.
• Do not change the seat covers. It may
damage the air ventilation seat.
• If the air vents do not operate, restart
the vehicle. If there is no change,
we recommend that you have your
vehicle inspected by an authorized
HYUNDAI dealer.
Page 101 of 548
Safety system
3-22
WARNING
Riding in an improper position
adversely affects the front passenger’s
seat belt warning system. It is important
for the driver to instruct the passenger
to properly be seated as instructed in this manual.
Information
• You can find the front passenger’s seat
belt warning light on the center fascia panel.
• Although the front passenger seat is not occupied, the seat belt warning light
will blink or illuminate for 6 seconds.
• The front passenger’s seat belt warning may operate when luggage is placed on
the front passenger seat.
Seat belt restraint system
Lap/shoulder belt
OHI038140
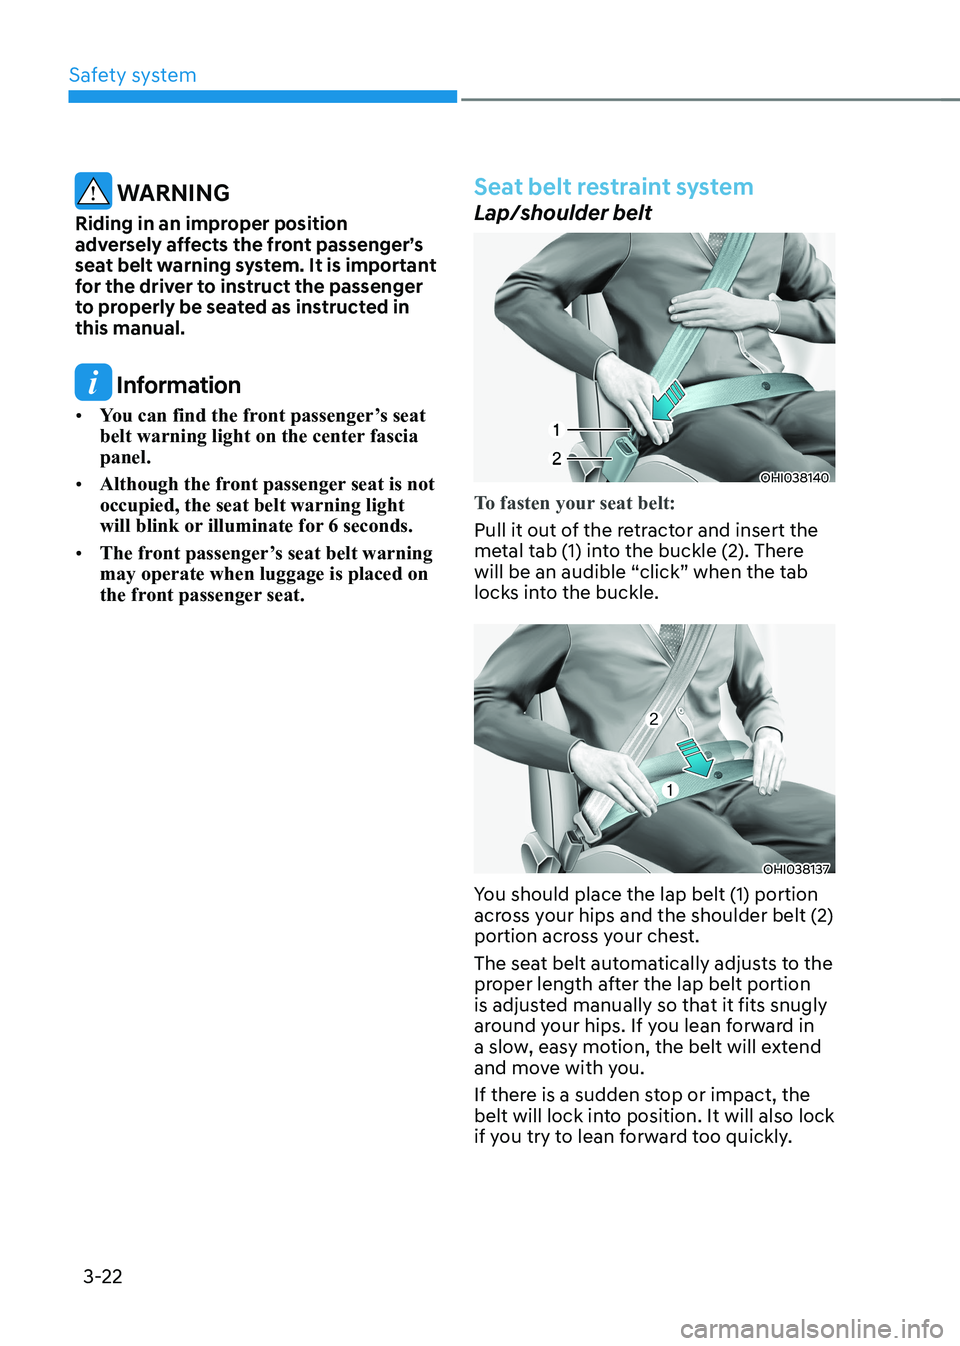
To fasten your seat belt:
Pull it out of the retractor and insert the
metal tab (1) into the buckle (2). There
will be an audible “click” when the tab
locks into the buckle.
OHI038137
You should place the lap belt (1) portion
across your hips and the shoulder belt (2)
portion across your chest.
The seat belt automatically adjusts to the
proper length after the lap belt portion
is adjusted manually so that it fits snugly
around your hips. If you lean forward in
a slow, easy motion, the belt will extend
and move with you.
If there is a sudden stop or impact, the
belt will lock into position. It will also lock
if you try to lean forward too quickly.
Page 102 of 548
03
3-23
NOTICE
If you are not able to smoothly pull
enough of the seat belt out from the
retractor, firmly pull the seat belt out
and release it. After release, you will be
able to pull the belt out smoothly.
OHI038182L
WARNING
Improperly positioned seat belts may
increase the risk of serious injury
in an accident. Take the following
precautions when adjusting the seat belt: • Position the lap portion of the seat
belt as low as possible across your
hips, not on your waist, so that it
fits snugly. This allows your strong
pelvic bones to absorb the force of
the crash, reducing the chance of
internal injuries.
• Position one arm under the shoulder
belt and the other over the belt, as
shown in the illustration.
• Always position the shoulder belt
anchor into the locked position at the
appropriate height.
• Never position the shoulder belt
across your neck or face.
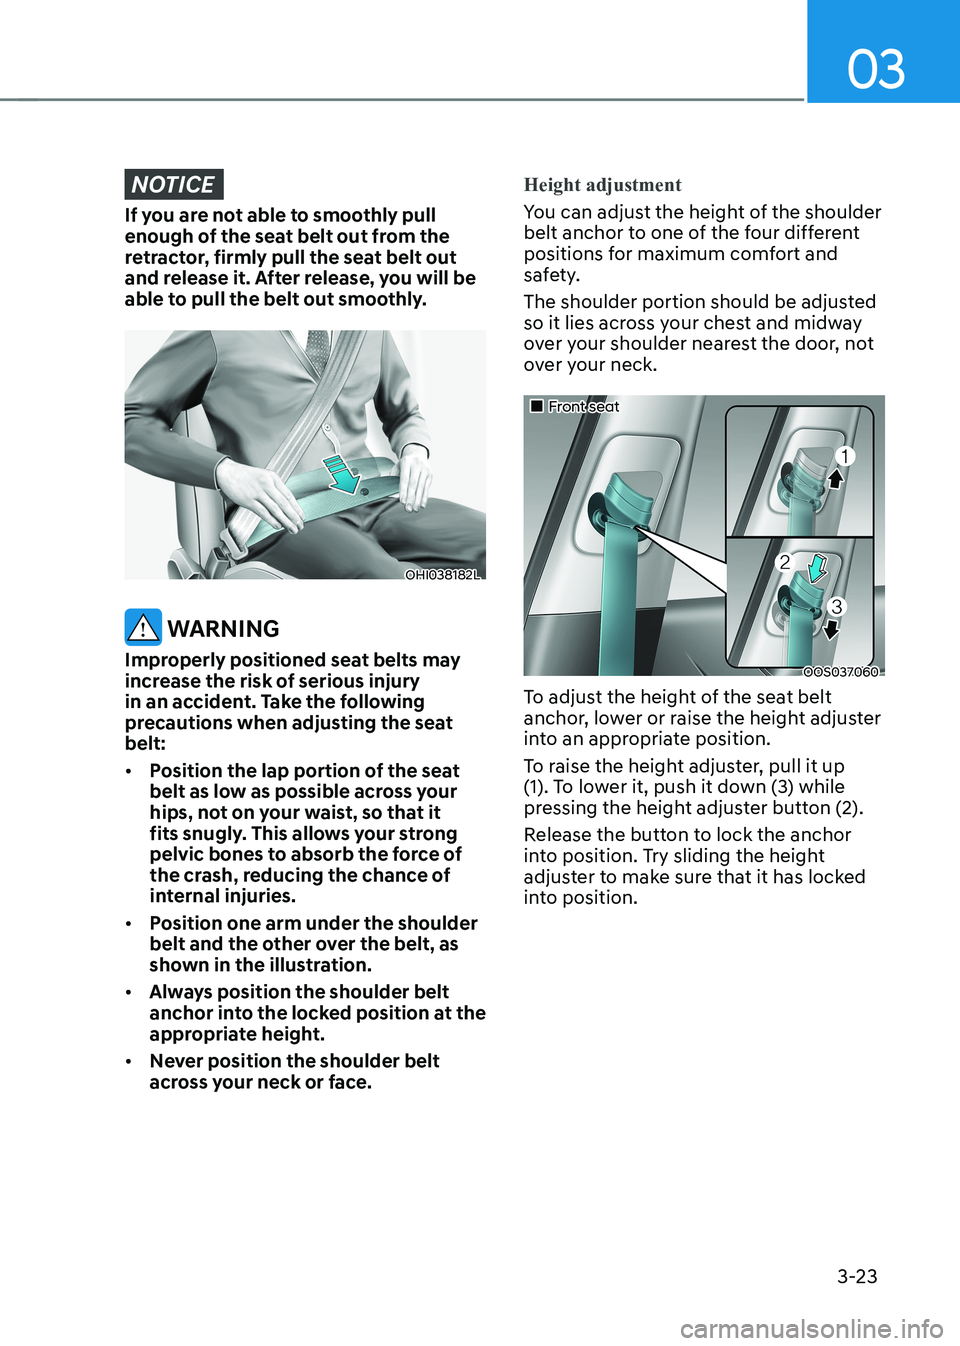
Height adjustment
You can adjust the height of the shoulder
belt anchor to one of the four different
positions for maximum comfort and
safety.
The shoulder portion should be adjusted
so it lies across your chest and midway
over your shoulder nearest the door, not
over your neck.
„„Front seat
OOS037060
To adjust the height of the seat belt
anchor, lower or raise the height adjuster
into an appropriate position.
To raise the height adjuster, pull it up
(1). To lower it, push it down (3) while
pressing the height adjuster button (2).
Release the button to lock the anchor
into position. Try sliding the height
adjuster to make sure that it has locked
into position.
Page 103 of 548
Safety system
3-24
OHI038142
To release your seat belt:
Press the release button (1) in the locking buckle.
When it is released, the belt should
automatically draw back into the
retractor. If this does not happen, check
the belt to be sure it is not twisted, then try again.Rear center seatbelt
(3-point rear center seat belt) OOSEV038031L
When using the rear center seat belt, the
buckle with the “CENTER” mark must be used.
Information
If you are not able to pull out the safety
belt from the retractor, firmly pull the belt
out and release it. After release, you will be
able to pull the belt out smoothly.
WARNING
Make sure that the seatback is locked in
place when using the rear center seat belt.
If not, the seatback may move when
there is a sudden stop or collision,
which could result in serious injury.